22
Paint is a program used to draw, color, and edit
pictures. You can use Paint like a digital sketchpad
to make simple pictures and creative projects or
to add text and designs to other pictures, such as
those taken with your digital camera.
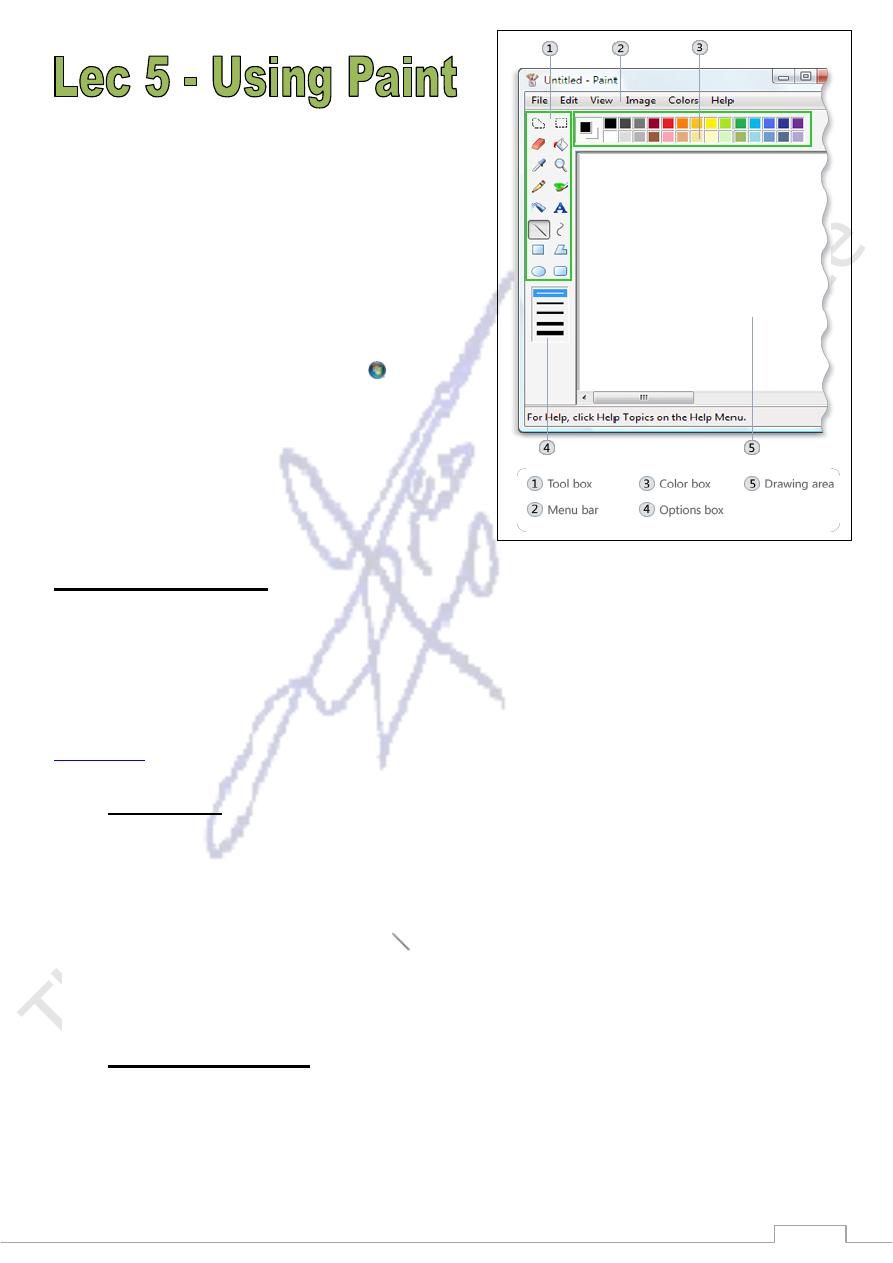
The parts of Paint
To open Paint, click the Start button , click All
Programs, click Accessories, and then click Paint.
When you start Paint, you see a window that is
mostly blank, with just a few tools for drawing
and painting. The following illustration shows the
different parts of the Paint w
indow:
Working with tools
* Paint includes a handy collection of drawing tools in the toolbox. You can use these tools
to create freehand drawings and
add a variety of shapes to your pictures. * This section describes
some common tasks. For information on how to use each tool in the Paint toolbox, see
Paint tools
.
Draw a line
Some tools, like the pencil, brush, line, and curve, let you make a variety of straight,
curved, and wiggly lines. What you draw is determined by how you move the mouse
as you draw. You can use the line tool to draw a straight line, for example.
1- In the toolbox, click the Line tool .
2- In the Color box, click the color you want to use.
3- To draw, drag the pointer across the drawing area.
Draw a squiggly line
Your drawings don't have to be composed of just straight lines. You can use the
Curve tool to create smooth curves, for example. The Pencil and Brush can be used to
make completely random, free-form shapes.
23
1- In the toolbox, click the Pencil tool .
2- In the Color box, click the color you want to use.
3- To draw, drag the pointer across the drawing area
.
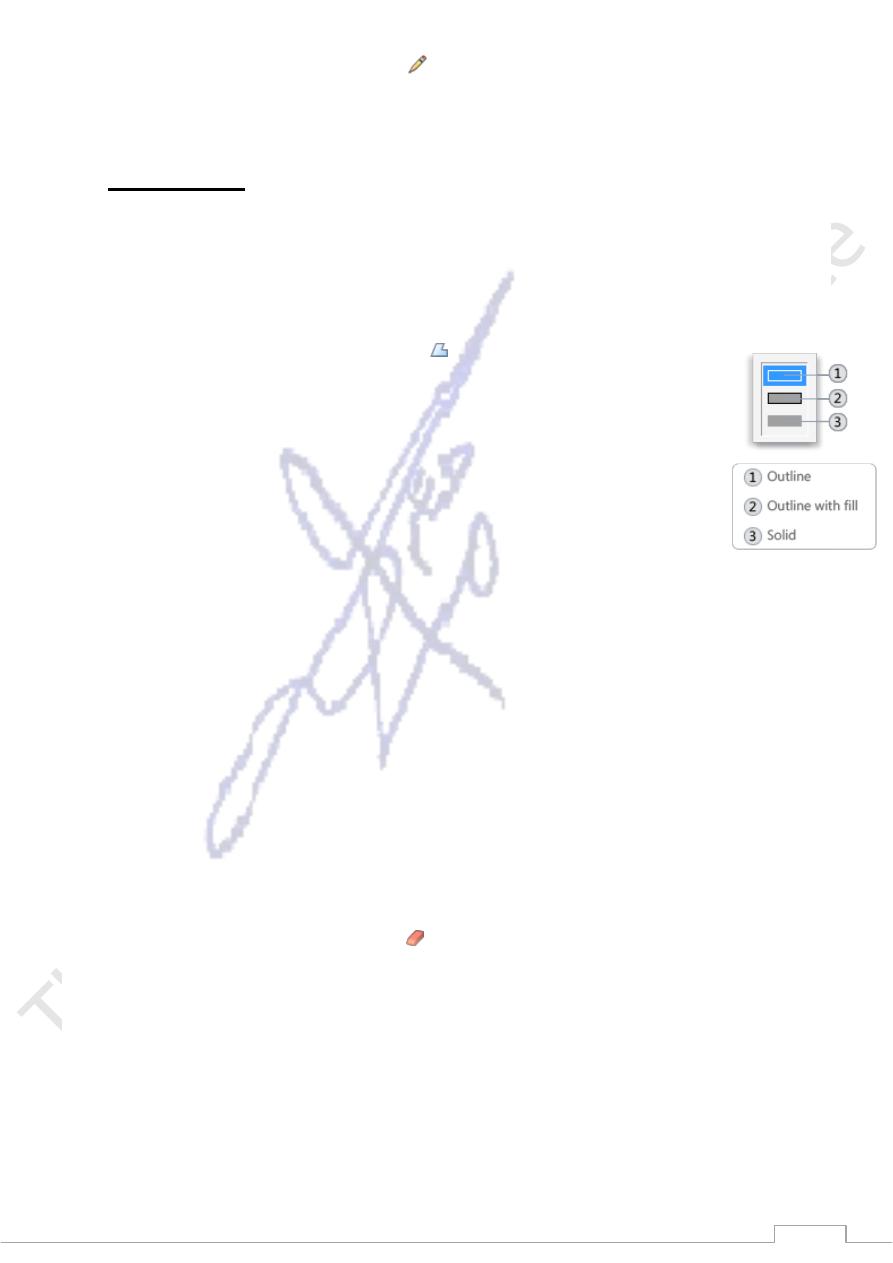
Draw a shape
Some tools, like the Rectangle and ellipse, let you add shapes to your drawing. The
technique is the same regardless of which shape you choose. For example, you can
use the Polygon tool to draw a polygon, which is a shape that can have any number
of sides.
1- In the toolbox, click the Polygon tool .
2- In the Options box, click a fill style:
o
Outline. Your shape will be just an outline, with a transparent interior.
o
Outline with fill. Your shape will be filled with the current background
color. (To set a background color, in the Color box, right-click a color.)
o
Solid. Your shape will be filled with the current background color, but it
will not have any outline.
3- To add a polygon, drag the pointer across the drawing area, and then click to end the
first side.
4- Drag the pointer to create the next side, and then click to end the side. Repeat this as
needed for additional sides.
5- To create the final side and close the polygon, double-click.
Erase part of your picture
If you make a mistake or simply need to change part of a picture, use the eraser. By
default, the eraser changes any area you erase to white, but you can change the
eraser color. For example, if you set the eraser color to yellow, anything you erase
turns to yellow.
1- In the toolbox, click the Eraser tool .
2- In the Color box, right-click the color that you want to erase with. If you want to erase
with white, you don't have to select a color.
3- Drag the pointer over the area you want to erase.
24
Changing the effect of the drawing tools
The Options box, located below the toolbox, is where you can change how a tool
draws. You can set the thickness of the tool's brush (which affects the weight of what
you draw on the screen) and whether the shapes you draw are outlined or solid.
Change the brush stroke of the Brush
1- In the toolbox, click the Brush tool .
2- In the Options box, click the brush shape you want to paint with.
3- To paint, drag the pointer across the drawing area.
Saving a picture
Save your picture frequently to ensure that you don't accidentally lose your work. To
do that, on the File menu, click Save. This saves all of the changes you made to the
picture since the last time you saved.
* The very first time that you save a new picture, however, you will need to give your
picture a file name. Follow these steps:
1- On the File menu, click Save.
2- In the Save as type box, select the file format you want.
3- In the File name box, type a name.
4- Click Sav
e
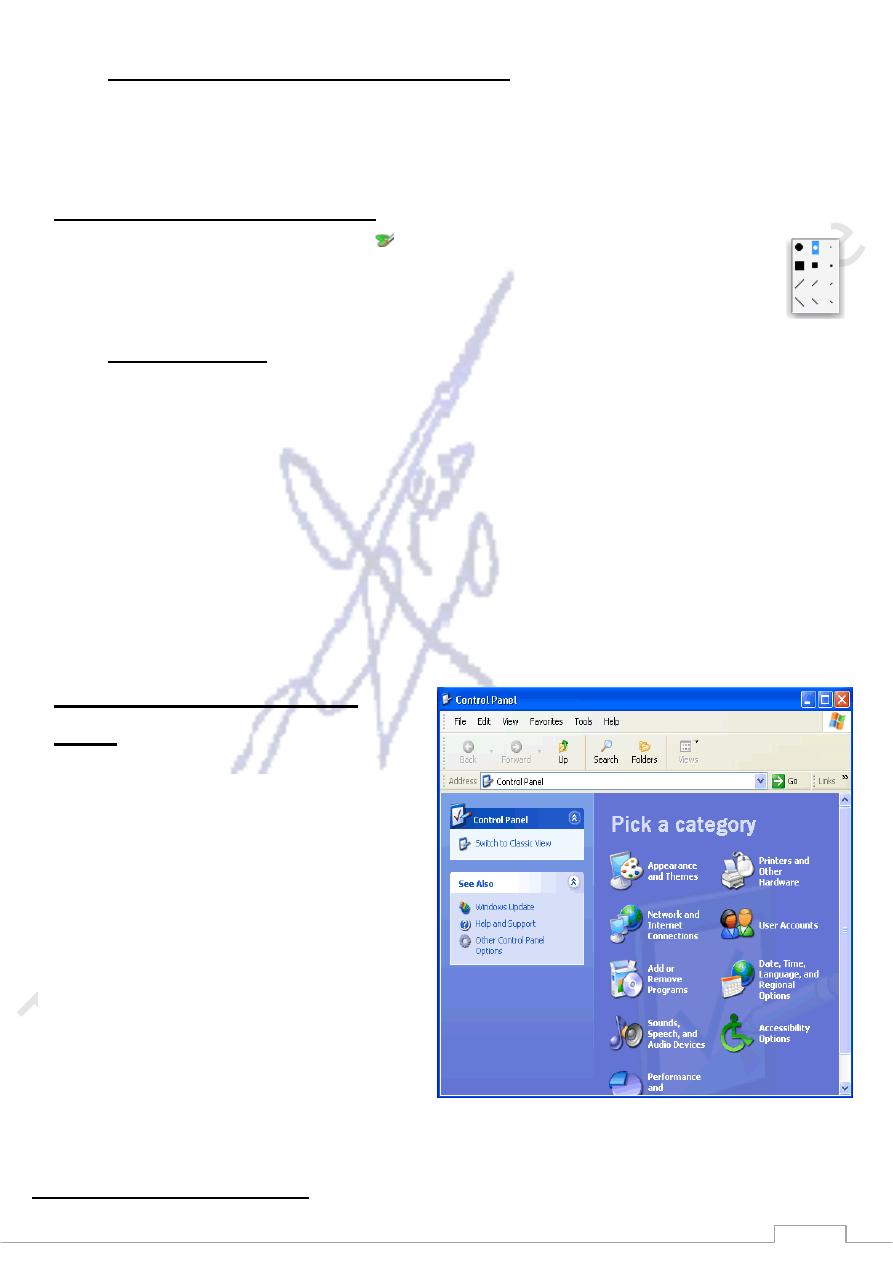
Introduction to the Control
Panel
You don't have to be a computer genius to
use Windows XP, but if you know something
about how to set up some basic features
and functions, it will do a lot more for you.
Windows XP makes this easier than ever
with the Control Panel. The Control Panel
features a number of tools that will help you
control how Windows XP features look and
act. But first you must learn how to access
the Control Panel.
To access the Control Panel:
25
* Click Start. * Click Control Panel. * The Control Panel opens. OR
Type Control Panel in the Address dialog box found on any Windows XP window. OR
Many folders feature a link to the Control Panel in the See Also dialog box (only in XP
view).
No matter how you get to the Control Panel, it will look like this above first viewing.
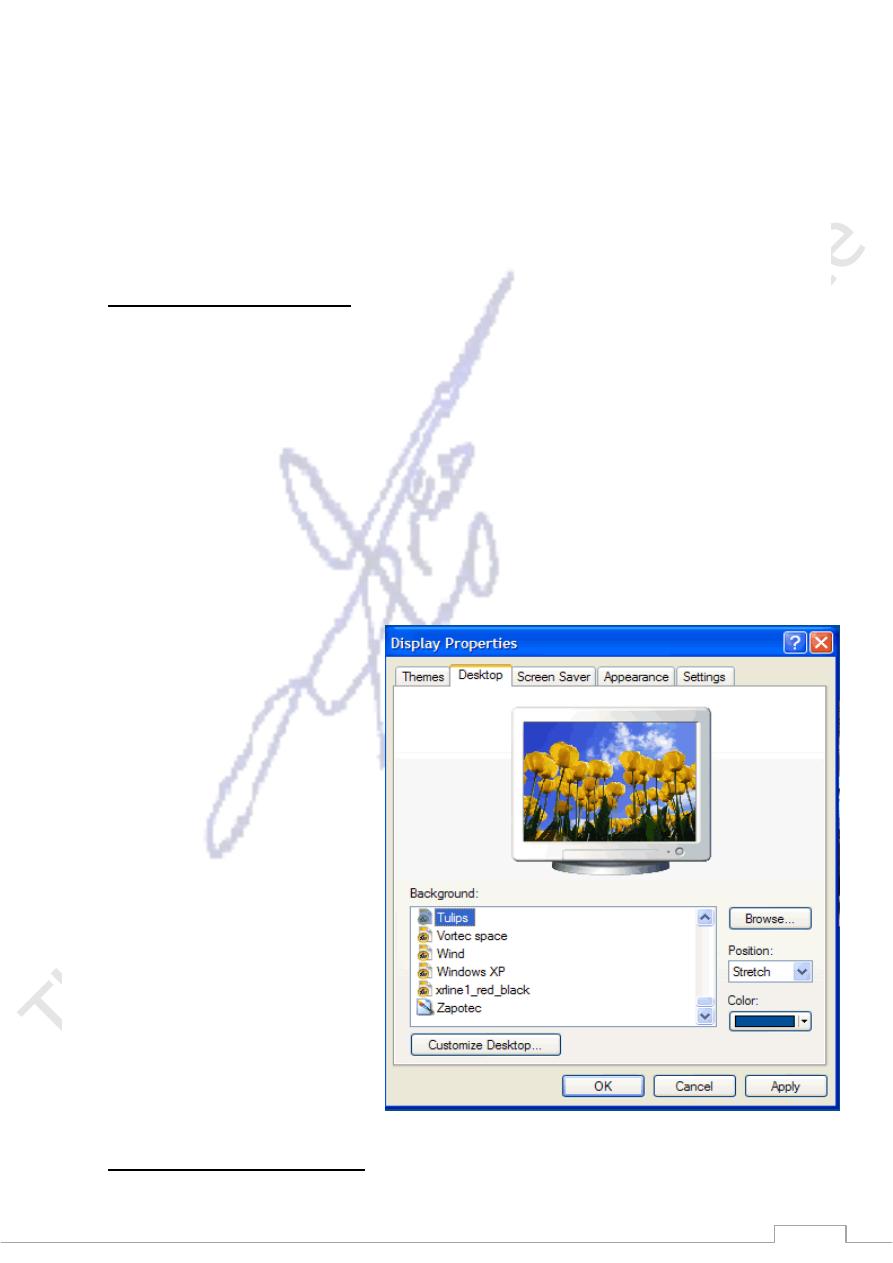
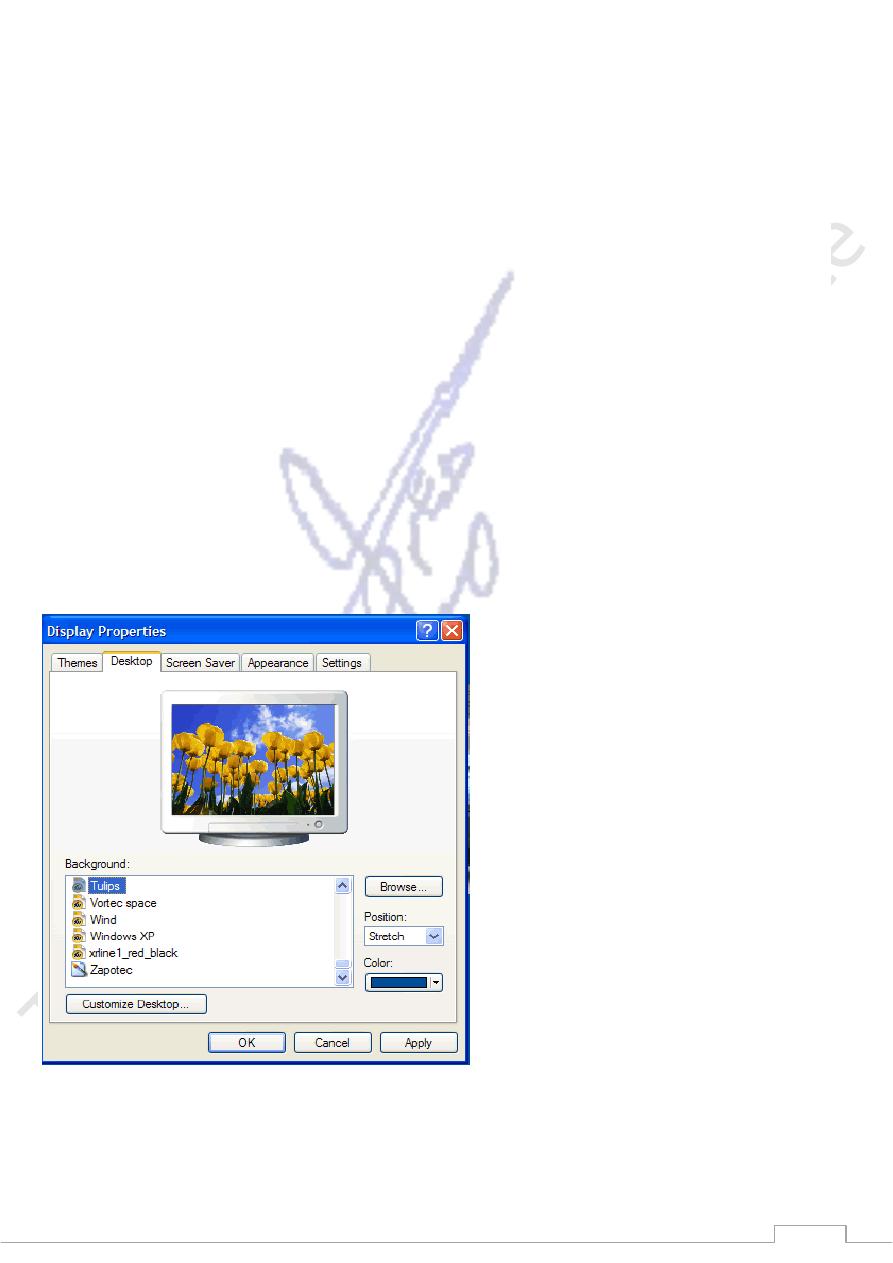
Changing the Wallpaper
Wallpaper is the background image that appears on your desktop. Windows XP offers many
wallpaper choices.
To change the wallpaper:
Open the Control Panel (located in Start menu).
Under Pick a Category, click Appearance and Themes.
Under Pick a Task, click Change the desktop background.
The Display Properties dialog box opens with the Desktop tab selected.
In the Background box, click or use the arrow keys to view the choices.
Use the drop down boxes to alter
wallpaper position or color.
Click OK to close the dialog box.
Advanced Users:
Click Browse to choose a picture
from the My Pictures folder (or
navigate to a picture located in
another folder.)
Click the Customize Desktop
button to alter your desktop icons
or display a web page on your
desktop.
Changing the Screensaver
26
In the early days of computing, screen savers helped prevent images from being burned into
the monitor. Now, screen savers entertain us, provide some privacy, and enhance or work or
home environment. Windows XP comes with several screen savers.
To change the screensaver:
Open the Control Panel (located in Start menu).
Under Pick a Category, click Appearance and Themes.
Under Pick a Task, click Choose a screen saver.
The Display Properties dialog box opens with the Screen Saver tab selected.
Click the arrow to open a drop down box. Click or use the arrow keys to view the choices.
Or, click Preview to view each option on your computer screen. Press any key on your
keyboard to return to the dialog box.
Click Settings to customize the appearance or your chosen screen saver.
(A dialog box will notify you if your choice doesn’t have any options.
In the Wait box, determine how many minutes should pass before your screen saver
turns on.
Click OK to close the dialog box.