Hematology
Hematology (Greek Haema = Blood; logy = Study of). Hematology is the branch of medical science that deals with the study of blood. Blood, along with the cardiovascular system constitutes the Circulatory system and performs the following functions:
1. Transport: Blood provides a pickup and delivery system for the transport of gases, nutrients,
hormones, waste products, etc. over a route of some 1,12,000 km of blood vessels, with 60–70 trillion cells.
2. Regulation: It regulates the body temperature by transporting heat from the tissues (mainly liver and muscles) to the skin from where it can be lost.
Its buffers regulate pH of the body fluids, while its osmotic pressure regulates water content of cells through the actions of its dissolved proteins and ions.
3. Protection: The blood protects the body against diseases caused by harmful organisms by transporting leukocytes and antibodies against more than a million foreign invaders.
It also protects the body against loss of blood after injury by the process of blood clotting.
Physical features of the blood:
The blood is denser and more viscous than water, slightly alkaline, sticky to touch, and salty in taste.
It clots on standing, leaving behind serum.
The normal total circulating blood volume amounts to 8% of the body weight, i.e. 5–6 liters in an average adult male weighing 70 kg, and 4–5 liters in a female.
Composition of the blood:. Blood consists of 55% of watery liquid plasma that contains various proteins and other solutes dissolved in it. The rest 45% is the formed elements mainly the red blood cells (RBCs) but also white blood cells (WBCs), and platelets.
The RBCs are the most numerous (4.5–5.5 million/mm3). Next in number are platelets (2.5–4.5 platelet/mm3). The WBCs number 4000–11000/mm3.
Collection of Blood Samples
The term “blood sample” refers to the small amount of blood, a few drops or a few milliliters.
There are two common sources of blood for routine laboratory tests:
Blood from skin capillaries by skin-prick:
The skin and other tissues are richly supplied with capillaries, so when a drop or a few drops of blood are required, as for estimation of Hemoglobin (Hb), cells Types counts, Bleeding Time and Clotting Time, blood films, blood from a skin puncture (skin-prick) with a lancet.
Blood from a superficial vein by puncturing it with a needle and syringe:
When larger amounts (few ml that cannot be obtained from a skin puncture) are needed as for complete hematological and biochemical investigations, venous blood is obtained with a syringe and needle by puncturing a superficial vein.
In infants, blood sample collected from heel of foot.
Arterial blood is obtained from radial artery, is punctured with a syringe and needle and needed for special tests such as blood pH, gas levels.
Note: After cleaning the skin, allow the alcohol to dry by evaporation, because sterilization with alcohol is effective only after it has dried.
For a sample of whole blood or plasma. The blood is transferred to a container containing a
suitable anticoagulant. This is to prevent clotting of blood.
For a sample of serum. No anticoagulant is used. The blood is allowed to clot in the container and serum is collect.
Commonly used Anticoagulants
Anticoagulants are substances employed to delay, suppress, or prevent clotting of blood. They are classified into 2 groups:
The in vitro (outside the body) anticoagulants.
The in vivo (in the body) anticoagulants.
The commonly used in vitro anticoagulants include:
Ethylene Diamine Tetra acetic Acid (EDTA), trisodium citrate, double oxalate, sodium fluoride, heparin.
The use of fluoride and heparin is limited to pH, blood glucose and gas analysis.
The in vivo anticoagulants include:
Heparin and dicoumarol derivatives (warfarin, dicoumarin). Thus, heparin is both an in vivo and an in vitro anticoagulant.
Sample of Whole Blood or Plasma
(Plasma = Blood minus all the blood cells)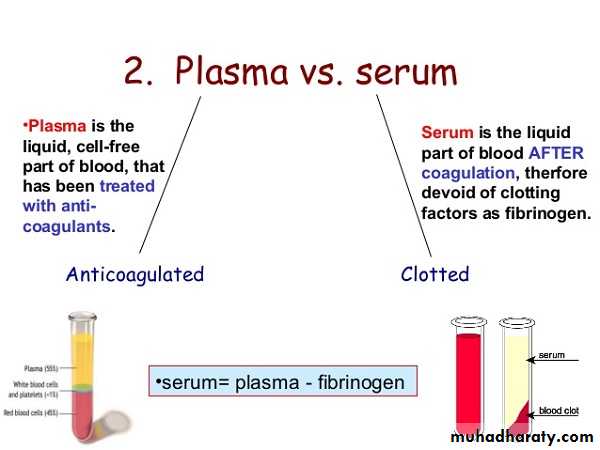
Draw blood from a vein and transfer it from the syringe to a container containing a suitable anticoagulant. Mix the contents well without frothing. A sample of whole blood is now ready for tests. If plasma is desired, centrifuge the anticoagulated blood for 20–30 minutes at 2500 rpm. Collect the supernatant plasma with a pipette and transfer it to another container. (The packed RBCs will be left behind).
Sample of Serum
(Serum = Plasma minus fibrinogen and all the clotting factors)Transfer the blood from the syringe to a container without any anticoagulant in it, and keep it undisturbed. After the blood has clotted in an hour or two and the clot shrunk in size, the serum will be expressed. Remove the supernatant serum with a pipette and transfer it to a centrifuge tube. Centrifuge it to remove whatever red cells may be present. Clear serum can now be collected with another pipette.
Apparatus and Materials
Keep the following equipment ready before venepuncture:1. Disposable gloves. These should always be worn before venepuncture.
2. Sterile, disposable, one-time use, 5 ml syringe with side nozzle.
3. 10 ml test tubes, or vials, with or without anticoagulant.
4. Sterile gauze pieces moist with 70% alcohol.
5. Tourniquet.
Procedures

Seat the subject comfortably on a chair with an arm rest, or near a table. The subject, if nervous, may lie down on a bed.
Examine both arms in front of the elbows to locate a suitable vein.
Once a suitable vein has been selected, support the subject’s arm over the edge of the table.
Apply the tourniquet about 2-3 cm above the elbow to obstruct the venous return. The subject may open and close her fist to increase the venous return and make the veins engorged (filled) with blood. If the vein is still not sufficiently prominent, a few ‘slaps‘ with your fingers over the region may do so.
Clean the skin over the selected vein with gauze and alcohol and allow it to dry. With the fingers of your left hand supporting and steadying the elbow from behind, stretch the skin over the vein downward with your left thumb placed about 4 cm below the vein. This traction
fixes the vein and prevents its slipping when it is punctured.
With the piston pushed in, the side nozzle towards the subject’s arm, and the bevel of the needle facing you, hold the syringe between your fingers and thumb of the right hand.
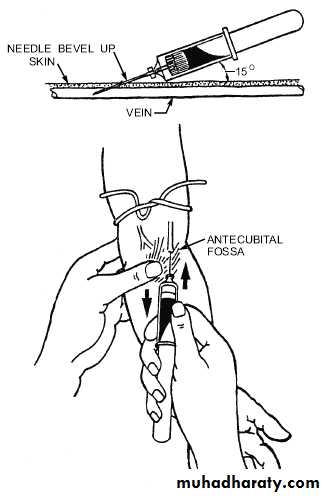
Puncture the skin and push in the needle under the skin with a firm and smooth thrust, at an angle of 15-20° to the skin.
Advance the needle gently along the vein and puncture it from the side, a few mm ahead of the skin puncture. This prevents counter puncture of the far wall of the vein and formation of a hematoma (local leakage of blood).
As the vein is punctured, all resistance will suddenly cease and blood will start to enter the syringe. With the needle still in the vein, and supporting the syringe with your left hand, gently pull the plunger back with the thumb and fingers of your right hand. Do not withdraw blood faster than the punctured veins is filling as too much pressure applied to the plunger is likely to cause mechanical injury and hemolysis of red cells. The subject may open and close the fist to enhance venous return.
When enough blood has been collected, release the tourniquet and press a fresh swab over the skin puncture. Withdraw the needle gently but keep the swab in position. Ask the subject to flex the arm and keep it so to maintain pressure on the puncture site till the bleeding stops.
Hold the syringe vertical with the plunger supported, and remove the needle with a slight
twist. Expel the blood gently into the container; do not apply force as it may cause mechanical injury to red cells. Gently shake, or swirl the container so that the anticoagulant (if used) mixes well with the blood without frothing.
Precautions
1. All aseptic precautions must be observed and disposable gloves, syringe and needles must be used.2. The tourniquet must be removed before taking the needle out of the vein to avoid formation of hematoma.
3. The blood from the syringe should be transferred to the container without delay to prevent clotting.
4. Ask the subject to keep the swab in position (about 3 – 5 minutes) till the bleeding from the puncture site stops.
Very important note
The entire process of withdrawing blood should be completed within two minutes of applying the tourniquet because; stagnation of blood in the vein is likely to alter its composition the cell counts usually increasing.
Collection of Capillary Blood
In adults and older children, capillary blood is generally obtained from a skin puncture made on the tip of the middle or ring finger, or on the lobe of the ear. In infants and young children in whom the fingers are too small for a prick, the medial or lateral side of the pad of the big toe or heel is used.
Very important note
The thumb and little finger are never pricked because the underlying palmar fasciae (venous bursae) from these digits are continuous with those of the forearms. Any accidental injury to these fasciae may cause the infection to spread into the forearm.
Apparatus
Blood Lancet/Pricking needle: Disposable, sterile, one-time use, blood lancets (flat, thin metal pieces with 3–4 mm deep penetrating sharp points) are commercially available and should be preferred.
2. Sterile gauze/cotton, moist with 70% alcohol.
3. Glass slides, pipettes, etc. according to requirements.
Procedures
1. Clean and vigorously rub the ball of the finger with the spirit swab, followed by a final cleaning with dry gauze. (Scrubbing increases local blood flow).
Allow the alcohol to dry by evaporation for the following reasons:
i. Sterilization with alcohol is effective only after it has dried by evaporation.
ii. The thin film of alcohol can cause the blood drop to spread sideways along with alcohol so that it will not form a satisfactory round drop.
iii. The alcohol may cause hemolysis of blood.
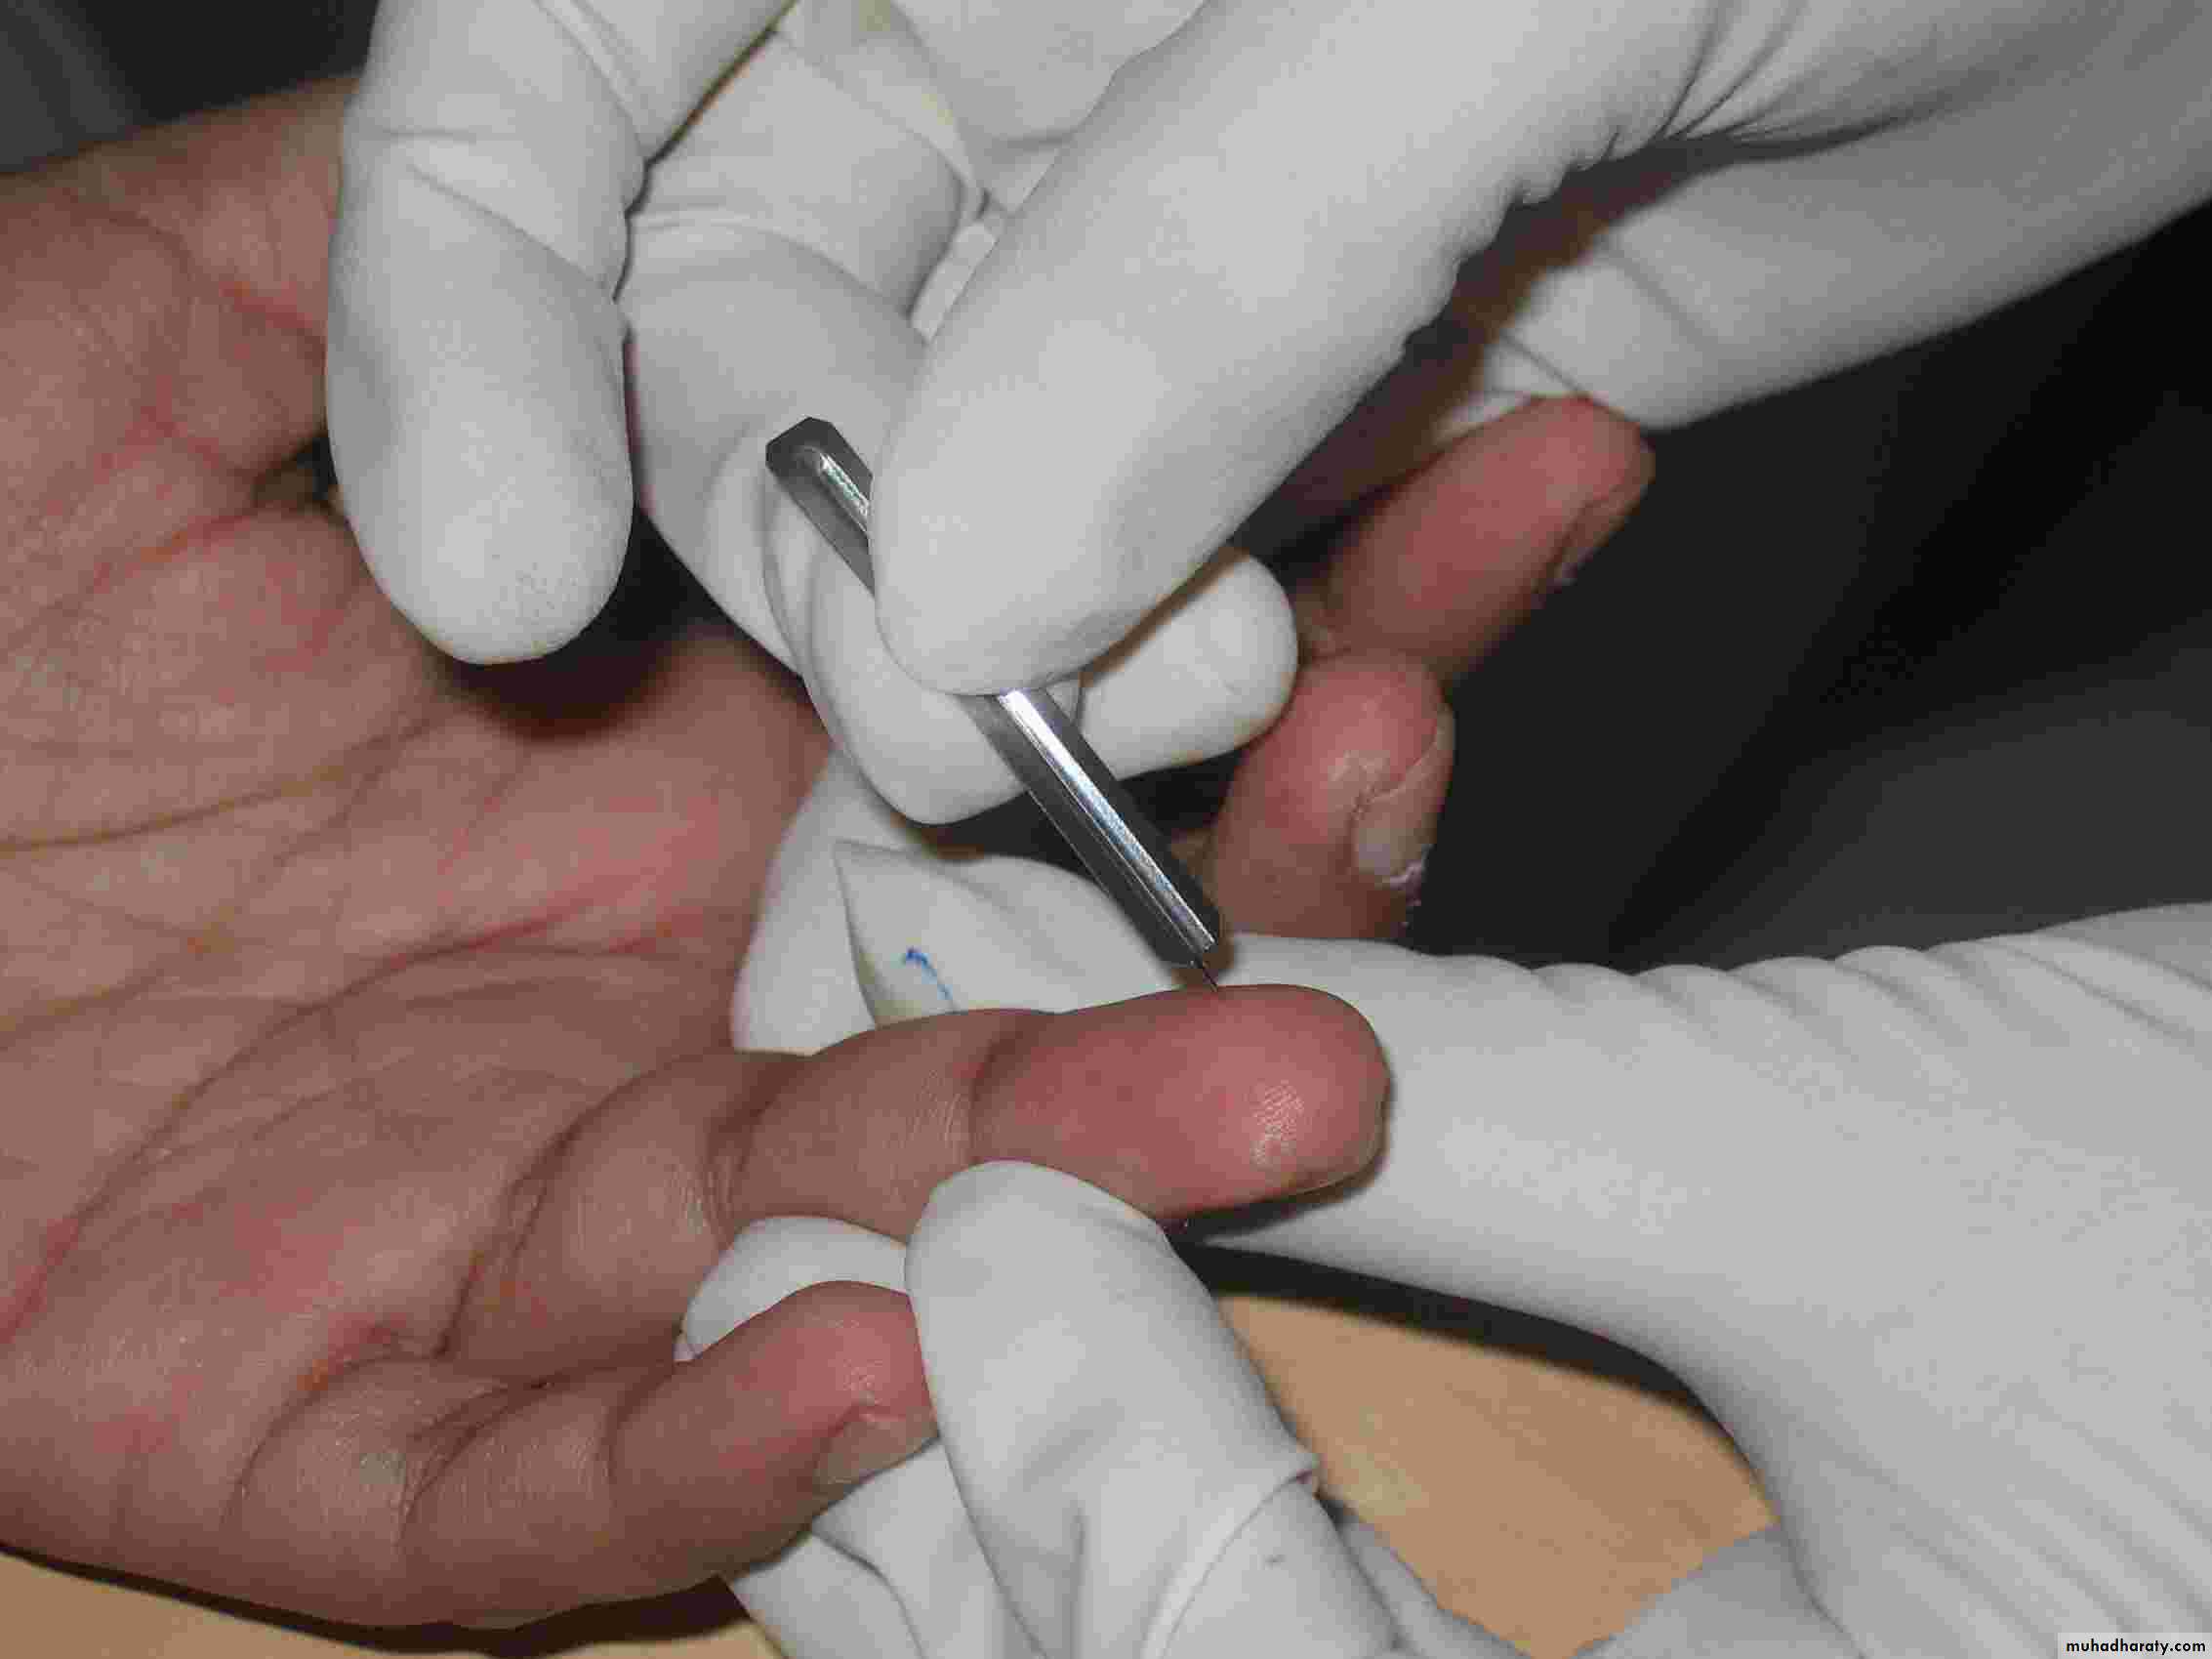
2. Steadying the finger to be pricked in your left hand, apply a gentle pressure on the sides of the ball of the finger with your thumb and forefinger to raise a thick, broad ridge of skin. (Do not touch the pricking area).
3. Hold the lancet between the thumb and fingers of your right hand, and keeping it directed along the axis of the finger, but slightly in center of the tip of the phalanx (i.e. not too far down or too far near the top of the nail bed), prick the skin with a sharp and quick vertical stab to a depth of 3–4 mm and release the pressure. The blood should start to flow slowly, spontaneously and freely (without any squeezing)—if a good prick has been given.
Very important note
Do not squeeze or press the finger as the tissue fluid squeezed out will dilute the blood and give false low values. The squeeze also tends to close the wound edges. You may exert a slight tension on either side of the puncture with your thumbs in order to open up the wound more widely (a plug of epithelial cells tends to block the puncture especially if the wound is shallow).
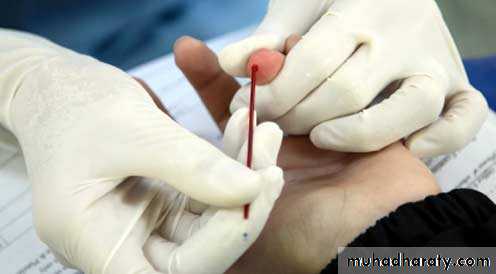
4. Wipe away the first 2 drops of blood with dry, sterile gauze as it may be contaminated not only with tissue fluid, but also with epithelial and endothelial cells or diluted with access alcohol which will appear as artifacts in the blood film.
5. Allow a fresh drop of blood of sufficiently large size (about 3–4 mm diameter) to well up from the wound, and make a blood smear, or fill a pipette as the case may be.
6. Clean the area of the prick with a fresh swab and ask the subject to keep the swab pressed on the wound with his/her thumb till the bleeding stops, which occurs in a 2 minutes or more.
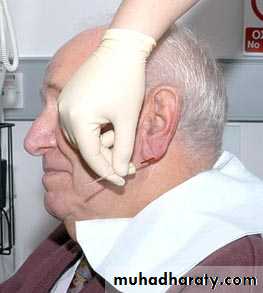
Ear-lobe Prick
After selecting the site, rub the lobe of the ear between your thumb and finger until warm. Clean the skin with alcohol and give a 2 mm deep prick. (The skin here is usually thinner than at the fingertip). Wipe away the first drop and allow a new one to form.
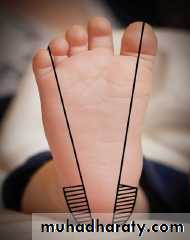
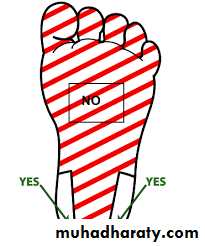
Pricking the Heel
In infants and young children, blood can be collected from the cleaned and warmed medial or lateral areas of the heel. The central plantar and the posterior curvature areas of the heel should be avoided as the prick may cause injury to the underlying tarsal bones which lie near the surface.Hemocytometry (Cell Counting)
Hemocytometry is the procedure of counting the number of cells in a sample of blood; the red cells, the white cells, and the platelets being counted separately.It is assumed that the cells are homogenously mixed (suspended) in the plasma in all regions of the body.
However, even under physiological conditions, there are slight differences (e.g. higher red cell counts in venous and capillary blood than in arterial blood) which, though minor, are accentuated by muscular exercise, changes in posture, meals etc. Nevertheless, important clinical information can be obtained if cell counts are done carefully on a venous blood sample.
Hemocytometer
The hemocytometer set consists of the following:
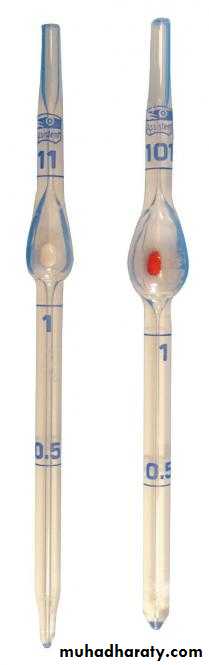
1. The diluting pipettes Two different glass capillary pipettes, each having a bulb, are provided for counting RBCs, platelets and WBCs . (These pipettes are sometimes called “cell pipettes” or blood pipettes.
* The third pipette that the students will be using is the hemoglobin pipette, which does not have a bulb).
2. The counting chamber; it is a thick glass slide, appropriately ruled with a counting grid, i.e.
squares of varying dimensions.
3. Special coverslips having an optically plane and uniform surface should be preferred over ordinary coverslips.
4. RBC and WBC diluting fluids.
5. Petri dish •Spirit swabs, •Blood lancet.
Differences Between the Two Pipettes
RBC pipette
WBC pipette
1. Calibrations are 0.5 and 1.0 below the bulb, and 101 above the bulb.
1. Calibrations are 0.5 and 1.0 below the bulb and 11 above it.
2. The capillary bore is narrow, thus it is a slow-speed pipette.
2. The capillary bore is wider; hence, it is a fast-speed pipette.
3. Bulb is larger and has a red bead.
3. Bulb is smaller and has a white bead.
4. The volume of the bulb is 100 times the volume contained in stem.
4. The volume of the bulb is 10 times the volume of the stem.
5. The dilution can be 1 in 100 or 1 in 200.
5. The dilution can be 1 in 10 or 1 in 20.
Filling the Pipette
Get a finger-prick under aseptic conditions.Holding the mouthpiece of the pipette between your lips and keeping the pipette (with its graduations facing you), the pipette may be filled with blood without sucking by lowering its bulb end below the horizontal and allowing the blood to flow down the stem by gravity.
Remove the pipette from the blood drop and clean its outer surface with a cotton swab by wiping it toward the tip.
Keeping the pipette horizontal all the time, bring the blood in the stem to the exact mark 0.5 by wiping the tip on a cotton swab till the blood recedes to the exact mark.
Holding the pipette nearly vertical, immerse its tip in the diluting fluid, and suck the diluent to the mark 11 (WBC) or 101 (RBC).
The dilution of blood should not be delayed otherwise it is likely to clot in the stem.
The sucking up of diluting fluid should not be done very quickly because blood being viscous.
Mixing the Blood with the Diluting Fluid. Once the diluting fluid has been sucked up, remove the close the pipette ends with thumb and forefinger of your right hand, and shake it vigorously with a figure of eight motion for 3–4 minutes.
Cleaning the Pipette. Pipette should be cleaned as soon as possible after the experiment is over. Rinse it in running water, sucking and expelling water with maximum force, a few times. Remove water by expelling several times.
Very important note
When blood is sucked up to the mark 0.5 (half part or volume) and is followed by the diluting fluid, the blood enters the bulb first and is followed by the diluent to the mark 101 (RBC pipette), or mark 11 (WBC pipette). The stem in both pipettes contains only the diluent. Thus, the dilution of the blood occurs in the bulb only.
RBC pipette:
Since the volume of the bulb is 100 (101 – 1.0 = 100), it means that 100 volumes (or parts) of diluted blood contain 0.5 (half) part of blood and 99.5 (100 – 0.5 = 99.5) parts or volumes of diluent. This gives a dilution of 0.5 in 100 (half in hundred), or 1 in 200 (one in two hundred); i.e. 1 part blood, and 199 parts of diluent, or 200 times. This figure of 200 is called the dilution factor. If blood is taken to the mark 1.0 in the stem and followed by diluent to the mark 101, the dilution obtained would be 1 in 100, or 100 times; the dilution factor being 100.
WBC Pipette.
In this case the volume of the bulb is 10 (11 – 1 = 10). When blood is taken to the mark 0.5 (half part or volume) followed by diluent to the mark 11, the volume of the diluted blood is now 10, which contains 0.5 part blood and 9.5 parts or volumes of the diluting fluid. This gives a dilution of 0.5 in 10 (half in ten), or 1 in 20 (one in twenty), the dilution factor being 20 (the blood will be diluted 20 times). Similarly, if blood is taken to the mark 1.0 followed by diluted to mark 11, the dilution now would be 1 in 10.
The Counting Chamber (Improved Neubauer Chamber)
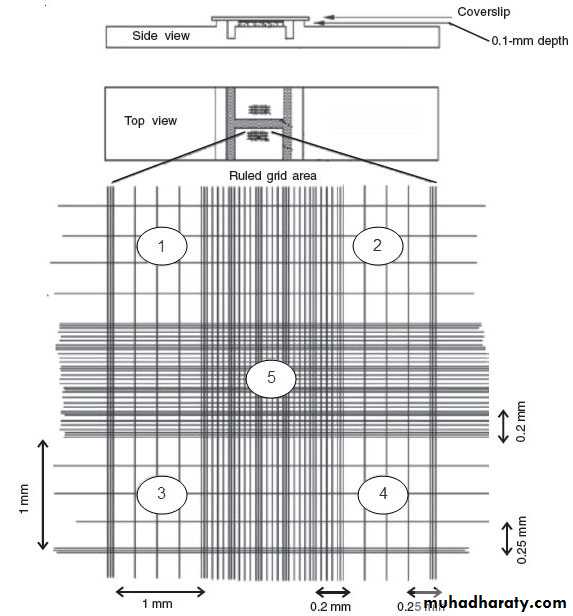

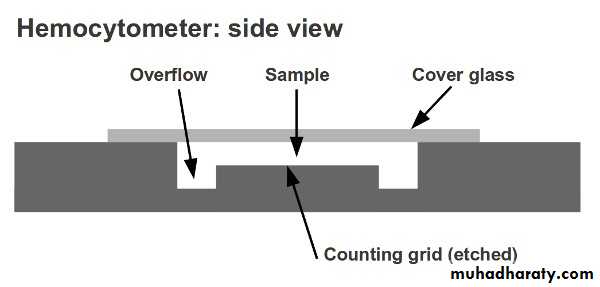
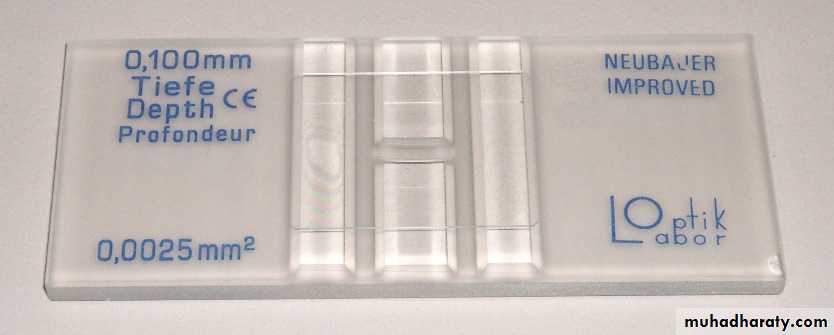
The counting chamber is a single, solid, heavy glass slide. Extending across its middle third are 3 parallel platforms separated from each other by shallow trenches (moats, or troughs). The central platform is wider, and exactly 0.1 mm lower than the two lateral pillars. The central platform is divided into two equal parts by a short transverse trench in its middle. Thus, there is an H-shaped trench enclosing the central platform.
The two lateral platforms can support a coverslip which, when in position, will span the trenches and provide a capillary space 0.1 mm deep between the under surface of the coverslip and the upper surface of the platforms. Identically ruled areas, called “counting grids”, consisting of squares of different sizes, are etched on each platforms. The two counting grids allow RBC and WBC counts to be made simultaneously if needed, or duplicate samples can be run.
The Counting Grid

The ruled area on each platforms, the counting grid, has the following dimensions:
• Each counting grid measures 9 mm2 (3 mm × 3 mm). It is divided into 9 large squares, each 1 mm2 (1 mm ×1 mm).
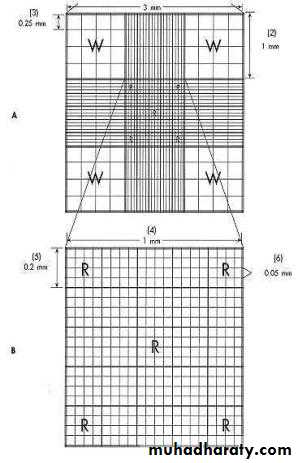
• Of these 9 squares, the 4 large corner squares are lightly etched, and each is divided by single lines into 16 medium-sized squares. These 4 large corner squares are employed for counting leukocytes and are, therefore, called WBC squares.
• The central densely etched large square (1 mm × 1 mm), called the RBC square, and is divided into 25 medium-sized squares.
• Each of these medium squares is separated from its neighbors by very closely placed double lines or triple lines. These double or triple lines extend in all directions beyond the boundaries of the 9 mm2 ruling, i.e. in between all the WBC squares around the central RBC square.
• Each of the 25 medium squares, bounded by double lines or triple lines, is further divided into 16 smallest squares by single lines.
For RBC (Total Erythrocyte) Counting
The red cells are counted in 4 corner groups and one central group of medium squares, each of which has 16 smallest squares, i.e. in a total of 80 smallest squares.
For WBC (Total Leukocyte) Counting
This count is done in the 4 corner groups of large squares, each of which has 16 medium squares.
Procedures
1. Assuming that the blood and the diluent have been properly mixed, the next step is to charge the chamber. Place a coverslip on the chamber so that it spans the central platform and the trenches around them—a process called “centering” the coverslip.
2. Keeping your finger over the top of the pipette and roll the pipette once more between your palms to mix the contents of the bulb. If this precaution is not taken the counts are bound to be unreliable.
3. Allow the first 2 drops to drain by gravity. This fluid contains cell-free diluting fluid in the stem which has not taken any part in the dilution of blood.
4. Hold the pipette at an appropriate angle and watching carefully, allow a drop of diluted blood to form at its tip. Then quickly place the tip of the pipette on the central platform in gentle contact with the edge of the coverslip. As the surface of the drop touches the coverslip, the fluid will run under it by capillarity and form a uniform film. Lift the pipette as soon as the counting floor piece is covered with diluted blood.
Ideally-charged chamber
An ideally-charged chamber is completely filled with diluted blood. If any blood flows into the trenches, it is called “overcharging”. If the fluid is insufficient to cover the floor piece, or if there are air bubbles, it is called “undercharging”, (air bubbles are formed if the coverslip or the floor piece is dirty with grease or is moist).
5. Once the chamber has been properly charged, move it to the microscope. Wait for 2–3 minutes so that the cells settle down. Counting cannot be started when the cells are moving and changing places due to currents in the fluid.
Counting the cells
Focus the appropriate squares under the required magnification and start counting.
Red Blood Corpuscles (RBCs Counting)
Principle
The blood is diluted 200 times in a red cell pipette and the cells are counted in the counting chamber.
Knowing the dilution employed, their number in undiluted blood can easily be calculated.
Apparatus and Materials
1. RBC pipette: It should be clean and dry and the bead should roll freely.
2. Improved Neubauer chamber with coverslip. These should be clean and dust free.
3. Microscope.
4. Disposable blood lancet/pricking needle.
• Sterile cotton/gauze swabs.
• 70% alcohol.
Hayem’s fluid (RBC diluting fluid): The ideal fluid for diluting the blood should be (isotonic) and neither cause hemolysis nor crenation of red cells. It should have a (fixative) to preserve the shape of RBCs and also prevent their autolysis so that they could be counted even several hours after diluting the blood if necessary. It should (prevent agglutination) and (not get spoiled on keeping). All these properties are found in Hayem’s fluid.
Composition of Hayem’s fluid
Sodium chloride (NaCl) 0.50 g
Sodium sulfate (Na2SO4) 2.50 g
Mercuric chloride (Hg Cl2) 0.25 g
Distilled water 100 ml
Dissolve all these chemical in distilled water and filter several times through the same filter paper. Discard the solution if a precipitate forms.
Important Notes:
• Sodium chloride and sodium sulfate provide isotonicity so that the red cells remain suspended in diluted blood without changing their shape and size. Sodium sulphate also acts as an anticoagulant, and as a fixative to preserve their shape and to prevent rouleaux formation (piling together of red cells).• Mercuric chloride acts as an antifungal and antimicrobial agent and prevents contamination and growth of microorganisms.
Rules for Counting
Switch over to high magnification (HP lens) and check the distribution of cells. If they are unevenly distributed, i.e., bunched at some places and scanty at others, the chamber has to be washed, dried, and recharged.
Cells lying on or touching its upper horizontal and left vertical lines are to be counted with that particular square.
We have already focused the upper left block of 16 smallest squares in the high power field. First, count the cells in the
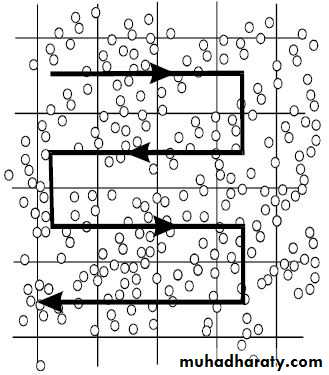
upper 4 horizontal squares from left to right, then come down to the next row and count the cells in each square from right to left. Then count the cells in the 3rd row from left to right, and in the 4th row, from right to left. As the counts are made, enter your results in the appropriate squares drawn in your workbook, showing the count in each square.
Move the chamber carefully till you reach the right upper corner block of 16 smallest squares (there are no smallest squares above and to the right of this group), and count the cells as before. Then move on to the right lower corner and then left lower corner groups, and finally count the cells in the central block of 16 smallest squares.
Thus, the counting will have been done in 80 smallest squares, i.e., in 5 blocks of 16 squares each.
Add up the number of cells in each of the 5 blocks of 16 smallest squares. A difference of more than 20.
Calculation of red cell count
The total number of red cells/c.mm = n X 50 X 200
The total number of red cells/c.mm = n X 10 000
(n) is the number of red cells found in 80 squares.
(50) is volume factor
(200) is diluent factor
Normal Red Cell Count
Males = 5.0 million/mm3 (4.75 – 6.0 million/mm3)
Females = 4.5 million/mm3 (4.0 – 5.5 million/mm3).
The Total Leukocyte Count (TLC)
Principle
A sample of blood is diluted with a diluting fluid which destroys the red cells and stains the nuclei of the leukocytes. The cells are then counted in a counting chamber and their number in undiluted blood reported as leukocytes/mm3.
Apparatus and Materials
1. Microscope •Counting chamber with a heavy Cover slip. •Blood lancet/pricking needle. •Sterile cotton/gauze swabs. •70% alcohol.
2. WBC pipettes: white bead in bulb, and markings 0.5, 1.0, and 11. Two such, clean and dry pipettes, with free-rolling beads are required.
3. Turk’s fluid. This fluid is used for diluting the blood.
Glacial acetic acid = 1.5 ml (hemolysis RBCs without affecting WBCs).
Gentian violet (1% solution) =1.5 ml (it stains the nuclei of leukocytes).
Distilled water to 100 ml.
Important Notes:
Note that the brown color of the diluted blood is due to the formation of acid hematin by the action of acetic acid on the Hb released from the ruptured red cells. However, hemolysis and formation of acid hematin does not interfere with the counting of leukocytes.
Calculation of white cell count
The total number of white cells/c.mm = n/4 X 10 X 20
The total number of red cells/c.mm = n X 50
(n) is the number of white cells found in 4 corner squares.
(10) is volume factor
(20) is diluent factor
Normal White Cell Count
Males = 4,000 to 11,000/ mm3of blood.
Females = 4.5 million/mm3 (4.0 – 5.5 million/mm3).
Tests for Hemostasis (process of stoppage of bleeding)
1. Platelet count.2. Bleeding time (BT).
3. Ivy bleeding time (hemostasis bleeding time).
4. Capillary fragility test of Hess (tourniquet test).
5. Clotting time (CT).
6. Clot retraction time (CRT).
7. Clot lysis time.
8. Prothrombin time.
Platelet Count
Principle
Whole blood is diluted with a 1% ammonium oxalate solution. The isotonic balance of the
diluent is such that all erythrocytes are lysed while the leukocytes, platelets remain intact.
Apparatus and Materials
1. RBC pipette: It should be clean and dry and the bead should roll freely.
2. Improved Neubauer chamber with coverslip. These should be clean and dust free.
3. Microscope.
4. Disposable blood lancet/pricking needle.
• Sterile cotton/gauze swabs.
• 70% alcohol.
1% ammonium oxalate: This fluid destroys red cells but preserves platelets; it also acts as an anticoagulant.
Procedure:
1. Get a finger- prick and draw blood up to the mark 1.0. Suck the diluting fluid to the mark 101.
2. Mix the contents thoroughly and wait for 20 minutes. The red cells will be hemolyzed, leaving only the platelets. Mix the contents once again and charge the chamber on both sides.
Place the charged chamber on wet filter paper and cover it with a petri dish to avoid evaporation.
Focus the RBC square; adjust till you see the platelets – which appear as small, round or oval structures lying separately, highly refractile bodies with a silvery appearance. Rack then microscope continuously and count the platelets in all 25 small squares at the center square.
Calculation of platelets count
Total number of platelets = n x 100 x 10
n = number of counted platelets
100 = diluent factor
10 = volume factor
Normal platelet count = 250,000 - 500,000/mm3
Bleeding time (BT)
Bleeding Time (BT) is the time interval between the skin puncture and spontaneous, unassisted (i.e. without pressure) stoppage of bleeding. The BT test is an in vitro test to estimate platelets function.
[I] “Duke” Bleeding time (finger-tip; ear-lobe)
Principle
• Since the skin of the fingertip is quite thick in some persons, a small cut in the skin of the earlobe with the corner edge of a sterile blade gives better results. The earlobe method is the original “Duke” method for BT.
• Ask your partner to fill the capillary tube with blood from the same skin puncture from where you are doing the BT.