Understanding System Software
system software is the software that starts the computer
and keeps it running, performing basic system tasks such
as running applications, managing files, and correcting
errors.
System software includes BIOS, the operating system, and
utility programs.

Understanding System Software
The System BIOS :
the Basic Input/Output System (BIOS) is the
built-in software on the motherboard that starts the computer. It
performs a power-on self-test (POST) at start-up, which ensures that
all the critical hardware devices are functioning properly, including
the CPU, the RAM, and the motherboard. If the hardware passes
the tests, the BIOS looks for an operating system on one of the
available drives, and then passes off control to the operating system
to complete the boot process. The BIOS has a list of default settings
it uses for managing memory and devices, but those settings can be
overridden by user settings that you specify.

The Operating System:
The BIOS starts the computer at a basic level,
but the operating system does the bulk of work to keep it running and to
help the user accomplish tasks.
It provides the user interface that humans use to communicate
commands and receive feedback.
It communicates with the hardware, instructing it to take action to
accomplish tasks. For example, it communicates with the keyboard and
mouse to accept input, and it communicates with the display screen to
show output.
It runs applications, and enables humans to interact with them.
It controls and manages the file storage system.
Understanding System Software
Understanding System Software

Utility Software :
is the software that performs some useful service to
the operating system, such as optimizing or correcting the file storage
system, backing up files, or ensuring security or privacy.
most operating systems come with many utility programs built-in. For
example, Microsoft Windows comes with utilities for checking a disk
for errors and optimizing the way files are stored on an HDD (hard disk
drive).
Understanding System Software

Introduction to Windows 7
When referring to an operating system, Windows or win
is an operating environment created by Microsoft that
provides an interface, known as a Graphical User
Interface (GUI), for computers. Windows eliminates the
need to memorize commands for the command line (MS-
DOS) by using a mouse to navigate through menus, dialog
boxes, buttons, tabs, and icons.
Microsoft Windows was first introduced with version 1.0
on November 10, 1983. Since its release, there have been
over a dozen versions of Windows. The most current
version of Windows for end users is Windows 10.

The Windows 7 interface, called the desktop, is your starting
point for most of the activities you perform in Windows 7.
From the desktop, you can run programs, manage files,
access the Internet, check the status of devices, and more.
Your Windows desktop is like a physical workspace in some
ways. You can have multiple files and projects open at the
same time, spread out on the desktop so you can see each
one of them. The desktop can be changed to suit your
personal style. The desktop background can be a solid color
Introduction to Windows 7
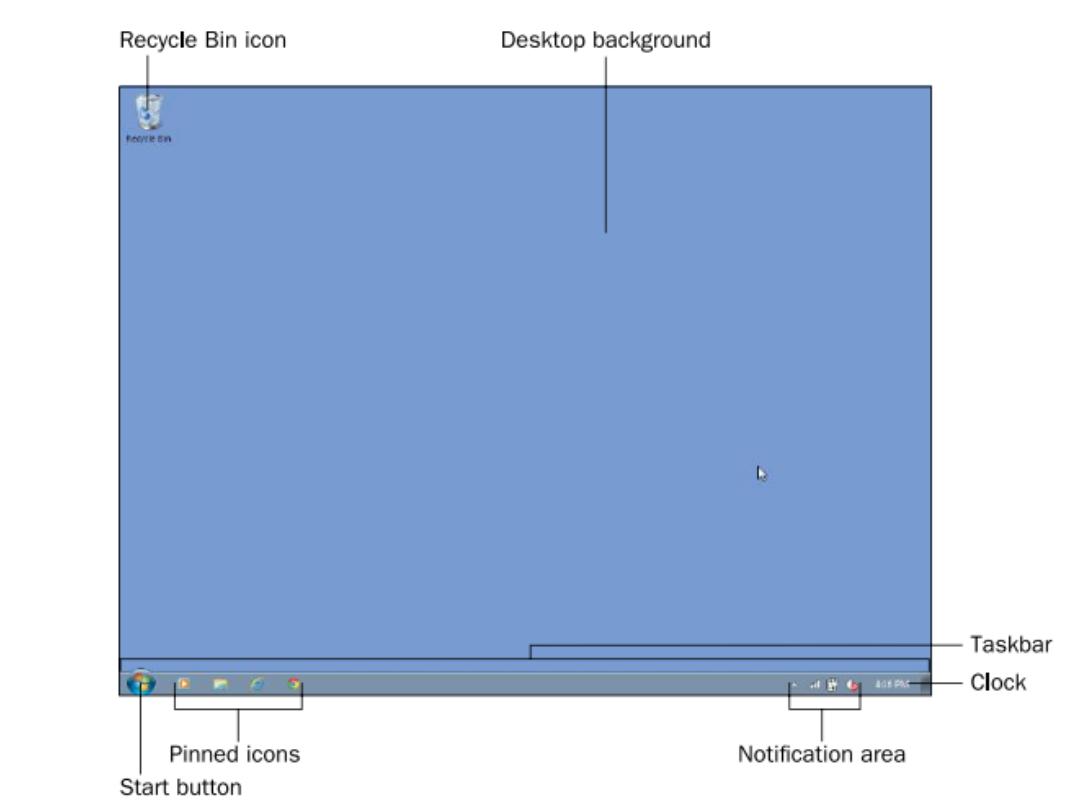
Figure 1

The taskbar is the thin bar across the bottom of the screen. It is used to start
programs and to manage the programs that are already running. At the far-left
end is the Start button. The small graphics you see on the desktop are called
icons. An icon can sit on the desktop, as the Recycle Bin icon does in Figure 1,
or it can be pinned to the taskbar for easy access as in Figure 1, four pinned
icons appear to the right of the Start button. The center of the taskbar is blank
in Figure 1, but if any programs were running or windows open, buttons for
those programs or windows would appear there. Some other icons are at the
right end of the taskbar, but these
aren’t pinned there. That area is called the
notification area and the icons there represent information from programs or
system components that are running in the background, such as the Volume
Control and the Battery Meter. At the far-right end of the taskbar is a clock.
Introduction to Windows 7
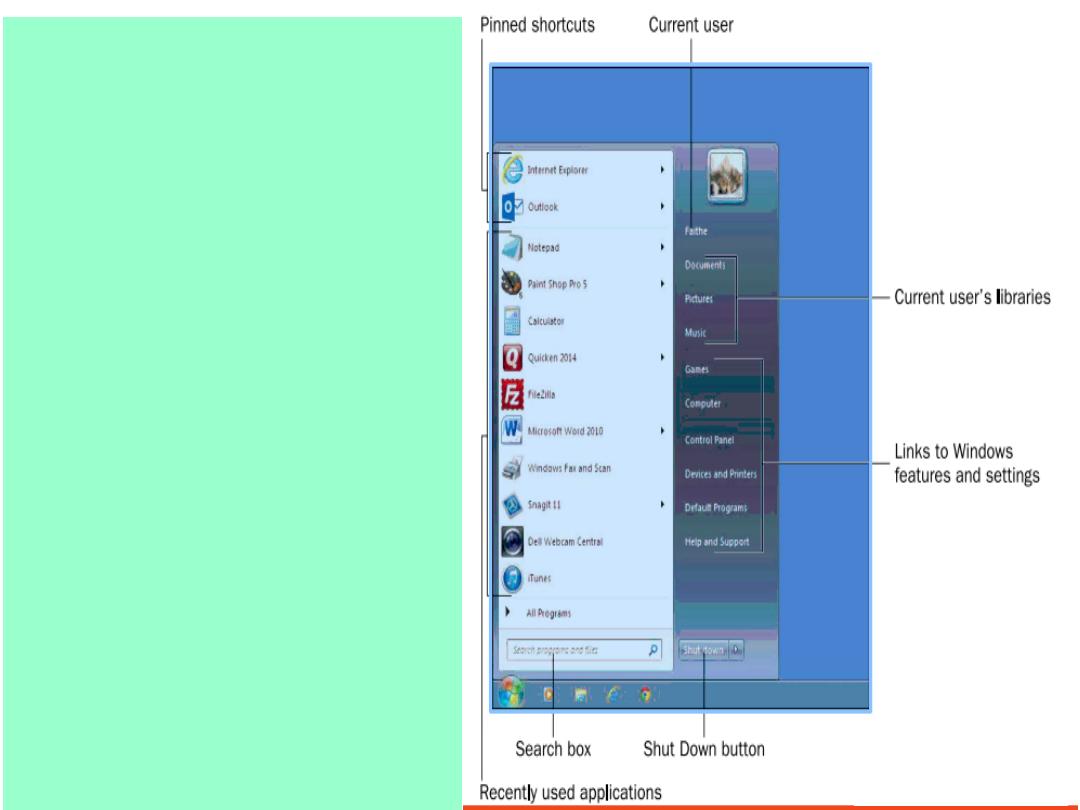
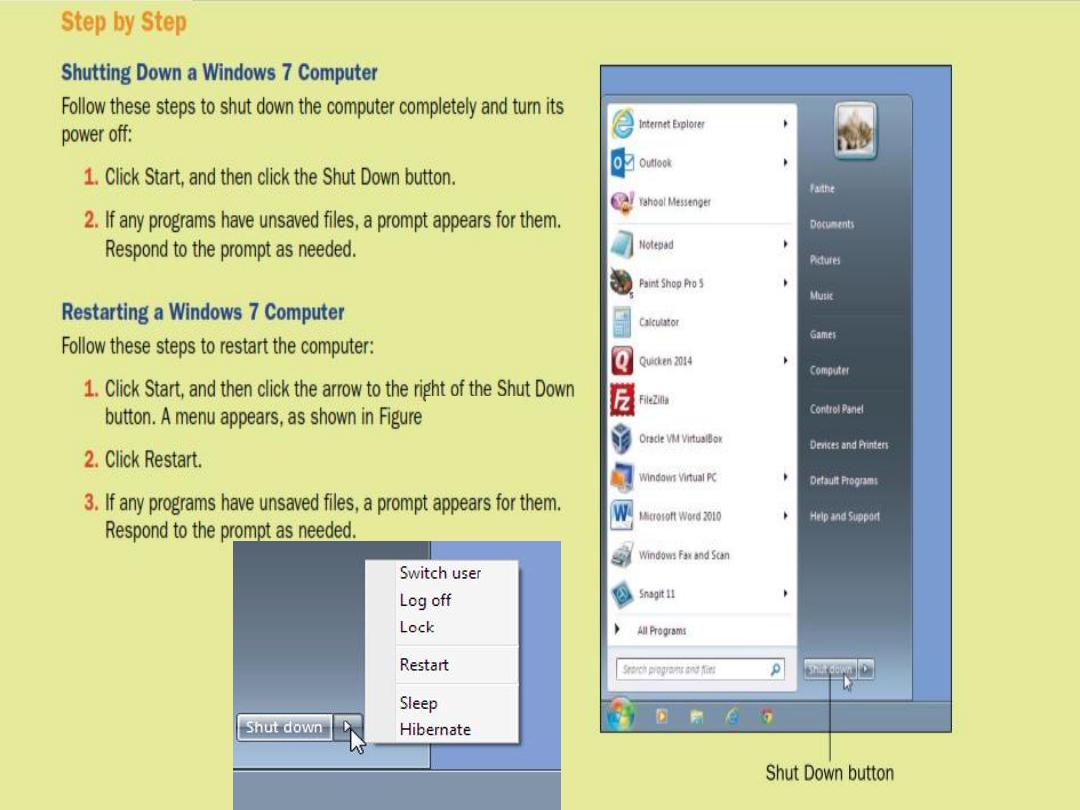
When you click the Start button,
the Start menu opens, as shown
in Figure2. It has two columns.
In the left column, the top
section
contains
pinned
shortcuts to applications. Figure
2 shows pinned shortcuts for
Internet Explorer and Outlook.
The bottom section of the left
column contains shortcuts to
recently
or
frequently
used
applications. This list changes
depending on your usage.
Below that is the All Programs
command.
It
opens
a
hierarchical menu of all the
installed
programs
on
your
system; At the bottom of the left
column is a Search box; you can
type in this box to narrow down
what appears on the Start menu
to find what you are looking for.
Figure 2

Starting Up and Shutting Down
When you turn on the
computer’s power, windows 7 loads
automatically. Depending on the way your copy of Windows
is configured, The desktop might appear automatically, or
you might see a login screen. At the login screen, if your
username appears with a password box under it, type the
password and press Enter to log in. If several different
usernames appear, click your account to select it.

Shutting Down or Restarting the PC
When you shut down the PC, Windows shuts down and the computer
stops using power. The next time you start the computer, Windows must
reload itself into memory, which takes a minute or two. You should shut
down a computer completely before moving it, storing it, or servicing it.
You should also shut down the computer when prompted to do so by
Windows itself. (A complete shutdown and restart is sometimes required
to complete the installation of certain updates.) When you shut down the
computer and then turn it back on again later,
that’s called a
cold boot
because the
computer’s circuitry has been off (and is therefore cold).
When you restart the PC, Windows shuts down, but the computer’s
power remains on, and Windows immediately restarts. Restarting is
also called a
warm boot
because the computer stays on (warm) as it
reboots. You should restart when Windows prompts you to do so (for
example, after updates have been installed), and also as a trouble
shooting technique if you begin to experience problems with windows.
To restart Windows, choose Restart from the Shut Down button’s menu.
Shutting Down or Restarting the PC
cold boot
To start up a computer from a power off state.
warm boot
To restart a computer that is already powered on.
3
Figure 3

Placing the PC in a Low-Power Mode
Windows supports two special modes that you can place the
computer in as an alternative to shutting down completely. In
each of these modes, when the computer resumes operation,
the desktop is just as you left it, including any open programs,
windows, and files. This saves you time because you
don’t have
to wait as long for Windows to start up as you normally would,
and when it does start up, you
don’t have to reopen the
applications and windows you want to continue working with.

Sleep mode
is a low-power state. It keeps the RAM powered, but shuts
down all other components. RAM
doesn’t use much memory, so the
computer consumes very little power. On a desktop computer, that
means it uses less electricity. On a battery-powered computer, that
means the battery lasts much longer. Waking up from Sleep mode is
very quick
—only a few seconds.
Hibernate mode
is a no-power-needed
state. It copies the contents of RAM to a reserved area on the hard
drive, and then shuts the power down completely. When the computer
starts back up again, instead of booting normally, it reads the stored
data back into memory, so you can pick up where you left off. Hibernate
mode takes more time to wake up from than Sleep mode does (about
30 seconds, on the average), but
that’s less time than it would take to
start the computer from being completely shut down.
To wake up from Sleep mode, press any key on the keyboard.
To wakeup
from Hibernate mode, press the computer’s Power
button.
Placing the PC in a Low-Power Mode

Logging Off and Switching Users
Windows 7 supports multiple user accounts. When one user is finished,
he or she can log off, which shuts down any running programs, closes
any open data files, unloads all personal settings for that user, and returns
to the login screen, with all the available users listed. From that point
another user can log in. Logging off closes the user’s personal activities
down, but it does not completely restart Windows. Therefore, it takes less
time than a full restart.
If another user wants to use the computer for a short time, the first user
may not want to take the time to shut down all applications and data
files that he or she is working on. The Switch User command suspends
the current user’s session but does not end it, and returns to the login
screen. Another user can then log in. The users can switch back and forth
freely between the open accounts, and other users can even log in too.

log off
To close a user account’s session, closing all open programs
and data files and unloading all of that user’s personal settings.
Switch User
A Windows feature that enables another user to log in
without the original user logging off first.
Logging Off and Switching Users

Locking the PC
If you are going to be away from your computer for a while, you might
not want other people to be able to see what you were working on or
snoop on your computer while you are gone. To prevent such intrusion,
you can use the Lock command. Locking preserves the current
state of the computer but redisplays the login screen. You must retype
your password when you return to the computer to continue your
session. Locking is similar to switching users except the login screen
that appears shows the prompt only for the user who locked the PC,
and not the full list of users that you see when you use Switch User.

Running Applications
programs that perform some useful task (other than keeping
the computer itself running) are known as applications.
Running applications is the main reason Windows exists.
Windows comes with a variety of small applications that it
calls Accessories; these include a calculator, a text editor, a
simple word processor, and a drawing program. You can also
buy and install other applications on your own.

Starting an Application
The Start menu has a few shortcuts on it. The top section contains pinned
shortcuts, and below that are shortcuts to recently or frequently used
applications. If the application you want to run isn’t in either of those places,
you must click All Programs to open the full menu system. This menu system
contains both application shortcuts and folders. If you click a folder, you see the
shortcuts within it. The Start menu is hierarchically organized . There are
subfolders within folders, and files can exist at any level of the organizational
structure. Figure 4 shows the Accessories folder expanded to how its
subfolders, and the System tools subfolder expanded below that.
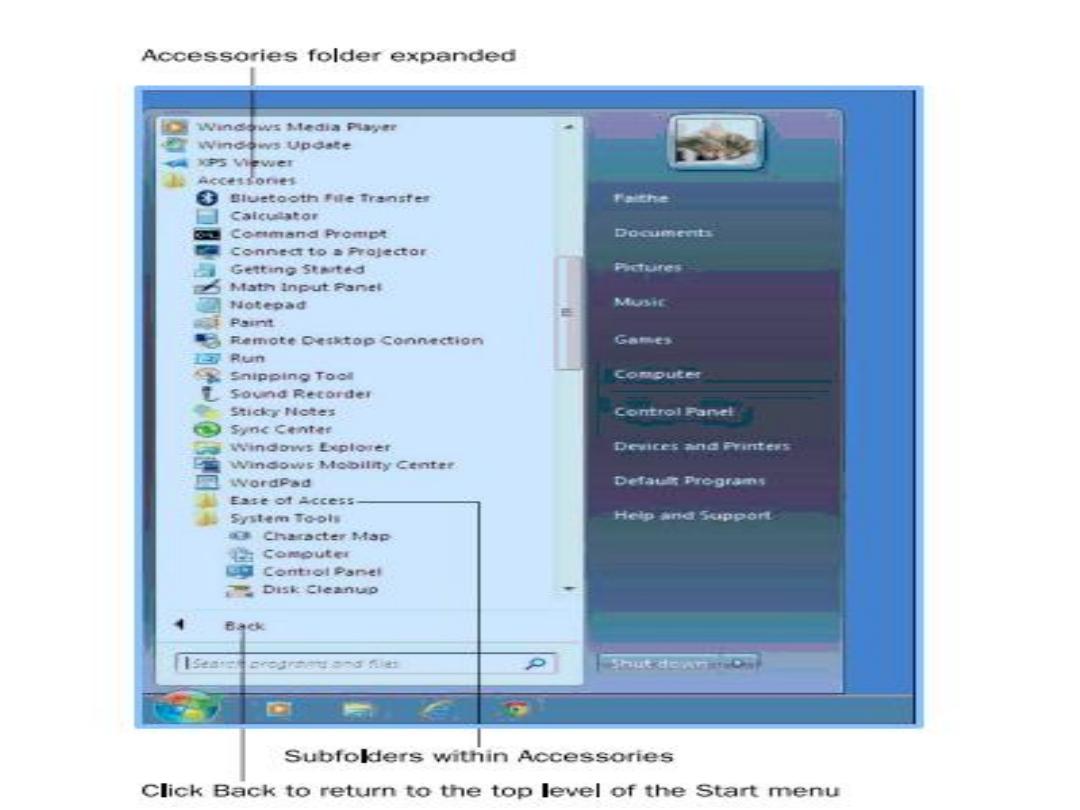
Figure 4
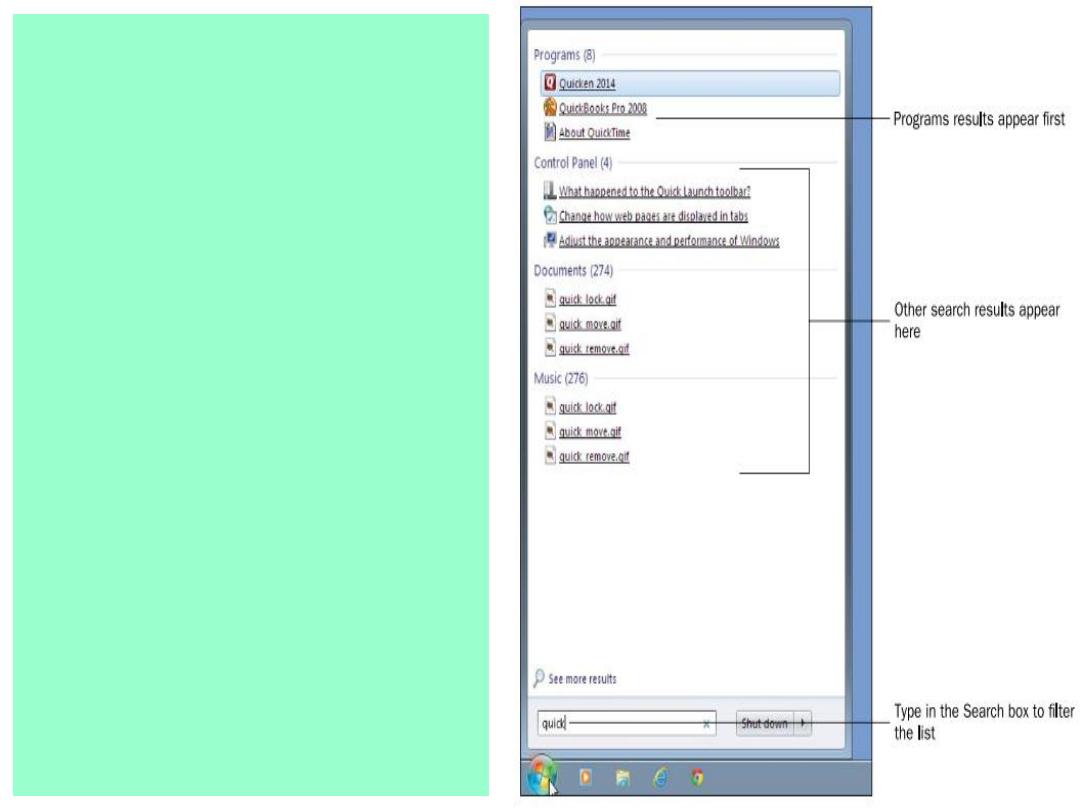
Because the Start menu can get
complicated with so many folders
and shortcuts, you may find it
easier to search for the application
you want to run rather than
browsing for it. To search for an
app, after opening the Start menu,
start typing the
application’s name.
The menu shows only the items
that match what you typed. It is a
full-featured search, and it finds all
files on your hard drive, not just the
applications on the Start menu.
However,
the
Start
menu
applications appear at the top of the
list, for easy access.

You can also start applications from shortcuts on the desktop or that
are pinned to the taskbar or to the top of the Start menu. Just click the
item you want on the Start menu or taskbar, or double-click the desired
icon on the desktop.
Starting an Application

Pinning Shortcuts
An easy way to refined an application on the Start menu is to pin it, either to the
Start menu or to the taskbar . If you pin it to the Start menu, it appears in the
upper-left quadrant of the Start menu . If you pin it to the taskbar, it appears to
the right of the Start button . After locating the desired item on the Start menu,
but before clicking it to select it, right-click it . On the menu that appears,
choose Pin to Start Menu or Pin to Taskbar . To place a shortcut on the
desktop, minimize all open windows . Open the Start menu, locate the icon you
want, and then hold down the Ctrl key as you drag the application off the Start
menu; a copy will be created on the desktop . Make sure you hold down Ctrl as
you drag; otherwise, the shortcut will be removed from the Start menu .
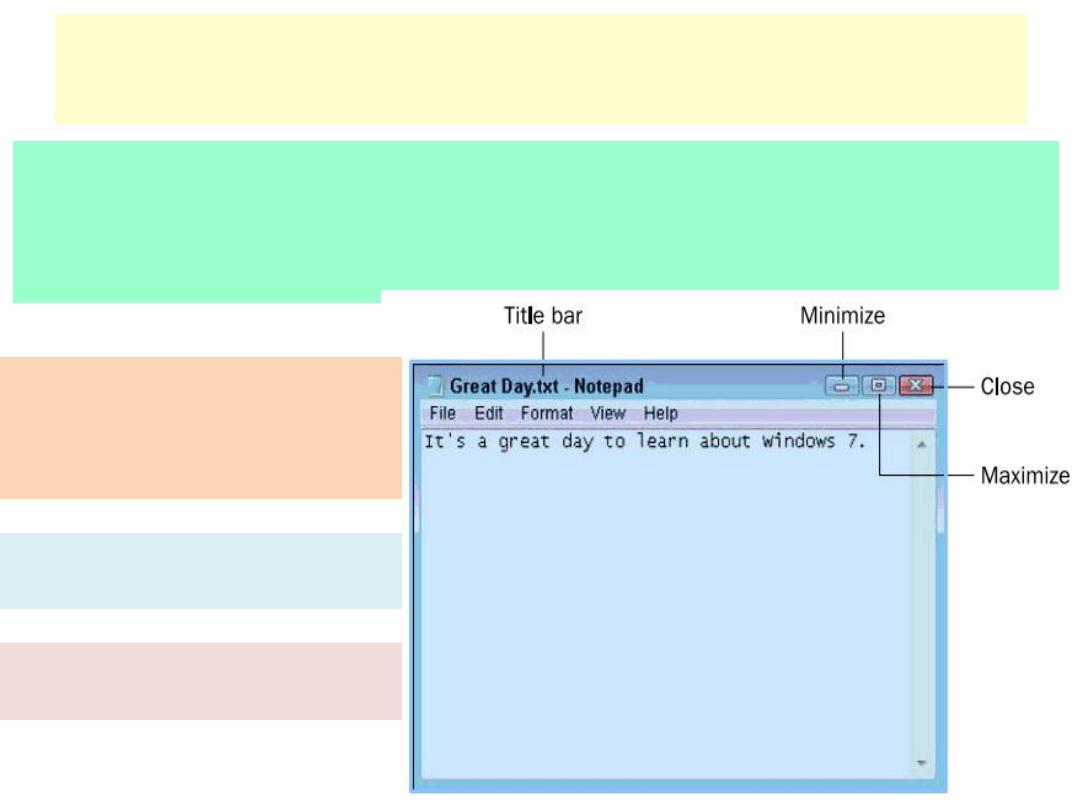
Manipulating a Window
Microsoft Windows is based on windows
—movable rectangular blocks in
which different types of content appear. When you run an application, it
appears in its own window, and when you browse a file listing, that listing
appears in its own window too.
title bar
The bar across the top of
a window that shows the w
indow’s
name; click the title bar and drag
the window to move it.
minimize
To shrink the window to
a button on the taskbar.
maximize
To enlarge the window
to fill the entire screen.
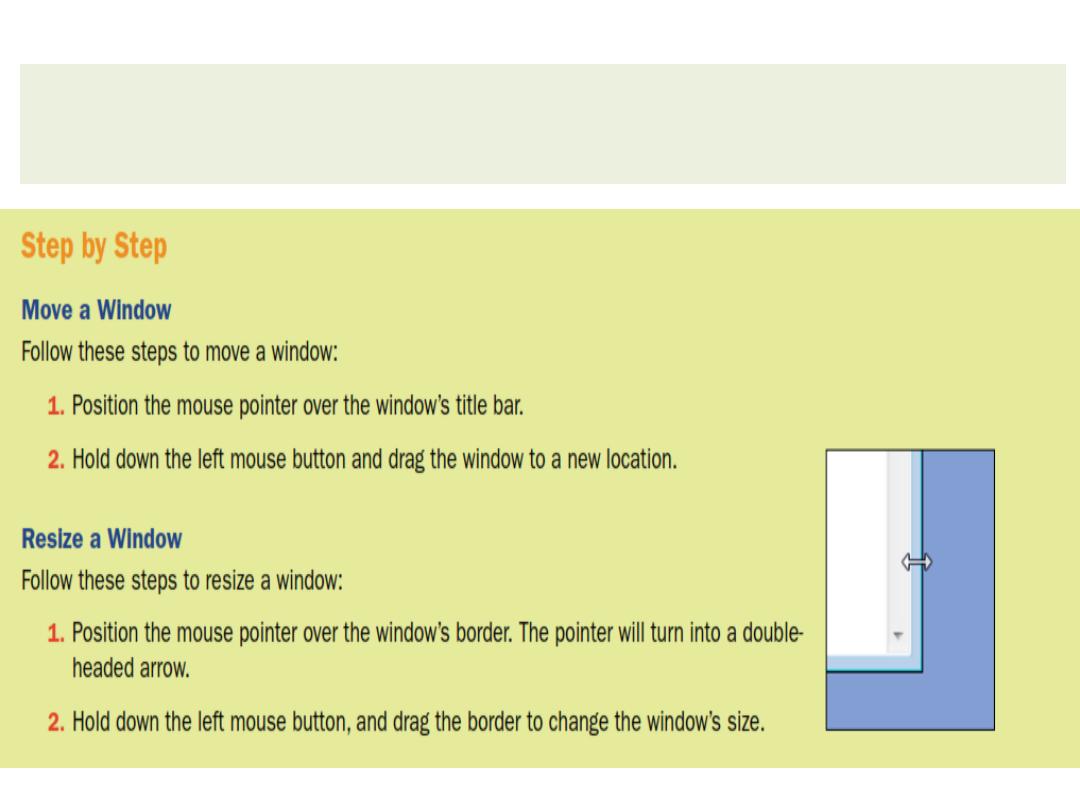
Each window has a border around its edges. You can position the mouse pointer
over any part of the border and then drag to change the size of the window. If you
drag a corner of the border, you can resize in both dimensions at once.
Navigating in an Application
Most
Windows-based
applications
have one of two interfaces: a
menu
interface
or a
Ribbon interface
. A menu
interface is typical of older applications
and applications not developed by
Microsoft; the Ribbon interface is
common
in
newer
Microsoft
applications. A menu-based interface
has a menu bar across the top of the
screen, immediately below the title bar.
You can click a menu name to open
the menu, Notice that some commands
have keyboard shortcuts listed next to
them. You can press those keys
instead of using the menu system if
you prefer.
Menu interface

Notice also that some commands
have ellipses after them (. . .).
These commands open dialog
boxes, which are windows that
prompt you for additional
information. For example, if you
click the Print command, the
Print dialog box opens,
prompting you to enter print
settings.
dialog box
A window that appears in
response to selecting a command,
prompting for more information
about how the user wants the
command to be executed.
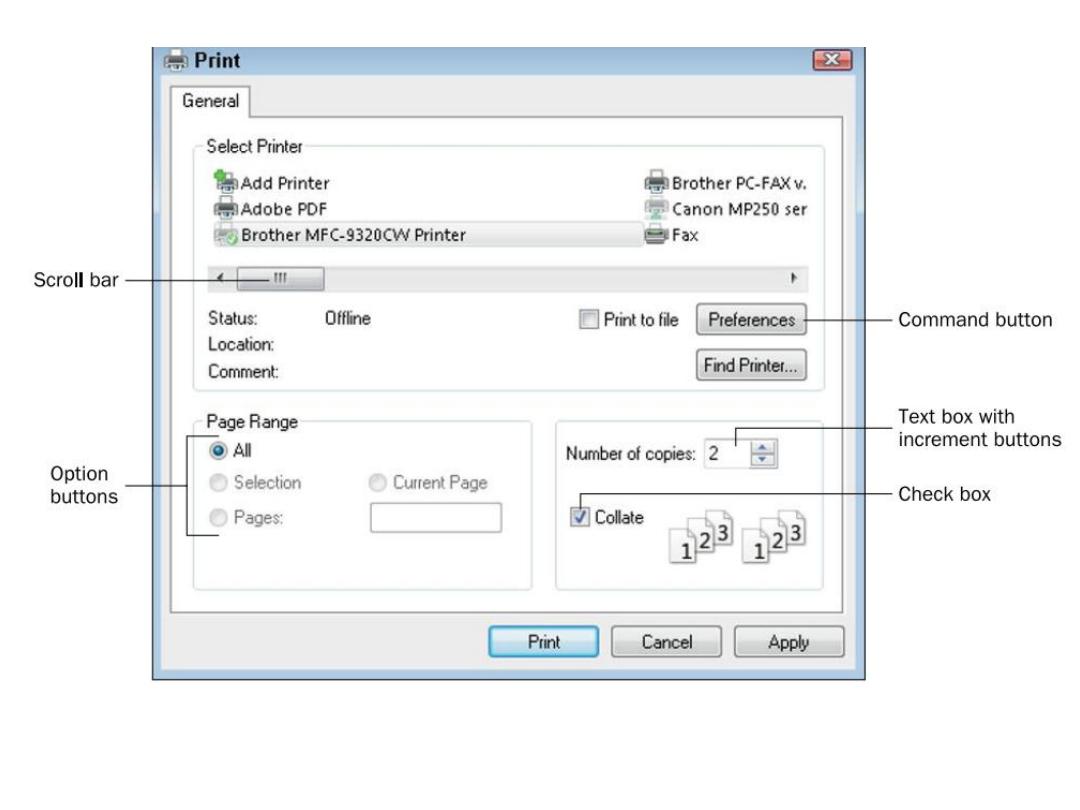
Some menu commands open dialog boxes.

Dialog boxes have various ways of asking you for information. For example, the
dialog box iof print command has the following features:
Scrollable list
: The list of printers at the top of the dialog box has a scroll
bar beneath it. You can drag the scroll box from side to side to scroll the
listing, or click the arrow at one end of the scroll bar to scroll in that
direction.
Check box
: A check box toggles a feature on or off. Click it to change its
state.
Text box
: A text box enables you to enter text or a number directly into it.
Increment buttons
: Text boxes that only accept numeric values sometimes
have increment buttons, which appear as small up and down arrows. You
can click an arrow to increment (increase) or decrement (decrease) the
number shown in the text box as an alternative to manually typing a
number.
Option buttons
: Option buttons present a group of mutually exclusive
values. When one option button in a group is selected, the previous
selection is cleared.
Command buttons
: Command buttons are large rectangular buttons with
text labels on them. Clicking a command button performs an action, such
as the Print, Cancel, or Apply buttons in Figure 5.8, or opens another dialog
box, as with the Preferences and Find Printer buttons.
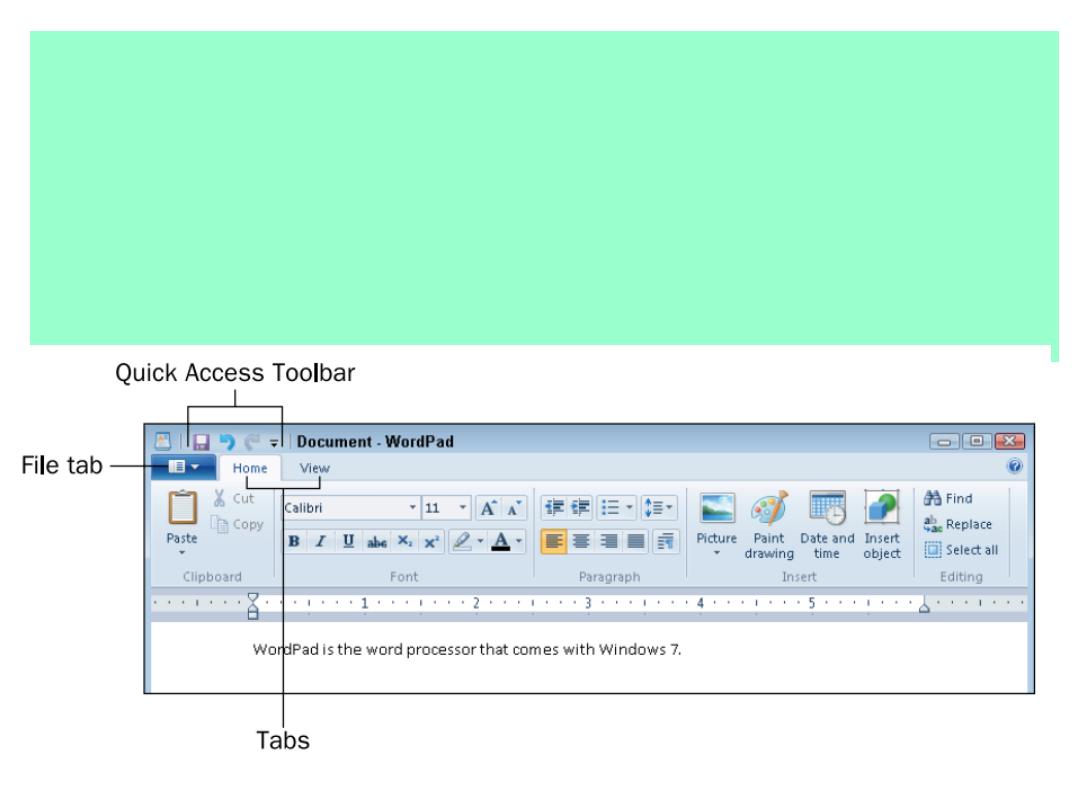
Ribbon-based applications do not have a menu bar or toolbar. Instead, they
have a tabbed Ribbon, which is somewhat like a large multi-page toolbar.
Each tab represents a different page of tools. Click a tab to access the
buttons and other tools on that tab. The Figure shows an app called
WordPad. It has two ordinary tabs, Home and View, containing commands
you can select. It also contains a File tab, which is the blue tab to the left of
the other two. The File tab opens a File menu, which contains commands
for saving, opening, closing, and printing files
Ribbon based interface

Exiting an Application
To close an application, close its window by clicking the
Close (X) button in the upper-right corner, or open its File
menu and choose Exit, or Press Alt+F4 when the pplication
window is active.

Managing Files
Selecting Files and Folders
Before you can issue a command that affects a file or folder (for
example, to move or copy it), you must first select that file or folder. If
you are selecting only one file or folder, it’s easy—just click it. It
becomes highlighted.(The highlighting color varies depending on the
color scheme you are using in Windows.) If, however, you want to act
upon multiple files or folders at once, you must select them all before
issuing the command.
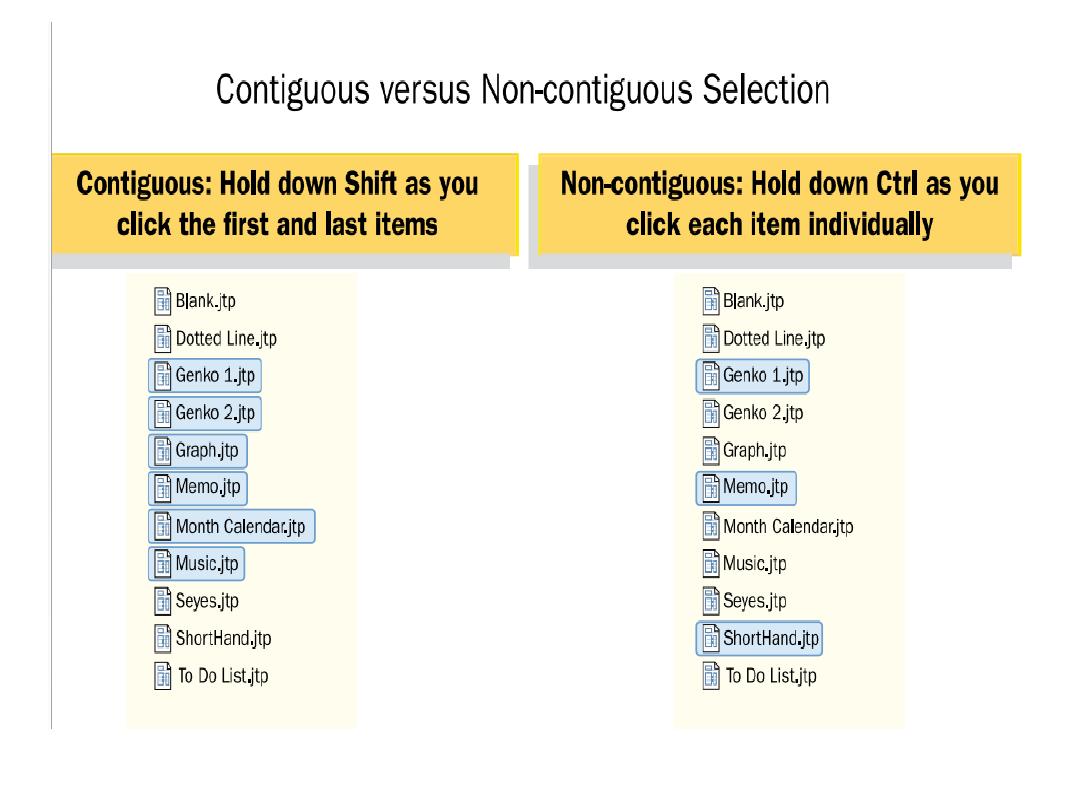
When two or more files or folders are
contiguous
(adjacent) in the file
listing, you can select them by clicking the first one and then holding
down the Shift key while you click the last one. All the files between
the two are also selected. When the files you want are
non-contiguous
(not adjacent), hold down the Ctrl key and then click individually on
each one. See Figure 5.15. When you are finished making your
selections, release the Ctrl key. To cancel a selection, click anywhere
away from the selection.

Renaming and Deleting Files and
Folders
There are many different ways to rename a file or folder. You can do any
of the following:
Select the file or folder and press F2 to make the name editable. Type the
new name and press Enter.
Click the file or folder to select it and then click it again to move the
insertion point into the name. Edit the name and press Enter Right-click
the file or folder and click Rename. Edit the name and press Enter.
Select the file or folder and then open the File menu and choose Rename.
Edit the name and press Enter.
To delete a file or folder, select it and then do any of the following:
Press the Delete key on the keyboard.
Right-click the file and folder and click Delete.
Open the organize menu and click Delete.

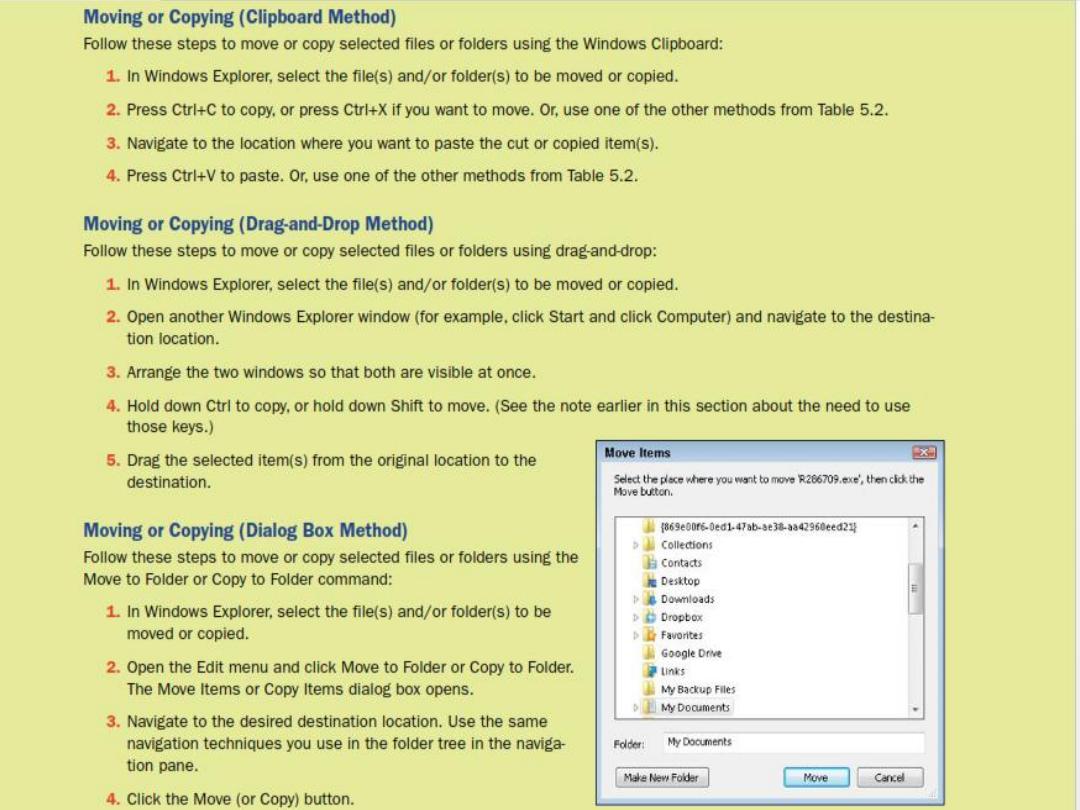
Moving and Copying Files and Folders
There are many ways to move and copy items. You can use the
windows
Clipboard
, or drag and drop files from one location to another,
or you can use the Move to Folder or Copy to Folder command in
Windows Explorer.
Clipboard
A reserved area in memory for temporarily holding content
that has been cut or copied from an application or from Windows
Explorer.