First stage – College of Medicine – University of Mosul / Nineveh
Computer Science/
Zina Abdul Salam Subhi
MS Word 2013
Lecture 2: MS Word 2013
Home Tab
The Home Tab is where you find all the options to format text in
your Word document. We look at each group in turn.
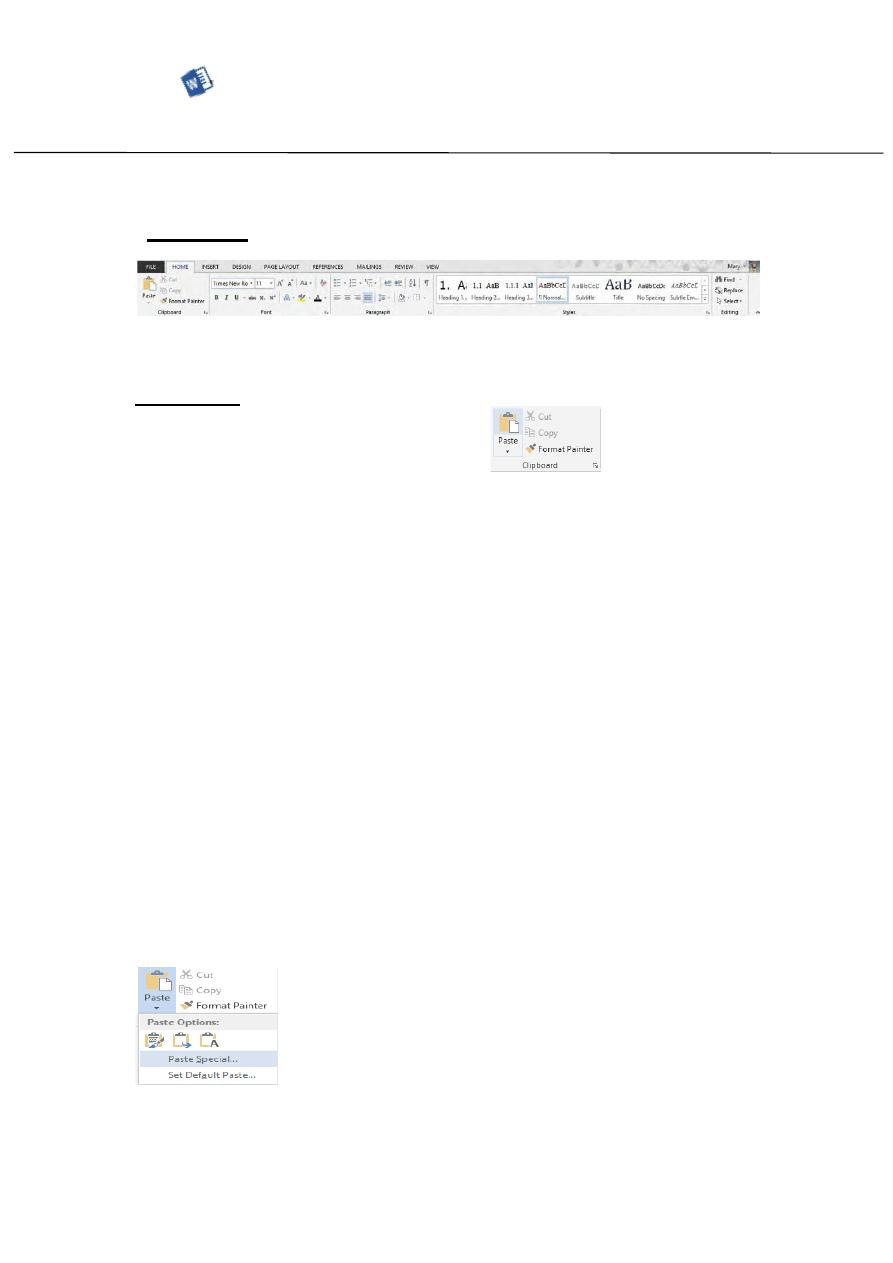
Clipboard:
Cut / Copy / Paste allow you to move and copy text and objects
around the document and between applications.
To Copy:
1. Select the text or object.
2. Select Copy in the Clipboard group or Ctrl + C.
3. Move to where you want to insert the text or object.
4. Select Paste in the Clipboard group or Ctrl + V.
To Move:
1. Select the text or object.
2. Select Cut in the Clipboard group or Ctrl + X.
3. Move to where you want to insert the text or object.
4. Select Paste in the Clipboard group or Ctrl + V.
More Options:
Selecting the More Options button (bottom right) will display the
last 7 items that have been added to the clipboard. Text or objects
are added to the clipboard when Cut or Copy are selected.
Different Paste Options:
First stage – College of Medicine – University of Mosul / Nineveh
Computer Science/
Zina Abdul Salam Subhi
MS Word 2013
Rather than clicking Paste, clicking on the down arrow will allow
you to select more options. The options displayed will change
depending on what is on the clipboard.
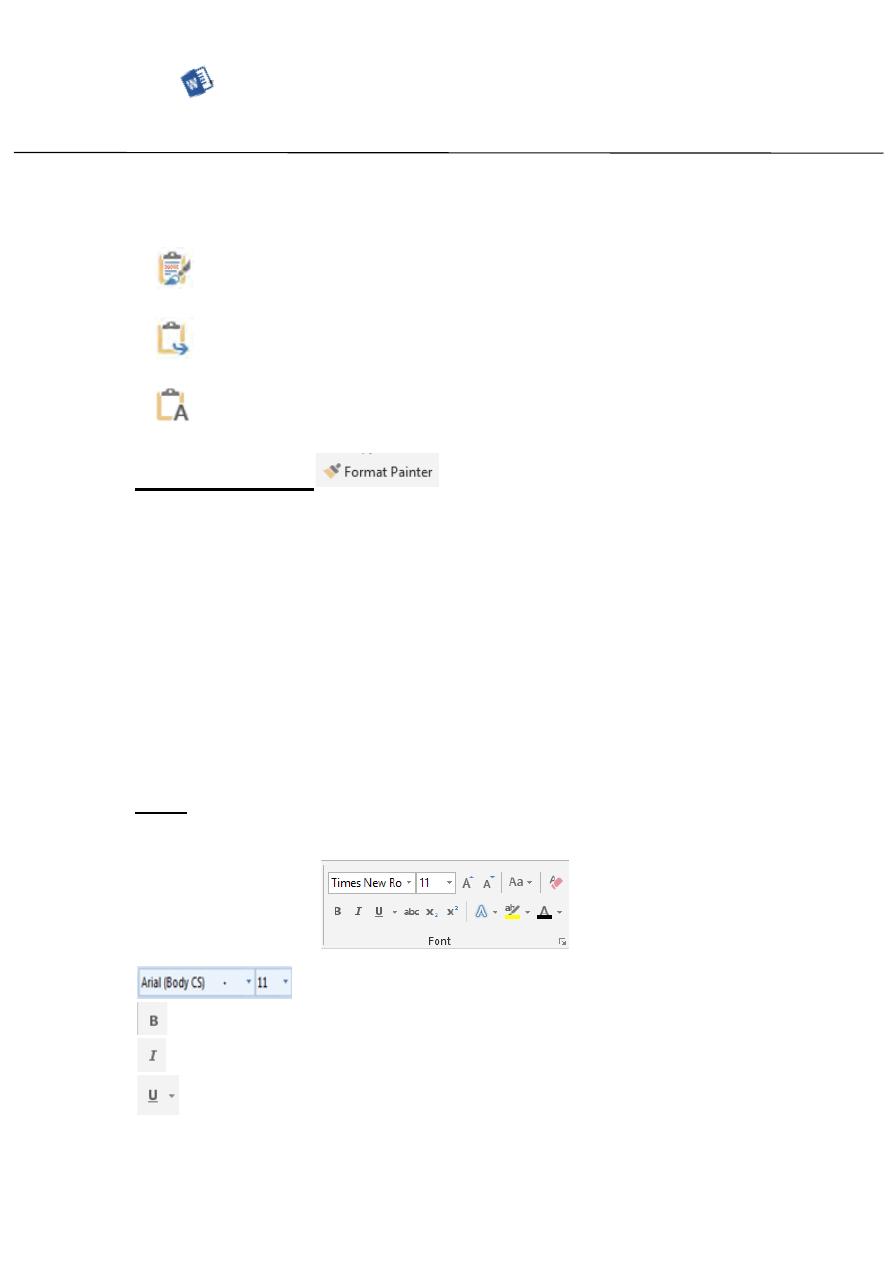
Keep source formatting. This will keep the
formatting in the original text or object.
Merge formatting. This will reformat the pasted
text so that it looks like the block of text it is being pasted into.
Keep text only. No formatting will be applied.
Format Painter:
The Format Painter option allows you to copy the formatting from
one part of a document to another part of the document. To use
the Format Painter:
1. Select the text that has the correct formatting.
2. Click Format Painter.
3. Drag the mouse over the text you want to format (the mouse will
change to a line with a paint brush).
Note: Selecting the Format Painter button once allows you to paint
text once. Double clicking the Format Painter button keeps it on
until you click to turn it off.
4. To stop formatting, press ESC.
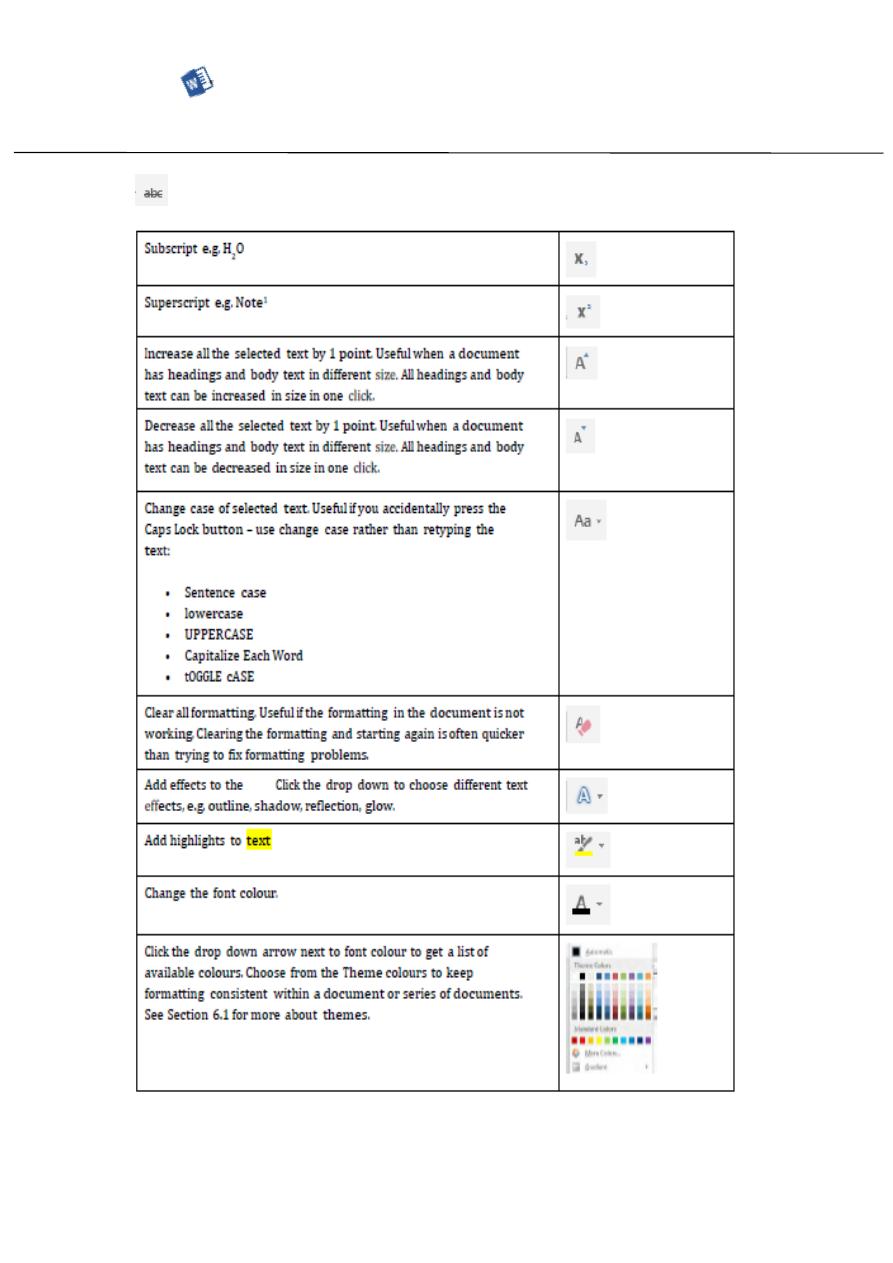
Font: There are a number of useful buttons in the Font group. First
select the text to apply the font change to.
Set the type and size of the text.
Bold or Ctrl + B
Italics or Ctrl + I
Underline. Select the down arrow to
choose the type of underline. Or ctrl+u
First stage – College of Medicine – University of Mosul / Nineveh
Computer Science/
Zina Abdul Salam Subhi
MS Word 2013
Strike through the text
First stage – College of Medicine – University of Mosul / Nineveh
Computer Science/
Zina Abdul Salam Subhi
MS Word 2013
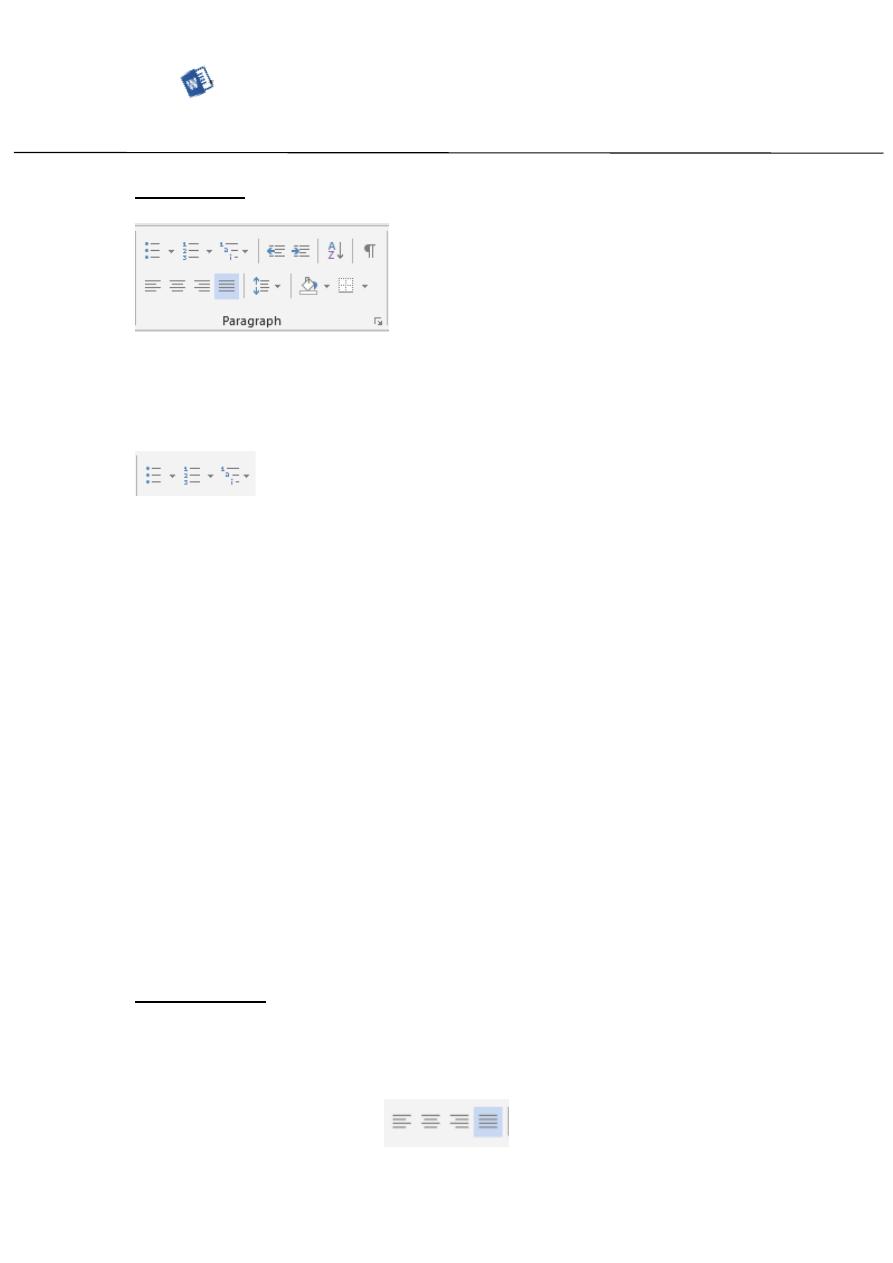
Paragraph:
The paragraph section allows you to set paragraph level
formatting.
Bullets and numbers:
Hints for managing bullets and numbers:
1. Select the numbers or bullets that you wish to apply using the
toolbar buttons:
a) Type the first line of text and press Enter to create the next
bullet or number.
b) To leave a blank line between the bullets or numbers, press
Shift + Enter.
c) When you are finished, press Enter twice.
2. If you need a bulleted list, just type an asterisk (*) followed by a
space. The asterisk turns into a bullet and your list is started.
When you’ve finished typing the first item in your list, press Enter
and a new bullet will appear on the next line.
3. To automatically create numbered lists, type the number one
and a dot (1.), followed by a space.
4. To start a letter list, type the letter ‘a’ and a dot (a.), followed by
a space.
5. To create a multi-level of bullets, type the first bullet, use Enter
to create the next level and press Tab to create a 2nd level of
bullet.
6. Press Shift + Tab to move back a bullet level.
Justification:
Justification is applied to a line of text. Each line can only have one
type of justification applied. If you want to align text on the left,
center and right on the same line, tabs will need to be used.
First stage – College of Medicine – University of Mosul / Nineveh
Computer Science/
Zina Abdul Salam Subhi
MS Word 2013
Align the text left or right
Select the text that you want to align.
On the Home tab, in the Paragraph group, click Align Left or Align
Right
Center the text
Select the text that you want to center.
On the Home tab, in the Paragraph group, click Center.
Justify the text
You can justify the text, which might make the last line of text in a
paragraph considerably shorter than the other lines.
Select the text you want to justify.
On the Home tab, in the Paragraph group, click Justify
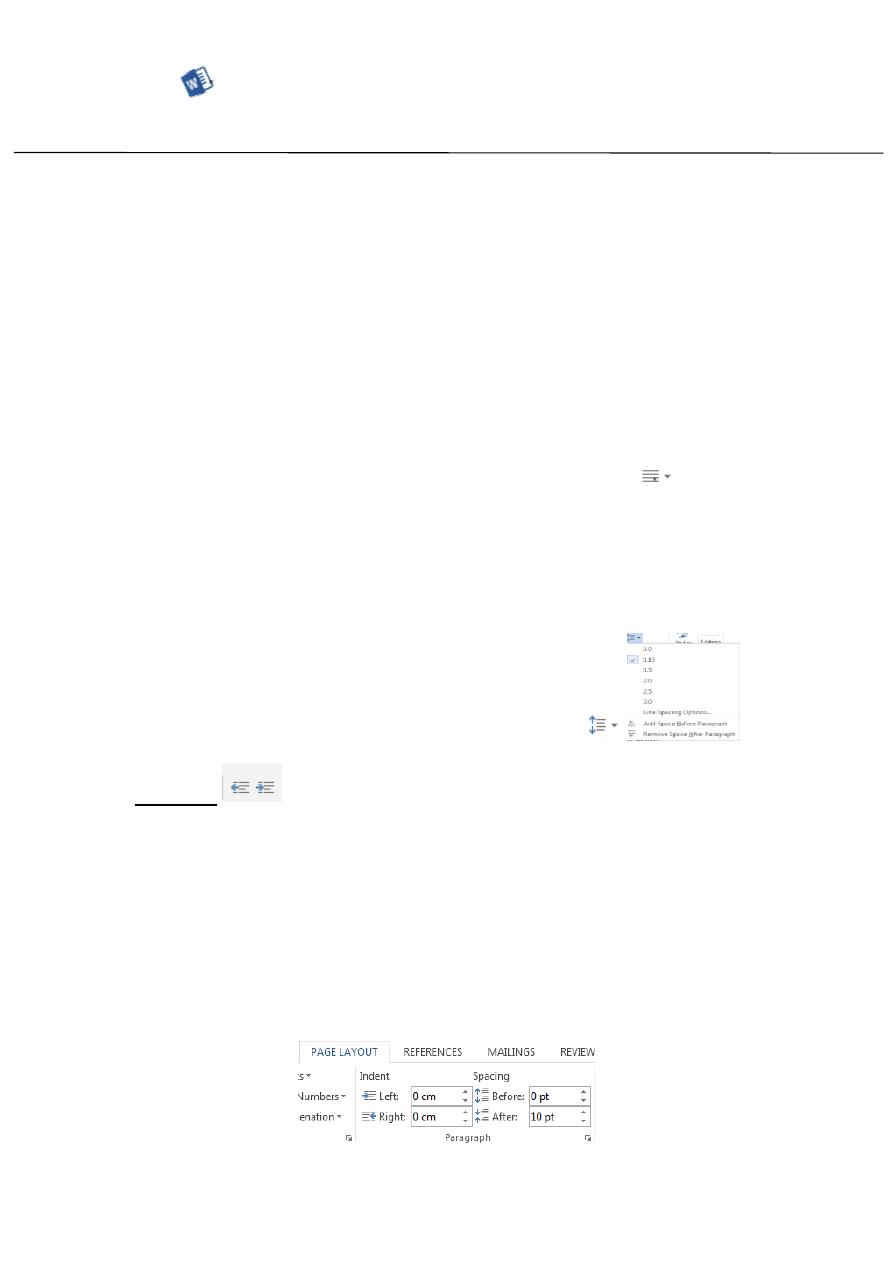
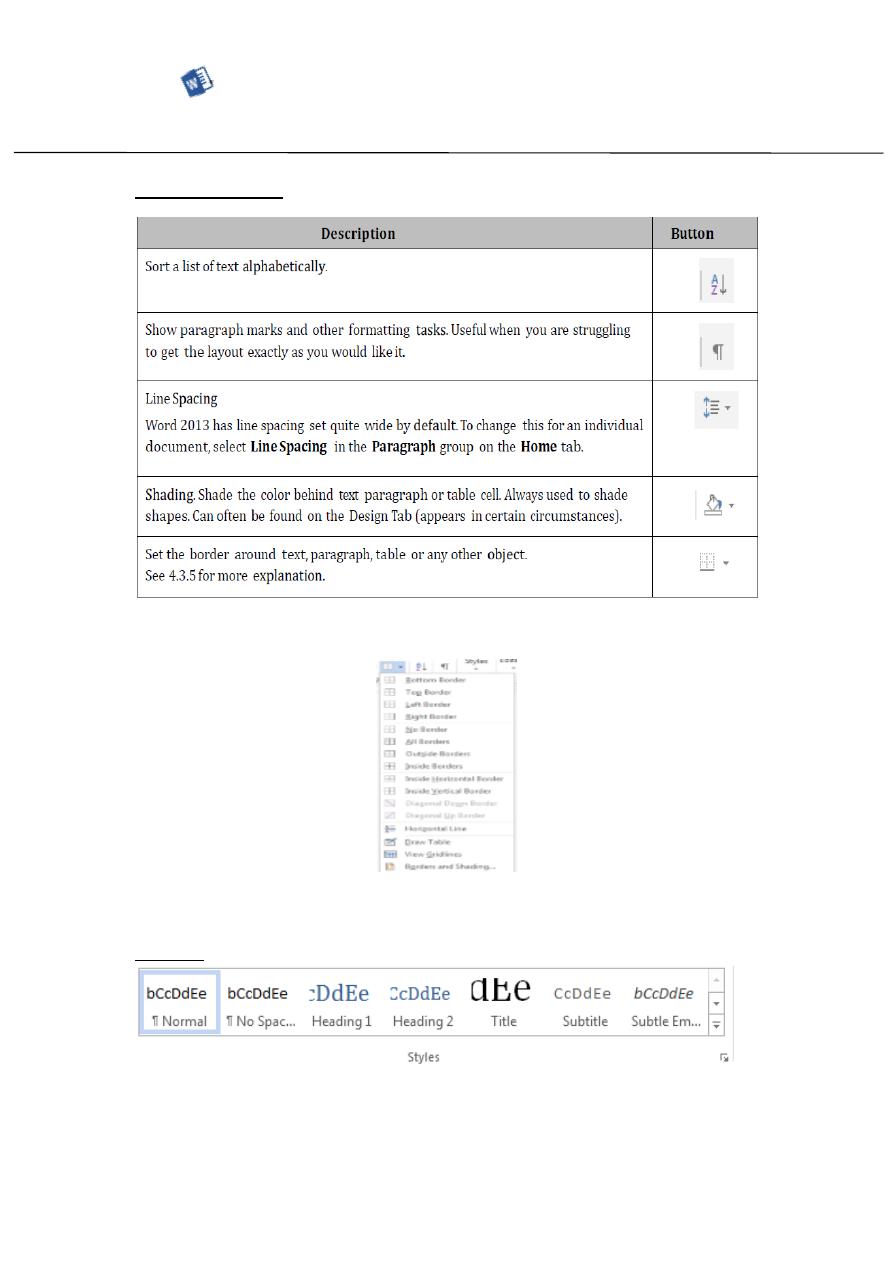
Change the line spacing in a portion of the document
Select the paragraphs for which you want to change the line
spacing.
On the Home tab, in the Paragraph group, click Line Spacing.
Do the following:
Click the number of line spaces that you want.
Indents:
Using the Indent buttons, you can move paragraphs to the left or
the right (from the left hand side). Each time you press the
Increase Indent button, the paragraph will move one tab stop to
the right. The indent is normally set to 1.27cm.
You can set the left and right indents for a paragraph by using the
Paragraph group in the Page Layout Tab.
First stage – College of Medicine – University of Mosul / Nineveh
Computer Science/
Zina Abdul Salam Subhi
MS Word 2013
Other Buttons:
Borders:
To put a border around text or a paragraph, select the text or
paragraph and click the drop down next to the Border button.
Styles:
Styles on the Home tab are ready-made, professional styles, quick
and easy to apply to make your document look professional. The
most frequently used styles will appear directly on the Tab.
First stage – College of Medicine – University of Mosul / Nineveh
Computer Science/
Zina Abdul Salam Subhi
MS Word 2013
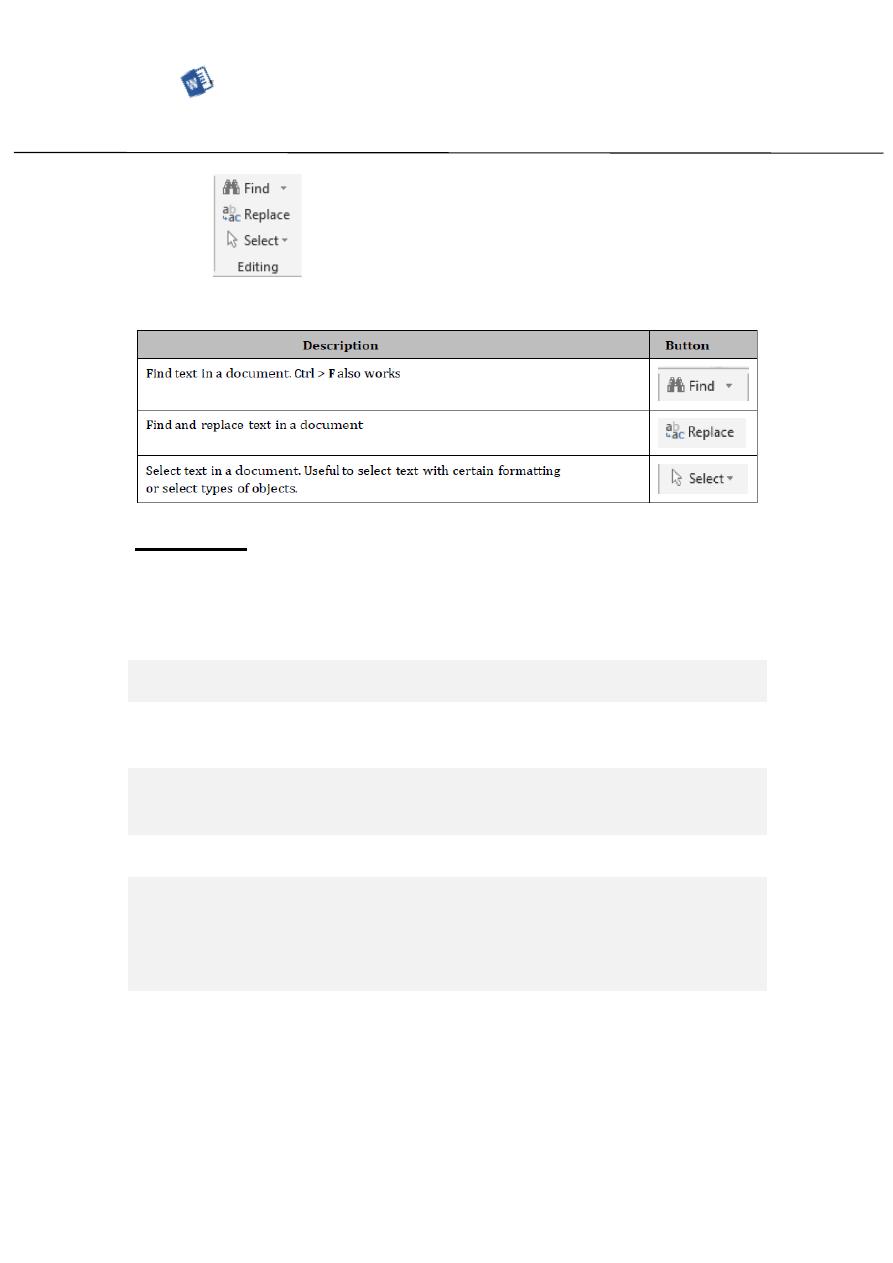
Editing:
The Editing group shows the standard options of:
Select text:
Any amount
of text
Click where you want to begin the selection, hold
down the left mouse button, and then drag the
pointer over the text that you want to select.
A word
Double-click anywhere in the word.
A line of text
Move the pointer to the left of the line until it
changes to a right-pointing arrow, and then click.
A sentence
Hold down CTRL, and then click anywhere in the
sentence.
A paragraph
Triple-click anywhere in the paragraph.
Multiple
paragraphs
Move the pointer to the left of the first paragraph
until it changes to a right-pointing arrow, and then
press and hold down the left mouse button while
you drag the pointer up or down.
A large block
of text
Click at the start of the selection, scroll to the end
of the selection, and then hold down SHIFT while
You click where you want the selection to end.
First stage – College of Medicine – University of Mosul / Nineveh
Computer Science/
Zina Abdul Salam Subhi
MS Word 2013
All the text
Ctrl>A
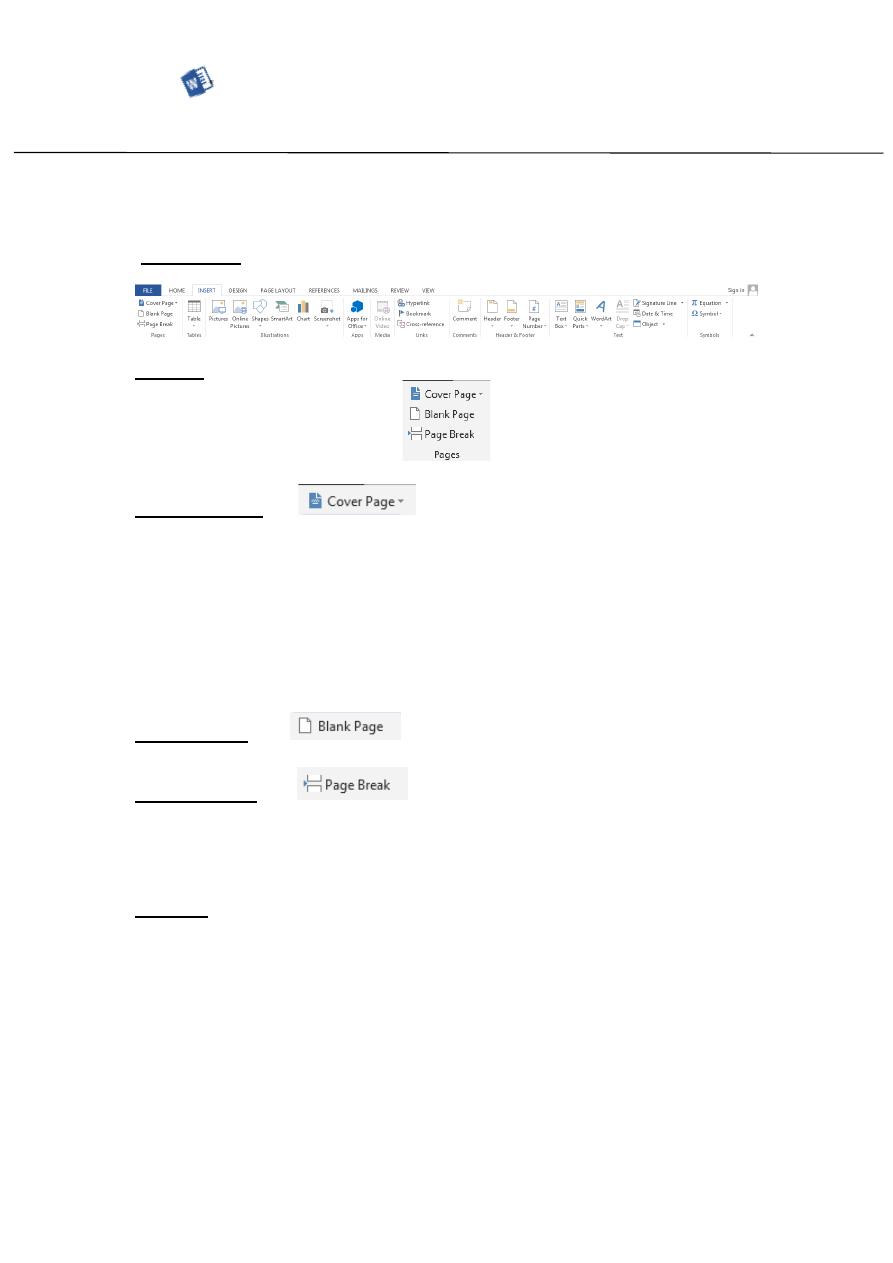
Insert Tab
Pages:
Cover Page:
Selecting Cover Page allows you to insert a formatted front page
into your document. Microsoft has a number of cover pages
available that you can use and more are available online. You can
design and include your own cover page by including a page in the
Building Blocks.
To remove an existing Cover Page from a document, use Cover
Page > Remove Current Cover Page.
Blank Page:
This will insert an additional blank page in a document.
Page Break:
Use this button to move text onto a different page or insert a page
break. Can also
be done using the keystrokes Ctrl + Enter.
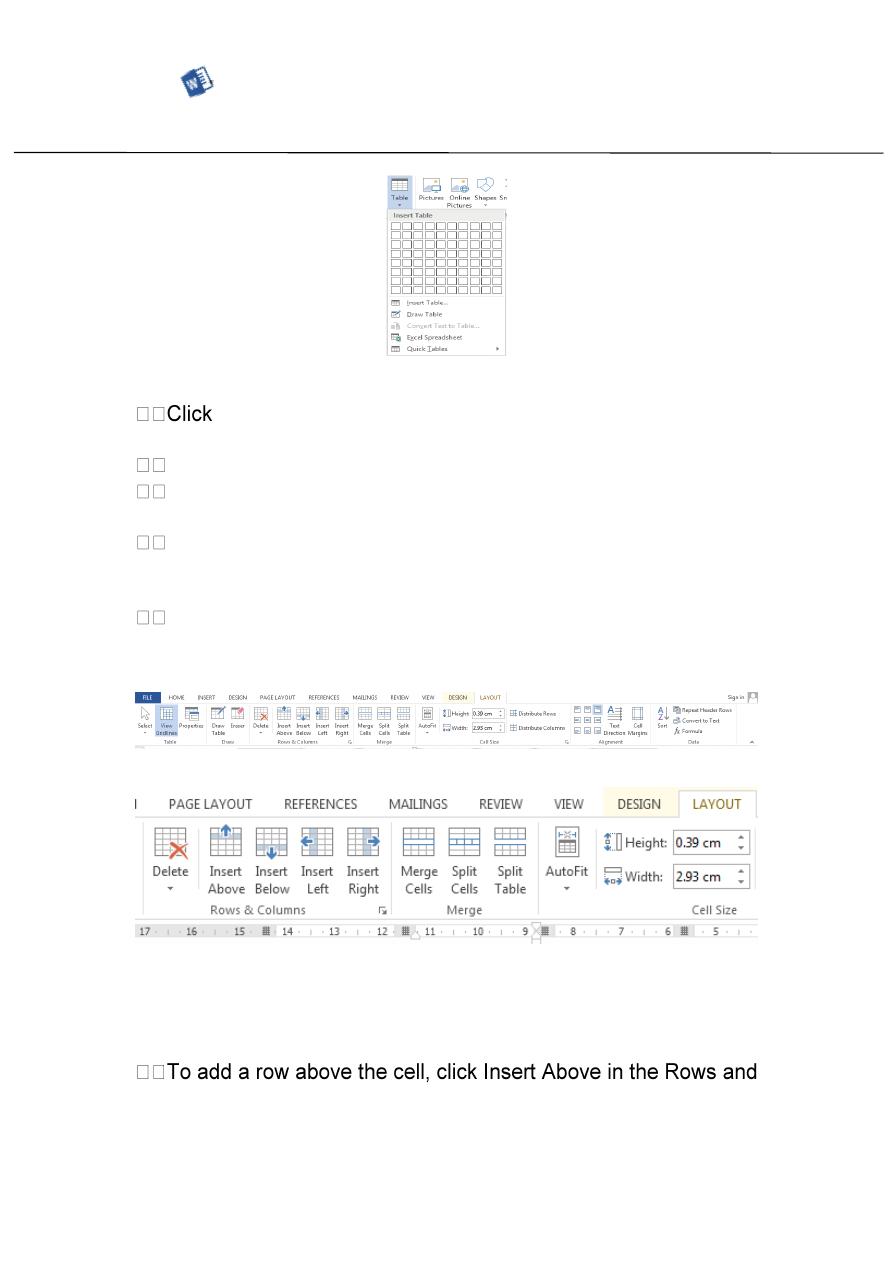
Tables:
This button allows a table to be inserted into the document in one
of five ways (click the drop down to get the options):
First stage – College of Medicine – University of Mosul / Nineveh
Computer Science/
Zina Abdul Salam Subhi
MS Word 2013
Manually highlight the numbers of cells required in the table
Insert Table
– select number of columns and rows
required in the table
Draw Table
– actually draw the rows and columns required
Convert Text to Table
– highlight text and reformat it as a
table
Excel Spreadsheet
– Insert a blank Excel spreadsheet which
can be completed in Excel (with formulae, functions etc.) but
included in the Word document
Quick Table
– select a preformatted table
Once the table is created in a document, two additional tabs will be
displayed
–Design and Layout.
Add a row above or below
1. Click in a cell above or below where you want to add a row.
2. Under Table Tools, on the Layout tab, do one of the following:
Columns group.
First stage – College of Medicine – University of Mosul / Nineveh
Computer Science/
Zina Abdul Salam Subhi
MS Word 2013
Columns group.
Add a column to the left or right
1. Click in a cell to the left or right of where you want to add a
column.
2. Under Table Tools, on the Layout
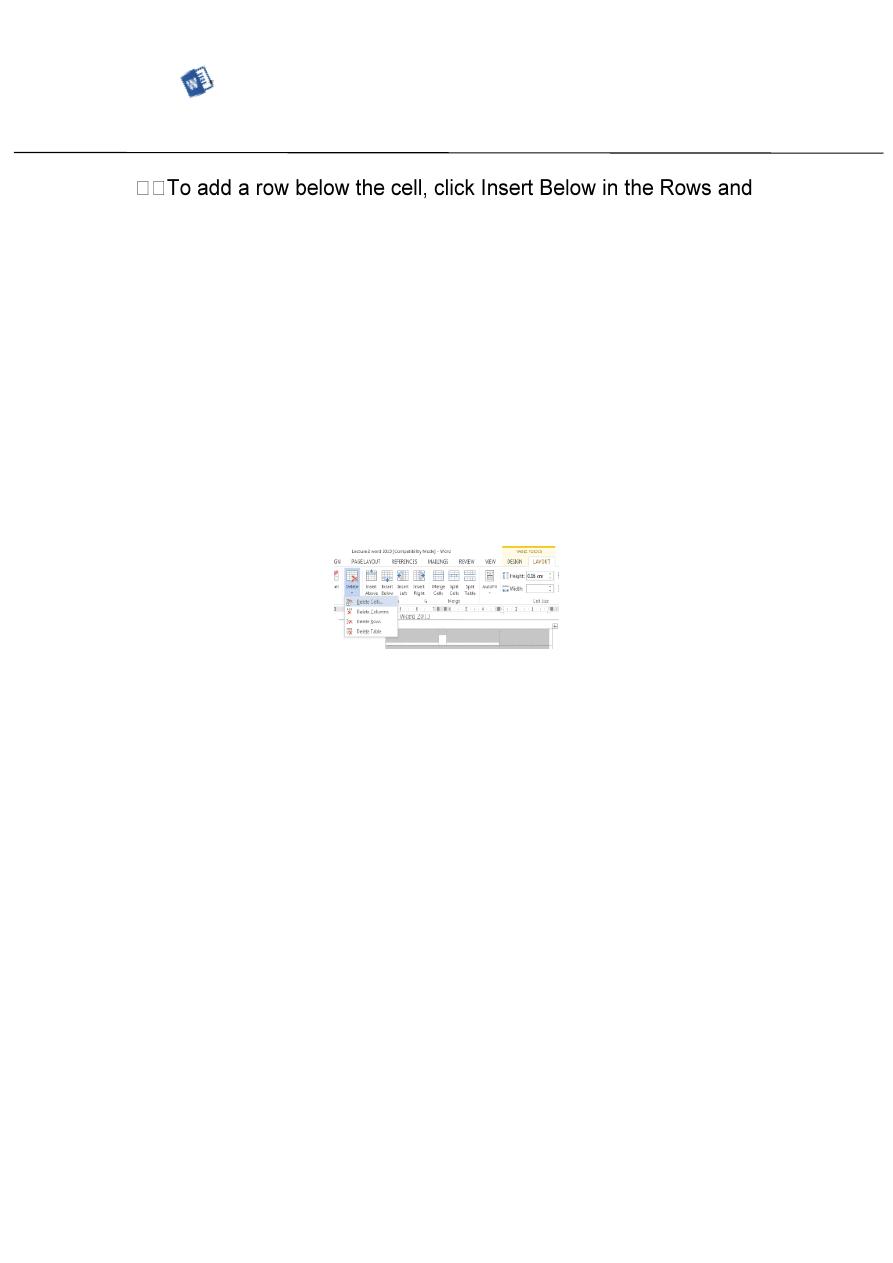
Delete a row from the table
1. Select the row that you want to delete by clicking its left edge.
2. Under Table Tools, click the Layout tab.
3. In the Rows & Columns group, click Delete, and then click
Delete Rows.
Delete a column from the table
1. Select the column that you want to delete by clicking its top
gridline or top border.
2. Under Table Tools, click the Layout tab.
3. In the Rows & Columns group, click Delete, and then click
Delete Columns.
Merge cells in the table
You can combine two or more table cells located in the same row
or column into a single cell. For example, you can merge several
cells horizontally to create a table heading that spans several
columns.
1. Select the cells that you want to merge by clicking the left edge
of a cell and then dragging across the other cells that you want.
2. Under Table Tools, on the Layout tab, in the Merge group, click
Merge
Cells.
Split cells in the table
Click in a cell, or select multiple cells that you want to split. .
First stage – College of Medicine – University of Mosul / Nineveh
Computer Science/
Zina Abdul Salam Subhi
MS Word 2013
1. Under Table Tools, on the Layout tab, in the Merge group, click
Split Cells.
2. Enter the number of columns or rows that you want to split the
Selected cells into.
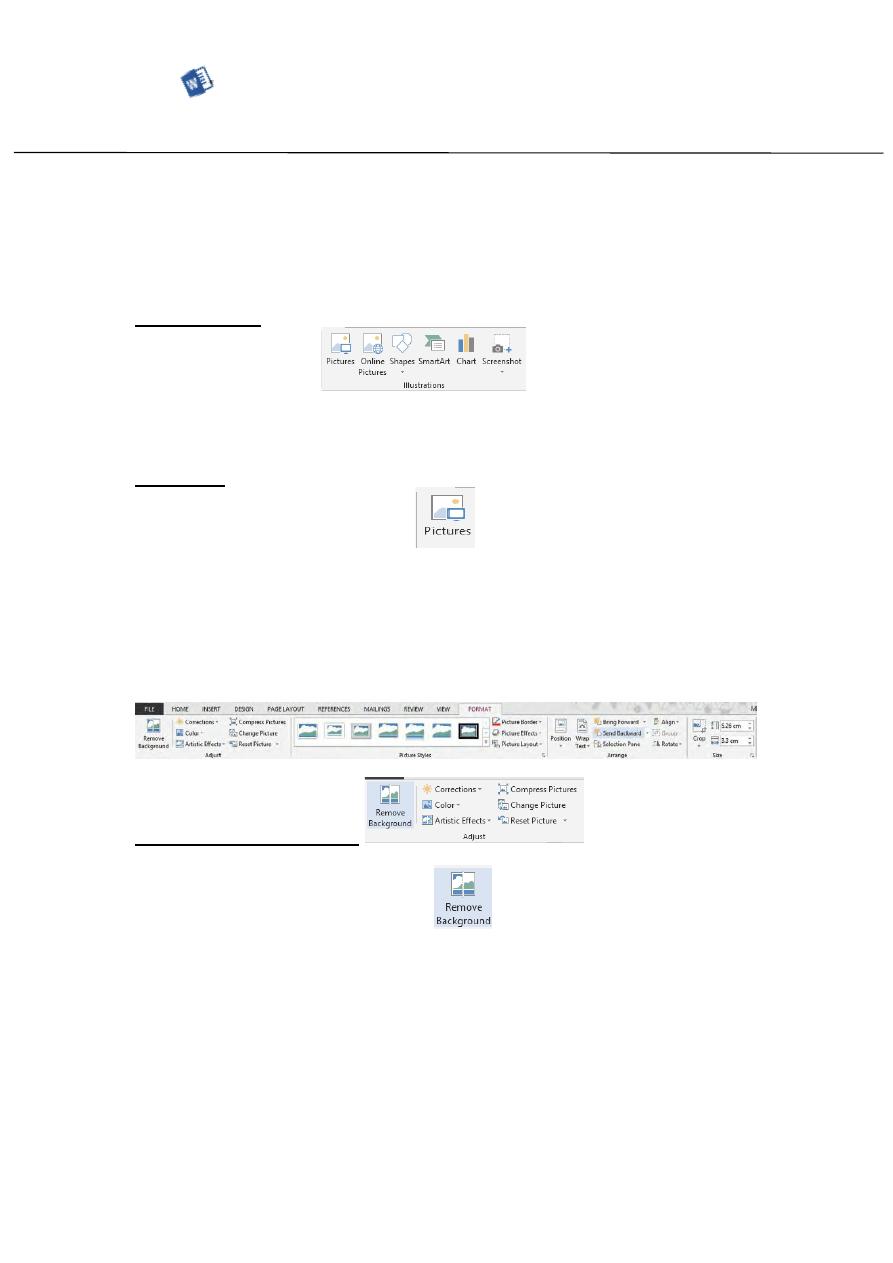
Illustrations:
When you insert pictures or other objects in Word 2013, the
pictures or objects are placed in the document aligned with the
text.
Pictures:
Pictures can be used that have already been stored on the hard
drive or they can be used directly from the camera or clip art can
be used. When you insert a picture, an icon is displayed next to
the picture to allow you to set the text wrapping for the picture.
When selecting or inserting a picture, an additional Tab is shown.
Adjust:
Remove Background:
Automaticaly remove unwanted portion of the picture.
First stage – College of Medicine – University of Mosul / Nineveh
Computer Science/
Zina Abdul Salam Subhi
MS Word 2013
First stage – College of Medicine – University of Mosul / Nineveh
Computer Science/
Zina Abdul Salam Subhi
MS Word 2013
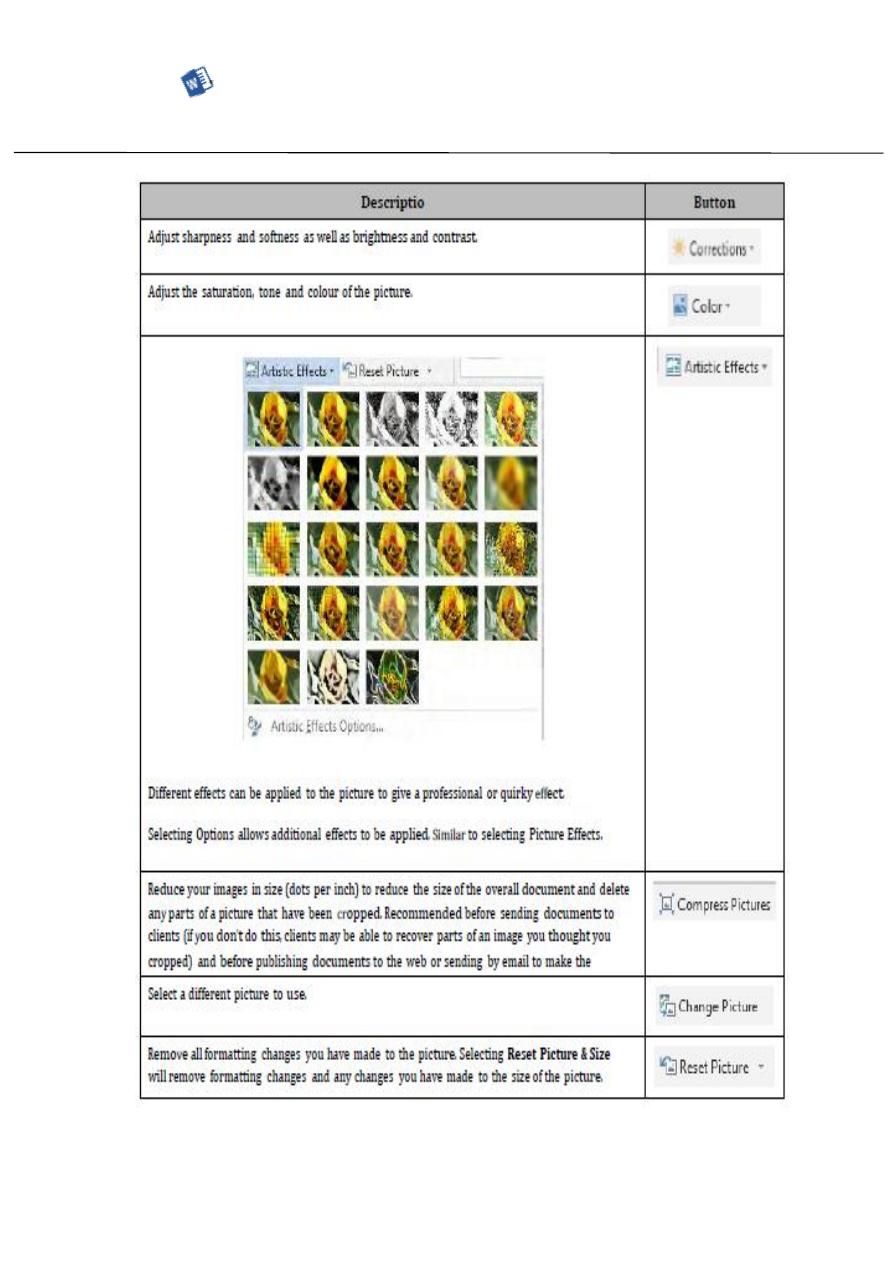
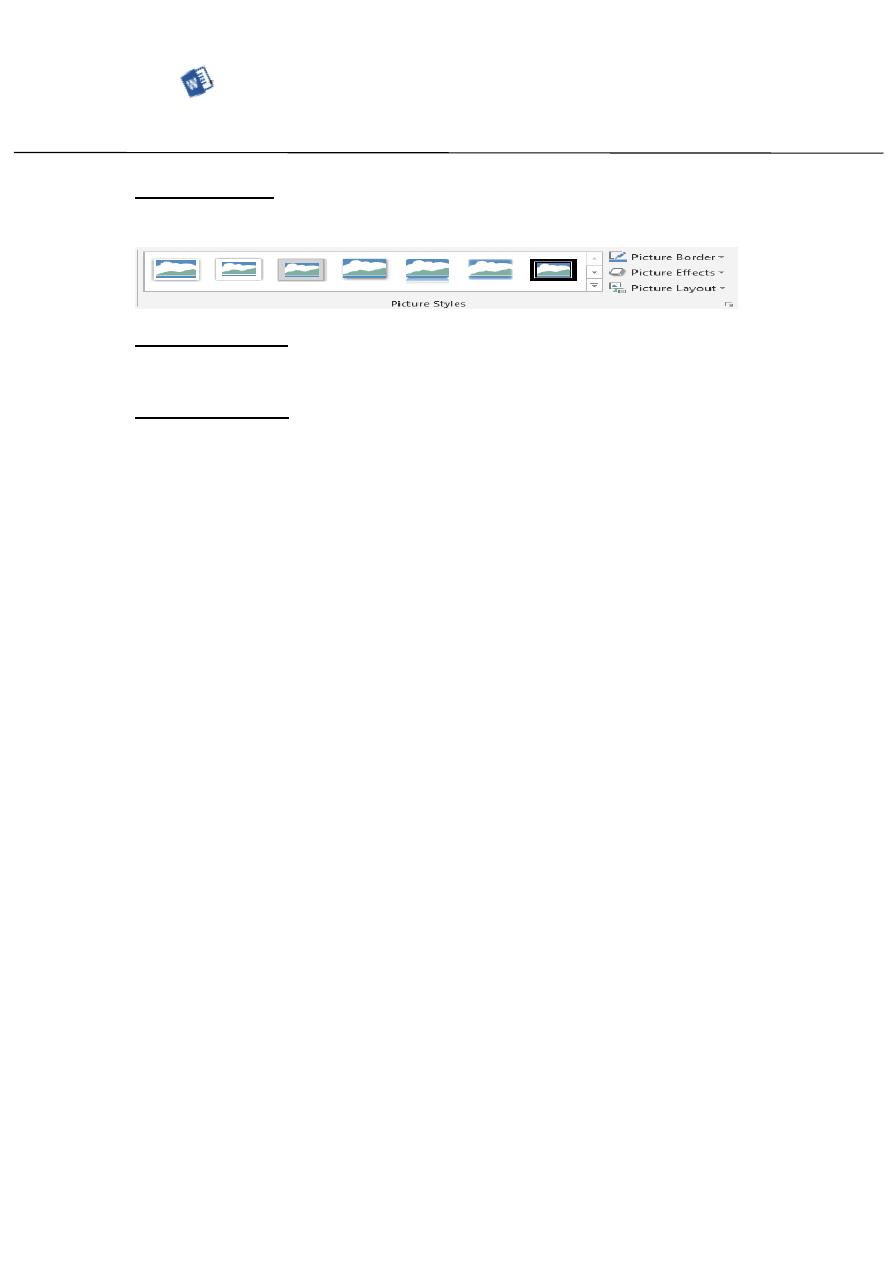
Picture Styles: Word has created a number of pre-set styles you
can apply to a picture. The styles most commonly used are listed
on the top but clicking the down arrow gives more styles:
Picture Border:
Select the type, color and width and line style for the outline of
your shape.
Picture Effects:
Add a number of effects to the picture including a shadow,
reflection, glow or 3D rotation. Each option has a number of
different versions of the effect you can add.
Picture Layout:
Converts the picture or pictures to a SmartArt graphic to allow
pictures to be formatted on the page with text. The SmartArt tabs
will then be displayed.