
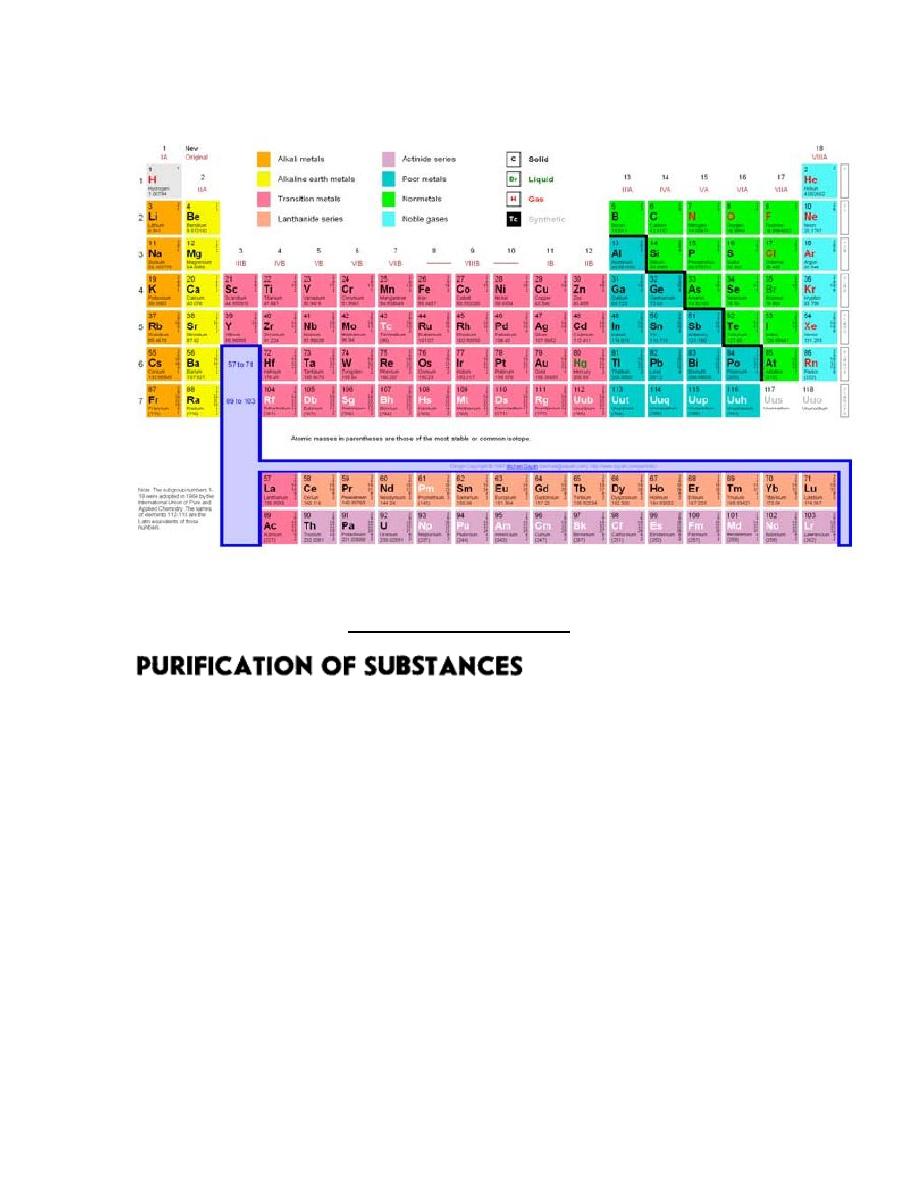
PRACTICAL MEDICAL CHEMISTRY
First Class
BY
Prof. Dr. Amer A. Taqa
Assistants
Lecturer, Dr. Ammar A. Q. Alhamdani
Lecturer Mayada M. A. Alnoaimi
2017-2018
MOSUL UNIVERSITY
College of Dentistry

1
PRACTICAL MEDICAL CHEMISTRY
Introduction to the laboratory
SAFETY PROCEDURES
1. Chemical laboratory is a very dangerous workshop. Never work in the
laboratory alone.
2. Do not eat, drink, or smoke in the laboratory. Most chemicals are poisonous.
Safety goggles will be worn in the laboratory any time there is laboratory
work in progress by any student.
3. Remember that your neighbor could have any accident even though you,
yourself, are not doing lab work. 4. If chemicals are spilled on the skin,
immediately flush the skin with running water and call for the laboratory
instructor. If chemicals are spilled on the clothes, remove them and flush the
skin with water.5. Never smell a reaction mixture directly. Minimise your
exposure to chemical vapours.
4. In order to avoid cuts and lacerations, protect your hands with a towel when
inserting either glass tubing or thermometers into stoppers or thermometer
adapters. Fire-polish all glass tubing and stirring rods so that there are no
sharp edges. Report any cuts to the lab instructor so that the injury may receive
proper attention.
5. Restrict long hair in such a manner that it does not interfere with your work,
become caught in the equipment, or catch fire. 8. Work with noxious chemicals
in the hood. When in doubt, work in the hood, including rinsing equipment used
in measuring such materials.
6. Absorb escaping noxious gases in water or the suitable medium, or conduct
the experiment in the hood.
7. Never heat an enclosed system. Never close completely an assembly from
which a gas is being evolved. Have any equipment assembly checked by a lab
instructor if this is the first time you have used the assembly.
8. Ordinary rubber stoppers are never used on flasks containing organic solvents.
Organic solvents attack rubber and cause contamination of your product.
2
9. Avoid fire. Most organic solvents are flammable. Play it safe and treat all
organic materials as though they are flammable.
10. NEVER heat an organic solvent over a Bunsen burner. Know the location of fire
extinguishers, bucket of sand, safety showers, and fire blankets.
11. Never attempt to extinguish an electrical fire with water. Use only
extinguishers designated for this purpose. Report any fire regardless of how
minor to the lab instructor. Report any burns to the lab instructor so that proper
treatment may be administered.
12. Avoid explosions. Never pour water into concentrated sulphuric acid. Always
add concentrated sulphuric acid slowly to water. Never mix a strong oxidising
agent with a strong reducing agent.
13. Never mix nitric acid with alcohol. Never heat a flask to dryness when distilling
or evaporating solvents. Small amounts of impurities that can be explosive will
be concentrated to dangerous levels.
Always know what your neighbours are doing, be prepared for any accident.

3
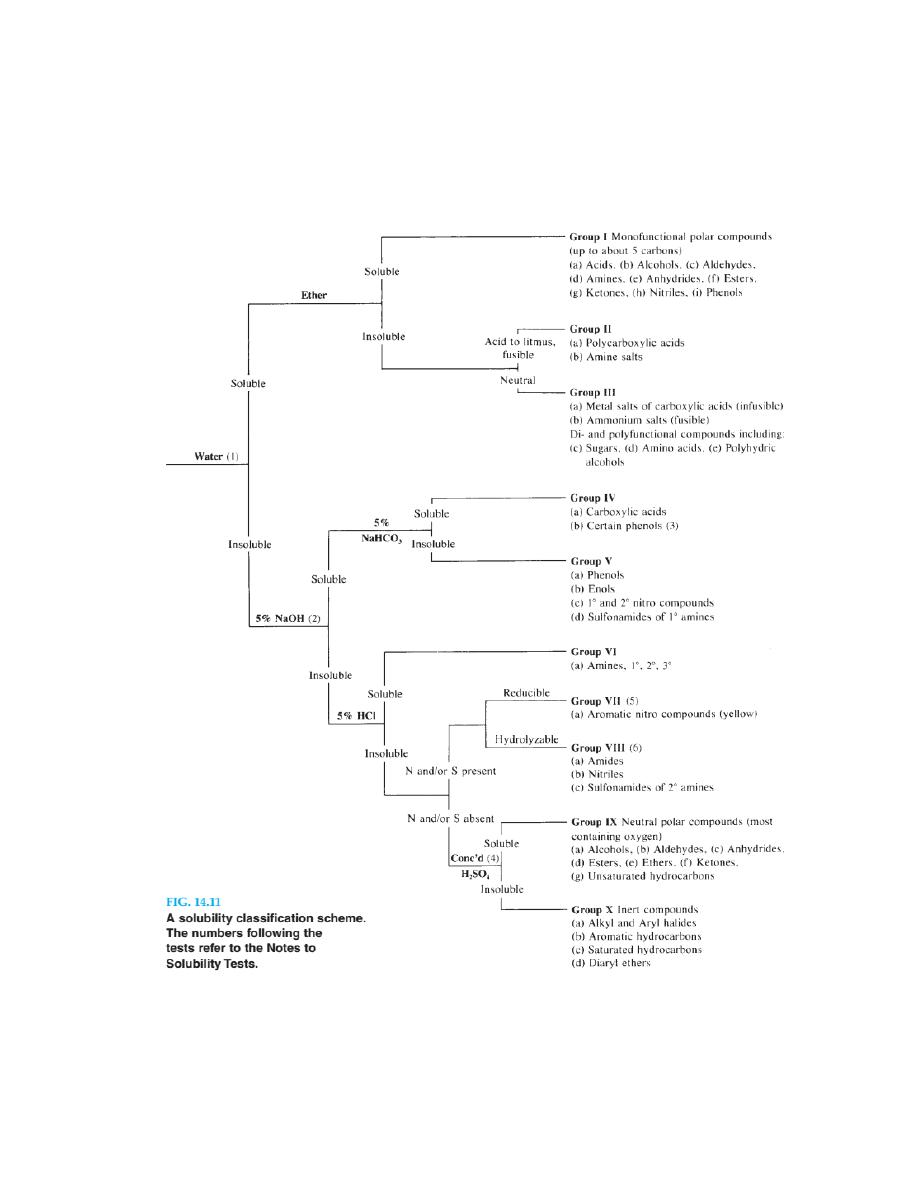
REAGENTS IN THE LABORATORY
Pure chemical reagents or solutions of chemical reagents are stored in labelled
bottles or dropping bottles in a convenient location in the laboratory. It is very
important to keep these reagents uncontaminated. Please obey the following rules
in using these reagents.
1. Read the labels carefully. Not only will the experiment be unsuccessful, but a
serious
accident
may
result
if
the
wrong
chemical
is
used.
2. Reagent bottles must be protected from contamination. You must therefore
never put spatulas, stirring rods, pipettes, or anything else into a reagent bottle.
Try to avoid taking a large excess of the reagent. However, if you should err
and take more than you need, do not return the excess to the bottle.
In other words, you only remove material from the reagent bottle, you
never put anything into it.
3. Never take the reagent bottles to the sink or to your desk. Put the bottles
back to the reagent shelf after using them.
4. Do not lay stoppers on the desk or shelf in such a way that they will become
contaminated. Depending on the shape of the stopper, either hold it while the
material is being removed or lay it on its flat top.
5. Glass stoppers that are stuck can generally be loosened by gently tapping
the stopper on the edge of the shelf.
6. The reagent area must be kept clean. Be sure that you clean up any chemicals
you spill.
7. If you empty a container, take it to be refilled, as directed by your instructor.
Do not return it to the reagent shelf empty.
8. Dispose the solid wastes in designated containers. Many kinds of liquid wastes
must be collected and handled separately. Ordinarily acids, bases, and most
inorganic
liquid
wastes
can
be
flushed
down the sink with copious amounts of cold water. Check the directions
for disposal of liquid wastes before using the sinks.
4
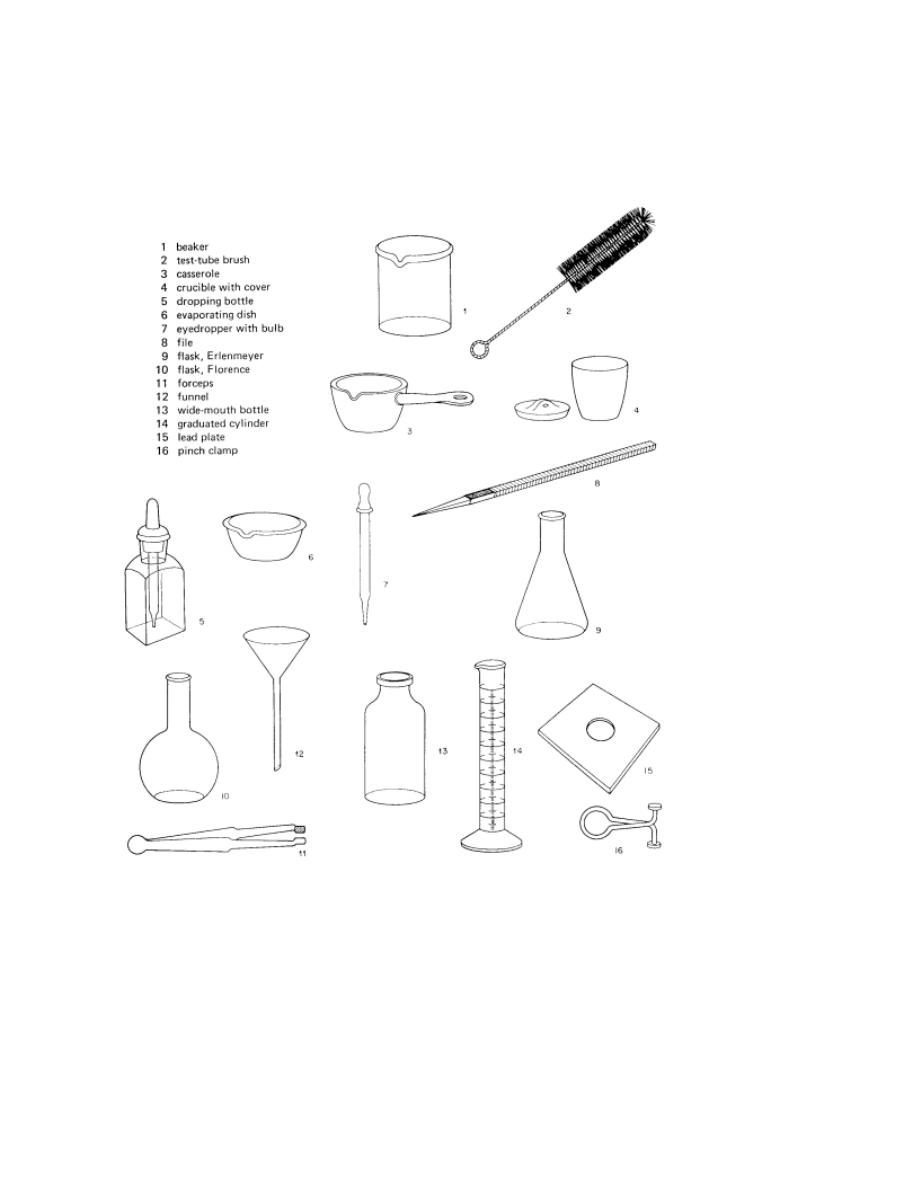
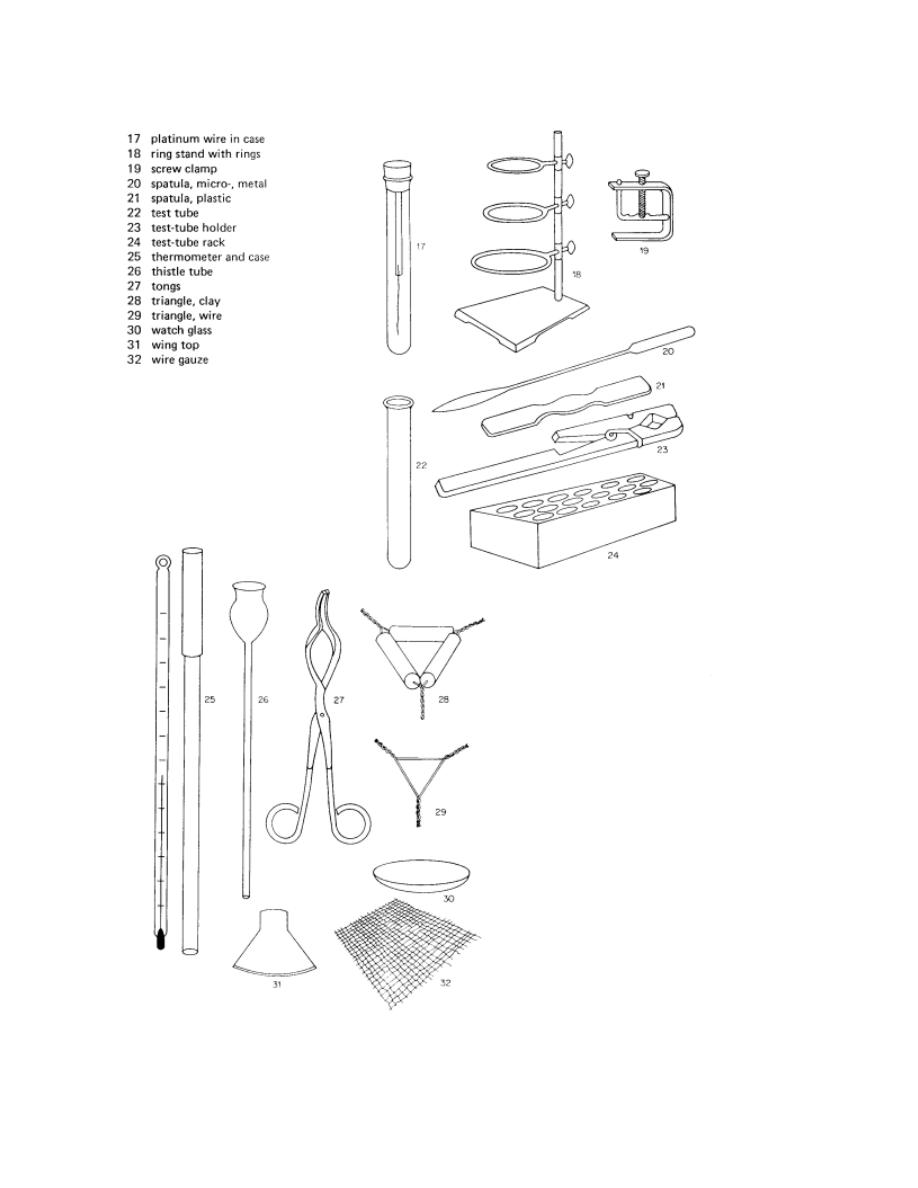
MOST COMMON LABORATORY EQUIPMENTS
5
6
EXPERIMENTAL ONE
RECRYSTALLIZATION
OBJECTIVE
1. To learn and apply the technique of recrystallization for the purification of a
crude or impure organic substance
.BACKGROUND
Recrystallization is the most convenient technique for purifying organic solids, if it
is feasible. It is based on the principles of solubility. In general, compounds
(solutes) are more soluble in hot liquids (solvents) than cold liquids. If a saturated
hot solution is allowed to cool, the solute is no longer soluble in the solvent and
forms crystals of pure compound which can be separated from the dissolved
impurities by filtration. Since the choice of solvent for recrystallization is often not
specified and is seldom obvious, testing by trial and error on a small scale is
generally required. Typically, a small amount (ca. 100 mg) of the substance to be

7
purified is placed in a small test tube and then 1 to 2 ml of the solvent to be tested
is added. If the solid dissolves cold, that solvent is obviously unsuitable. If the solid
mixture is largely insoluble in the cold solvent, the mixture is
warmed to its boiling point. If the material then dissolves, and reprecipitates on
cooling, the solvent is a good candidate for the recrystallization procedure.
Sublimation
Another possible complication in melting-point determinations occurs if the sample
sublimes. Sublimation is the change that occurs when a solid is transformed
directly to a gas, without passing through the liquid phase [see Technique 16]. If
the sample in the capillary tube sublimes, it can simply disappear as it is heated.
Many common substances sublime, for example, camphor and caffeine.
You can determine their melting points by sealing the open end of the capillary
tube in a Bunsen burner flame before it is placed in the melting-point apparatus.).
Decomposition
Some compounds decompose as they melt, a behavior usually indicated by a
change in color of the sample to dark red or brown. The melting point of such a
compound is reported in the literature with the letter d after the temperature. For
example, 186°C d means that the compound melts at 186°C with decomposition.
Sometimes decomposition occurs as a result of a reaction between the compound
and oxygen in the air. If this is the case, when the air is evacuated from the
capillary tube and the tube is sealed, the melting point can be determined without
decomposition. Place the sample in the capillary tube as directed earlier. Punch a
hole in a rubber septum, insert the closed end of the capillary tube through the
inside of the septum, then gently push most of the capillary through the septum. Fit
the septum over a piece of glass tubing that is connected to a vacuum line. Turn on
the vacuum source, and while heating the upper portion of the capillary tube in a
Bunsen burner flame, hold and pull on the sample end of the capillary tube until it
seals.
RECRYSTALLIZATION
A pure organic compound is one in which there are no detectable impurities.
Because experimental work requires an immense number of molecules
(Avogadro’s number per mole), it is not true that 100% of the molecules in a
“pure” compound are identical to one another. Seldom is a pure compound purer

8
than 99.99%. Even if it were that pure, one mole would still contain more than
1019 molecules of other compounds. Nevertheless, we want to work with
compounds that are as pure as possible, and recrystallization is one of the major
techniques for purifying solid compounds.
What Is Recrystallization?
When a crystalline material (solute) dissolves in a hot solvent and then returns to a
solid again by crystallizing (precipitating) in a cooled solvent, the process is called
recrystallization. Its success depends on the increasing solubility of the crystals in
hot solvent and their decreasing solubility when the solution cools, thereby causing
the compound to recrystallize. Impurities in the original crystalline material are
usually present at a lower concentration than in the substance being purified. Thus,
as the mixture cools, the impurities tend to remain in solution while the highly
concentrated product crystallizes.
MELTING POINTS AND MELTING RANGES
Molecules in a crystal are arranged in a regular pattern. Melting occurs when the
fixed array of molecules in the crystalline solid rearranges to the more random,
freely moving liquid state. The transition from solid to liquid requires energy in the
form of heat to break down the crystal lattice. The temperature at which this
transition occurs is the solid’s melting point, an important physical property of any
solid compound. The melting point of a compound is useful in establishing its
identity and as a criterion of its purity.
Until the advent of modern chromatography and spectroscopy, the melting point
was the primary index of purity for an organic solid. Melting points are still used as
a preliminary indication of purity.
9
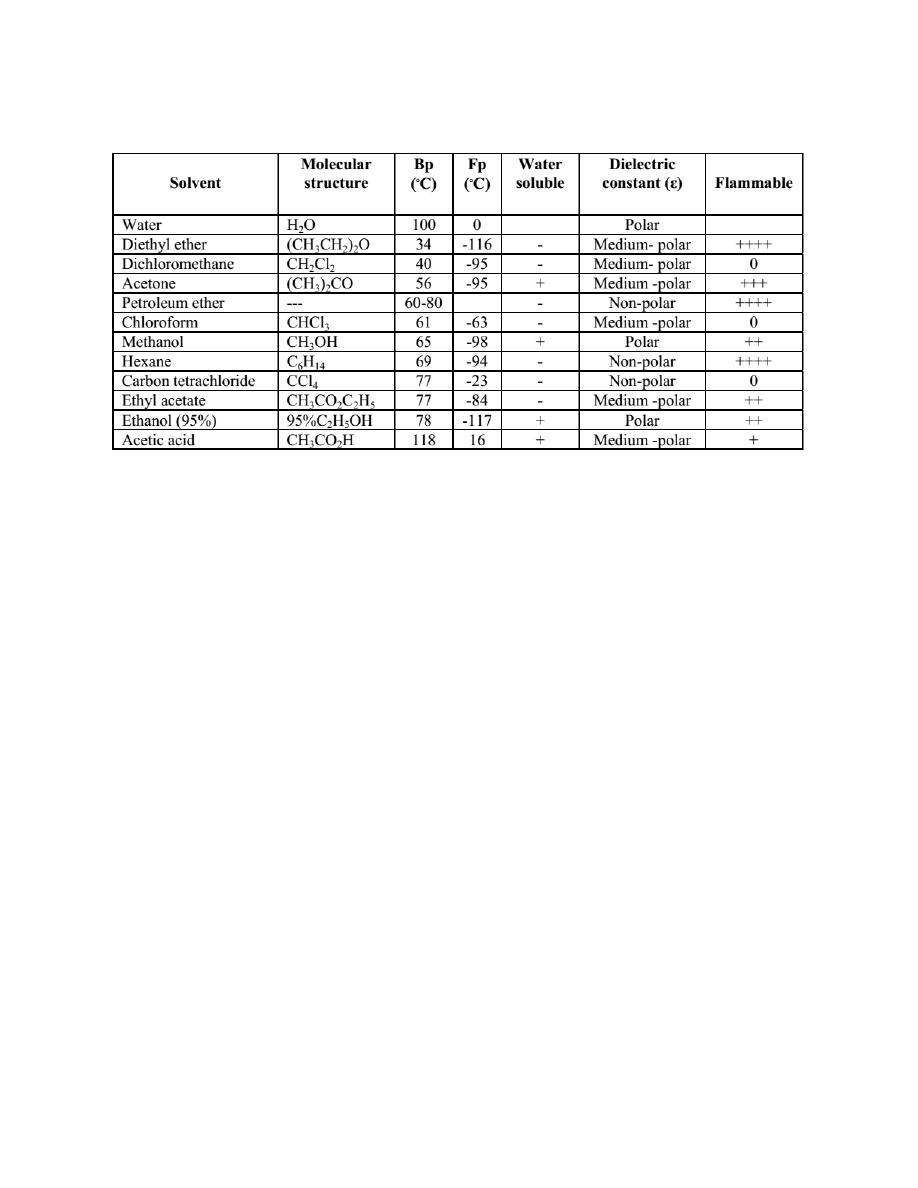
Common solvents for crystallization
Sometimes no single solvent is suitable and two miscible solvents can be combined
to produce a suitable solvent. In this experiment, solvent selection for
crystallization of known compounds will be performed. Then an unknown sample
will be purified by crystallization
Solvent selection
1. Place each of 10 finely crushed known samples, the size of half a grain of rice, in
6 test tubes.
2. Add 5 drops of water, 95% ethanol, ethyl acetate, acetone, toluene and hexane to
test tubes No.1- 6, respectively. Swirl the content in each tube and note whether the
sample is soluble in the solvent at room temperature. Observe and record the
observations.
3. Warm the test tubes containing insoluble sample in the conical well of the heat
dissipation block on hot plate. Swirl the content in each tube and note whether the
sample is soluble in hot solvents. Observe and record the observations.
: Be careful not to leave the solution heating without attention.
4. Let the solution cool and observe the crystals form.
5. Record each solvent tested and indicate which of the six solvents is the best
solvent suited for crystallization of each known sample.

10
6. Select the suitable solvent for recrystallization of an unknown sample, according
to the above procedures. Record the observations and the most suitable solvent for
recrystallization.
Recrystallization of an unknown sample
7. Place 100 mg (accurately weigh) of the unknown sample for crystallization into
5-mL conical bottom flask. Add 1 mL of the suited solvent.
8. Heat the mixture to a gentle boiling and often swirl the solution until the solid is
all dissolved. : Be careful not to allow bumping which will cause a possible loss
of material from the flask.: If necessary, add 10 mg of activated carbon and
reheat boiling for a few minutes to decolorize the solution.Note the solution cool
down slightly before adding the activated carbon.
9. If the solid does not dissolve completely, add a few portions of 0.1 mL solvent
and continue heating.
10. Observe at every addition whether any more solid dissolves. If not, it may be
due to impurities. Filter the hot solution through a Pasteur filtering pipette to
remove insoluble impurities or activated carbon. : If no activated carbon has been
added or no undissolved particles are in the solution,this step should be omitted.
11. Put the stopper on the flask. Allow the filtrate cool down. After the solution has
come to room temperature, carefully set in an ice-water bath to complete the
crystallization process.: Do not disturb the solution. Slow cooling gives the best
crystals.
12. In case of mixed-solvent crystallization, reheat the solution to boiling and add
the first solvent dropwise until the boiling solution remains cloudy or precipitate
forms.
Then add a drop of second solvent to restore the clear solution. Remove the flask
from the heat, put the stopper on the flask. Allow the solution to cool to room
temperature.
: If no crystallization occurs after the solution has cooled, it indicates either too
much
solvent has been used or that the solution is supersaturated. The crystallization
can be induced by adding a crystal of the original solid in a supersaturated
solution. If no solid is available and a volatile solvent is being used, immerse the
tip of a glass rod or metal spatula in the solution for a few seconds. The crystals
11
that form at the end of the rod or spatula are then added into the solution to
initiate crystallization.
13.Rinse the crystals with a small portion of cool solvent, and continue suction to
air dry.
14. Weigh the crystal and calculate percent recovery. Determine the melting point
and
record.
Use of Freezing Mixtures in Crystallization.—It often happens that substances
which do not separate from their hot solutions when the latter are cooled with
water, crystallize out well when the solutions are allowed to stand for some time in
a freezing mixture. For this purpose, a mixture consisting of equal weights of
sodium chloride and finely divided ice or snow, is commonly used; with snow, a
temperature of -17° is obtained.

12
A mixture of equal weights of crystallized calcium chloride and snow gives the
temperature -48°. A convenient freezing mixture is made by covering finely
divided ice with commercial concentrated hydrochloric acid.
MIXTURES AND COMPOUNDS
WE now proceed to the more purely chemical parts of our study, and must first try
to form clear ideas as to what is meant by a chemical compound and how we
distinguish it from a mixture. Mix together about equal quantities of sugar and sand
: taste a little of the mixture how are the properties of the mixture related to those of
the ingredients ? (a) How can you separate the sugar from the sand ? can you pick
out any bits of sugar or sand with your fingers ? Rub some of the mixture in a
mortar can you separate the sugar and sand now? (b) Put what you have powdered
in the mortar into a beaker, add water and stir well or heat on the sand-bath; what
happens? How can you separate the solution of sugar from the insoluble sand?
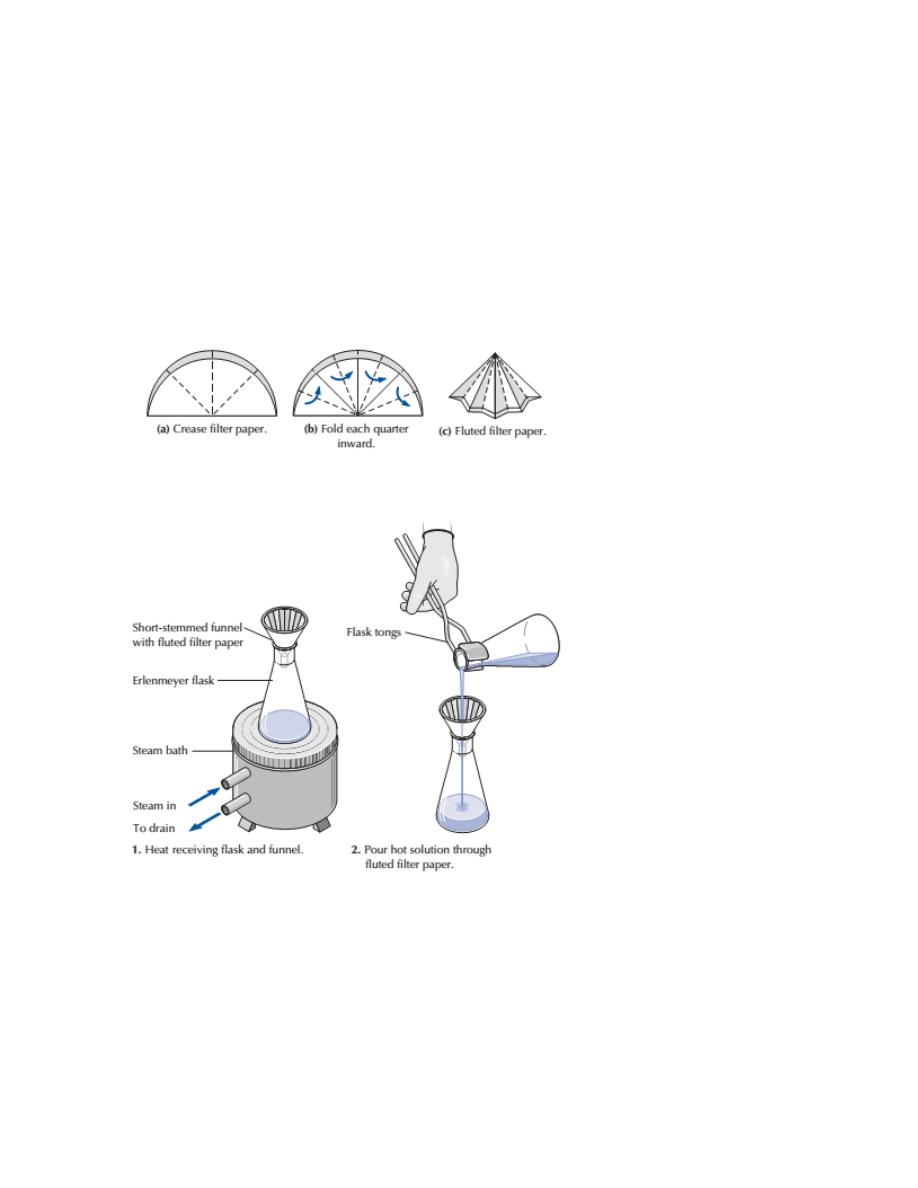
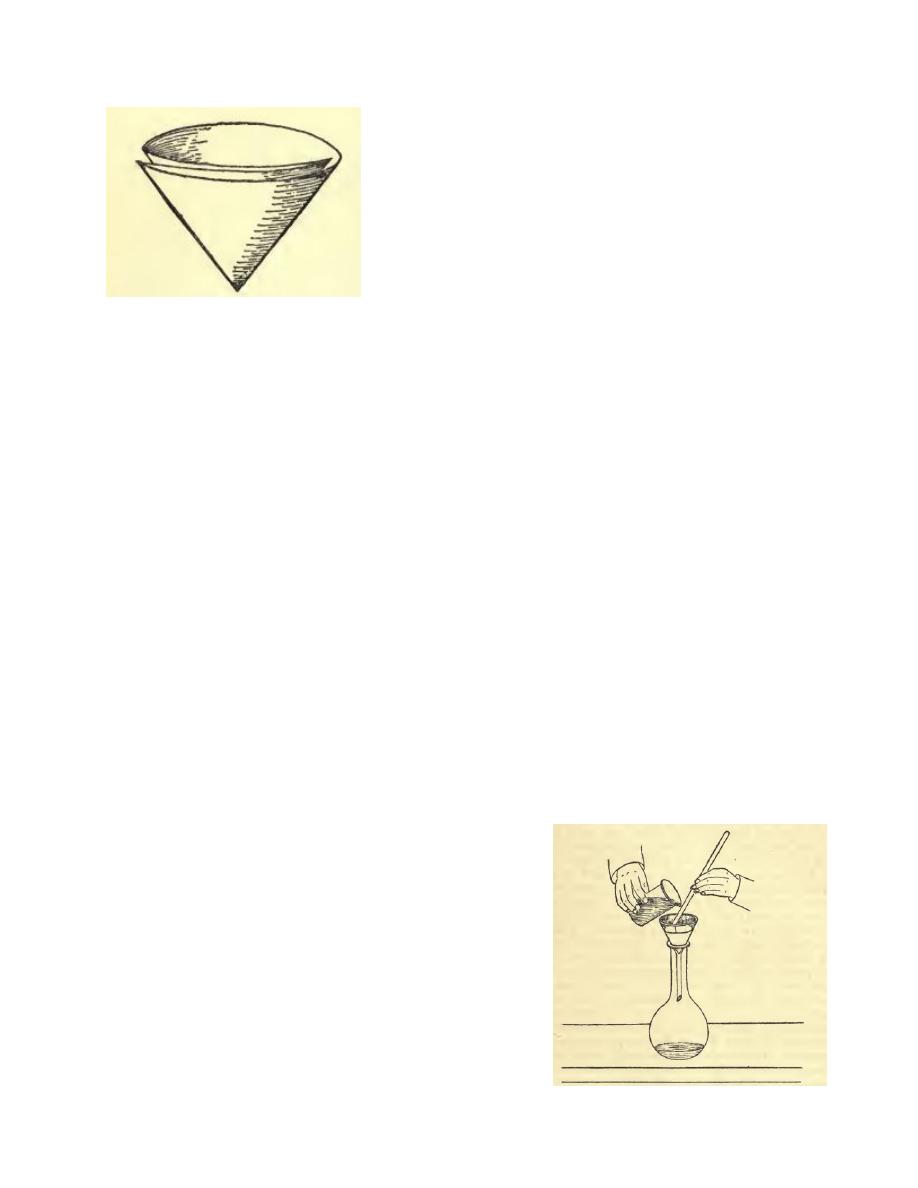
Take a piece of filter paper, fold it as shown in Fig. I 5, then put it in a funnel and
fit the paper carefully to the sides of the funnel ; place the funnel in the mouth of a
flask and now pour the contents of the beaker into the FIG. 15. Folded Filter Paper,
funnel, taking care not to let the liquid fill the funnel up to the top of the filter
paper. What is the result? (c) Mix some salt and chalk: taste a little; how do the
properties of the mixture compare with those of the ingredients? Separate them in
the same way as before; is the separation complete? Try this by taking a weighed
quantity of salt and
13
of chalk (both should be dry), mixing, and then separating as before
; dry the funnel with the chalk and filter paper in a steam-oven, then weigh the
chalk and the filter paper (but without the funnel), putting an equal piece of filter
paper in the other pan of the balance so as to get the weight of the chalk itself. To
find the weight of the salt, take a weighed evaporating dish, put the solution of salt
into it (or if there is too much, .Filtering. much liquid put in only part at first and
afterwards add more) and evaporate it to dryness on the sand-bath. Let the dish cool
and weigh it with the salt. How does the weight of salt obtained compare with the
amount used?
(d) Mix some fine iron-filings with about twice the weight of flour of sulphur:
examine the properties of the mixture; is it attracted by a magnet like iron, and
will it burn like sulphur? Try to separate the iron and sulphur again (i) by the
magnet,(2) by shaking with water. You find that neither the iron nor the sulphur
will dissolve in the water, but other liquids could be used to separate the sulphur by
dissolving it, just as the salt and sugar were separated by solution in water; such a
liquid is carbon disulphite, but its use by a class is dangerous and objectionable on
account of its inflammability and bad smell. (e) Put a little of the dry mixture of salt
and chalk in a test tube and heat it for a few minutes in the flame of your burner ;
let it cool, then shake out the contents and examine them to see whether any change
has occurred.
14
EXPERIMENTAL TWO
Distillation.
You have seen in several of the preceding experiments that when a solution of a
solid in water is evaporated, the solid is left behind: we have also found that the
steam given off carries none of the solid with it, for in Exercise. (c) the amount of
salt left was equal in weight to that used. It is plain that by condensing the steam

15
given off we shall get water free from the solid impurities dissolved in it, provided
they behave like salt and do not evaporate along with the steam.
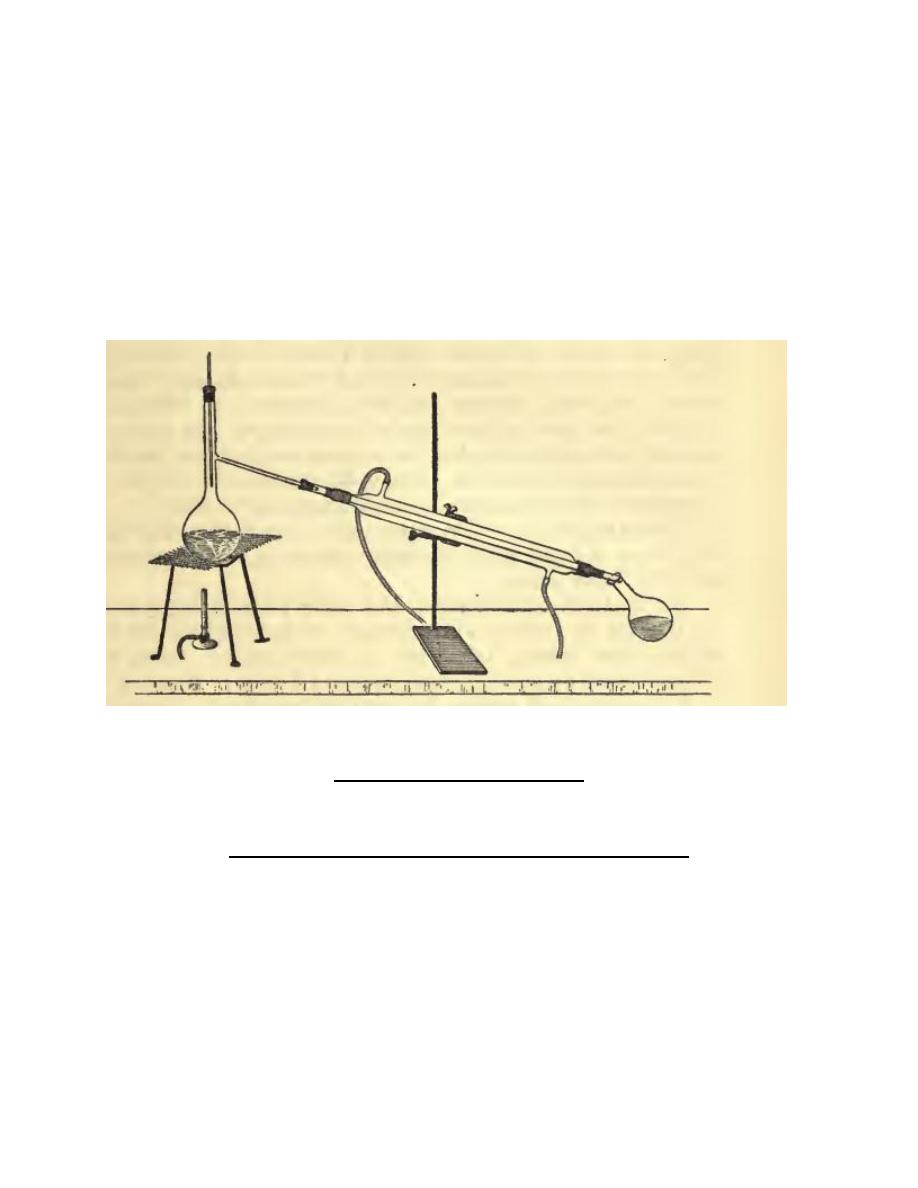
(a) Fit a 600 cc. flask with a good cork and a bent piece of fairly wide glass tubing
; it is best to have the end of the tube which is inside the flask ground aslant ; the
tubing should be chosen of such a size as to go readily, but with not much to spare,
into the inner tube of a Liebig's condenser, and the joint can then easily be made
sufficiently airtight by means of a strip of clean glazed paper wrapped round the
smaller tube ;fill the flask about half full of water, and add a few crystals of
potassium permanganate, which will colour the water intensely purple. Heat the
flask on wire gauze or a sand-bath ; connect the lower side-tube of the condenser
with the tap, and the upper side-tube to the sink : turn on the tap gently until the
outer jacket of the condenser is full and water issues steadily from the waste tube.
Collect the condensed water in a flask or beaker. Test this water does it contain any
of the potassium permanganate ? (b) Repeat the experiment, using water to which
some strong ammonia solution has been added in place of water coloured with
potassium permanganate. Collect the distillate in several portions and test each of
them by smell for the presence of ammonia : if a more sensitive test than the sense
of smell is wanted, you may use paper coloured red with litmus, which you will
find on trial is turned blue by ammonia.
Fractional Distillation.
This last experiment will have shown that it is sometimes difficult to purify water
by distillation from a volatile impurity ; the separation can, however, generally be
effected more or less completely in such a case by the process known as fractional
distillation .
Mix equal volumes of water and methylated spirit, and put the mixture in a 200 cc.
distillation flask of the kind shown in Fig. 33. In the neck of the flask fit a cork,
through which passes a thermometer whose bulb should be FIG.
Fractional Distillation.
just below the opening of the side tube ; a cork will be needed to connect this side
tube with the condenser. Heat the flask on wire gauze, and collect the distillate in
two approximately equal portions; test these by trying whether a little of each will
burn, also by taking their specific gravities with a hydrometer. Which contains
more alcohol? Empty the distillation flask, then pour back into it the first half A of
the distillate: distil until half of A has been collected, and test this by taking its
16
specific gravity. Compare the numbers obtained with the specific gravity of the
methylated spirit itself. What do you find ? Notice also the temperatures indicated
by the thermometer throughout the distillation. What do you conclude as to the
boiling point of methylated spirit ? Then try the next experiment.
Empty the distillation flask, and pour in some undiluted methylated spirit ; heat
this to boiling and notice carefully the temperature indicated by the thermometer
during the distillation. Has methylated spirit a constant boiling point ? If not, you
may conclude that it is not a single substance, but a mixture of two or more.
EXPERIMENTAL THREE
Physical and Chemical Properties of Hydrocarbons
CHEMISTRY OF HYDROCARBON
Background:
In this experiment you will observe the solubility (a physical property) and
the chemical reactivity of three different groups of hydrocarbons: alkanes, alkenes
and aromatic compounds.

17
Hydrocarbons are organic compounds that contain only carbon and
hydrogen. They are extremely important to our society because so many products
are derived from them: fuels, fabrics, plastics, antifreezes, anesthetics, insecticides,
to name a few. The major source of aliphatic hydrocarbons is petroleum, an
extremely complex mixture of compounds. Each of us, on the average, uses
several tons of petroleum each year (directly or indirectly), mostly for fuel.
Aromatic hydrocarbons are mainly obtained from coal, although small amounts are
also obtained from petroleum.
The solubility of a substance (the solute) in a solvent is the most important
chemical principle underlying three major techniques you will study in the organic
chemistry laboratory: crystallization, extraction, and chromatography. Solubility
can generally be predicted based on the “like dissolves like” rule. This means that
polar compounds dissolve in polar solvents and nonpolar compounds dissolve in
nonpolar solvents. This rule works because solubility is based on intermolecular
forces, and these forces can occur between molecules of the same compound, or
between molecules of different compounds. So, compounds with similar
intermolecular forces will form solutions. Recall that polar compounds have
dipole-dipole interactions, while nonpolar compounds have dispersion forces,
which are much weaker. When discussing a liquid being mixed with another liquid
(as in this experiment), it is sometimes more appropriate to say that the compound
and the solvent are miscible. Likewise, if the liquid organic compound is insoluble
in the solvent, then they are immiscible. You will test the solubility of the three
types of hydrocarbons in water and in dichloromethane.
Each of the three classes of hydrocarbons has different chemical reactivity.
Alkanes are relatively unreactive because they have strong, nonpolar covalent
bonds. Also, since they are already completely saturated, they can’t undergo
addition reactions. Aromatic hydrocarbons are also relatively unreactive, but for a
different reason. They have a special stability due to resonance (their pi electrons
are completely delocalized). Aromatic compounds do not undergo addition
reactions, because they would lose this special stability. Alkenes, however, are
much more reactive than the other two classes. They have electron-rich double
bonds (their pi electrons are not completely delocalized, even in conjugated
alkenes) that allow them to easily undergo addition reactions.
EQUIPMENT AND CHEMICALS
BJECTIVE The objective of this experiment is to distinguish the difference
between various types of hydrocarbons by performing simple tests and reactions
involving hydrocarbons.
18
- DISCUSSION Organic chemistry is the study of compounds containing
carbon (excluding CO2, CO, carbonates, elemental carbons, and others). The
two primary sources of organic compounds are oil and coal. Other sources of
organic compounds are plants, animals, and microorganisms. Hydrocarbons
are organic compounds that contain only carbon and hydrogen. There are
various classifications of hydrocarbons. To study the chemical and physical
properties of hydrocarbons.
In this experiment you will test the reactivity of the three types of
hydrocarbons with bromine, and with potassium permanganate. These are two
common classification tests for hydrocarbons. Bromine only reacts with alkanes or
aromatic hydrocarbons under special conditions. However, bromine reacts readily,
and rapidly, with alkenes to produce dibromoalkanes. A successful reaction is
indicated when the reddish-brown bromine is used up and colorless products are
formed (see below). Potassium permanganate is an oxidizing agent that can react
with alkenes to form diols, but does not react with alkanes or with aromatic rings.
It can react with alkyl substituents on aromatic rings, but only under very vigorous
conditions (high temperature etc.) A successful reaction will produce a brown
precipitate (MnO
2
), and the purple color of the potassium permanganate will
disappear (see below).
Hydrocarbons can be further divided into saturated hydrocarbons that have only
single carbon-carbon bonds (alkanes), and unsaturated hydrocarbons that have
multiple carbon-carbon bonds (alkenes, alkynes, aromatics). Most of the aliphatic
compounds are named based on the first ten alkanes (Table 14-1). As a rule,
hydrocarbons with names ending in -ANE are alkanes, -ENE are alkenes, and -
YNE are alkynes.

19
PROCEDURE
PART A - SOLUBILITY OF HYDROCARBONS The solubility of pentene,
toluene, heptane, and an unknown will be tested in various solvents. 1. Put 5 ml of
water (a polar solvent) into four different small test tubes. Label each test tube as
pentene, toluene, heptane, or unknown. 2. Add 1 ml of each hydrocarbon to their
respective test tubes. Stopper and shake. 3. The absence of two distinct liquid
layers indicates solubility (a cloudy appearance indicates insolubility). Record your
observations on the Report Sheet. 4. Add 5 ml of ligroin (non-polar solvent made
of saturated hydrocarbons) to four additional small test tubes. 5. Add 1 ml of each
hydrocarbon to its respective test tube. Stopper and shake. Record your
observations on the Report Sheet. 6. Remember the old saying - like dissolves like.
PART B - FLAMMABILITY OF HYDROCARBONS The combustion of the
heptane, pentene, toluene, and an unknown with oxygen will be observed. 1. Place
1 ml of heptane in an evaporating dish and ignite with a burning wood splint.
Record your observations on the Report Sheet. 2. Place 1 ml of pentene in an
evaporating dish and ignite. record your observations on the Report Sheet. 3. Place
1 ml of toluene in an evaporating dish and ignite. Record your observations on the
Report Sheet. 4. Place 1 ml of unknown in an evaporating dish and ignite. Record
your observations on the Report Sheet.
PART C - REACTION OF HYDROCARBONS WITH BROMINE The
reaction of pentene, heptane, toluene, and an unknown with bromine will be
observed. Bromine is brownish and the disappearance of the brown from a reaction
mixture indicates a reaction is taking place (positive test). 1. Clean and dry four
small tubes. 2. Place 1 ml of pentene in the first test tube, 1 ml heptane in the
second test tube, 1 ml of toluene in the third test tube, and 1 ml of the unknown in
the fourth test tube. 3. Carry out this next step in a fume hood. 4. Add 4 drops of
5% bromine in CCl4 to each test tube and gently swirl the contents of the tubes. 5.
Every 30 seconds place a piece of moistened blue litmus paper to the lip of each
test tube and blow gently into the test tube. If the blue changes to red, it indicates
the presence of HBr being given off in the reaction. Report your results on the
Report Sheet. 6. Observe any colour changes and the speed of the changes for five
minutes.
Record
these
observations
on
your
Report
Sheet.
PART D - REACTION OF HYDROCARBONS WITH POTASSIUM
PERMANAGANATE Potassium permanganate (KMO4) is an oxidizer. KMO4 is
a purple coloured compound. If the KMnO4 reacts with the hydrocarbon, a brown
colour will be observed (MnO2). This is known as the Baeyer Test for unsaturation.
1. Place 1 ml of each of the hydrocarbons (heptane, pentene, toluene, and the
unknown) into separate clean and dry small test tubes. 2. Add 3 drops of 1%
20
aqueous KMnO4 to each test tube, swirl gently, and let stand. 3. Record your
observations on the Report Sheet.
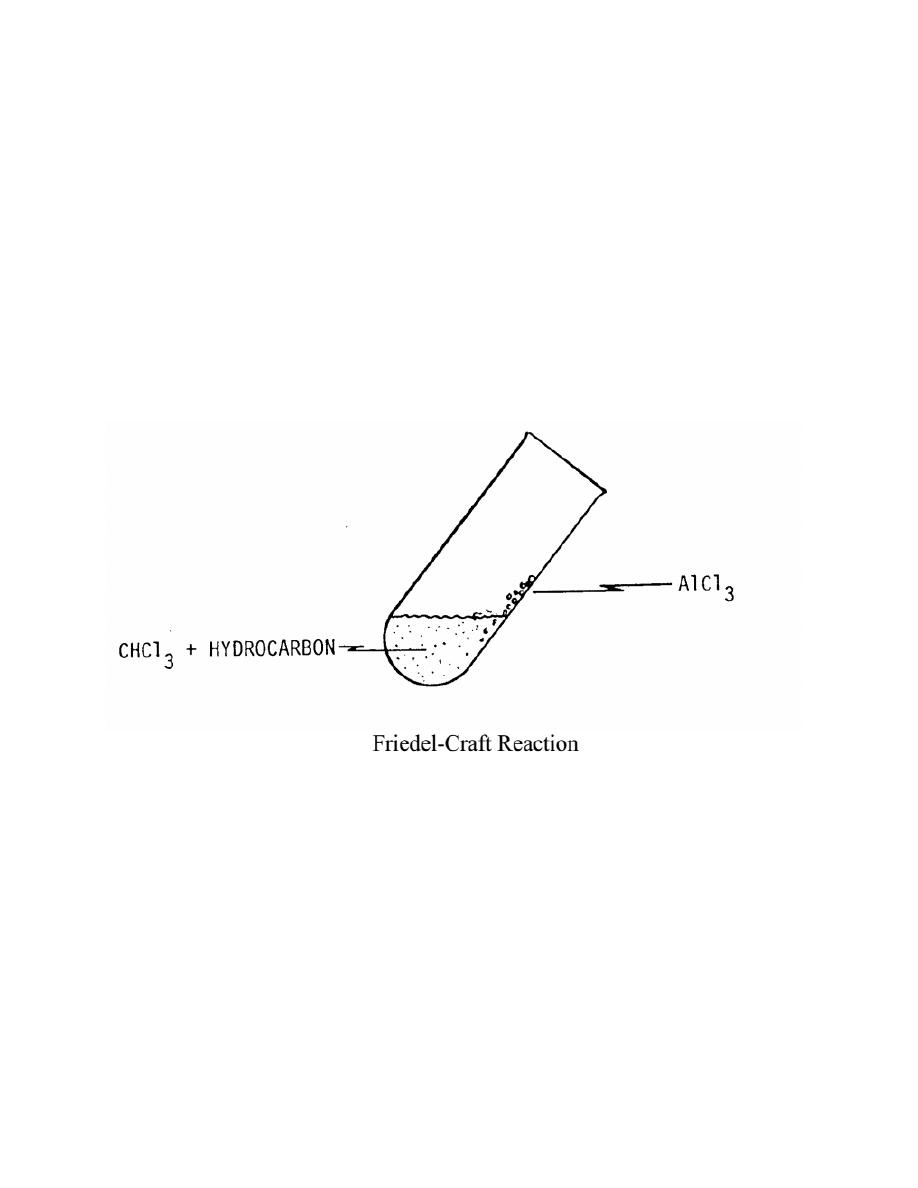
PART E - REACTION OF HYDROCARBONS WITH ALUMINUM
CHLORIDE The reaction of aromatic hydrocarbons with aluminum chloride
(AlCl3) and chloroform (CHCl3) to produce a brightly coloured compound is
known as a Friedel-Crafts reaction. 1. Place 2 ml of CHCl3 into four separate clean
and dry small test tubes. 2. Add two drops of pentene to one test tube, two drops of
heptane to the second test tube, two drops of toluene to the third test tube, and two
drops of the unknown to the fourth test tube, and gently swirl each test tube. 3.
Incline each test tube to moisten the wall and add 0.5 gm of AlCl3 so that some of
the solid strikes the side of the moisten test tube wall. 4. Record your observations
on the Report Sheet.
21
EXPERIMENTAL FOUR
Properties of Alcohols and Phenols
The functional group we are considering in this experiment is the hydroxy (or
hydroxyl) functional group, -OH. This group shows up in a number of guises in
organic compounds. Some of the common ones are shown in the table below.
Functional
Group
Structure
Compound
Generic
Name
Comments
Alcohol
In an alcohol, the -OH is
attached to a tetrahedral
carbon
atom.
Very
weekly
acidic.
enol
Two functional groups
attached to the same
carbon. It’s an alkene and
an
alcohol.
Usually
unstable.
phenol
-OH directly bonded to
an
aromatic ring. Weekly
acidic.
Two functional groups
attached to the same
carbon.
Formed
from
reaction
between
an
alcohol and an aldehyde
or
ketone.
carboxylic acid
Two functional groups
attached to the same
carbon.
Moderately
acidic.
sulfonic acid
Very acidic.
22
The functional groups we will consider in this experiment are alcohols and phenols.
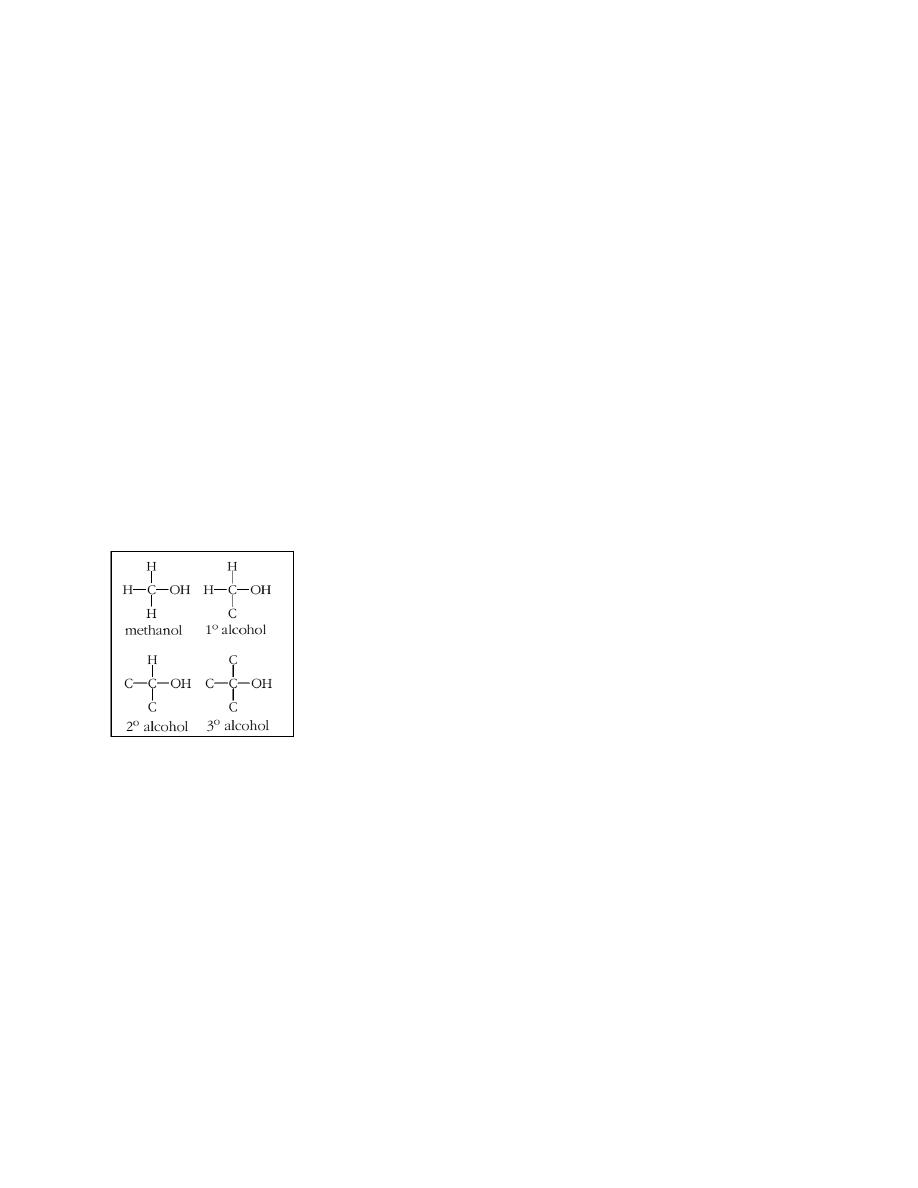
In alcohols the -OH group is attached to a tetrahedral carbon atom. If the carbon
atom is bonded to three hydrogens in addition to the -OH, the alcohol is methanol.
If the carbon that is bonded to the -OH is bonded to one carbon and two hydrogens,
the alcohol is a primary (1o) alcohol. If the carbon that is bonded to the -OH is
bonded to two carbons and one hydrogen, the alcohol is a secondary (2o) alcohol.
If the carbon that is bonded to the -OH is bonded to three carbons, the alcohol is a
tertiary (3o) alcohol. All of these alcohols share some characteristics but other
characteristics are different owing to their different structures. In phenols the -OH
group is directly attached to a carbon that is part of an aromatic ring. Alcohols and
phenols are similar in some ways, but there are enough differences so that they are
considered different functional groups. One major difference is that phenols are
typically about a million times more acidic than alcohols. Addition of sufficient
aqueous sodium hydroxide to a phenol will cause the -OH group of most of the
molecules present to be deprotonated; this will not happen to an alcohol.
In phenols the -OH group is directly attached to a carbon that is part of an
aromatic ring. Alcohols and phenols are similar in some ways, but there are enough
differences so that they are considered different functional groups. One major
difference is that phenols are typically about a million times more acidic than
alcohols. Addition of sufficient aqueous sodium hydroxide to a phenol will cause
the -OH group of most of the molecules present to be deprotonated; this will not
happen to an alcohol.
Chemical Properties We shall focus on chemical reactions that can help to
distinguish alcohols from phenols and to distinguish among the classes of alcohols.
23
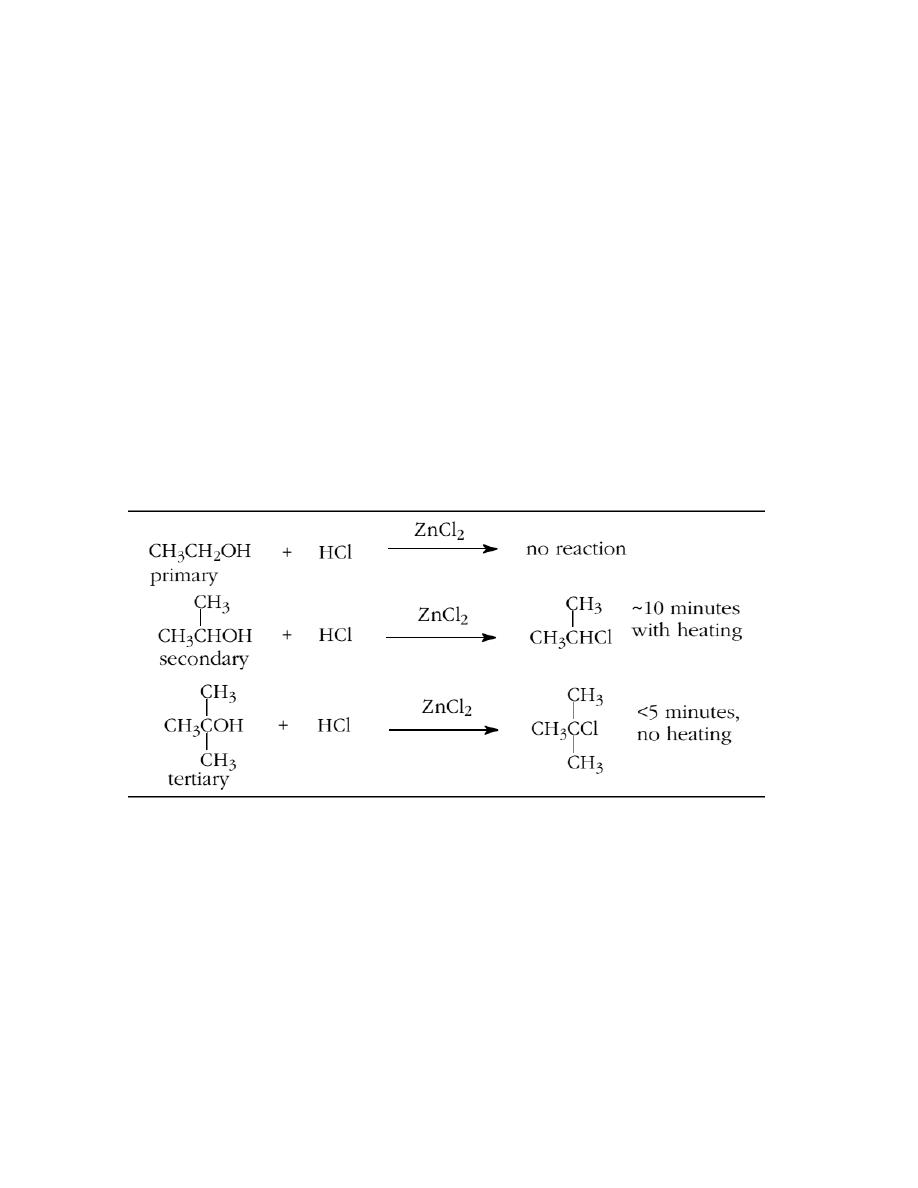
1. Lucas Test.
This test is used to distinguish among primary, secondary, and tertiary water
soluble alcohols. Lucas reagent is a mixture of concentrated hydrochloric acid and
zinc chloride. Zinc chloride is a Lewis acid, which when added to hydrochloric acid
makes it even more acidic. Water soluble tertiary alcohols react with Lucas reagent
almost immediately to form an alkyl chloride which is insoluble in the aqueous
solution. The formation of a second liquid phase in the test tube almost as soon as
the alcohol initially dissolves is indicative of a tertiary alcohol. A secondary
alcohol reacts slowly to form a chloride and, after heating a little, gives a second
phase, usually within 10 minutes. Primary alcohols and methanol do not react
under these conditions. In the case of tertiary alcohols the chloride is usually
attached to the carbon that held the hydroxyl group. In the case of
secondary alcohols, it is often the case that the chlorine is attached to the carbon
that held the hydroxyl, but rearrangements are possible.
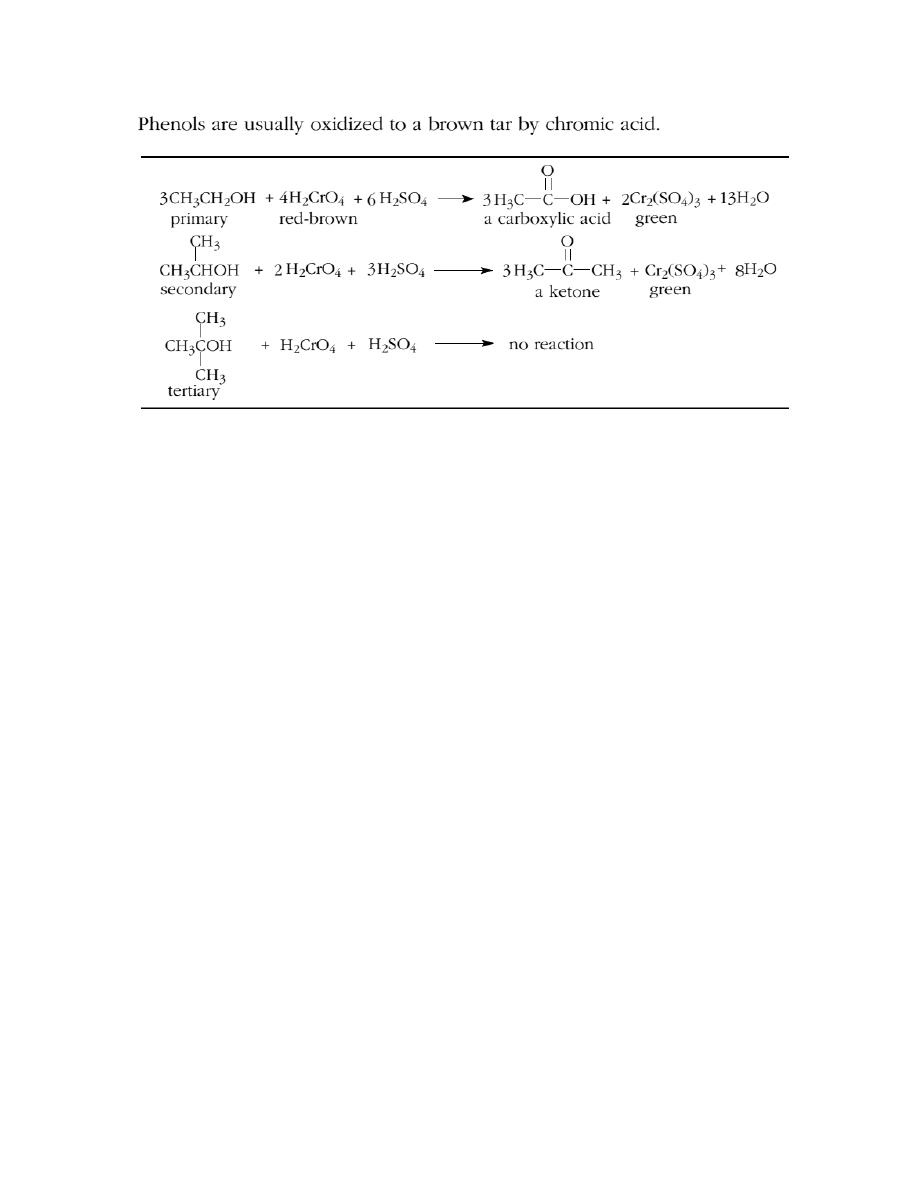
2. Chromic Acid Test. Primary alcohols are oxidized to carboxylic acids by
chromic acid. The Cr+6 in the chromic acid, which is red-brown, is reduced to
Cr+3, which is green. Secondary alcohols are oxidized to ketones by chromic acid.
The chromium reduction is the same here as for the primary alcohols. Tertiary
alcohols are not oxidized by chromic acid. Thus this reaction can distinguish
between primary and secondary alcohols, on the one hand, and tertiary alcohols, on
the other.
24
Acidity of Phenols.
Most phenols are weaker acids than carboxylic acids and stronger acids than
alcohols. When phenols react with a base the phenol is converted into a phenoxide
anion (see reactions below). The phenoxide anion is more soluble in water than the
corresponding phenol. Consequently, if a water-insoluble phenol is treated with an
aqueous solution of a base that is strong enough to convert most of the phenol to
the phenoxide anion, that phenol will dissolve in the aqueous base (as the
phenoxide salt). Aqueous sodium hydroxide and sodium carbonate are strong
enough bases to dissolve most water-insoluble phenols, while aqueous sodium
bicarbonate is not. None of the above-mentioned bases is strong enough to convert
a substantial amount of a typical alcohol into an alkoxide anion (which would cause
a water-insoluble alcohol to dissolve as its alkoxide anion).
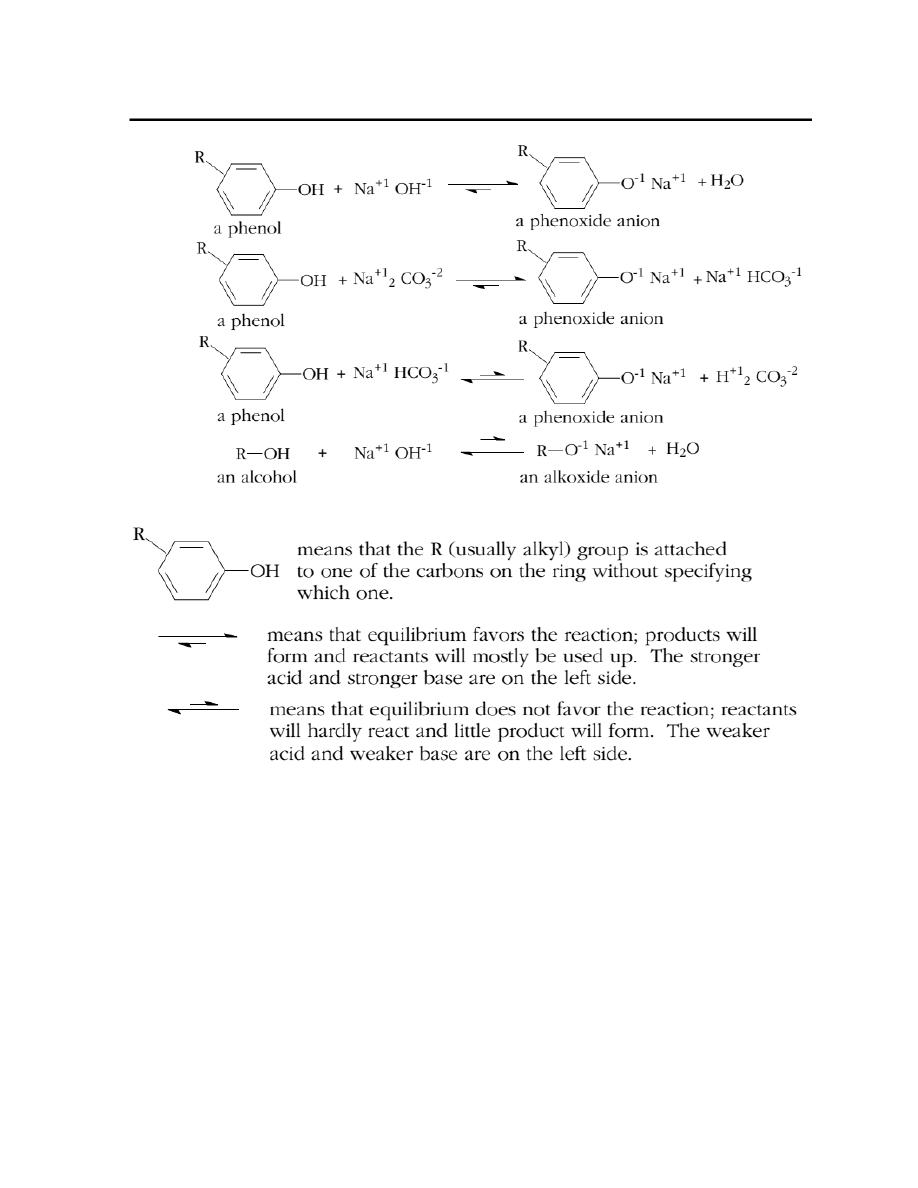
25
The order of basicity of the bases appearing on the left in the above equations is,
from most basic to least basic: sodium hydroxide, NaOH > sodium carbonate,
Na
2
CO
3
>sodium bicarbonate, NaHCO
3
.
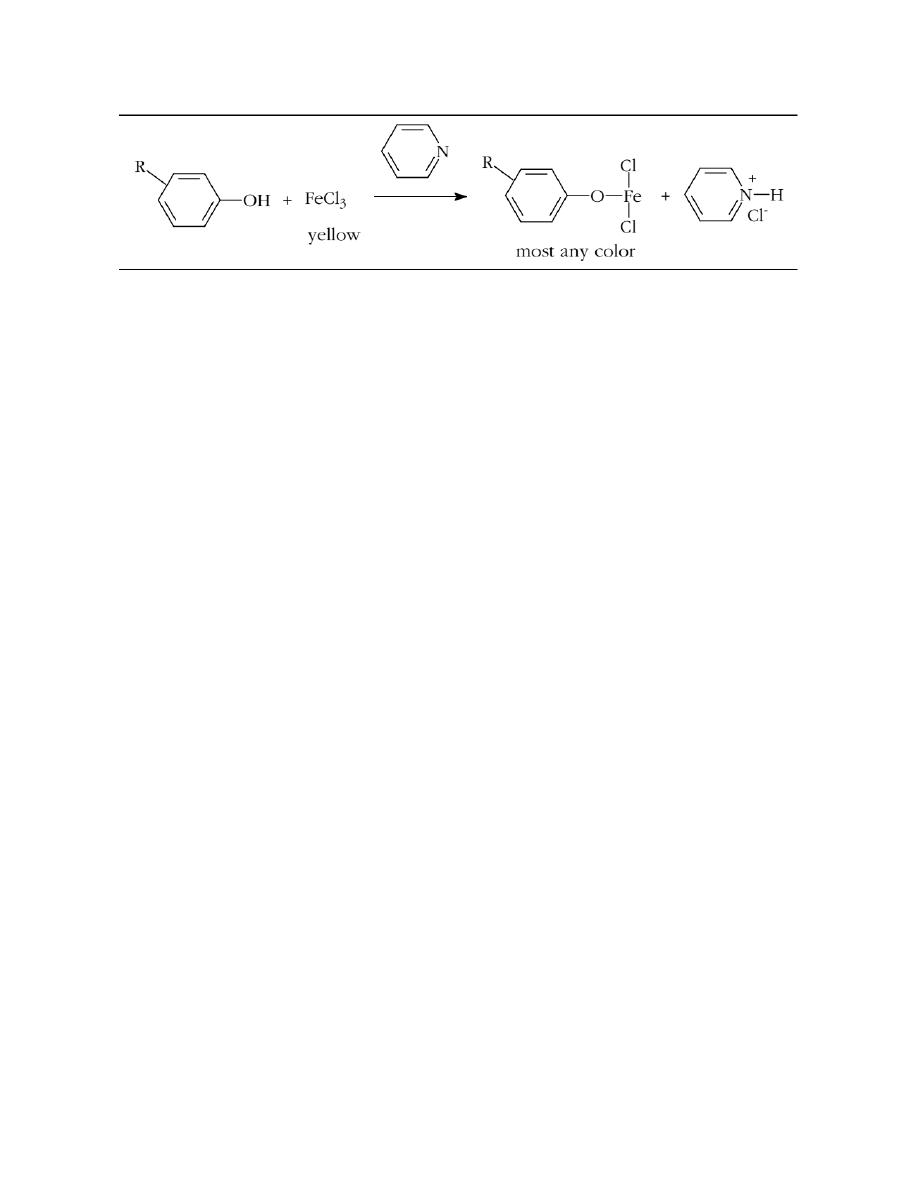
Iron(III) Chloride Test.
Addition of iron(III) chloride dissolved in chloroform (trichloromethane) to a
phenol dissolved in chloroform, gives a colored solution upon addition of pyridine.
Depending on the structure of the phenol the color of the product can be most
anything from red to violet. Alcohols do not give this test.
26
Objectives of the Experiment –
1. To learn something about the physical and chemical properties of alcohols.
2. To use the information obtained about chemical properties to identify an
unknown as a primary, secondary, or tertiary alcohol or phenol.
2. Procedure – Solubility of Alcohols and Phenols In each of the following
cases you will attempt to make an approximately 10% (by weight) solution
of the alcohol or phenol in water (very polar) and in hexane (nonpolar) to
see if the compound is soluble to at least that extent.
1. Label clean dry test tubes as follows: 1-propanol, 1-butanol, 1-pentanol, phenol,
5-isopropyl-2-methylphenol. Place 10 drops (= ~0.5 ml = ~0.5 g) of the appropriate
compound into each test tube. In the case of phenol add 0.5 g. Using a 10 ml
graduated cylinder, add 4.5 ml (= 4.5 g) of deionized water to each tube. Agitate
the tubes to mix the contents. (Note that, in general, liquids that are miscible will
dissolve in each other quickly. Solids that are soluble may take some time and
require encouragement like stirring with a stirring rod.) Record on the report sheet
whether the compound is completely soluble, partially soluble, or insoluble in the
water. Discard the contents of the tubes into the sink and wash down the drain with
water. Rinse the test tubes with water, then with a small portion of acetone, then
with a small portion of hexane. Invert the tubes in a beaker and allow them to dry
for a couple of minutes. Rinse the graduated cylinder with acetone and then hexane.
2. Again place 10 drops (in the case of phenol 0.5 g) of each compound into the
corresponding test tube. Using the 10 ml graduated cylinder, add 6.8 ml of hexane
(~4.5 g) to each tube. Agitate the tubes to mix the contents. Note on the report sheet
whether the compound is completely soluble, partially soluble, or insoluble in the
hexane.
Discard the contents of the tubes into the sink and wash down the drain with water.
Rinse the test tubes with water, then with a small portion of acetone. Allow to
drain.

27
1. Lucas Test –
Place 5 drops of each sample into the appropriate tube. Add 1 ml of Lucas
reagent. Stopper the test tube with a cork and agitate the contents of the tube
vigorously by holding the top of the tube with the thumb and index finger of
one
hand
and
striking
the
bottom
of
the
tube
horizontally with the index finger of the other hand. After the contents are
thoroughly mixed, remove the cork and allow the tube to stand for five
minutes.
Look for any cloudiness or separation of a second layer that has developed in
this
5 minute time span. Record results on the report sheet. Allow the tubes to sit
for another 5 minutes and again observe the ones that had been clear to see if
there is any cloudiness or second layer of liquid. Place any tubes that still
have
one
clear layer into a 60
o
C water bath for 15 minutes. Again look for cloudiness
or a second layer of liquid and record your results on the report sheet.
2. Chromic Acid Test– Place 5 drops of each sample into the appropriate clean
dry test tube. To each test tube add 10 drops of acetone and 2 drops of
chromic acid. Stopper the tube with a cork and agitate. Remove the cork and

28
place the tube in a 60oC water bath for 5 minutes. Note the color of each
solution and any other characteristics. Record your observations.
3. Iron(III) Chloride Test – Place 10 drops of each sample into the
appropriate clean dry test tube. Add 10 drops of trichloromethane
(chloroform) to each tube. Add 5 drops of iron(III) chloride in chloroform to
each tube. Add 2 drops of pyridine to each tube. Agitate the tube. Record
your observations.
3. 4. Acidity – Place 5 drops of each sample into the appropriate clean, but not
necessarily dry, test tube. To each test tube add 5 drops of deionized water.
Use a clean glass stirring rod to stir each sample and then touch the wet tip of
the rod to a piece of pH paper on paper. After 15 seconds compare the color
of the paper with the colored scale that accompanies the test paper. Record
the pH of the mixture on your report sheet. Based on these tests you should
be able to identify your unknown as a primary alcohol, secondary alcohol,
tertiary alcohol, or a phenol.
EXPERIMENTAL FIVE
Properties of Carboxylic Acids and Esters
Introduction
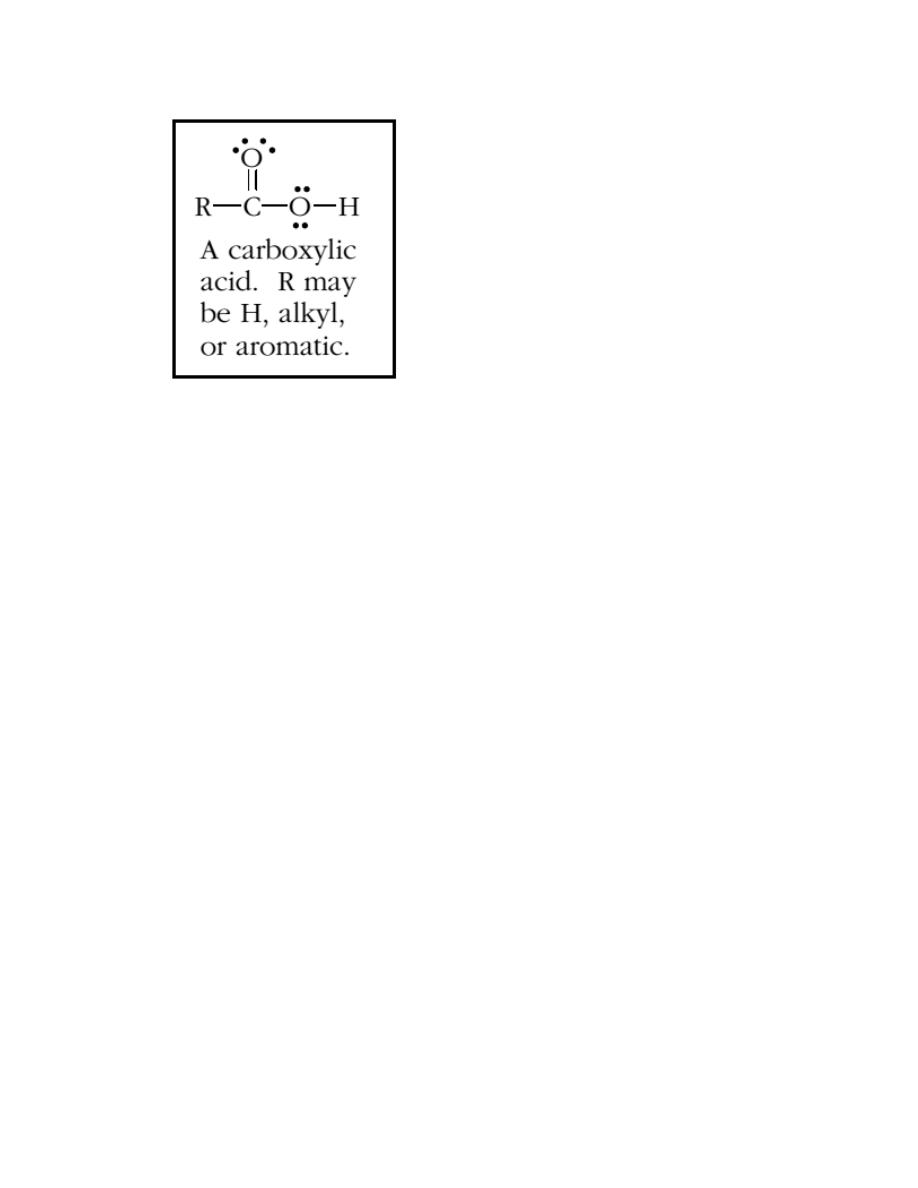
Carboxylic acids are characterized by the carboxyl group which combines
the carbonyl group of aldehydes and ketones with the hydroxyl group of
alcohols and phenols. Since the carbonyl and hydroxyl groups are directly
bonded to each other each affects the properties of the other. The result is
that the hydroxyl group of a carboxylic acid is considerably, but not
completely, different from its alcohol or phenol sibling; the same can be said
when one compares the carbonyl of a carboxylic acid with that of an
aldehyde or ketone.
29
When a carboxylic acid is reacted with an alcohol in the presence of a strong
acid, which acts as a catalyst, an ester is formed along with a molecule of
water. An example of this reaction is shown below where acetic acid reacts
with isopentanol (3- methylbutanol) to form the ester isopentyl acetate and
water. Isopentyl acetate is sometimes called banana oil because it is mainly
what gives bananas their fragrance and flavor. This type of reaction is known
as the Fisher esterification, in honor of its discoverer Emil Fisher. It is an
equilibrium reaction and the equilibrium constant is typically about 1. This
means that if one starts with one mole of carboxylic acid and one
mole of alcohol, the result at equilibrium will be one-half mole of ester, one-
half mole of water, one-half mole of carboxylic acid and one-half mole of
alcohol. One way to improve the yield is to remove water from the reaction
mixture as it is formed. This will drive the reaction in the forward direction
and is an example of Le Châtelier’s principle.
[Le Châtelier’s principle: If the conditions of a system, initially at
equilibrium, are changed the equilibrium will shift in such a direction as to
tend to restore the original conditions.] In this case the water is removed and
by Le Châtelier’s principle the substances present will react to form more
water. But by the chemical equation, if more water is formed
more ester will be formed, also. Many esters, like isopentyl acetate, have
pleasant fragrances and are used in perfumes and as flavorings.
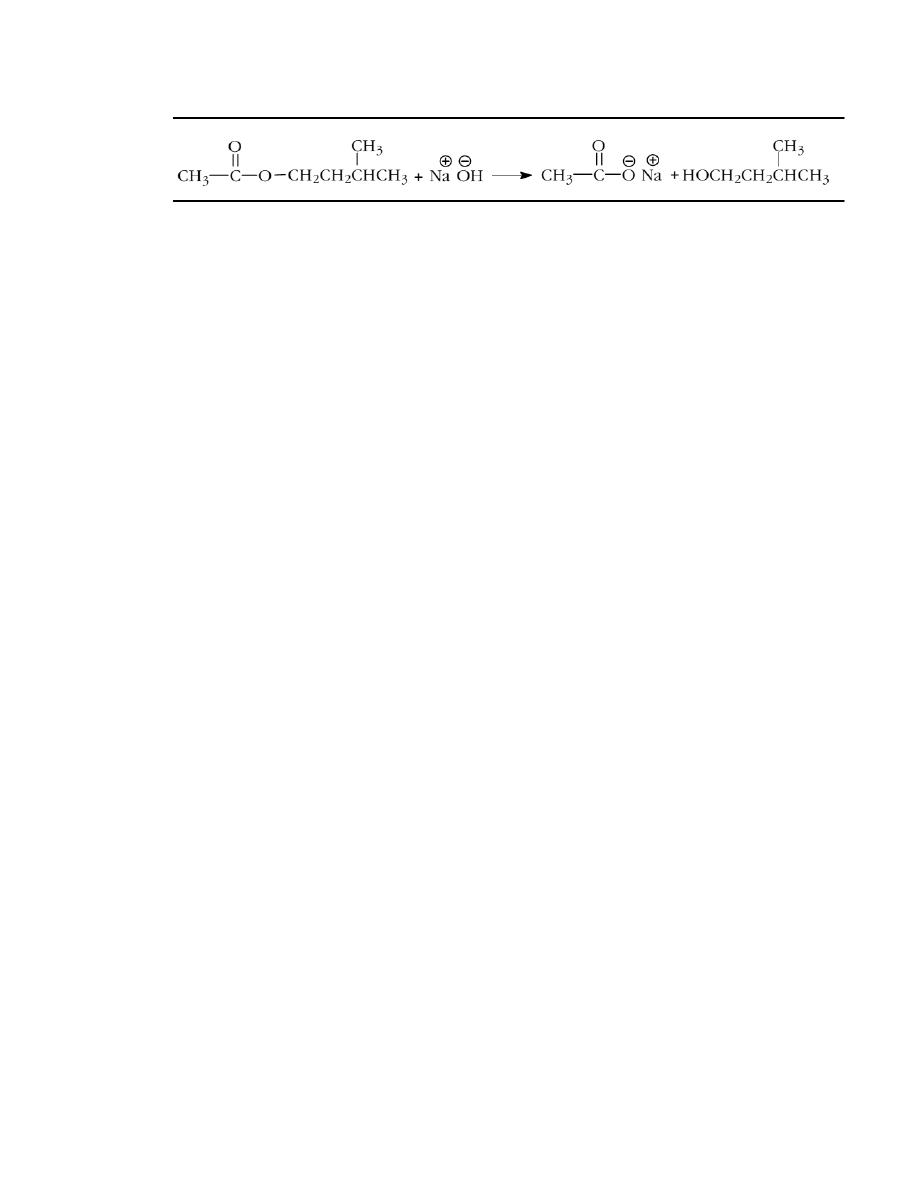
Esters can be broken apart under basic conditions, also. This reaction is
called saponification because it can be used to make soap if one selects the
appropriate ester (known as a triglyceride, usually obtained from animal fat)
as starting material. The products of a saponification are an alcohol and the
salt of a carboxylic acid as shown below.
30
Objectives
1. To study some of the physical and chemical properties of carboxylic acids. 2. To
prepare several esters and note their aromas. 3. To saponify two esters. Procedure
Note: You may make the approximation that 20 drops of a liquid equals 1 milliliter.
Characteristics of acetic acid –
1. Place 2 ml of 0.75M acetic acid into a test tube. Note and record the odor.
Dip a glass stirring rod into the solution and touch the wet tip of the stirring
rod to a piece of wide-range pHydrion paper. Compare the color of the paper
with the chart that comes with the paper and record the pH of the solution.
Repeat the above process with 0.75M samples that have been provided of 1-
butanol and phenol. Record odors and pH values as above.
2. Add 2 ml of 1 M aqueous sodium hydroxide to each of the above
solutions. Cork the test tubes and agitate. Remove the corks and determine
the pH of each, as above. If not yet basic (pH > 7) add more sodium
hydroxide by drops, agitating and testing pH as you go. When the solution
becomes basic note any change in the odor and record the result.
3. Now add 2 M aqueous sulfuric acid dropwise to each tube, with agitation,
until the contents of the test tubes are just acidic (test with pHydrion paper,
pH <7; about 20 drops should be required). Note any change in the odors.
Record the results. Clean the test tubes.
2. Characteristics of Benzoic Acid –
3. 1. Weigh 0.10 g of benzoic acid into a test tube. Add 2 ml of water. Agitate
the test tube. Does the benzoic acid have an odor? How soluble is benzoic
acid in water?
4. 2. Add 1 ml of 2 M aqueous sodium hydroxide to the benzoic acid - water
mixture. Stopper the tube with a cork and agitate the test tube in the usual
way by holding the top of the tube with one hand and striking the bottom of
the tube horizontally with the index finger of the other hand. Check with pH
paper to be sure the mixture is basic (pH > 7); if not add more aqueous
sodium hydroxide dropwise until the mixture is basic. Record any

31
observations. 3. Measure and record the pH of the above mixture. Add 20
drops of 3 M hydrochloric acid to the above mixture, dropwise. After every
second drop is added, agitate, check and record the pH, and note any
changes. Saponification
5. Place 20 drops of methyl salicylate and 10 ml of 6 M aqueous sodium
hydroxide into a large test tube labeled “methyl salicylate saponification”.
Record the odor of methyl salicylate. Place 10 drops of cooking oil and 10
ml of 6 M aqueous sodium hydroxide into a large test tube labeled
“triglyceride saponification”. Place the tubes in a steam bath and heat them
for 30 minutes. Every 5 minutes, being careful not to burn yourself with
the steam, remove the tubes from the steam bath and cork and shake them.
After shaking, uncork them and return them to the steam bath. Note: To save
time begin the “esterification” part of the experiment as the test tubes are
steaming. 2. Cool the test tubes to room temperature using an ice-water bath.
3. Record the odor of the material in the methyl salicylate saponification
tube. Then add 6 M hydrochloric acid to this tube, one milliliter at a time,
until the solution is acidic. Stir with a glass rod after each addition and test
with pHydrion paper. Record your observations as the solution becomes
acidic.
4. Cork the tube labeled triglyceride saponification. Shake the tube and
record observations. Then add 6 M hydrochloric acid to this tube, one
milliliter at a time, followed by shaking. After each addition test with
pHydrion paper. Record your observations as the solution becomes acidic.
Fisher Esterification –
1. Label five clean, dry test tubes with numbers corresponding to the compound
pairs listed in the table to the right.
2. Add 10 drops of the corresponding carboxylic acid (0.1 g salicylic) to the
numbered test tubes. Note and record the odor. Then add 10 drops of the
indicated alcohol, recording the odor of the alcohol.
3. Add 5 drops of concentrated sulfuric acid to each test tube, stopper the tubes
with corks and agitate 4. Loosen the corks in the necks of the tubes and
place the tubes in a 60oC water bath for 15 minutes. Remove the tubes
from the bath, allow to cool to room temperature, and add 2 ml of water
to each. Remove a few drops of the top liquid layer from each test tube,
in turn, placing them on a clean watch glass and note the odor. Can you
pair the odors with the following: banana, raspberry, peach, wintergreen,
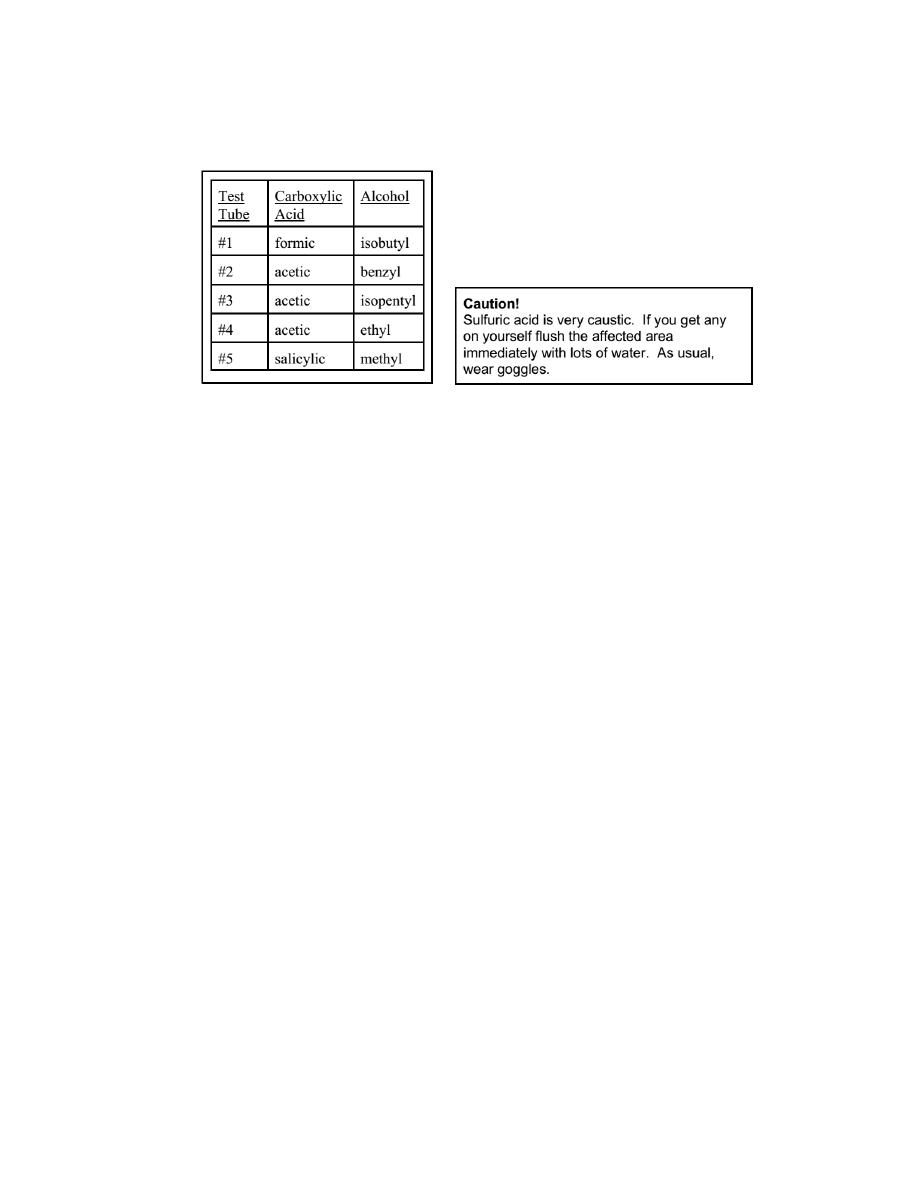
32
and nail polish remover. [Many nail polish removers are mainly acetone,
but some are based on one of these esters.]
1. Label five clean, dry test tubes with numbers corresponding to the
compound pairs listed in the table to the right.
2. Add 10 drops of the corresponding carboxylic acid (0.1 g salicylic) to
the numbered test tubes. Note and record the odor. Then add 10 drops of
the indicated alcohol, recording the odor of the alcohol. 3. Add 5 drops
of concentrated sulfuric acid to each test tube, stopper the tubes with
corks and agitate.
6. Loosen the corks in the necks of the tubes and place the tubes in a 60oC
water bath for 15 minutes. Remove the tubes from the bath, allow to cool to
room temperature, and add 2 ml of water to each. Remove a few drops of the
top liquid layer from each test tube, in turn, placing them on a clean watch
glass and note the odor. Can you pair the odors with the following: banana,
raspberry, peach, wintergreen, and nail polish remover. [Many nail polish
removers are mainly acetone, but some are based on one of
these esters.]
33
EXPERIMENTAL SIX
AMINES
Organic amines are compounds in which one or more hydrogens of
an ammonia molecule, NH
3
have been replaced by R- or Ar- groups. Amines
may be classified as:
(1) Primary R-NH
2
or ArNH
2
(2) Secondary R
2
NH or ArRNH
2
or Ar
2
NH
(3) Tertiary R
3
N, ArR
2
N, Ar
2
RN
Amines are quite basic. Ammonia itself has a Kb value of 1.8 x 10
-
5
. Aliphatic amines have Kb values of 10
-4
, while aromatic amines have
Kb values as 10
-10
. These differences are explained by the relative stability of
the cation produced in the reaction: G-NH
2
+ H
+
àG-NH
3
+
When G = R,
base strength is increased because the R- group is electron donating group and
therefore stabilizes the cation produced. When G = Ar, the base strength is
decreased because the net effect of the aryl group is to withdraw electrons and
destabilize the cation formed.
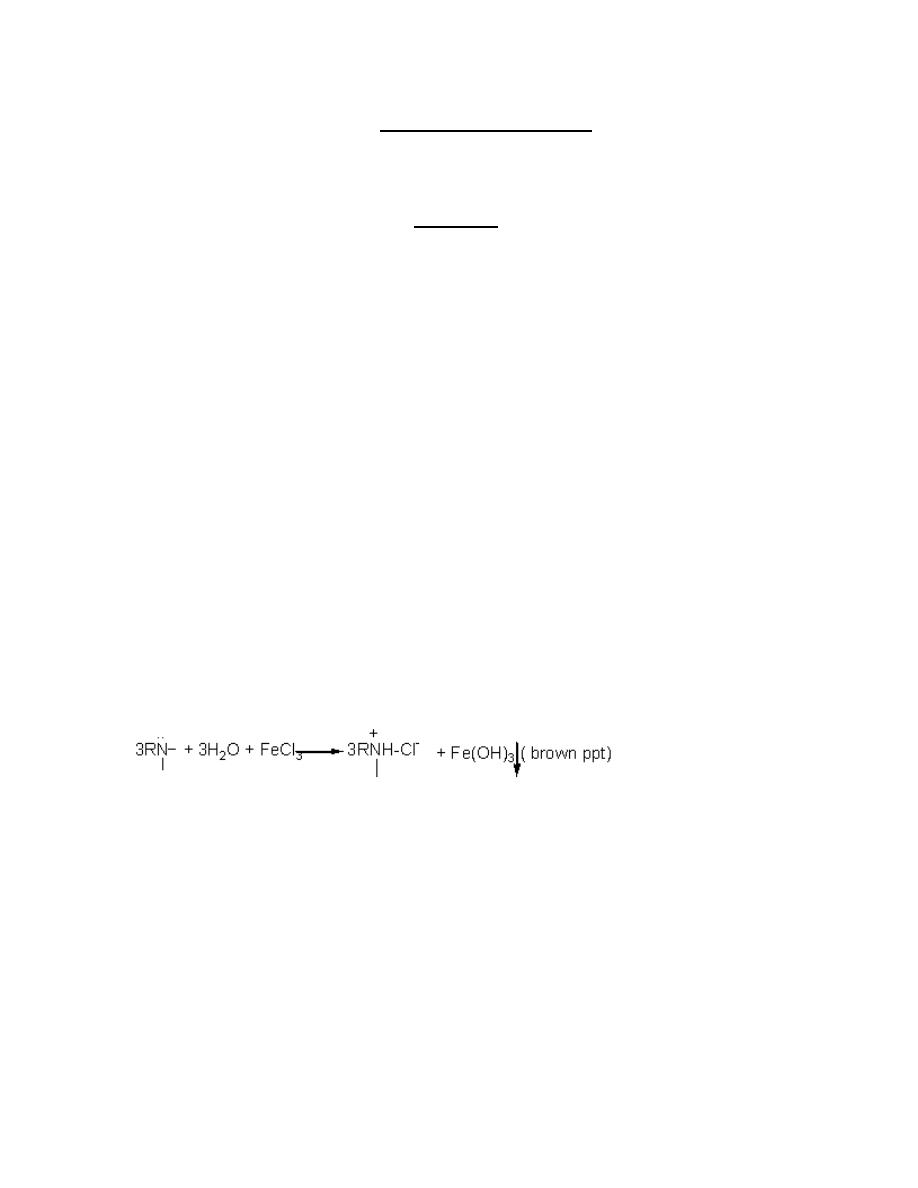
The relative base strength of amines can be tested in several ways. Aqueous
solutions of each base can be tested with indicators. Several drops of the amine to
be tested can be added to FeC1
3
solution. If the amine produces sufficient OH
-
to exceed the Ksp for Fe(OH)
3
, a brown gelatinous precipitate
forms. Because iron(III) hydroxide has a very small Ksp value, this test is positive
for very weak bases.
In addition, amines are readily protonated by strong acids such as HCl and
H
2
SO
4
. The water solubility of amines is similar to that of other organic
compounds that contain H-bonding portions. Small aliphatic amines are water
soluble. As the carbon number increases, solubility in water decreases. The
usual limit occurs at about four or five carbons. Thus, methylamine is soluble
in water while aniline is not soluble. Although most amines are NOT water
soluble, amine salts, being ionic, are generally water soluble.
Most pure amines are clear or very pale in color. Often, stock samples
are found to be of various colors, from dark brown to almost black. Amines
are quite easily oxidized to form these highly colored products. However,
most amines can be readily purified by distillation or by recrystallization. This
oxidizability of amines is shown by simple reaction with bleaching powder.

34
Whether an amine is primary, secondary, or tertiary can be determined by the
Hinsberg test. The amine in question is treated with benzenesulfonyl
chloride in KOH and then acidified with HCl. The results are interpreted as
follows:
Amine Type
Benzenesulfonyl
Chloride in KOH
HCl Addition
Primary RNH2
Reacts,
but
product
dissolves
in
OH-
solution
Precipitate forms.
Secondary
Amine
R2NH
Reacts
and
forms
insoluble product
Precipitate remains.
Tertiary Amines R3N
No
reaction.
Amine
remains as second layer
or ppt.
Amine is protonated
and dissolves.
Procedure
I. Solubility of Amines
1. Place 3-mLs of distilled water in a reaction tube. Add ethylamine in 5-drop
increments until a second layer is observed. Record on the data sheet.
2. Repeat the procedure using aniline. Record the results.
3. Repeat the procedure using solid aniline hydrochloride small pea-sized
increments.
II. Basicity of Amines
1. pH paper
a) Place 3-mLs of distilled water in each of three medium sized test tubes. Number
each tube as 1 - 3.
b) Add 5 drops of concentrated NH
3
to Tube 1; 5 drops of ethylamine to Tube 2;
and 5 drops of aniline to Tube 3.
c) Test each solution with pH paper. Record the results on the data sheet.
2. Ferric Chloride Test
Add about 2-mLs of 5% ferric chloride solution to each of the test tubes
from above step 1. Observe and record the results.

35
3. Reaction with Strong Acids
a) Place one drop of concentrated sulfuric acid on a clean dry watchglass. Add 1-2
drops of aniline. Note and record the results.
b) Repeat the procedure using a drop of concentrated HC1. Note and record the
results.
III. Ease of Oxidation
Place about 2.5-mLs of water and one drop of aniline in a reaction tube. Add
a small amount of bleaching powder [Ca(OC1)
2
] about the size of a small
pea. Stopper and shake well. Observe and record.
IV. Derivative Preparation
A. Acetyl (To be prepared in the HOOD!)
(1) Place about 1-mL of acetic anhydride into a medium sized test tube.
Add about 20-25 drops of aniline. Warm gently in the sand bath or in a water
bath on the hot plate for three to four minutes. This should complete the reaction.
(2) Add about 0.5 mL of water, continue to heat. This should hydrolyze any
remaining acetic anhydride. During this time white crystals of the acetamide
should appear.
(3) Add another 0.5-mL of water, heat to boiling. If all product crystals do
not dissolve, add more water as needed. Once the crystals completely
dissolve, remove from the heat. (This is recrystallization.)
(4) Cool thoroughly. Suction filter. Press dry. Obtain and record a melting point
for the product.
B. Benzoyl (To be prepared in the HOOD!)
(1) Place about 20 drops of aniline in a medium-size test tube. Add 5-mLs
of 10% NaOH. Stopper the tube well.
(2) Add about 5 drops of benzoyl chloride. Stopper and shake gently. Benzoyl
chloride is a lachrymator. It should be handled carefully in the hood. It should
NEVER be washed down an open sink. Rapid hydrolysis increases eye irritation.
(3) Add more benzoyl chloride in 5-drop increments. After each
addition, stopper the tube and gently shake it. CAUTIOUSLY smell the
tube after shaking. If no irritating odor is present, add another 5 drops of

36
benzoyl chloride. This technique of addition prevents a large excess of the
benzoyl chloride being present.
(4) Once the addition seems complete and product crystals of the
benzanilide appear, cool the reaction mixture and suction filter using the Hirsch
funnel. Wash the crystals with cold water. (NOTE: if excess benzoyl chloride is
present, the filtration process will be accompanied by irritating fumes.)
(5) Recrystallize the crystals from hot ethyl alcohol.
(6) Cool, suction filter, press dry, and obtain a melting point.
C. Diphenylthiourea
(1) Place about 20 drops of aniline in a medium test tube. Add aboutt. two mLs of
ethyl alcohol.
(2) Add about one-mL of phenylisothiocyanate to the test tube. Stopper
and shake.
(3) Crystals of diphenylthiourea should appear within a few minutes. If no
crystallization is observed, follow the steps outlined below.
(a) Cool thoroughly in an ice-water bath.
(b) Scratch the inside of the test tube with a stirring rod.
(c) Add a little ice-water.
(d) Wait.
(4) Once crystals form, cool thoroughly. Suction filter using the Hirsch funnel.
(5) Recrystallize from a little hot ethyl alcohol.
EXPERIMENTAL SEVEN
Preparation of aspirin
Aspirin is the common name for the compound acetylsalicylic acid, widely used as
a fever reducer and as a pain killer. Salicylic acid, whose name comes from Salix,
the willow family of plants, was derived from willow bark extracts. In folk
medicine, willow bark teas were used as headache remedies and other tonics.
Nowadays, salicylic acid is administered in the form of aspirin which is less
irritating to the stomach than salicylic acid. To prepare aspirin, salicylic acid is
reacted with an excess of acetic anhydride. A small amount of a strong acid is used
37
as a catalyst which speeds up the reaction. In this experiment, phosphoric acid will
be used as the catalyst. The excess acetic acid will be quenched with the addition of
water. The aspirin product is not very soluble in water so the aspirin product will
precipitate when water is added. The synthesis reaction of aspirin is shown below:
Since acetic acid is very soluble in water, it is easily separated from the aspirin
product. The aspirin isolated in this step is the “crude product”. A “purified
product” can be obtained through recrystallization of the crude product in hot
ethanol. In this experiment, the crude product will be the desired product. The
percent yield of the crude product will be determined for this reaction. The purity
of the product will also be analyzed. The product will be analyzed by three
different methods: melting point, titration, and spectroscopic assay. The melting
point range of pure aspirin is 138-140
C and the melting point range of the
salicylic acid starting material is 158-161
C. If impurities are present in your crude
sample, the melting point range for your product will be lower than the range of
pure aspirin. Also, your melting point range may be greater than 2 degrees.
From the titration of your sample, the moles of acetylsalicylic acid present can be
determined assuming that there is not a large percentage of an acid impurity present
in your crude sample.
The spectroscopic analysis of aspirin will involve the complexing of iron(III) to the
deprotonated form of salicylic acid (salicylate ion) to give a purple solution. Only
the salicylate ion complexes to iron(III). Your aspirin product as well as a
commercial aspirin tablet will be compared to a standard 0.15% ferricsalicylate
solution. In the presence of moisture, aspirin may decompose (hydrolysis) into
salicylic acid and acetic acid. This reaction is the reverse of the synthesis reaction.
The maximum allowable amount of free salicylic acid in an aspirin sample is
0.15% salicylic acid.
38
Procedure
1. Use a centigram balance to weigh a 50 mL Erlenmeyer flask. Place about 2 g
of sylicylic acid in the flask and weigh again. In the fume hood, the
instructor will transfer 5.0 mL of acetic anhydride from a buret into the flask.
Add 5 drops of 85% phosphoric acid (catalyst) to the flask.
2. 2. Clamp the flask in a beaker of tap water supported on a ring stand over a
burner flame. Stir if needed to dissolve the salicylic acid. Heat the water to
boiling, and shut off the flame. Keep the flask in the hot water bath for 10
more minutes.. While the flask is still in the water bath, slowly add 2 mL of
distilled water to the flask to decompose any excess acetic anhydride.
3. After a minute, remove the flask from the water bath and add 20 mL of
distilled water. Let theflask cool to room temperature. As the solution cools,
crystals of aspirin will appear. Cool the solution further by placing the
reaction flask in an ice bath. Chill 5-10 mL of distilled water in a separate
container.
4. Weigh a watch glass and filter paper on the centigram balance.
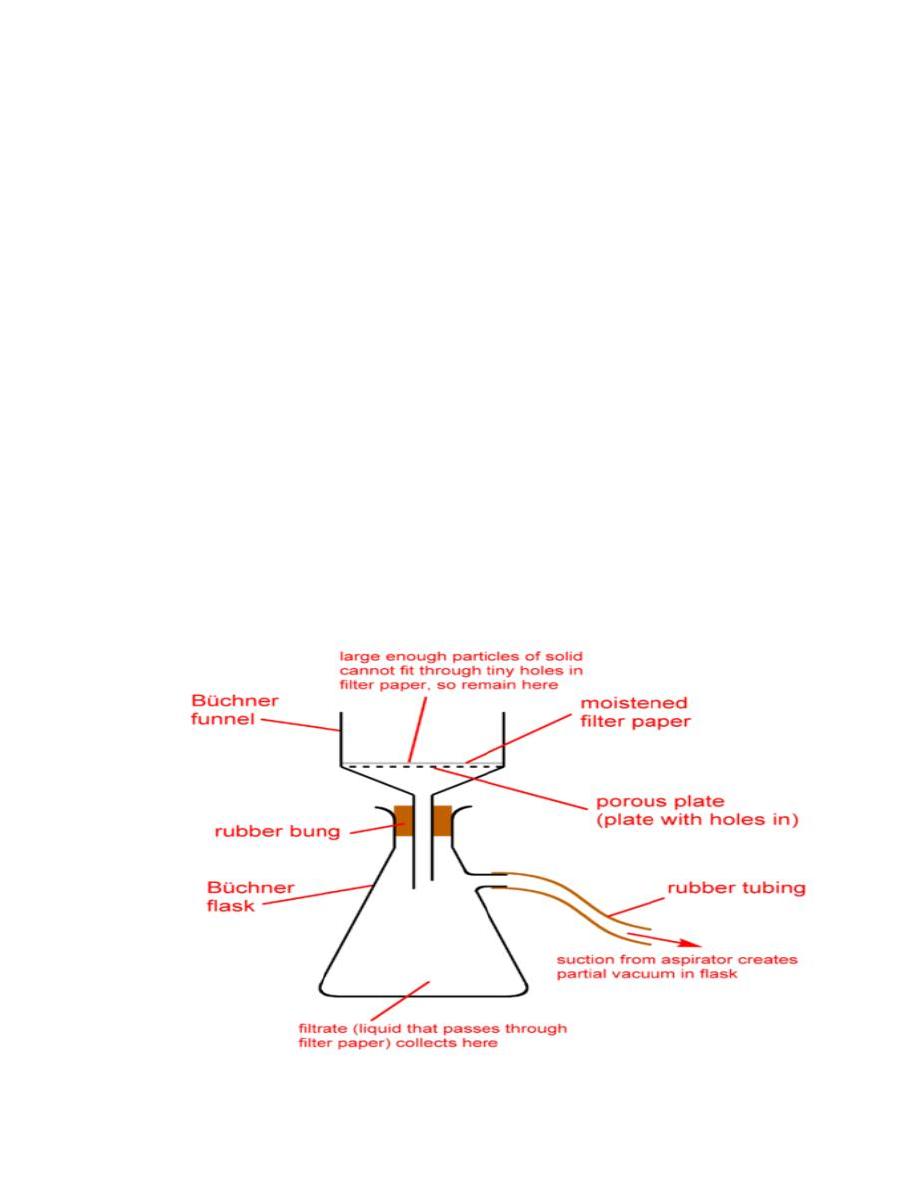
5. Set up a Büchner funnel on a vacuum flask connected to a water aspirator.
Place the filter paper in the funnel and moisten with distilled water from a
squirt bottle. Turn on the aspirator and transfer the aspirin slurry into the
funnel. Wash the crystals with 5 mL of the cold DI water.
39
6. Transfer the filter paper and aspirin to a pre-weighed watch glass and
allow to air dry in your locker until the next lab period.
7. It is safe to discard of the filtrate down the sink with water. ay 2 –
Analysis/Melting
Point
1. Weigh the dry product to obtain the yield of the reaction. Calculate the
theoretical yield and percent yield of the reaction. 2. Pack a few crystals of
your aspirin product in a melting point capillary tube. Your instructor will
demonstrate how to use the melting point apparatus. Allow the temperature
of the melting point apparatus to increase 1
C per minute starting from 120
C. Measure the melting point range of the aspirin product. The melting
point range is the temperature when you first notice the aspirin crystals
melting up until the temperature when no crystals remain.
EXPERIMENTAL EIGHT
EXTRACTION of Eugenol oil from clove plant
An essential oil is a substance extracted from a plant material. It is a hydrophobic
liquid containing highly volatile aromatic compounds. Essential oils are generally
extracted by distillation. The essential oils which impart the distinctive aromas are
complex mixtures of organic constituents, some of which being less stable, may
undergo chemical alterations when subjected to high temperatures. In this case,
organic solvent extraction is required to ensure no decomposition or changes have
occurred which would alter the aroma and fragrance of the end-product.
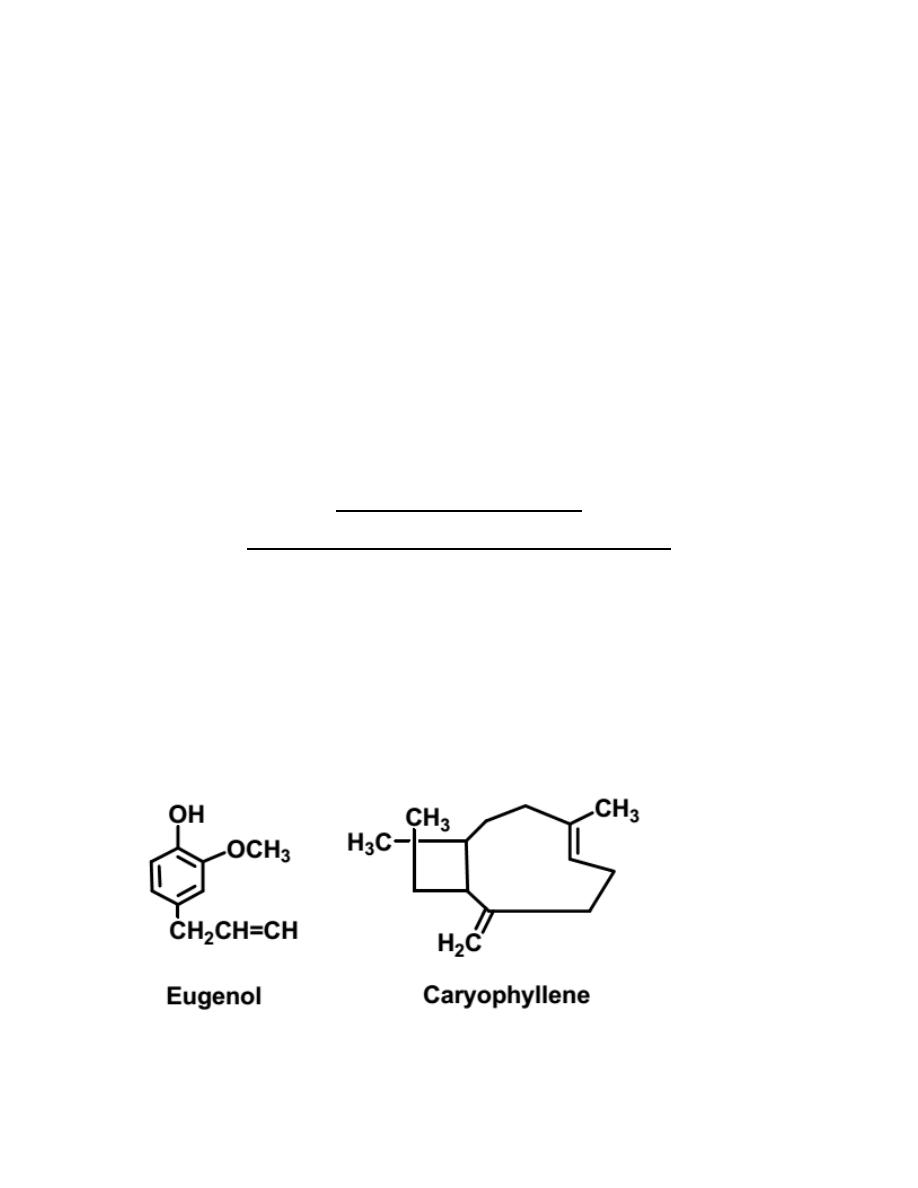
Oil of clove is rich in Eugenol (4-allyl-2-methoxyphenol). Caryophyllene is also
present in relatively small amount, along with other terpenes. Clove oil is made

40
from the buds of the flower of a tree that grows in tropical equatorial regions. It is
intense oil, most commonly used to relieve dental pain and infection and to
dissolve the eggs deposited by intestinal worms. Clove oil is delicious but
overwhelming in both smell and taste. It is antiseptic, carminative, warm and very
aromatic. It is often used as a flavoring in toothpaste, mouthwashes, and exotic
foods. In this experiment, the essential oil of clove will be isolated by distillation
and extracted with dichloromethane.
1- Crush 1.5 g of dry cloves into very small pieces. Place them in 25-mL round
bottom flask. Add 15 mL of water and swirl well.
2. Connect the flask with a receiver distilling still and a water-cooled condenser.
Distil the solution to obtain the distillate in the trough of the still about 7 mL.
3. Transfer the distillate with a Pasteur pipette into the 10-mL conical bottom flask,
Flask No.1. Rinse the still with 2 mL of dichloromethane and transfer the
dichloromethane into Flask No.1. Stir the mixture using a Pasteur pipette
method.
(Draw a portion of the lower layer up into a pipette and carefully expel it back
into the flask, through the upper layer. Do this repeatedly for a few times).
: If the dichloromethane is not mixed well, the incomplete separation and the
poor yield will be obtained.
4. Allow the mixture to separate completely into two distinct layers. Remove the
lower dichloromethane layer, using a Pasteur pipette method (Squeeze the
rubber bulb and lower the tip of the pipette to the bottom of the flask. Carefully
draw up the lower layer until the interface between the layers reaches the
pipette tip. Lift out the pipette and expel any drops of the upper layer caught in
the tip. Then transfer the lower layer in the pipette into another container).
Transfer it into another conical bottom flask, Flask No.2.
5. Repeat extraction of the liquid in Flask No.1 with another 2 mL of
dichloromethane as described in steps 3-4. Combine the dichloromethane in
Flask No.2.
6. Add a small amount of anh.Na2SO4 and swirl the solution. Keep adding until
someof it swirls freely, and then set aside when the solution is no longer
cloudy.
7. Filter the solution using a Pasteur filter-tip pipette method. (Wrap the Pasteur
pipette tip with a small piece of cotton wool. Immerse the pipette into the
solution until the pipette tip reaches the bottom of the flask while squeezing
the rubber bulb. Draw the solution up into the pipette by releasing the
41
rubber bulb. Take off the cotton wool and expel the solution in the pipette
into the proper container).: Be careful not to lose the cotton wool during
suction. While lifting the pipette out, apply a little pressure by squeezing
the bulb softly to prevent suction of unfiltered solution into the pipette..
Transfer the solution in the pipette into another conical bottom flask, Flask
No.3. Connect the flask with a receiver distilling still and a water-cooled
condenser. Distil off dichloromethane to obtain the product at the bottom of
the flask.
EXPERIMENTAL NINE
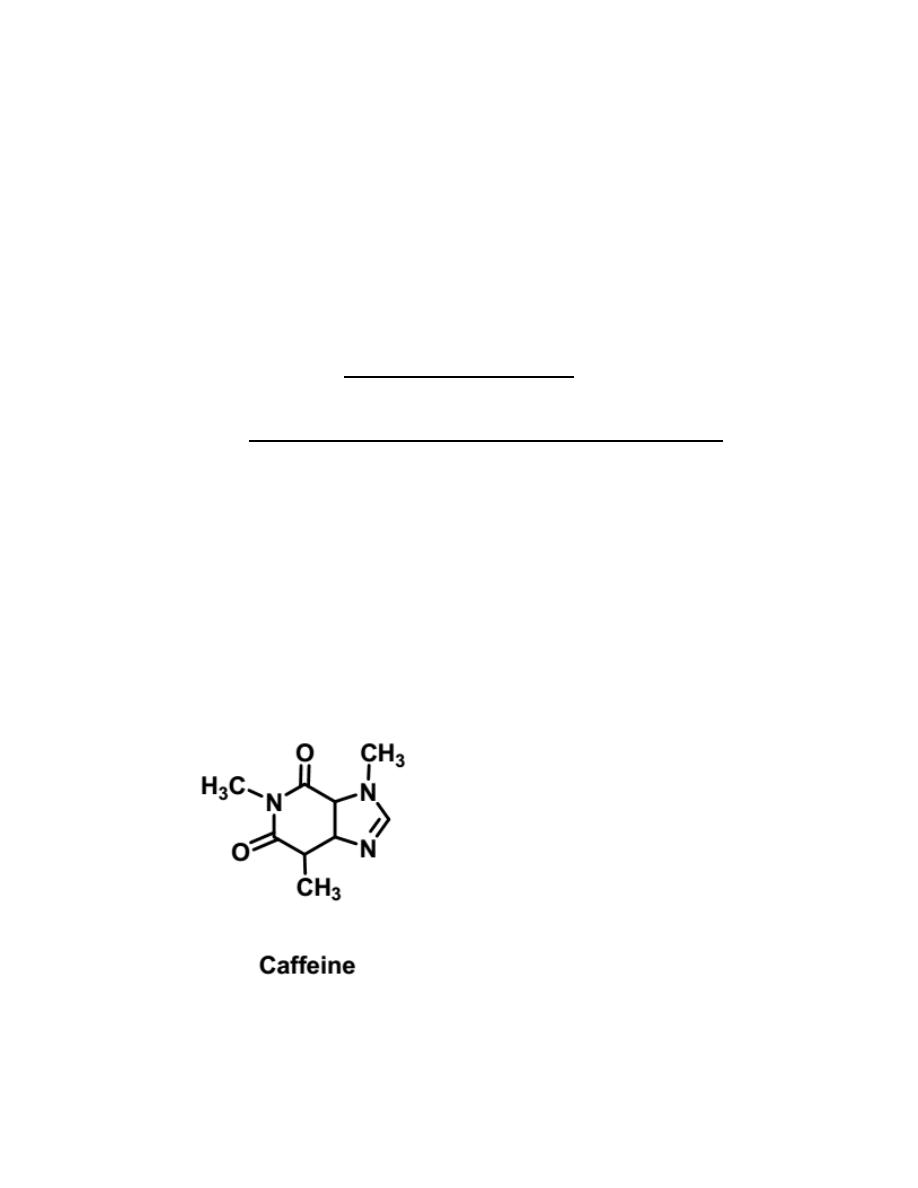
ISOLATION OF CAFFEINE FROM TEA LEAVES
Caffeine is an alkaloid which is a class of naturally occurring compounds
containing nitrogen and having the properties of an organic amine base.
Caffeine is the most powerful xanthine in its ability to increase alertness, put
off sleep and to increase one’s capacity for thinking. Caffeine is a vasodilator
(relaxes the blood vessels) as well as a diuretic (increases urination).
Caffeine does not exist alone in tea leaves. The leaves are mainly
cellulose, pigments and chlorophylls, and tannins. Tannins are phenolic
compounds of high molecular weight that have certain properties in
common. Caffeine is found in varying quantities in many plants. Some of the
better-known plant sources are coffee and cocoa beans, tea leaves, and kola
nuts.
In this experiment, caffeine will be extracted from tea and purify it by
sublimation.

42
Extraction of caffeine
1. Weigh 2 tea bags in 50-mL beaker and record their mass.
2. Place 15 mL of water, 2 g of Na2CO3, and a boiling stone into a 25-mL
round bottom flask. Boil the solution gently in a heat dissipation block on a
hot plate.
3. Pour a hot solution (from step 2) in a beaker containing 2 tea bags.
Completely immerse 2 tea bags into the solution and let them soak for 3
minutes.
: Occasional press the tea bags using a stirring rod. Be careful not to tear the
bag
open.
4. Transfer 10 mL of the solution into 10-mL conical bottom flask, Flask No.1.
Add a boiling stone. Connect the flask with a receiver distilling still fitted with a
water cooled condenser. Distil off water as much as possible
.5. Pour the rest of the solution into Flask No.1 and continue distillation until 2-3
mL of the solution is left in the flask.
6.
Allow
the
solution
to
cool
down
at
room
temperature.
7. Add 3 mL of dichloromethane and gently stir the mixture using a Pasteur pipette
method. (Draw a portion of the lower layer up into a pipette and carefully expel it
back into the flask, through the upper layer. Do this repeatedly for a few times). :
Gently mix the mixture. If not it may cause the emulsion occur in the mixture.
8. Allow the mixture to separate completely into two distinct layers. Remove the
lower dichloromethane layer, using a Pasteur pipette method. (Squeeze the rubber
bulb and lower the tip of the pipette to the bottom of the flask. Carefully draw up
the lower layer until the interface between the layers reaches the pipette tip. Lift
out the Pasteur pipette from the solution while still squeezing the rubber bulb and
expel any drops of the upper layer caught in the tip. Then transfer the lower layer
in the pipette into another container). Transfer it into another conical bottom flask,
Flask No.2.
: Be careful not to lose the cotton wool during suction. While lifting the pipette
out, apply a little pressure by squeezing the bulb softly to prevent suction of
unfiltered solution into the pipette.

43
9. Repeat the extraction of the solution in Flask No.1 with another 3 mL of
dichloromethane as described in steps 7-8. Combine dichloromethane in Flask
No.2.
10. Wash the dichloromethane layer in Flask No.2 with 2 mL of 5% NaOH and
then 2 mL of water using a Pasteur pipette method as described in steps 7-8.
Transfer dichloromethane in the pipette into another conical bottom flask, Flask
No.3. : Discard the upper aqueous layer.
11. Add a minute amount of anh.Na2SO4 and swirl the solution. Keep adding until
some of it swirls freely, and then set aside the solution is no longer cloudy.
12. Filter the solution using a Pasteur filter-tip pipette method. (Wrap the Pasteur
pipette tip with a small piece of cotton wool. Immerse the pipette into the solution
until the pipette tip reaches the bottom of the flask while squeezing the rubber
bulb. Draw the solution up into the pipette by releasing the rubber bulb. Lift out the
Pasteur pipette from the solution while still squeezing the rubber bulb. Take off the
cotton wool and expel the solution in the pipette into the proper container). : Be
careful not to lose the cotton wool during suction. While lifting the pipette out,
apply a little pressure by squeezing the bulb softly to prevent suction of unfiltered
solution into the pipette.
13. Transfer the solution in the pipette into another conical bottom flask, Flask
No.4. Connect the flask with a receiver distilling still fitted with the water-cooled
condenser. Distil off the dichloromethane to obtain the solid at the bottom of the
flask.
Another method
Isolation of Caffeine from Tea.—Boil gently 10 grams of tea with 500 cc. of water
for 15 minutes. Filter through a folded filter, and precipitate the tannin by adding)
drop by drop, to the hot filtrate a 10 per cent solution of lead acetate. When a
precipitate is no longer formed, filter the solution again, and evaporate it to about
75 cc. If a precipitate has separated during the evaporation, filter again. Cool the
solution,
and
extract
it
with
30
cc.
of
chloroform.
Separate
the chloroform and filter it through a dry paper. Set the solution aside to evaporate
pontaneously. Observe the appearance of the crystals. Apply the murexide test to a
few of the crystals. Use in one experiment nitric acid, and in another bromine-

44
water. (See experiment 161d above.) Sublime the rest in watch-glasses. (See §35,
page 24.) Taste a little of the sublimed caffeine.
Sublimation of product
Transfer the solid into a suction flask equipped with a cold finger. Sublime the
solid by heating in a heat dissipation block on a hot plate. When sublimation is
complete, carefully lift out the cold finger. Scrape off the crystals, weigh and
calculate its percent recovery. Determine its melting point.
Notes to Solubility Tests
1. Groups I, II, III (soluble in water). Test the solution with pH paper. If the com
pound is not easily soluble in cold water, treat it as water insoluble but test
with
indicator
paper.
2. If the substance is insoluble in water but dissolves partially in 5% sodium
hydroxide, add more water; the sodium salts of some phenols are less soluble
in alkali than in water. If the unknown is colored, be careful to distinguish
between the dissolving and the reacting of the sample. Some quinones (colored)
react with alkali and give highly colored solutions. Some phenols (colorless)
dissolve and then become oxidized to give colored solutions. Some compounds
(e.g., benzamide) are hydrolyzed with such ease that careful observation is
required to distinguish them from acidic substances.
3. Nitrophenols (yellow), aldehydophenols, and polyhalophenols are sufficiently
strongly acidic to react with sodium bicarbonate.
4. Oxygen- and nitrogen-containing compounds form oxonium and ammonium
ions in concentrated sulfuric acid and dissolve.
5. On reduction in the presence of hydrochloric acid, nitro compounds form
water-soluble amine hydrochlorides. Dissolve 250 mg of tin(II) chloride in
0.5 mL of concentrated hydrochloric acid, add 50 mg of the unknown, and
warm. The material should dissolve with the disappearance of the color and
give a clear solution when diluted with water.
6. Most amides can be hydrolyzed by short boiling with a 10% sodium hydroxide
solution; the acid dissolves with evolution of ammonia. Reflux 100 mg of the
sample and a 10% sodium hydroxide solution for 15–20 minutes. Test for the
evolution of ammonia, which confirms the elementary analysis for nitrogen
and establishe s the presence of a nitrile or amide.
45

46
Part Two
Biochemistry
Over the years, the world of Biochemistry has seen many changes for better
investigational techniques for the welfare of the patients. Hence it becomes
mandatory for any written material to show the changes duly. In this section, my
efforts have gone in a direction to improve the material.
In the ever expanding knowledge of Biochemistry it is very difficult on the part of
single individual to go through the various bigger volume of textbooks on practice
of biochemical investigations. This section in a concise but equally satisfactory
form will help the students and practitioners either to a great extent. Besides being
handy it has been kept up to its spirit of recent approaches by virtue of which one
has the best utility in a busy time. For every medical practitioner and enlighten
patients, Biochemistry has been playing a significant role. This section will
certainly be of significant importance to the practitioners as well as laboratories.
Methods of Expressing Concentration Concentration may be defined as weight per
unit volume.The most common expressions are:
1.Percent
2.Molarity
3.Normality
4.Molality
5.Formality.
1.Percent
According to Caraway there are three ways of expressing percentage of solution,
i.e. W/W, W/V,V/V. a. Weight per unit weight (W/W) A 10% W/W solution
contains 10 gm of solute in 90 gm of solvent. b. Weight per unit volume (W/V) A
10% W/V solution contains 10 gm of solute dissolved in final volume of 100 ml of
solution c. A 10% V/V solution contains 10 ml of the concentrate per 100 ml of
solution.

47
Physical Chemistry
pH Determination All biochemical reactions are greatly influenced by the
hydrogen ion concentration of the surrounding medium in which the reaction takes
place. The most convenient way of expressing hydrogen ion concentration is by the
term pH. pH is defined as the negative logarithm of the hydrogen ion concentration
of the solution. Hence it is both important and useful to know some of the simple
methods of pH determination. pH can be determined both by colorimetric and
electrometric methods. Electrometric method is the most accurate one and is done
by using a pH meter whereas colorimetric determination of pH can be simply done
by the following methods:
1.
Indicator
papers
also
called
narrow
range
pH
papers.
2. Universal indicators.
1. Gillespie’s drop method. Indicators are substances which change in colour
with change in the pH of the solution to which they are added. Indicators are
weak organic acids or bases. Their unionized forms show a colour while
their ionized forms, i.e. cations or anions have different or another colour.
The colour of the solution in presence of an indicator depends upon the
relative proportions of ionized and unionized forms of the indicator which in
turn depend upon the hydrogen ion concentration. For each indicator there is
a definite pH range in which it is present as a mixture of its ionized and
unionized forms. In this specific range, variations in the pH of the solution
will bring visible change in the colour of the indicator. It is necessary that the
effective pH range of the indicator includes the pH of the unknown sample.
1. Indicator paper
1 Indicator paper consists of a strip of a sensitized paper and is accompanied
by a colour chart which shows different colour which the indicator exhibits
at different pH values.
2 Take a strip of indicator paper and moisten it or dip it in the solution whose
pH is to be determined. Remove the excess of the fluid adhering to the
indicator paper strip by means of pressing between the folds of filter papers.
Compare the colour of the pH paper with the colour chart on the indicator
paper and thus determine the pH of the solution.

48
2. Universal indicator
Universal indicator is a wide range indicator solution having pH between 0
to 14.Take 5 ml of the unknown solution. Add to it 0.1 ml of the universal
indicator. Mix well and find out the pH by matching the colour of the
solution with the colour chart on the universal indicator bottle. The one with
which it coincides or matches, is the pH of the unknown solution.
2. Gillespie’s drop method
In the determination of pH by this method, the ratio of two forms of the
indicator may be found out by adding a known number of drops of an
appropriate indicator to the test solution and finding out how the same
number of drops has to be distributed between an acid and
alkali so that the colour of the test solution matches with that of the acid and
alkali solution.
Carbohydrates
To Study the Reactions of Monosaccharides:
Solutions provided are 1% glucose and 1% fructose.
Molisch Test
This is a general test for carbohydrates. Carbohydrates on treatment with strong
concentrated sulphuric acid undergo dehydration to give furfural or furfural
derivate which on condensation with α-naphthol yields a violet or purple coloured
complex whose exact structure is unknown. If oligosaccharides or polysaccharides
are present, they are first hydrolysed to the constituent monosaccharides which are
then dehydrated. Pentoses yield furfural and hexoses yield 5-hydroxymethyl
furfural.
Reagent:Molisch reagent α-naphthol in ethanol (ethanolic α-naphthol).
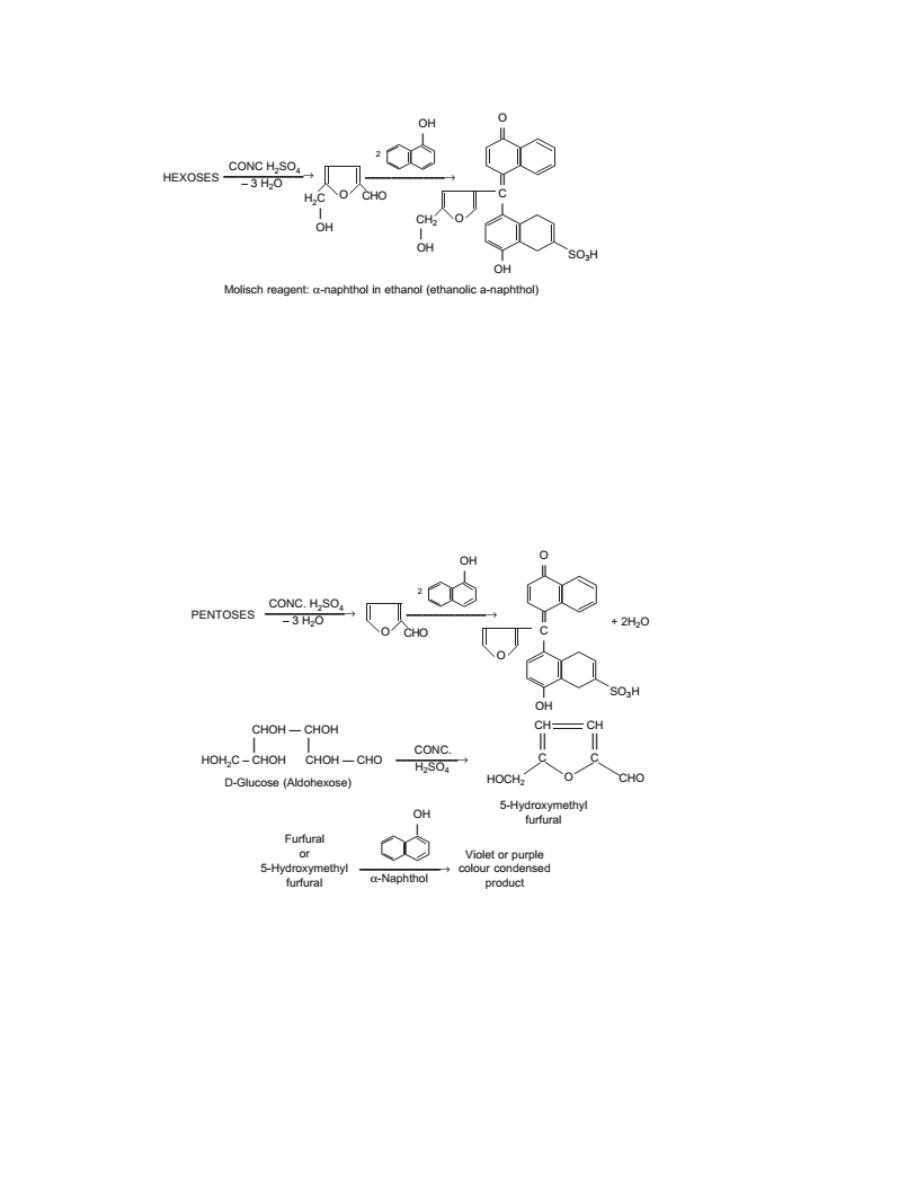
49
Test
In a clean and dry test tube, take 2 ml of the carbohydrate solution. Add 2 drops of
ethanolic α-naphthol (Molisch reagent). Mix and incline the test tube and
cautiously add 2 ml of concentrated sulphuric acid by the side of the test tube so
that the acid forms a layer under the carbohydrate solution. Gently rotate the test
tube between the palms of the hands to bring about slight mixing at the interface.
An appearance of violet or purple ring at the interface (junction) of two solutions
indicate the presence of carbohydrates.
Precaution
Test tube for this test should be completely dry.
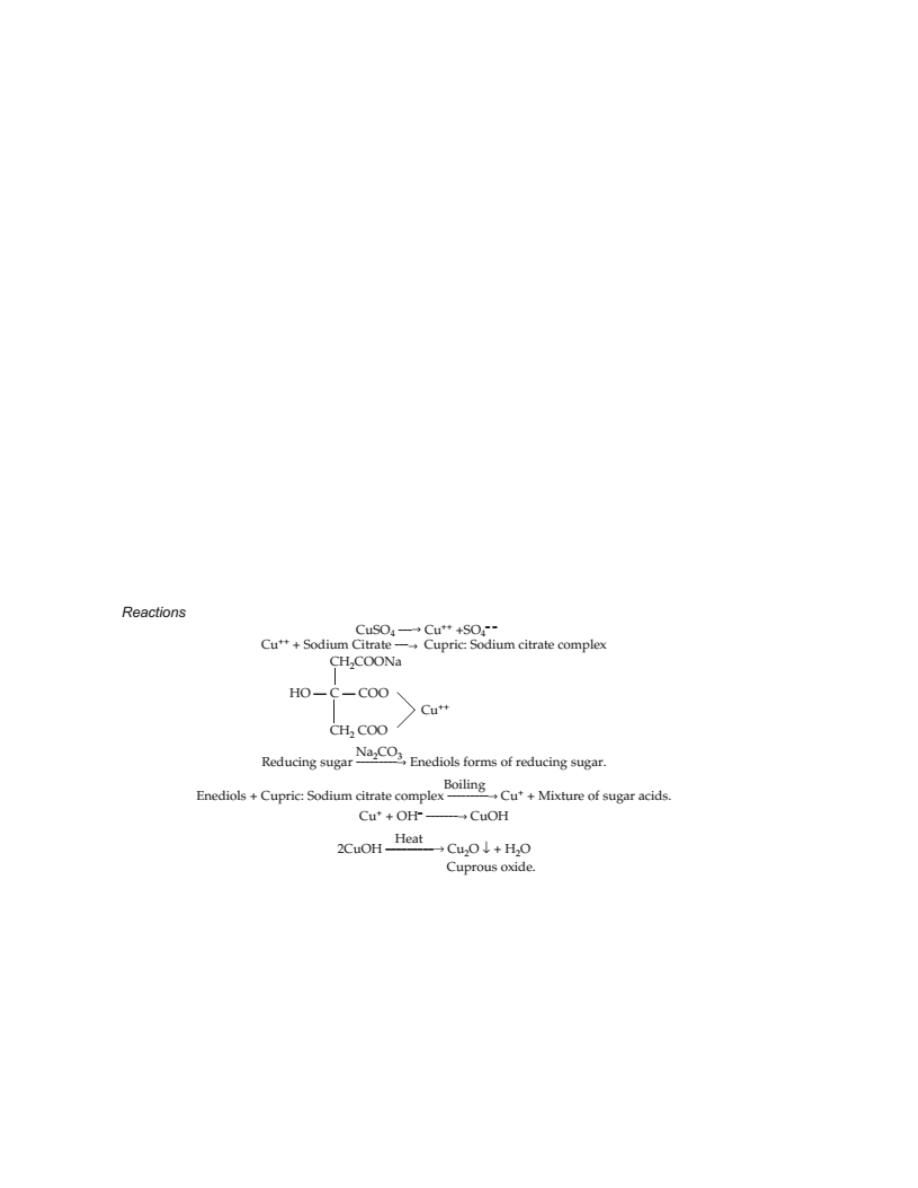
50
Benedict’s Qualitative Test
This test is positive for reducing sugars only. Reducing sugars (mono or
disaccharides) by virtue of free aldehydic or ketonic group in their structure reduce
cupric ions in alkaline solutions at high temperature. The alkali present in the
Benedict’s reagent enolises the reducing sugar to form enediols (different forms of
reducing sugar) which are highly reactive and act as strong reducing agent.
Benedict’s qualitative reagent contains: i. Copper sulphate Furnishes cupric ions
(Cu
++
) in solution.
ii. Sodium carbonate Makes medium alkaline. iii. Sodium citrate Prevents the
precipitation of cupric ions as cupric hydroxide by forming a loosely bound cupric-
sodium citrate complex which on dissociation gives a continuous supply of cupric
ions.
Benedict’s qualitative reagent is prepared by dissolving 173 gm of sodium citrate,
90 gm of anhydrous Na
2
CO
3
in 500 ml of distilled water. Slightly heat the contents
to dissolve. Filter the solution and make the volume to 850 ml. Dissolve separately
17.3 gm of CuSO
4
.5H
2
O in 150 ml of water. Add this solution slowly and with
stirring to the above solution—the mixed solution is ready for use.
Tests
Pipette 5 ml of Benedict’s qualitative reagent in a test tube. Add to it 8 drops of
given carbohydrate solution. Boil over a flame or in a boiling water bath for 2
minutes. Cool the solution. An appearance of green, yellow or red precipitate
indicates the presence of reducing sugars. The colour of the solution or precipitate
gives an approximate amount of reducing sugars present in the solution.

51
Fehling Test
This is another reduction test to detect the presence of reducing sugars.
It differs from Benedict’s qualitative test in that Fehling reagent contains
Rochelle’s salt (Sodium-potassium tartarate) in place of sodium citrate. Fehling
solution consists of: Fehling solution A It contains copper sulphate solution. It is
prepared by dissolving 34.65 gm of CuSO
4
-5H
2
O in 500 ml of distilled water
Fehling solution B It contains potassium hydroxide and Rochelle salt (Sodium
potassium tartarate). It is prepared by dissolving 125 gm of KOH and 173 gm of
Rochelle salt in 500 ml of distilled water. Mix, equal volume of Fehling A and
Fehling B before use. Benedict’s reagent is superior to Fehling test. It is
semiquantitative and more sensitive. Sodium citrate in Benedict’s reagent and
sodium-potassium tartarate (Rochelle’s salt) in Fehling solution prevent the
precipitation of cupric hydroxide or cupric carbonate by forming a deep blue
soluble, slightly dissociated complex with the cupric ions. These complexes
dissociate sufficiently to provide a continuous supply of ready available cupric ions
for oxidation.
Test
To 2 ml of Fehling solution (1 ml of Fehling A + 1 ml of Fehling B), add 2 ml of
Carbohydrate
solution. Mix and boil. Appearance of yellow or red precipitate of cupric oxide
indicates the presence of reducing sugars.
Barfoed’s Test
This test is used to distinguish monosaccharides from disaccharides by controlling
the pHand the time of heating. Barfoed’s test is a reduction test carried out in an
acidic medium. The acidity makes it a weaker oxidising reagent. Therefore only
monosaccharides, will reduce cupric ions. However if heating is prolonged,
disaccharides may be hydrolysed by the acid and the resulting monosaccharide will
give the test positive.
Reagent
Cupric acetate in lactic acid. Barfoed’s reagent is prepared by dissolving 24 gm of
copper acetate in 400 ml of boiling water. To this add 25 ml of 8.5% lactic acid
solution. Stir cool the solution and dilute to 500 ml.
Test
To 2 ml of Barfoed’s reagent add 2 ml of carbohydrates solution. Place the test tube
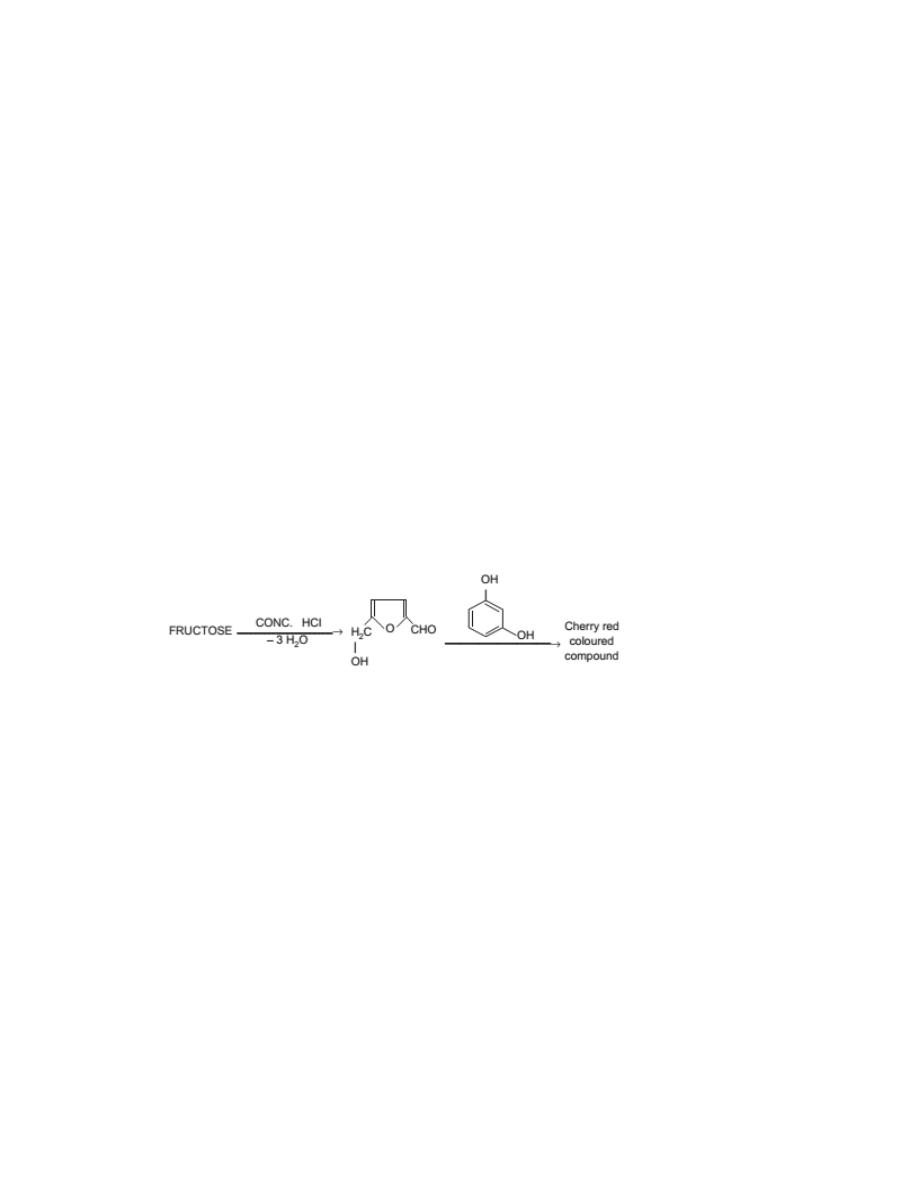
52
in boiling water bath for 3 minutes. An appearance of brick red precipitate of
cuprous oxide indicates the presence of monosaccharides.
Precautions The solution should be boiled for 3 minutes only. Overheating should
be avoided because on prolonged heating disaccharides will also give this test
positive.
Seliwanoff’s Test
This test is positive for ketohexoses only and hence is used in the detection of
fructose. Ketohexoses, i.e. fructose on treatment with hydrochloric acid form 5
hydroxymethyl furfural which on condensation with resorcinol gives a cherry red
coloured complex. Seliwanoff’s test distinguishes between fructose and glucose.
Overheating of the solution is avoided because on continuous boiling, aldoses will
also give this test positive because of their conversion to ketoses by hydrochloric
acid. Sucrose will also give Seliwanoff’s test positive because the acidity of reagent
is sufficient enough to hydrolyse sucrose to glucose and fructose but Benedict’s test
will be negative.
Reagent
Resorcinol in concentrated hydrochloric acid (diluted 1:1 with water).
Test
To 3 ml of Seliwanoff’s reagent in a test tube add 3 drops of carbohydrate solution.
Heat over a flame for 30 seconds only. Cool the solution. An appearance of cherry
red colour indicates the presence of fructose.
Phenylhydrazine Test (Osazone Formation Test)
Reducing sugar can be distinguished by phenylhydrazine test when characteristic
osazone crystals are formed. These osazones have definite crystal structure,
precipitation time and melting point and hence help in the identification of reducing
sugars.
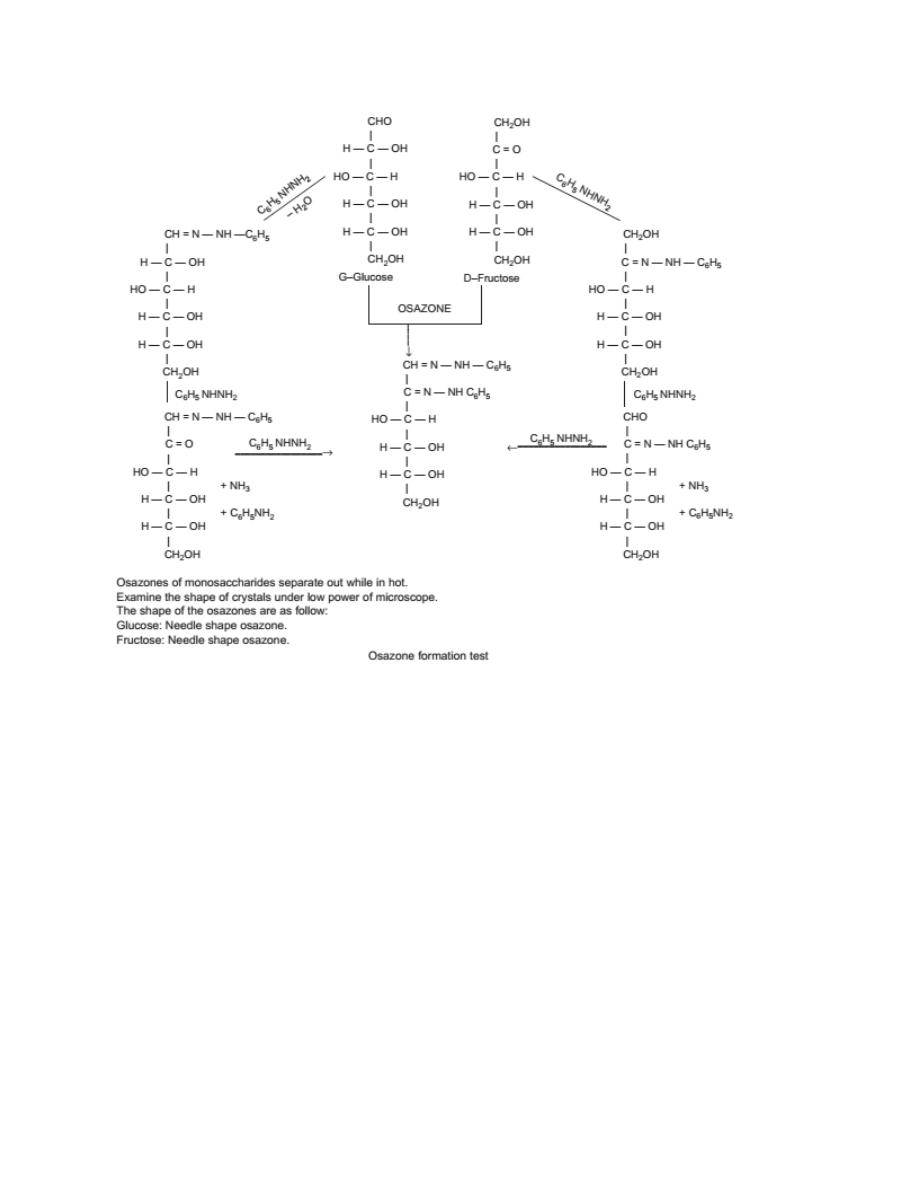
53
Phenylhydrazine reagent
In contains equal part of phenylhydrazine hydrocholoride and anhydrous sodium
acetate.
It
is prepared only at the time of reaction.
Test
In a clear and dry test tube, take approximately 0.5 gm. of phenylhydrazine mixture
(equal
part of phenylhydrazine hydrochloride and anhydrous sodium acetate). Add 5 ml of
carbohydrate solution and 1-2 drops of glacial acetic acid. Mix and place the test
tube in boiling water bath for 30 minutes.
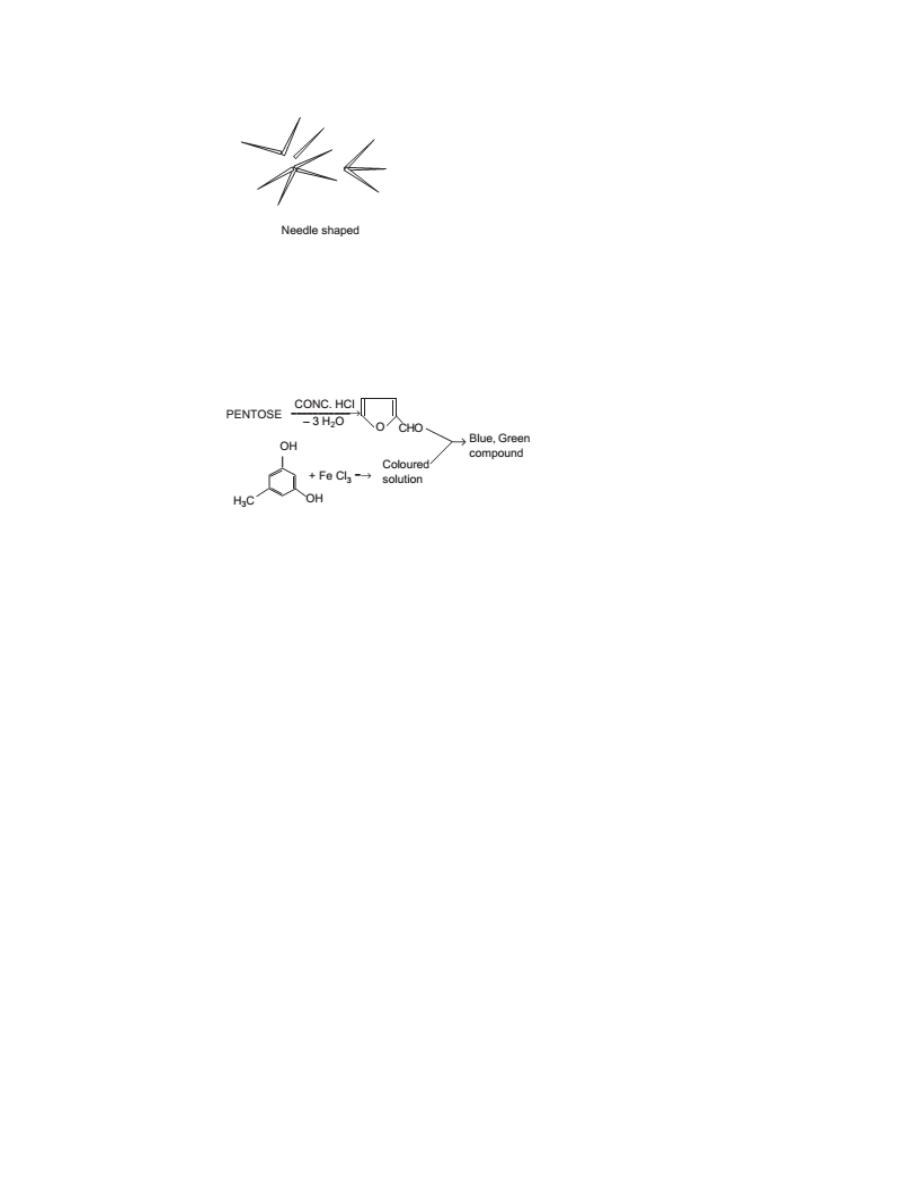
54
Bial’s Test for Pentoses
This is a sensitive test for the detection of pentoses. Pentoses on heating with strong
acid are converted to furfural which reacts with the coloured compound produced
when orcinol and ferric chloride react with each other.
Bial’s
reagent
(0.2%
orcinol
in
concentrated
hydrochloric
acid).
To 5 ml of Bial’s reagent acid add 10 drops of pentose solution (i.e. Aarabinose).
Boil. Appearance of green colour.
To Detect Galactose
Mucic acid test
Galactose on oxidation with strong acid gives mucic acid which crystallises out and
can be observed microscopically.
Test
In a test tube take 1 ml of galactose solution followed by 1 ml of concentrated nitric
acid. Evaporate the mixture by using boiling water bath for 1½ hours in a furming
cup board. Keep it overnight. Examine a drop of the crystals under low power of
microscope.
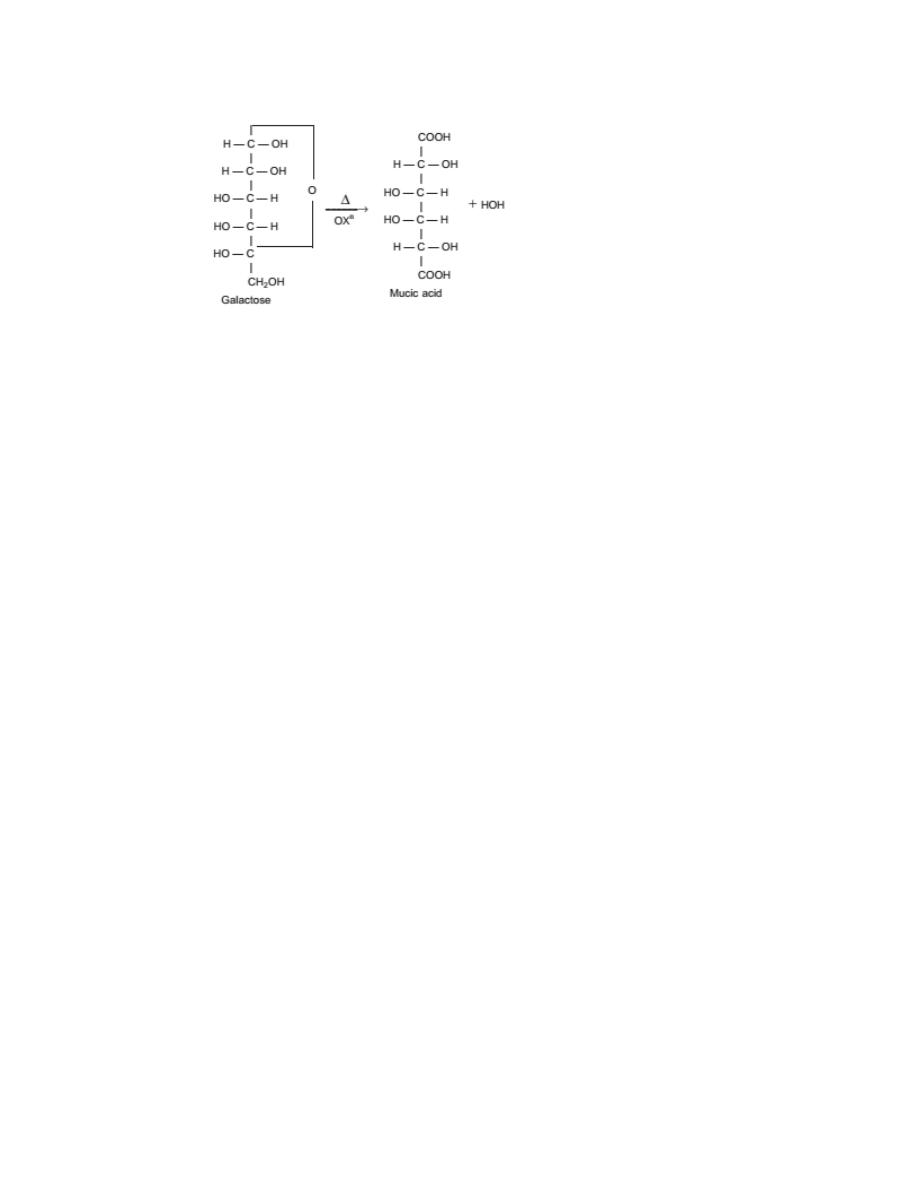
55
To Study the Chemical Reactions of Disaccharides
The most common disaccharides are maltose, lactose and sucrose. Maltose and
lactose are reducing disaccharides where as sucrose is a non-reducing disaccharide.
One percent solution of each maltose, lactose and sucrose are provided.
1. Molisch test
Dissaccharides are first hydrolysed to constituent monosaccharides which are then
dehydrated.
Test In a clean and dry test tube, take 2 ml of the carbohydrate solution. Add 2
drops of ethanolic α-naphthol (Molisch reagent). Mix. Incline the test tube and
cautiously add 2 ml of concentrated H
2
SO
4
by the side of the test tube. An
appearance of violet or purple ring at the junction of two solutions indicate the
presence of dicarbohydrates.
2. Benedict’s qualitative reagent
Test Pipette 5 ml of Benedicts qualitative reagent in a test tube. Add 8 drops of
given dicarbohydrate solution. Boil for 2 minutes. An appearance of green, yellow
or red precipitate indicates the presence of disaccharides.
Maltose and lactose give Benedict’s qualitative test positive whereas with sucrose
the test is negative, i.e. no reduction is observed.
3. Barfoed’s test
Test To 2 ml of Barfoed’s reagent add 2 ml of disaccharide solution. Place the test
tube in boiling water bath for 3 minutes. No change in colour indicates the presence
of disaccharides in the solution. Negative for disaccharides.
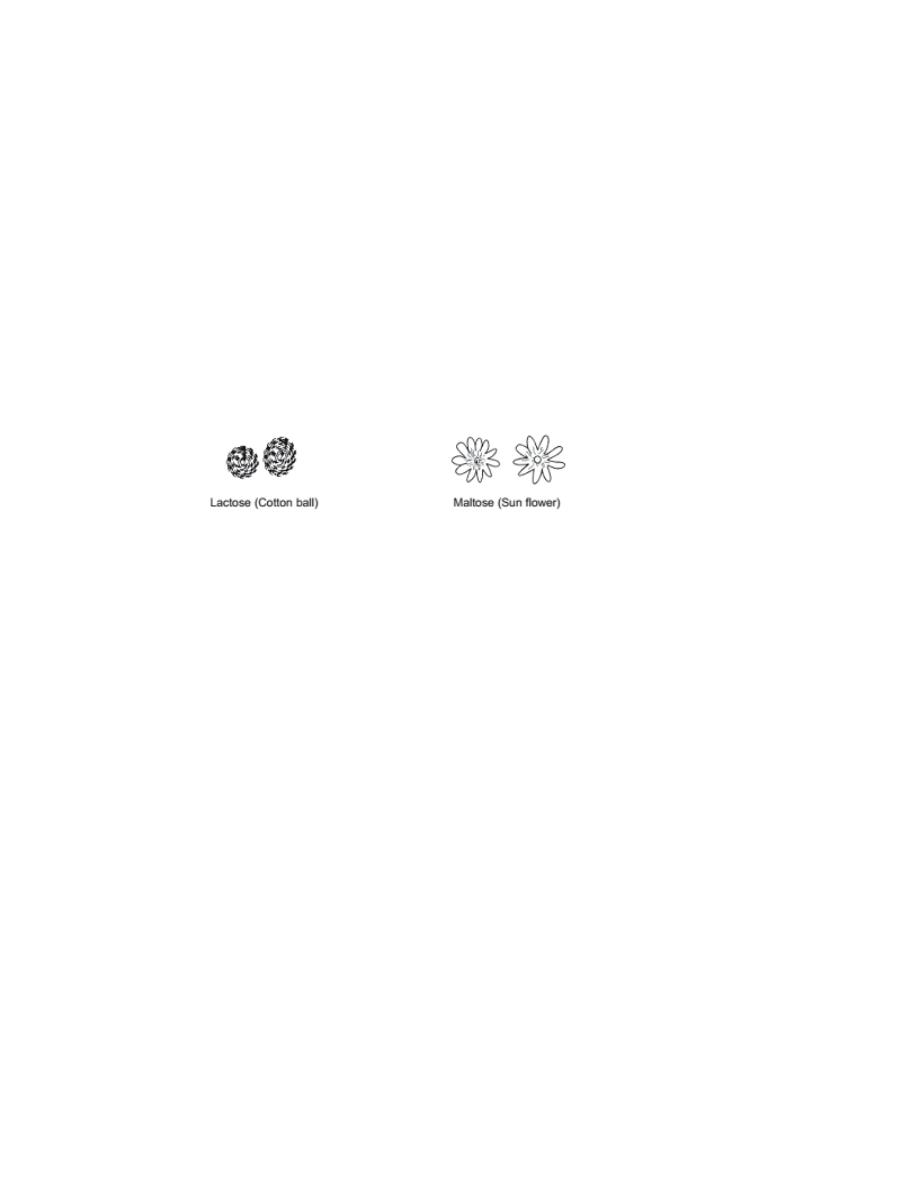
56
4. Osazone formation (i.e. phenylhydrazine test)
Osazones of disaccharides separate out on cooling. Test In a clean and dry test tube,
take roughly 0.5 g of phenylhydrazine mixture. Add 5 ml of disaccharide solution
and 2 drops of glacial acetic acid. Mix. Place the test tube in boiling water bath for
30 minutes. After 30 minutes, take out the test tube from the boiling water bath and
allow it to cool by itself in a test tube rack (Do not disturb the test tube in between
as the osazones of disaccharides separates out on slow cooling). Appearance of
yellow crystals takes place. Observe the shape of crystals under low power
microscope.
The shape of osazones are: Malatose : Sunflower shape Lactose : Cotton ball shape
Sucrose It will give Benedict’s qualitative test negative.
Lactose (Cotton ball) Maltose (Sun flower)
Sucrose is Confirmed As Test Take 5 ml of sucrose solution in a test tube. Add to
it 1-2 drops of concentrated hydrochloric acid. Boil the contents for few minutes
(2-5 minutes). Cool the solution. Divide it in two parts.
Neutralise one part of the solution with sodium carbonate and carry out the
Benedict’s qualitative test. The test will be positive. Carry out the Barfoed’s test
with the other part of the solution. It will be positive now.
Osazone Formation Carry out the osazone test with the hydrolysate solution of
sucrose. Appearance of needle shaped crystals.
To Study the Chemical Reactions of Polysaccharides
Solutions provided are 1% starch and 1% dextrins.
1. Molisch test
2. Iodine test.; This test is used for polysaccharides detection and differentiation.
Iodine forms a coordination complex between the helically coiled polysaccharides
chain and the iodine centrally located with in the helix due to adsorption. The
iodine colour obtained with the polysaccharides depends upon the length of the
unbranched or linear (α1, 4 linkage) chain available for complex formation.
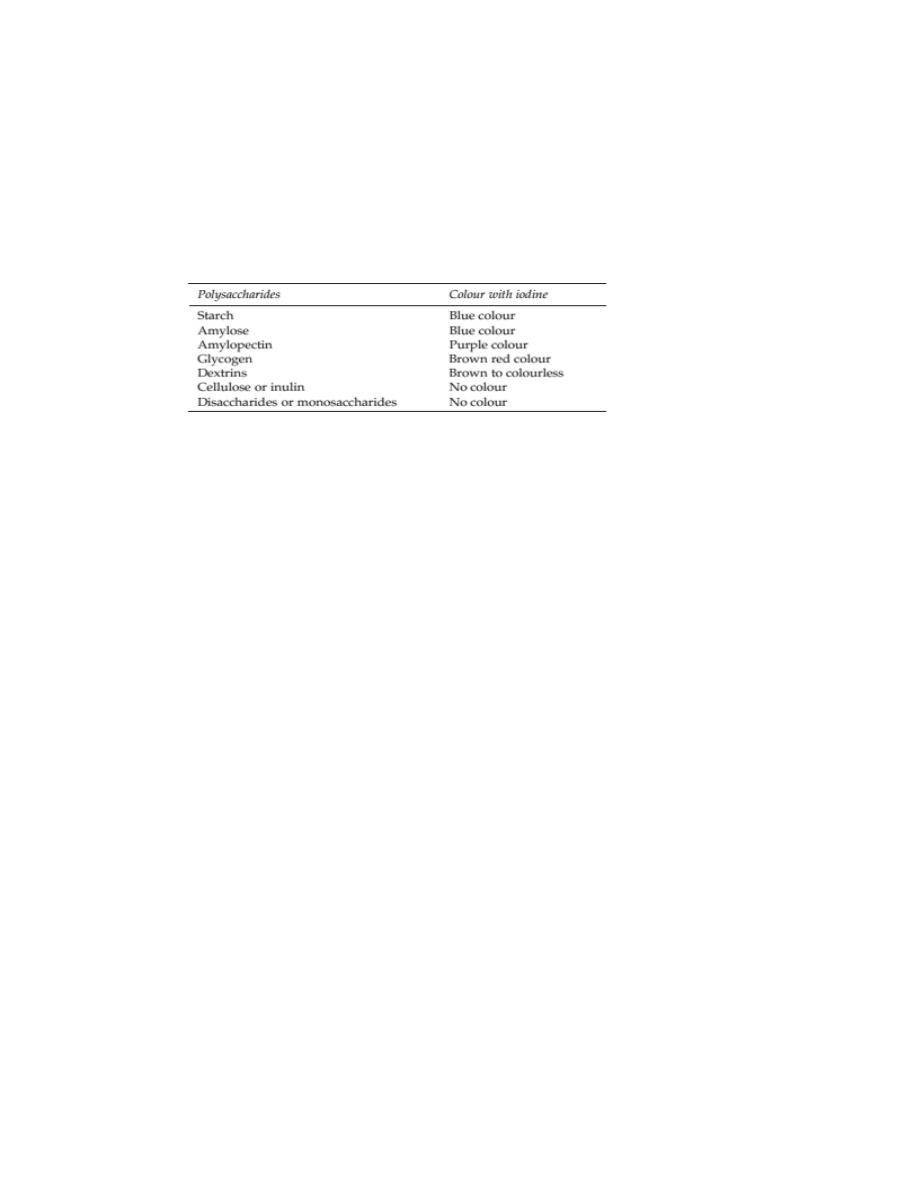
57
Amylose a linear chain component of starch gives a deep blue colour.
Amylopectin, a branched chain component of starch gives a purple colour.
Glycogen gives a reddish brown colour. Dextrins, formed from the partial
hydrolysis of starch gives colours ranging from brown red to colourless depending
on the size of the molecule. Cellulose, inulin, disaccharides or mono saccharides
gives
no
colour
with
iodine
Test
In two ml of carbohydrate solutions, add few drops of hydrochloric acid (to make
the medium acidic) followed by 1 ml of iodine solution. Mix and observe the
colour. No change in colour indicates the absence of polysaccharides.
Hydrolysis
i. Acid hydrolysis
In a 100 ml conical flask, take 20 ml of 1% starch solution. Add 5 ml of 2N HCl
(prepared by diluting one part of concentrated HCl to 4 parts of water). Divide the
solution in five equal parts (i.e. 5 ml each) in five different tubes and place the
tubes in a boiling water bath. Remove the tube from the boiling water bath at an
intervals of 1, 5, 8, 12 and 20 minutes.
Now divide the solution in each tubes in two parts:
i. With one part, perform Benedict’s qualitative test, after making the solution
alkaline (i.e. by neutralising the acidity of the solution with sodium carbonate).
ii. Second part, perform iodine test.
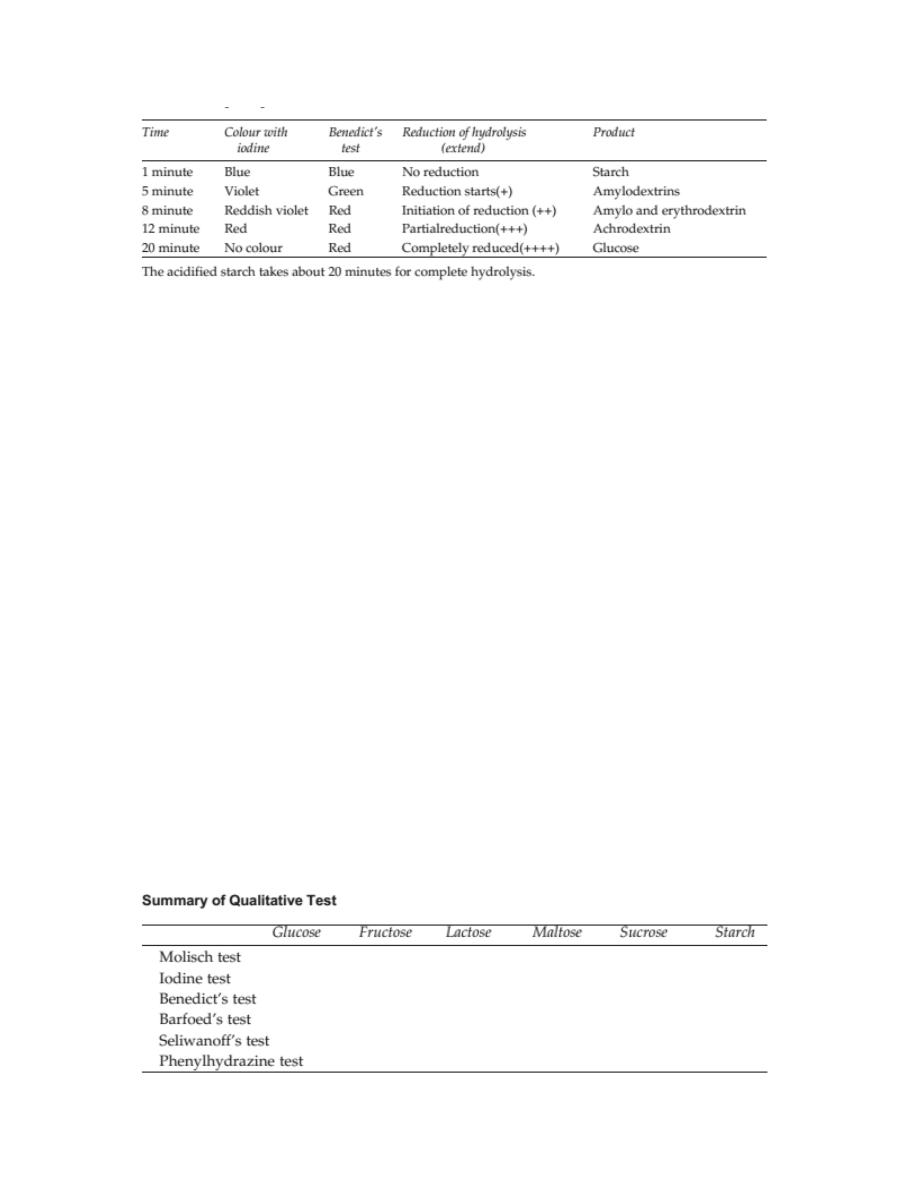
58
ii. Enzymatic hydrolysis
Take a clean test tube and collect some saliva in it. Take two dry test tubes and
label them as blank and experimental. Add 5 ml of 2% starch solution and 1 ml of
Citrate buffer (pH 6.0, prepared in 0.25 M NaCl) in each test tube. Mix well.
Now add 1 ml of distilled water only in the blank and 1 ml of saliva in the test.
Keep the test tubes for 30 minutes at room temperature.
1. In Blanka. Iodine test : Blue colour
b. Benedict’s test: Negative.
2. In Test
a. Iodine test : Negative
b. Benedict’s test : Red precipitate.
Blank Test sample
Iodine test Blue colour Negative
Benedict’s test Negative Red precipitate
Starch with saliva shows reduction as starch is converted to glucose which is a
reducing sugar. Where as starch without saliva is not broken up in to smaller
molecules because there is no hydrolysis.

59
Identification of Unknown Carbohydrate Solution
1. No need to perform Molisch test, as the unknown solution is carbohydrate in
nature.
2. Iodine test Positive for polysaccharides. Depending upon colour, the
polysaccharide is identified. If negative, polysaccharides are absent.
3. Benedict’s test Positive for reducing sugars.Reducing sugars can be
monosaccharides or disaccharides. If the Benedict’s test is negative, it means
reducing sugars are absent. Absence of Benedict’s test, indicates the presence of
non-reducing disaccharide, i.e sucrose.
4. Barfoed’s test Positive for monosaccharides. Barfoed’s test differentiates
between monosaccharides and disaccharides.
5. Seliwanoff’s test Positive for ketohexoses. Indicates the presence of fructose.
6. Osazone test For the identification of particular carbohydrates.
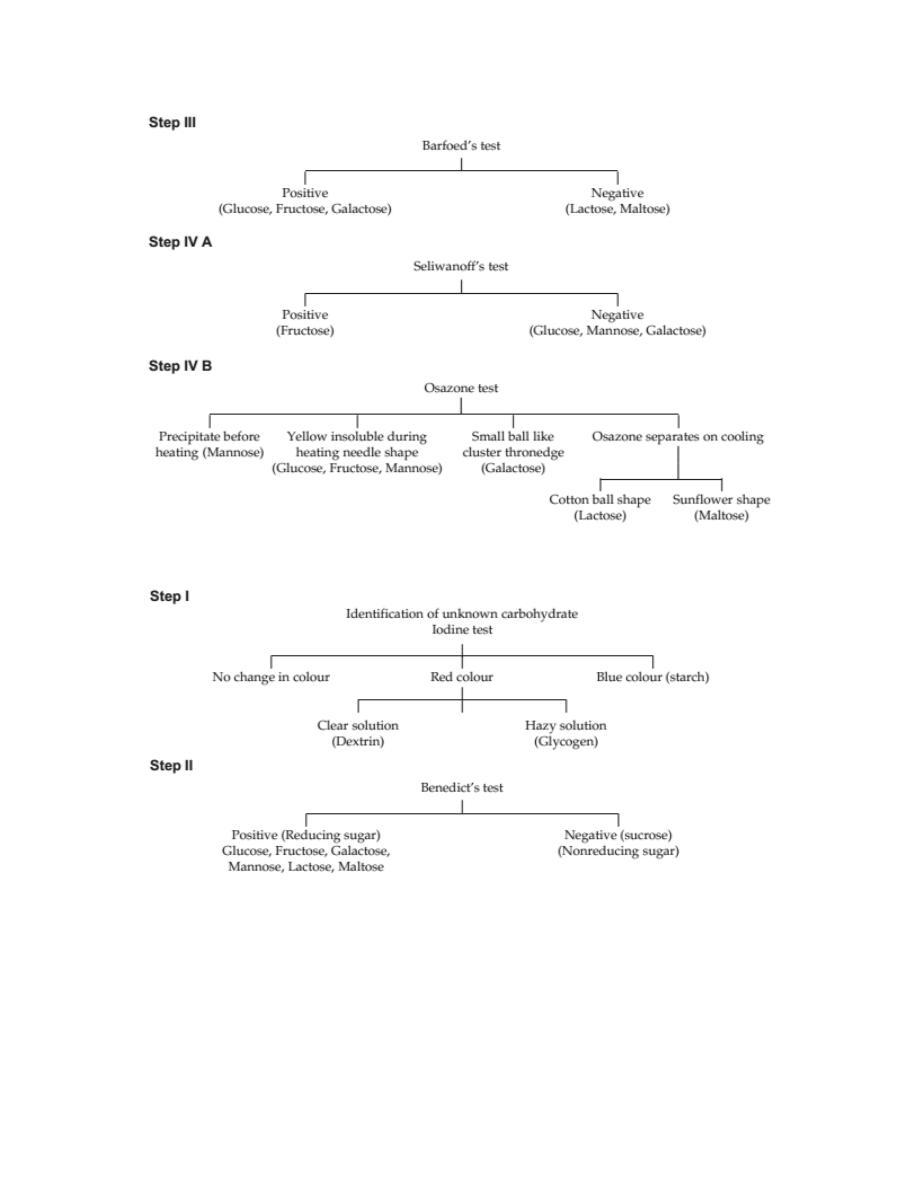
60
61
4.Achromic Point
Determination of Achromic Point of Your Own Saliva
This is a simple enzymatic hydrolysis of starch. This is different from acid
hydrolysis. Enzymatic hydrolysis gives bigger units and does not break the
branched point (i.e. amylopectin chains) or α-1, 6 linkage.
Achromic point is that point at which no colour is obtained with iodine. Chromic
period is that time period which is required to obtain achromic point when
enzymatic hydrolysis is being performed.
In an animal, there are enzymes which break only the α-1, 4 linkage, i.e. they break
only the straight chains. Enzymes for breaking the α-linkage are present only in the
plants.
-linkage enzyme which acts randomly breaking the
starch into monosaccharides (i.e. glucose) and maltose units. At places where there
is α-1, 6 linkage oligosaccharide units, the breaking proceeds in the following
order.
i. Once enzyme activity starts we get first soluble starch.
ii. The first product hereafter formed is amylodextrins.
iii. Next we get erythrodextins which gives reddish colour with iodine.
iv. No colour with iodine is got when we get achrodextrin. This point is called
achromic point.
Reagents required
1% starch, Buffer—pH 6.71% NaCl.
Procedure
Take 5 ml of 1% starch. Add 2 ml of buffer (pH 6.7) to it and 1 ml of 1% NaCI.
Mix.Take out 5 ml of it. This is prepared buffer-starch solution. Rinse your mouth
with water. Take 10-15 ml of warm water in mouth and rotate the water with
tongue. Take this in a polythene beaker and now taken 5 ml of this.
Take a tile having grooves and put iodine in equal amount in each groove.
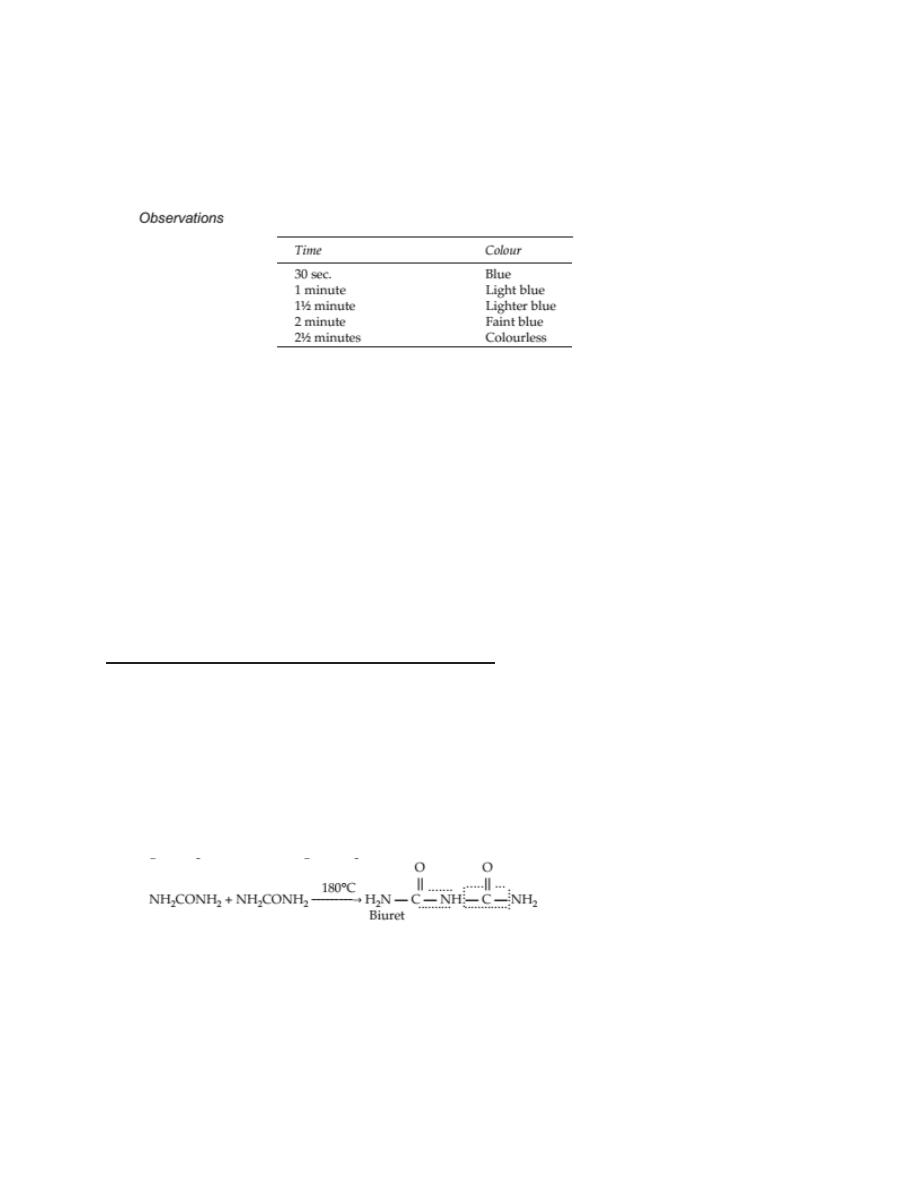
62
Now mix the saliva and prepared buffer-starch solution, and a drop of it at zero
hour and then at intervals of 30 seconds in iodine till the achromic point is reached.
Note the chromic period.
Result and Conclusion
The achromic point of saliva is 2½ minutes, this means that 2½ minutes are taken
till achromic point is got and formation of achrodextrin takes place. Now if we put
the hydrolysed solution in a drop of Fehling’s very little red precipitate is got
because enzyme hydrolysis does not produce many monomers.
Proteins
To Study the General Reactions of Proteins
1. Biuret Test: Biuret test is given by all compounds that contains two or more
peptide bonds. Since proteins are polypeptide, hence it is a general tests for
proteins.
The name of the reaction is derived from the organic compound, a biuret,
obtained by heating urea at high temperature which gives a positive test.
Reagent
Biuret reagent contains dilute copper sulphate in strong alkali.
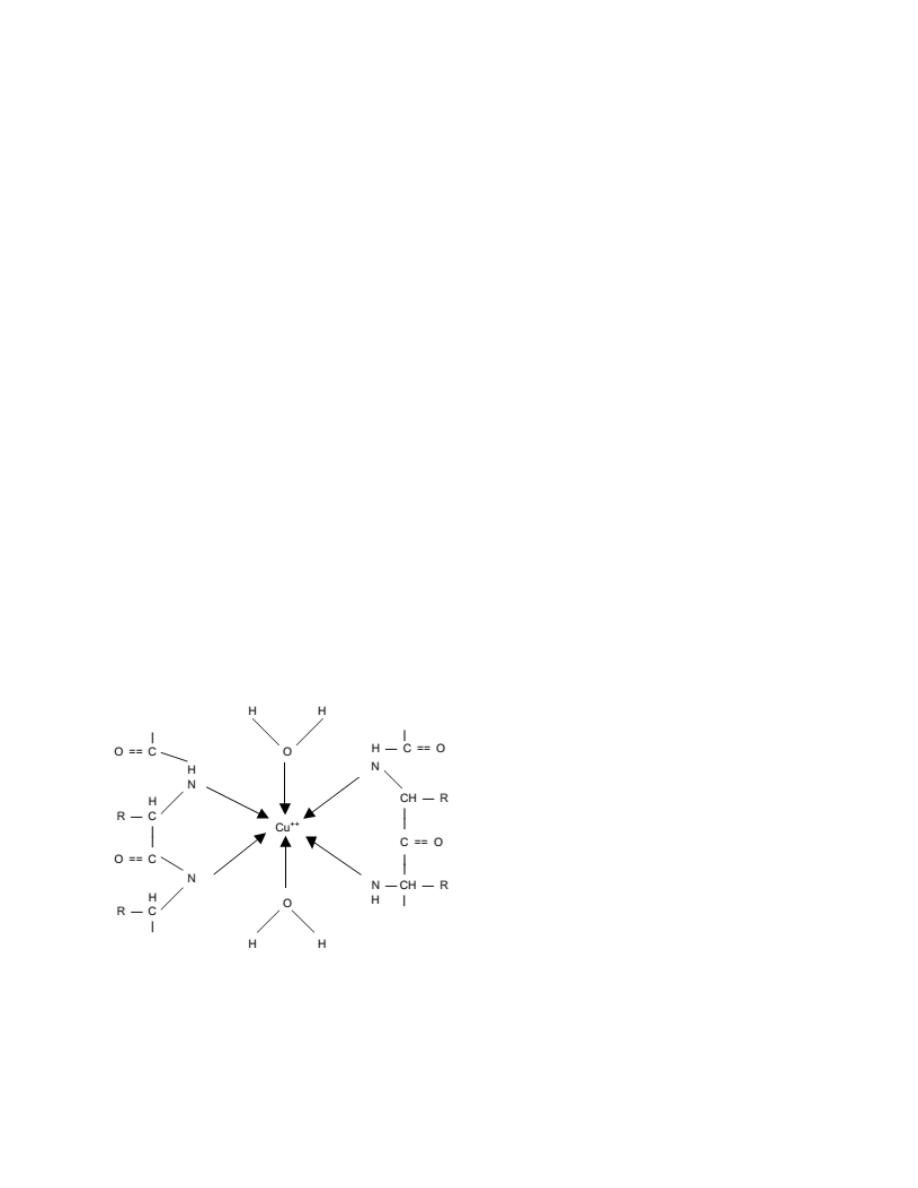
63
Biuret Reagent (Stock) It is prepared by dissolving 22.5 gm of Rochelle salt in 200
ml of 0.2N NaOH to this is added 7.5 gm of CuSO
4
5H
2
O with constant stirring.
Then is added 2.5 gm of KI and make the volume to 500 ml with 0.2 N NaOH.
Working biuret reagent is prepared by dissolving 50 gm of stock biuret reagent to
250 ml with 0.2N NaOH containing 5 gm of KI per liter.
Reaction
The purple or violet colour produced is believed to be due to a coordinate
complex between the cupric ions and four nitrogen atoms, two from each of two
adjacent peptide chains.
Test
Take 6 ml of 5% NaOH, in a test tube and add few drops of 1% CuSO
4
solution till
blue colour solution is produced. Divide the solution, i.e. 3 ml each in two test
tubes marked experimental test ‘A’ and control test ‘C’.
• To ‘A’ add 3 ml of protein solution. • To ‘C’ add 3 ml of distilled water.
Appearance of purple or violet colour in the tube ‘A’ shows the presence of
proteins with respect to tube ‘C’ which serves as a control for the test.
Appearance of purple or violet colour in the tube ‘A’ shows the presence of
proteins with respect to tube ‘C’ which serves as a control for the test.
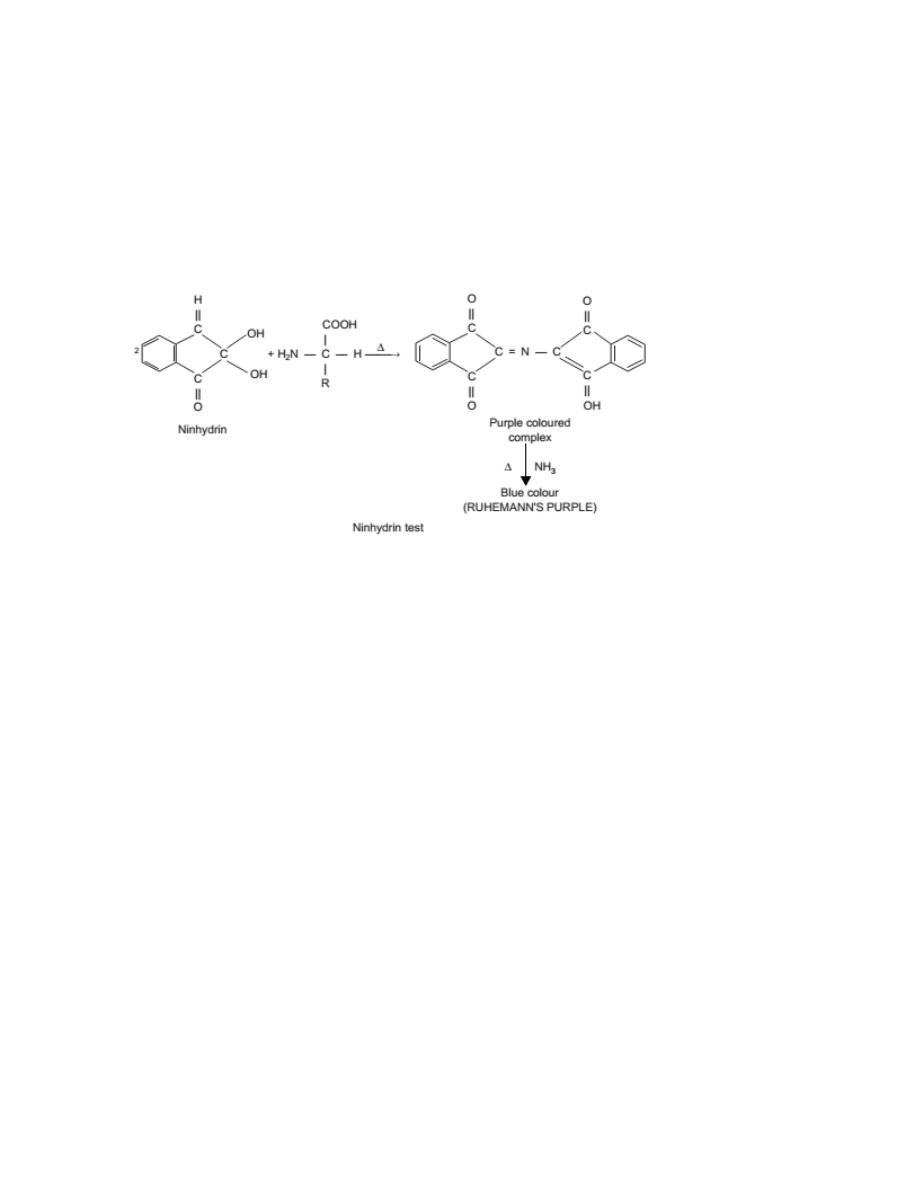
64
2. Ninhydrin Test
Proteins containing free α-amino acid radical in the molecule reacts with ninhydrin
to give a blue-violet coloured compound. Ninhydrin test is not given by protein and
hydroxy proline because no free α-amino group is present. They give only a yellow
colour.
Reagent
Ninhydrin dissolved in acetone.
Reaction
Protein solution heated with ninhydrin leads to the formation of a blue coloured
compound called Ruhemann’s complex.
Test
Take 1 ml of protein solution, add to it 2-3 drops of freshly prepared ninhydrin
solution. Heat the solution. Appearance of blue colour indicates the presence of
proteins.
To Study the R-Groups of Proteins
The most important aspect of R-group of proteins is that of their nutritional
significance. These acids which the animal body is unable to synthesise either
completely or in amounts sufficient to normal growth maintainence must be
supplied
in
the
food.
These
so
called
essential
amino
acids can be tested for in various way and can in many cases, be detected and
determined by means of simple colour reactions based upon the qualitative test.

65
A variety of colour reactions specific to particular functional groups in amino acids
are known. They are useful in both the qualitative and quantitative identification of
particular amino acids.
1.
Xanthoproteic test (For benzenoid radical)
The reaction is based upon the nitration of the benzene ring with
concentrated HNO
3
yielding yellow derivatives of nitrobenzene which turns
to orange in alkaline medium.
Test
Take 3 ml of test solution (protein solution). Add 1 ml of concentrated HNO
3
. A
white precipitate due to denaturation of protein is formed. Boil the solution. A
yellow solution derivative is formed due to nitration of benzene ring. Cool the
solution and make it alkaline with 20% NaOH, orange colour is produced.
2. Millon’s test (For hydroxy benzene radical)
This test is specific for tyrosine and is an indication of the presence of
tyrosine in the protein because tyrosine is the only amino acid containing
hydroxy phenyl group. A pink colour is obtained in this test is due to
mercury complex of nitrophenol derivatives.
Reagent
Mercuric nitrate dissolved in concentrated HNO
3
.
Test
Take 1 ml of test solution in a test tube. Acidify with dilute-H
2
SO
4
. Check
with litmus. Add 1ml of Millon’s reagent. Boil the solution. A yellow
precipitate adheres to the side of the test tube. Cool the solution under tap
water. Add a drop of 1% sodium nitrite (NaNO
2
) and gently warm. The
precipitate or solution turns red.
3. Hopkins-Cole test (For indole group): This test is specific for tryptophan
and is an indication of the presence of tryptophan in the protein.
Test
Take 1 ml of test solution and add few drops of 1: 500 commercial formalin
(40% formaldehyde). Add 2 drops of mercuric sulphate (i.e. 10% HgSO
4
in 10%
H
2
SO
4
). Mix. Incline the test tube and add 1 ml of concentrated H
2
SO
4
by the
side of the test tube. A purple ring is formed at the junction of the two layers.
4. Sakaguchi test (For guanidino group)
This test is given by all compounds containing guanidino group and thus is
an indication of the presence of arginine present either in free or in combined
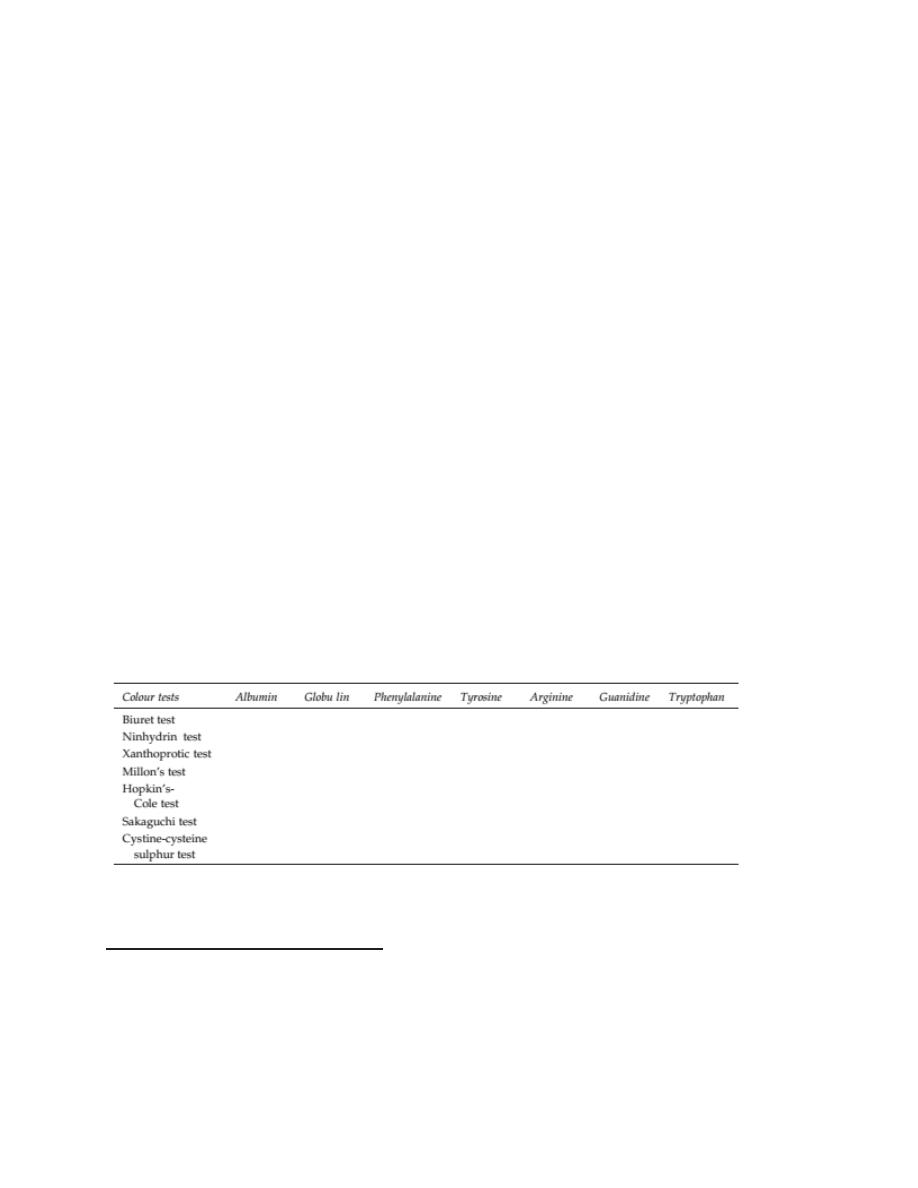
66
form.
Guanidines in alkaline solution give a red colour in the presence of α-
naphthol
and
sodium
hypobromite.
Test
Take 3 ml of test solution in a test tube. Add 1 ml of 5% NaOH, 2 drops of
ethanolic α-napthol, and 2 drops of 10% sodium hypobromite. Mix well.
Wait for 5 minutes. Development of bright red colour takes place. Run a
control by taking 3 ml of distilled water instead of protein solution and add
all other reagents as in test.
5. Test for cystine or cysteine (–S–S–and–SH radicals): Sulphur is present
in proteins as cystine, cysteine or methionine.
Test
Take 2 ml of test solution and add 2 ml 40% NaOH. Boil for 2 minutes. Cool and
add lead acetate solution. A black precipitate of PbS insoluble in dilute HCl is
formed.
6. Test for free—SH radical
Take 1 ml of test solution. Add few crystals of ammonium sulphate. To it add few
drops of freshly prepared solution of sodium nitroprusside and 1 ml of liquor
ammonia. Development of rose red colour takes place.
Precipitation Reactions of Proteins
1. Precipitation by heavy metals.
2. Precipitation by alkaloidal reagents.

67
3.Heat.
1. Precipitation by heavy metals (10% lead acetate, 10% CuSO
4
and 10%
ZnSO
4
)
Proteins are precipitated from solutions by salts of heavy metals probably by
combination of the metal ions with the anionic form of the protein. On the alkaline
side of the isoelectric point proteins exits as negative ions.
Test
1. Take 3 ml of protein solution. Add 2 drops of 5% NaOH. Mix, followed by 2 ml
of 10% lead acetate solution. Appearance of white precipitate.
2. Take 3 ml of protein solution. Add 2 drops of 5% NaOH. Mix, followed by 2 ml
of 10% CuSO4 solution. A light blue precipitate appears.
3. Take 3 ml of protein solution. Add 2 drops of 5% NaOH. Mix, followed by 2 ml
of 10% ZnSO
4
solution. An intense white precipitate appears.
2. Precipitation by alkaloidal reagents
Proteins are precipitated from the solution by combination between the acid anions
and the positively charged protein molecule by forming all insoluble complex. The
alkaloidal reagents precipitate proteins by combination of the acidic radical of the
former with the cationic form of the protein, which predominates when the solution
is on the acidic radical of the former with the cationic form of the protein, which
predominates when the solution is on the acidic side of the isoelectric point.
a.
To 3 ml of protein solution, add few drops of metaphosphoric acid. A dirty
white precipitate appears.
b. To 3 ml of protein solution, add few drops of 20% sulphosalicyclic acid.
White precipitate appears.
c. To 3 ml of protein solution, add 3 ml of Esbach reagent. A precipitate appears.
d. To 3 ml of protein solution, add few drops of glacial acetic acid followed by 1
ml of 5% potassium ferrocyanide. A deep yellow precipitate appears.
3. Precipitation of proteins by heating
Proteins which are precipitated when their solutions are heated are termed as
heat coaguable proteins. This property of proteins is made use of in the detection
of albumin in urine simply by heating the urine.

68
Lipids
To Perform General Tests for Lipids
Lipids are defined as a group of fatty nature which are insoluble in water but
soluble in nonpolar solvents like ether, chloroform, etc. Lipids thus include
fats, oils, waxes and related compounds. Lipids are classified as simple and
complex.
Experiment
1. Solubility
Take three perfectly dry test tubes. To the first add 2 ml of distilled water, to
the second 2 ml of ethyl alcohol and to the third 2 ml of chloroform. To each
of the three test tubes add 3 drops of the provided oil. Shake gently and
observe.
Observation
The provided oil is insoluble in water, hence it floats on the surface of water,
forming a separate layer. The oil is fairly soluble in ethyl being heavier than
alcohol, some of the oil (undissolves, settle down at the bottom as minute
droplets, whereas it is extremely soluble in chloroform. The resulting
solution is clear.
Inference
Oils are insoluble in water sparingly soluble in alcohols but extremely
soluble in fat solvents like chloroform.

69
Experiment
2. Emulsification
Take three perfectly clean test tubes.
• To the first add 5 ml of distilled water.
• To the second add 5 ml of bile salt solution.
• To the third add 5 ml of household detergent (Surf solution).
• To each of the three test tubes, add 3 ml of the provided oil.
• Shake vigorously and observe.
Observation
In the first tube a temporary emulsion of oil in water is formed. On vigorous
shaking, this emulsion is unstable and so breaks down early. In case of bile
salt solution and household detergent solution, a highly stable emulsion is
formed. The emulsion is very fine and breaks down after long time.
Inference
Oils form a coarse and unstable emulsion with water. This readily breaks
down. So this concludes that oils do not reduce the surface tension of water.
In case of bile salt solution and household detergent, the emulsion is fine and
very stable because bile salts and household detergents reduce the surface
tension of water as a result of which oil fragments into small
droplets which form an emulsion.
Experiment
3. Acrolein test
Take a clear test tube and add 4 drops of provided oil to it. Then add a pinch
of potassium bisulphite and heat vigorously. Smell the fumes of the gas
which come from one of the test tube.
Observation
Pungent smelling fumes arise from one of the test tube.
Inference
Acrolein is evolved which has a pungent smell. All the triglycerides give this
test.
Experiment
4. Saponification
Take a clean dry test tube and add 0.5 ml of the provided oil then add 2.5 ml
of ethanol to it and mix well. After mixing, add 10 ml of 10% alcoholic
sodium hydroxide, shake well and keep in boiling water bath for 15 minutes.
Take the test tube after 15 minutes and add water so that the resulting

70
volume of the solution is 15-20 ml. Shake well to dissolve. Divide the
contents into 4 equal parts in four different test tubes.
a. To the first part, add 3 ml of conc. HCl and shake well. b. To the second
part, add an equal volume of saturated NaCl solution. c. To the third part,
add 3 drops of CaCl
2
.
b. d. To the fourth part, add 3 drops of MgCl
2
.
c. Observation
A
white
precipitate
of
liberated
fatty
acid
is
obtained.
Sodium salts of fatty acid rise up and form a pale white layer.
A white precipitate of calcium salt of fatty acid is formed.
A white precipitate of magnesium salt of fatty acid is formed.
Inference
The liberated fatty acid being insoluble in water is precipitated.
The sodium salt of fatty acid is salted out. Calcium salt of fatty acid being
insoluble is precipitated.
Experiment
5. Test for unsaturation Take a clean dry test tube and add 3 drops of oil in
it. Then add 2 ml of ethyl alcohol and mix well. Then add 0.5% alcoholic
bromine solution until bromine solution imparts its own colour.
Observation
The colour of the solution was colourless at first but gradually turned pale
yellow, i.e. the colour of the bromine solution itself.
Inference
Bromine goes into the solution forming a dibromide, i.e. it add to the double
bonds. In other words, bromine solution is decolourised, but when all the
double bonds are saturated the bromine solution imparts its own colour.
Experiment
6. Test for cholesterol
a. Libermann-Burchard reaction
Take a perfectly dry test tube and add 2 ml of CHCl3 solution of
cholesterol to it. Then add 10 drops of acetic anhydride and mix well.
Then add drops of concentrated H2SO4 from the sides of the test tube.
Keep it in dark after mixing well.
Observation
A deep green coloured solution is obtained.
Inference
This indicates the presence of cholesterol.

71
Experiment
b. Salkowski reaction: Take a perfectly clean and dry test tube and add to
it 2 ml cholesterol. Solution prepared in cholesterol. Then add an equal
volume of concentrated H
2
SO
4
dropwise along the side of the test tube.
Observation
Two layers are formed. The upper brown one is formed by CHCl
3
and the
lower one yellow in colour formed by concentrated H
2
SO
4
. This layer of
conc. H
2
SO
4
gives fluorescence.
Inference
This indicates the presence of cholesterol.
Inference
The liberated fatty acid being insoluble in water is precipitated.
The sodium salt of fatty acid is salted out. Calcium salt of fatty acid being
insoluble is precipitated.
Experiment
5. Test for unsaturation: Take a clean dry test tube and add 3 drops of oil in
it. Then add 2 ml of ethyl alcohol and mix well. Then add 0.5% alcoholic
bromine solution until bromine solution imparts its own colour.
Observation
The colour of the solution was colourless at first but gradually turned pale
yellow, i.e. the colour of the bromine solution itself.
Inference
Bromine goes into the solution forming a dibromide, i.e. it add to the double
bonds. In other words, bromine solution is decolourised, but when all the
double bonds are saturated the bromine solution imparts its own colour.
Experiment
6. Test for cholesterol
a. Libermann-Burchard reaction: Take a perfectly dry test tube and add 2
ml of CHCl
3
solution of cholesterol to it. Then add 10 drops of acetic
anhydride and mix well. Then add drops of concentrated H
2
SO
4
from the
sides of the test tube. Keep it in dark after mixing well.
Observation
A deep green coloured solution is obtained.
b. Inference
This indicates the presence of cholesterol.
c. Experiment
b. Salkowski reaction: Take a perfectly clean and dry test tube and add to

72
it 2 ml cholesterol. Solution prepared in cholesterol. Then add an equal
volume of concentrated H
2
SO
4
dropwise along the side of the test tube.
d. Observation
Two layers are formed. The upper brown one is formed by CHCl3 and the
lower one yellow in colour formed by concentrated H
2
SO
4
. This layer of
conc. H
2
SO
4
gives fluorescence.
e. Inference
This indicates the presence of cholesterol.
Determination of Saponification Number of an Oil
Saponification number is defined as the number of milligrams of KOH
required to saponify completely 1 gm of fat. Since fats are mixture of
triglycerides, most of which are of mixed type, so saponification number is a
measure of average moleculer weight of the fatty acids comprising the fats
(i.e. the measure of the average chain length of the fatty acid).
Saponification number is an important constant particularly in distinguishing
or identifying certain oils.
Procedure
Take a clean and dry 100 ml conical flask. Using a 2 ml pipette, transfer 1.5
ml of the oil sample provided in the conical flask. Add 15 ml of 0.5 N
ethanolic KOH into the flask containing the oil. Mix the contents well. Place
a funnel at the neck of the conical flask (the stem of funnel acts as a
condenser) and place it in the boiling water bath for half an hour till all the
oil globules disappear and a yellow cake is formed by potassium salts of
fatty acids. After half an hour, take out the conical flask, cool it to room
temperature. Add 20 ml of distilled water in the flask, and shake till a clear
solution is formed. Now add 1-2 drops of phenolphthalein as an indicator.
Titrate with 0.5 NHCl till the colour is changed from red to colourless. Note
the titre value. Also run a blank titration, without using oil under similar
conditions and note the titre valve.
Observation
• Volume of HCl required for saponified solution = T ml.
• Volume of HCl required for blank titration = B ml.
• Volume of HCl utilised = (B–T) = Blank test reading value.
According to Normality equation
• 1 ml of 0.5 N HCl = 1 ml of 0.5 N KOH
• (B–T) ml of 0.5 N HCl = (B–T) ml of 0.5 N KOH
• 1 ml of 0.5 N KOH = 28 mg of KOH
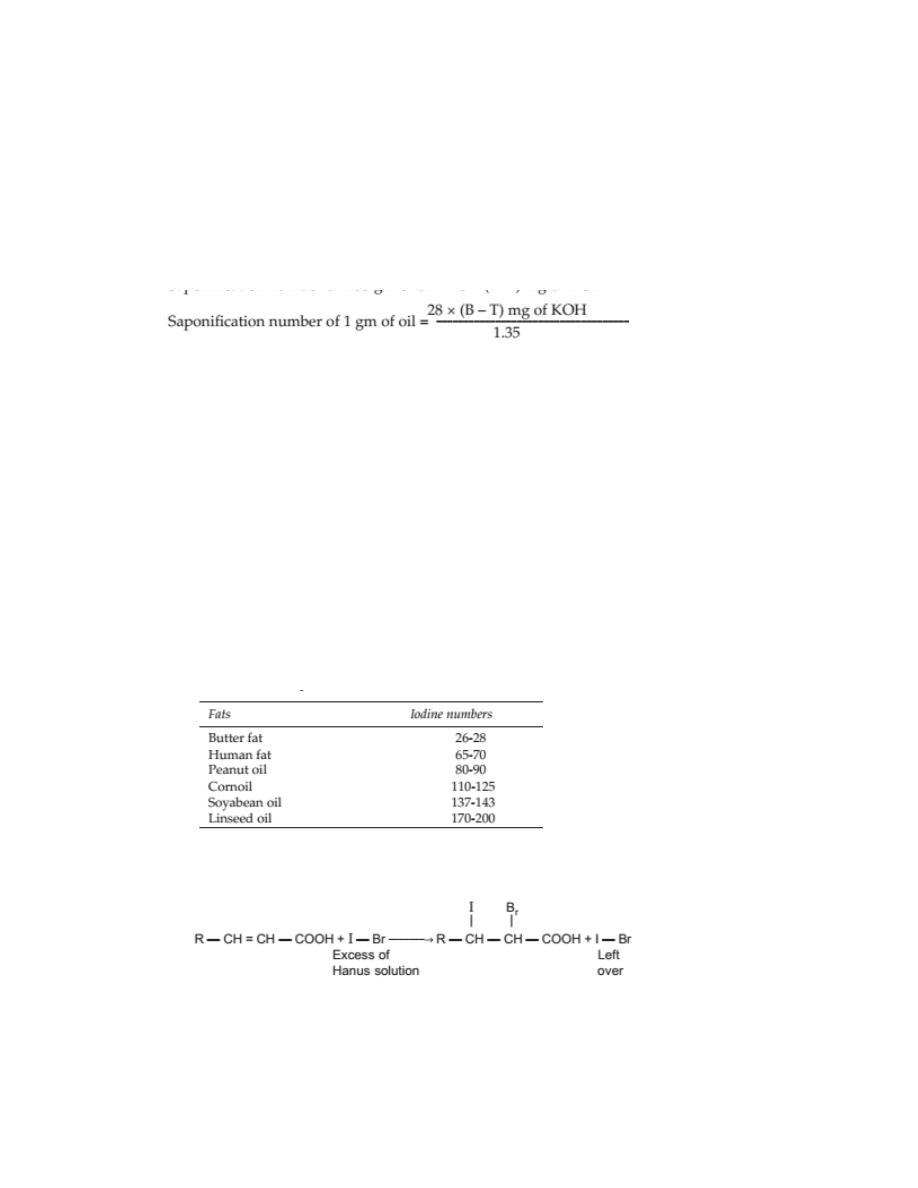
73
• (B–T) ml of 0.5 N KOH = 28 (B–T) mg of KOH
• Weight of oil = Volume × density = 1.5 × 0.9 = 1.35 gm.
• Saponification number of 1.35 gm of oil = 28 × (B–T) mg or KOH
28 × (B – T) mg of KOH
•
Saponification
number
of
1
gm
of
oil
=
____________________________________
1.35
Iodine Number
To Determine the Iodine Number of the Given Oil
Iodine number is defined as the number of grams of iodine absorbed by 100
gm of the fat. Halogens, e.g. iodine or bromine are taken up by the fats
because of the presence of double bonds present in the fatty acid part of the
fat. Iodine number is a measure of the degree of unsaturation of a fat. The
higher the iodine number, the more is the unsaturation present in the fat.
Iodine number is a useful characteristic for assessment of both purity and
nutritive value of the fat. Bromine is often used instead of iodine because it
is more reactive. The value is influenced by the percentage of each
unsaturated fatty acid, the degree of unsaturation of each acid and the mean
molecular weight of the fat. The iodine members of some important fats are
mentioned below:
Principle
The given amount of fat is treated with a measured excess of Hanus solution.
To the left over Hanus solution is added potassium iodide solution. The
iodine thus liberated is titrated against standard solution of “hypo” (Na
2
S
2
O
3
)
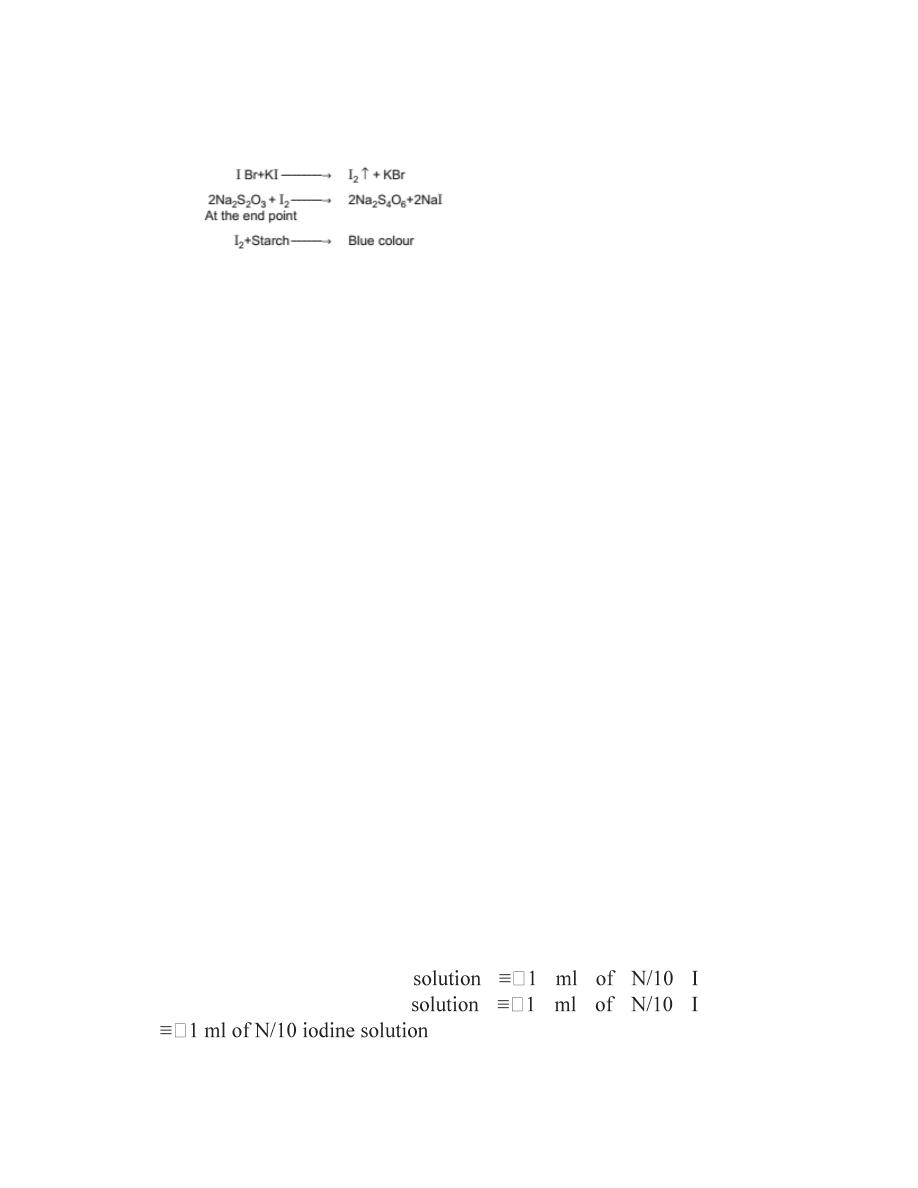
74
using starch as an indicator. The colour change is from deep blue-black to
white which marks the end point of the titration.
Procedure
Test
In a 250 ml conical flask, add 5 ml of given oil sample (the oil sample is
dissolved in CCl4. The concentration of the oil sample is 5 g%), followed by
10 ml of Hanus solution. Mix well, cover the mouth of the flask with a paper
and keep it for 30 minutes for reaction to take place. After 30 minutes, add 5
ml of KI solution into it. Mix well, followed by 25 ml of distilled water. Add
4-5 drops of starch as indicator. The colour of the solution turn blue-black.
Titrate the contents of the flask with N/10 Na
2
S
2
O
3
till the colour changes
from blue-black to white, which marks the end point of the titration. Note
down the titre value which is x ml.
Blank
In 250 ml conical flask add 5 ml of CCl4 only instead of oil sample and
repeat the same procedure as in the test. Note down the titre value which is y
ml. The difference between the two (i.e. blank-test) gives the amount of
Na2S2O3 utilised in titrating the IBr which was used in saturating the
unsaturated fatty acid moiety, i.e. the volume of I Br required to saturate the
oil = (Blank-Test) value. In the test titration the excess of I-Br, i.e. the left
over
I-Br
is
titrated
against
Na2S2O
3
.
In blank titration the excess of I-Br (as in the first case) and the actual
volume of I-Br which would have used up by an oil to be saturated are
together
titrated
against
Na
2
S
2
O
3
.
Calculation
Titre value obtained for test titration = x ml
Titre value obtained for blank titration = y ml According to Normality
equation
1 ml of N/10 Na
2
S
2
O
3
-Br solution
1 ml of n/10 Na
2
S
2
O
3
-Br solution
Equivalent weight of iodine = 127.
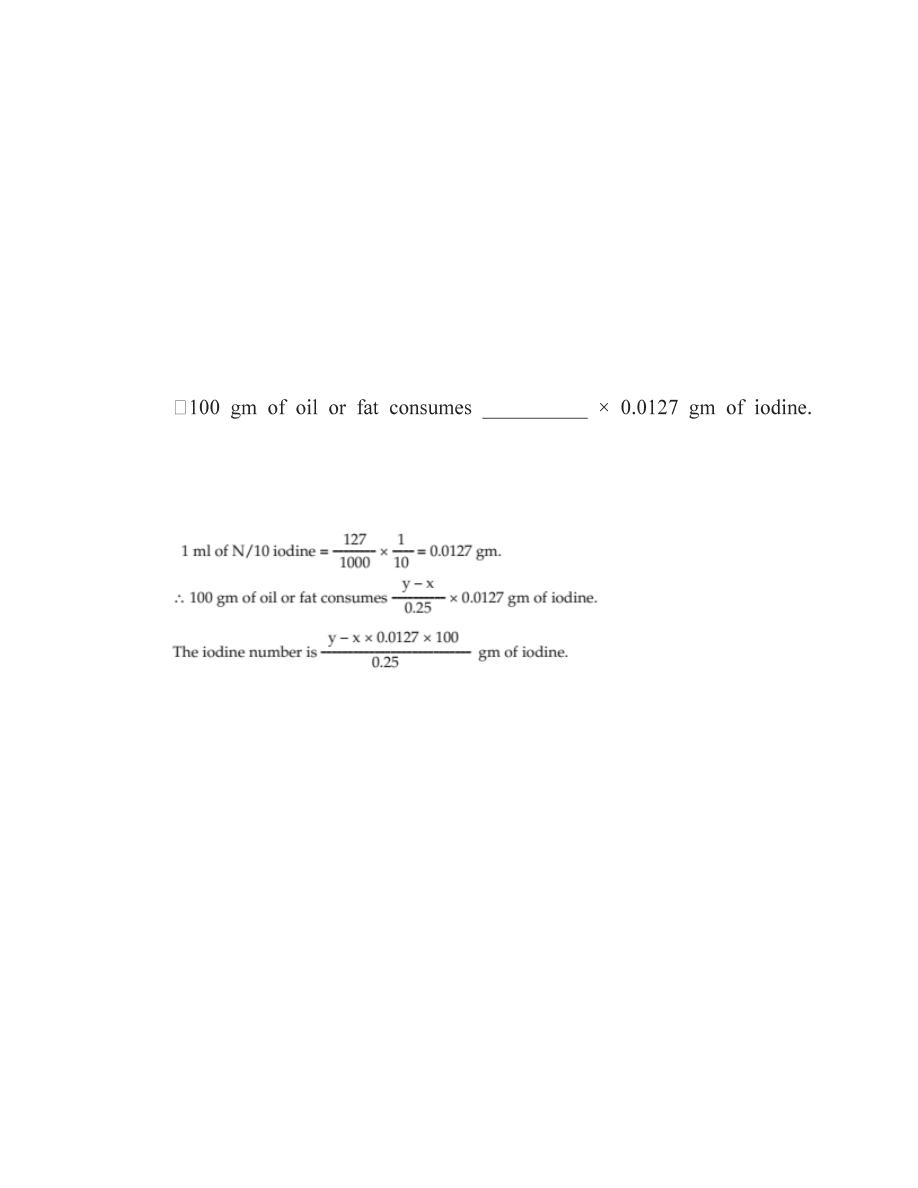
75
127
1
1 ml of N/10 iodine = ________ × ____ = 0.0127 gm.
1000 10
(Two molecules of Na
2
S
2
O
3
are equivalent to one molecule of iodine; thus
one molecule of Na
2
S
2
O
3
is equivalent to one atom of iodine).
1
ml
of
N/10
Na
2
S
2
O
3
solution
=
0.127
gm
of
iodine.
Amount of iodine absorbed by given amount of oil or fat = (y-x) × 0.0127
gm of iodine
The concentration of oil sample is 5 gm%, i.e. 5 ml of oil = 0.25 gm of oil.
0.25 gm of oil or fat consumes (y – x) × 0.0127 gm of iodine.
y – x
∴
0.25
y – x × 0.0127 × 100
The iodine number is ____________________________ gm of iodine.
0.25
QUESTIONS
ANALYSIS
References
1- J. Leonard, B. Lygo, G. Procter, advanced practical organic chemistry,
UK. 2001.
2- Dr. Tibor Pasinszki, Inorganic Chemistry Laboratory Practice,2002.
3- Taro Saito, Inorganic Chemistry, Kanagawa University, 2004.
4- Supawan Tantayanon, Small Scale Laboratory:Organic Chemistry at
University Level, Bangkok, THAILAND,2002.

76
5- Jerry. R.Mohring, Christina N. Hammond, Paul F. Schatz, techniques in
organic chemistry, 010 by W. H. Freeman and Company.
6- Varun Kumar Malhotra, PRACTICAL BIOCHEMISTRY FOR
STUDENTS, 4ed, JAYPEE BROTHERS MEDICAL PUBLISHERS (P)
LTD New Delhi,2003.
7- Beverly Bell & Christopher Gunter Edited by Prof. JD Bradley and Jane
Spriggs, Organic Chemistry Microscience Experiments Teaching and
Learning
Materials
MANUAL FOR LEARNERS, he UNESCO-Associated Centre for
Microscience Experiments RADMASTE Centre University of the
Witwatersrand, Johannesburg, 2006.