
1
Experiment (1)
Blood:
It consists of:
1. Formed elements (erythrocytes, leukocytes and platelets).
2. Plasma.
Methods of obtaining blood:
1. When only a few drops are required, sufficient blood may be
obtained from capillary puncture.
2. When more than a few drops of blood are required, venepuncture is
necessary.
Red Blood Cell Count
The number of red blood cells is determined by diluting a definite
small amount of blood with a specific amount of diluting fluid. The
number of cells in a very small known volume of diluted blood is counted
and the number finally multiplied to give the number of cells in a cubic
millimeter. The instrument used is called hemocytometer. The
hemocytometer consists of:
1. Counting chamber:
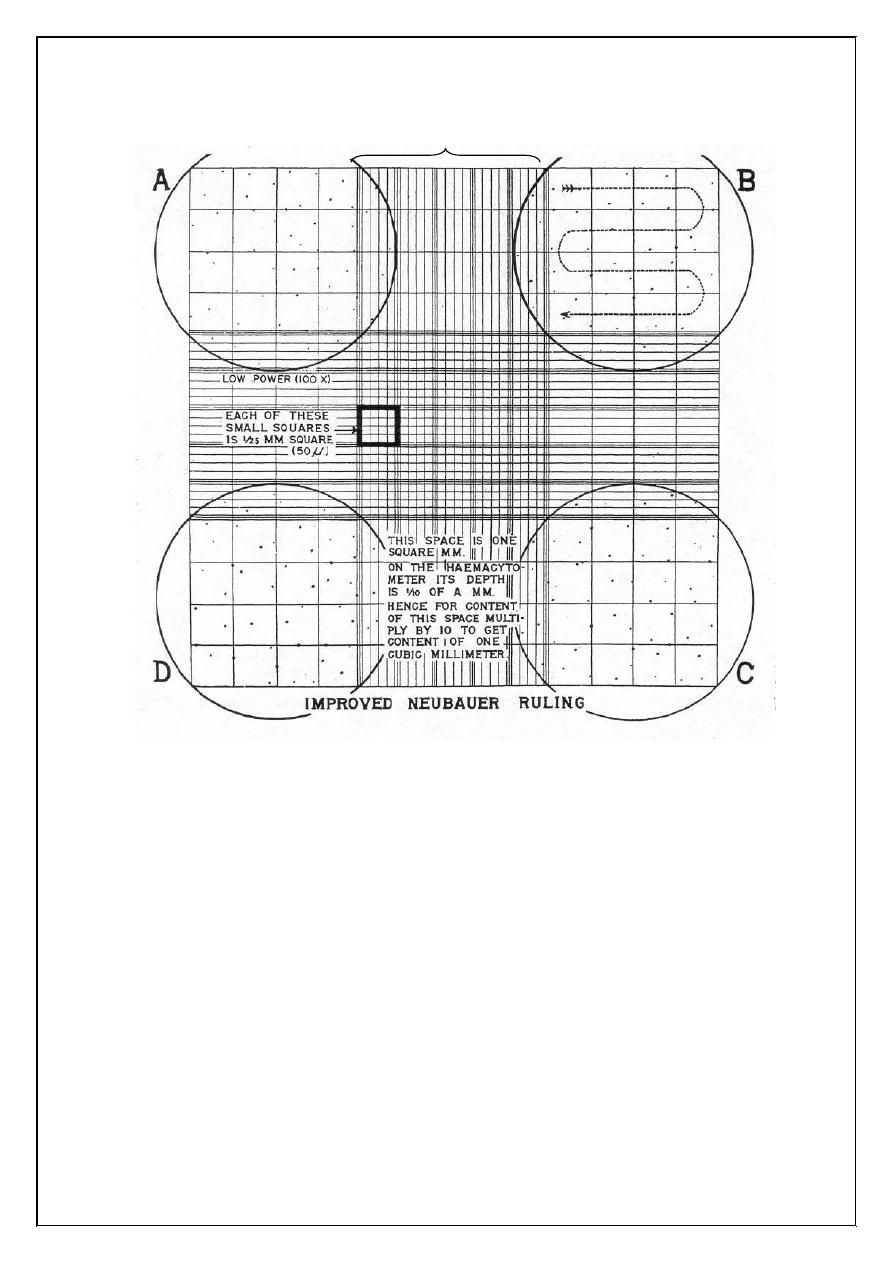
It is a heavy glass slide, in the center of which is ruled platform.
The platform is lower than the rest the slide by 0.1mm. The graduated
area is ruled both horizontally and vertically (the crossed lines). The
crossed lines form nine square ABCD is subdivided into 16 medium
squares, each of which is subdivided into 16 small squares. The area of
each small square is 1/400 square mm, and since the depth of fluid
between the ruled surface and the cover glass is 1/10mm, the volume of
the fluid covering one of the small squares is:
1/400 x 1/10 = 1/4000 cubic mm
2
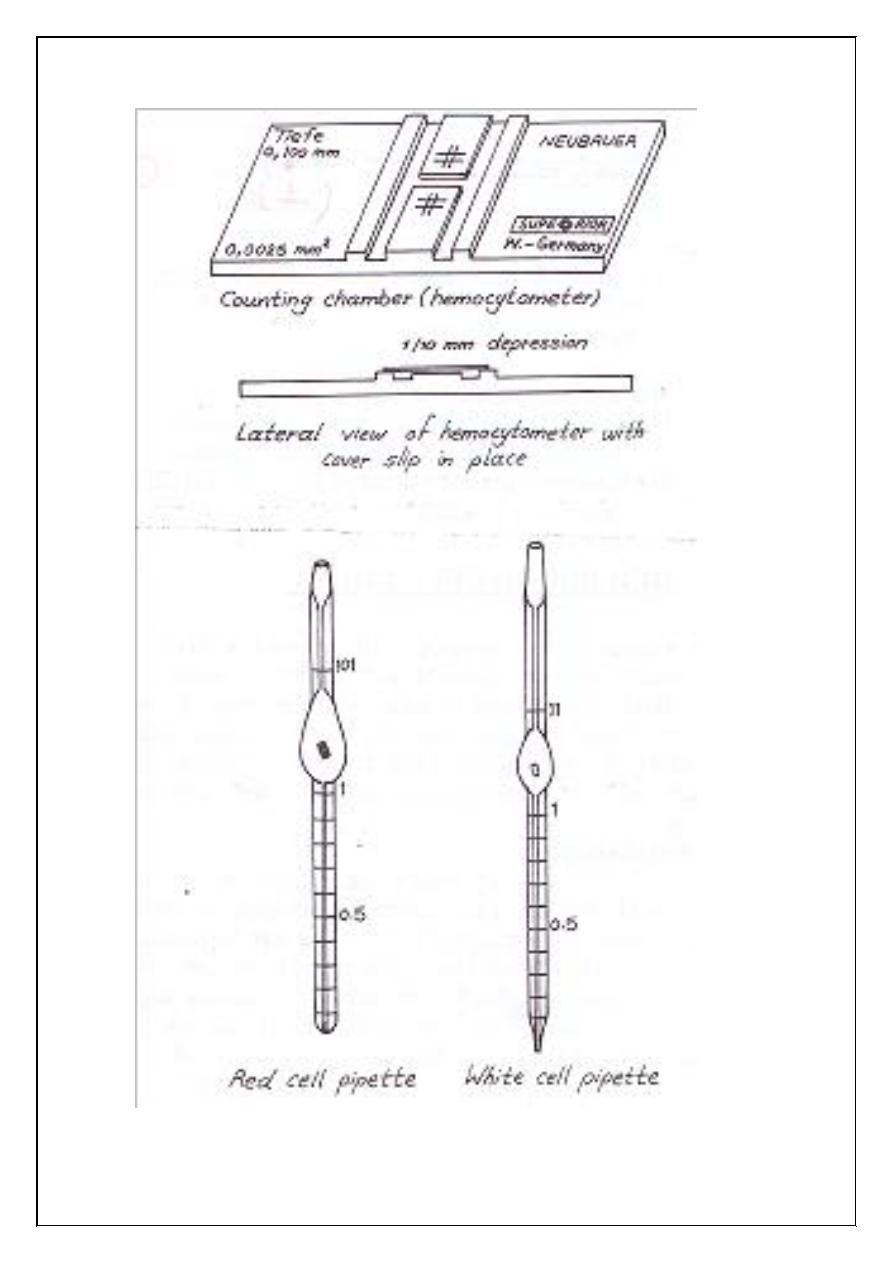
Figure (1.1): Counting chamber, red and white cell pipettes.
3
Figure (1.2): Ruled counting area of Neubauer hemocytometer (ABCD
marks the area used for counting erythrocytes)
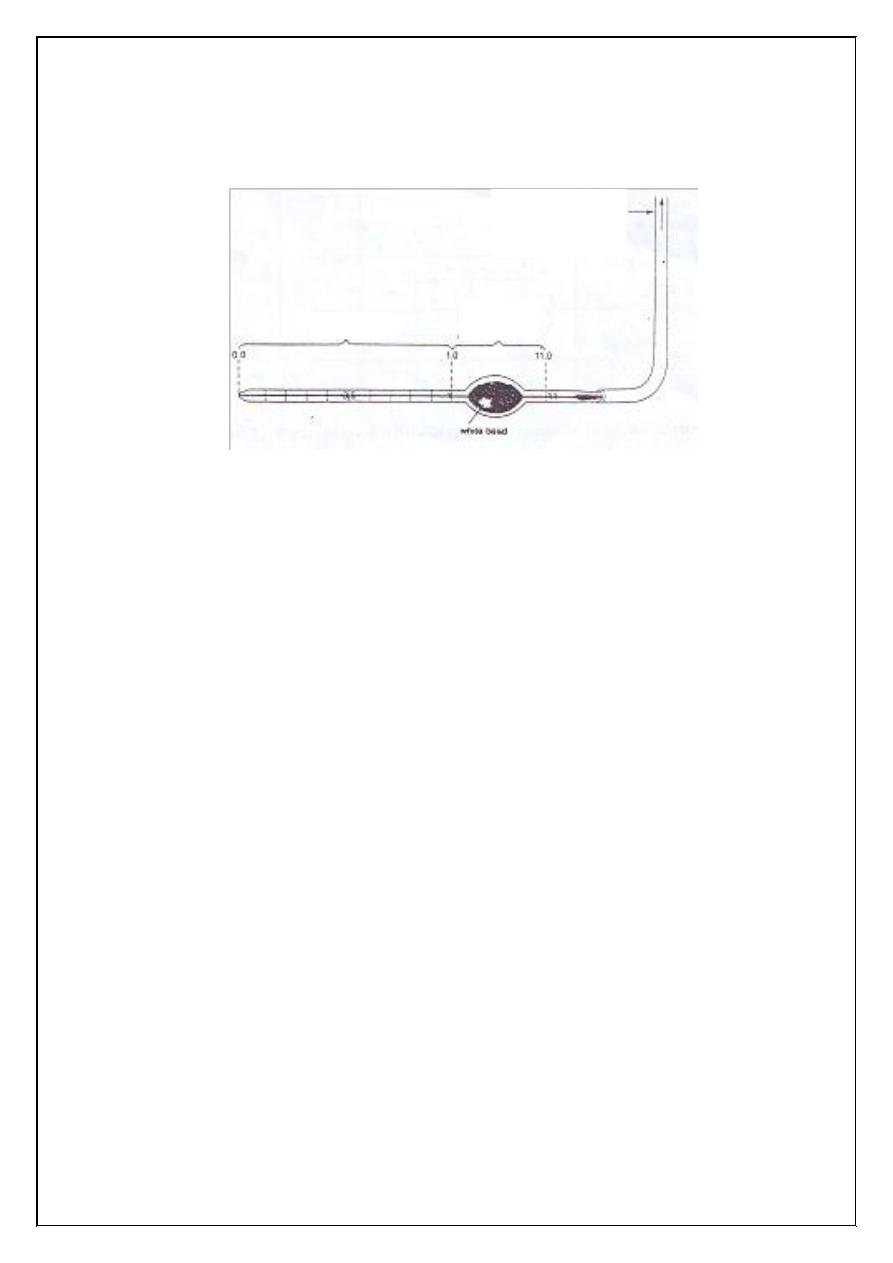
2. Special pipette (red cell pipette):
The pipette has a narrow stem, graduated with figures indicating
0.5 and 1, which widens into a bulb containing a red glass bead, which
helps in mixing the blood with the diluting fluid (Hayem's solution). The
bulb narrows again, and at this point it is marked 101.
3. Special thick plane covers glass:
(Cover slip) of the standard weight and thickness.
WBC
WBC
WBC
WBC
RBC
1 mm
4
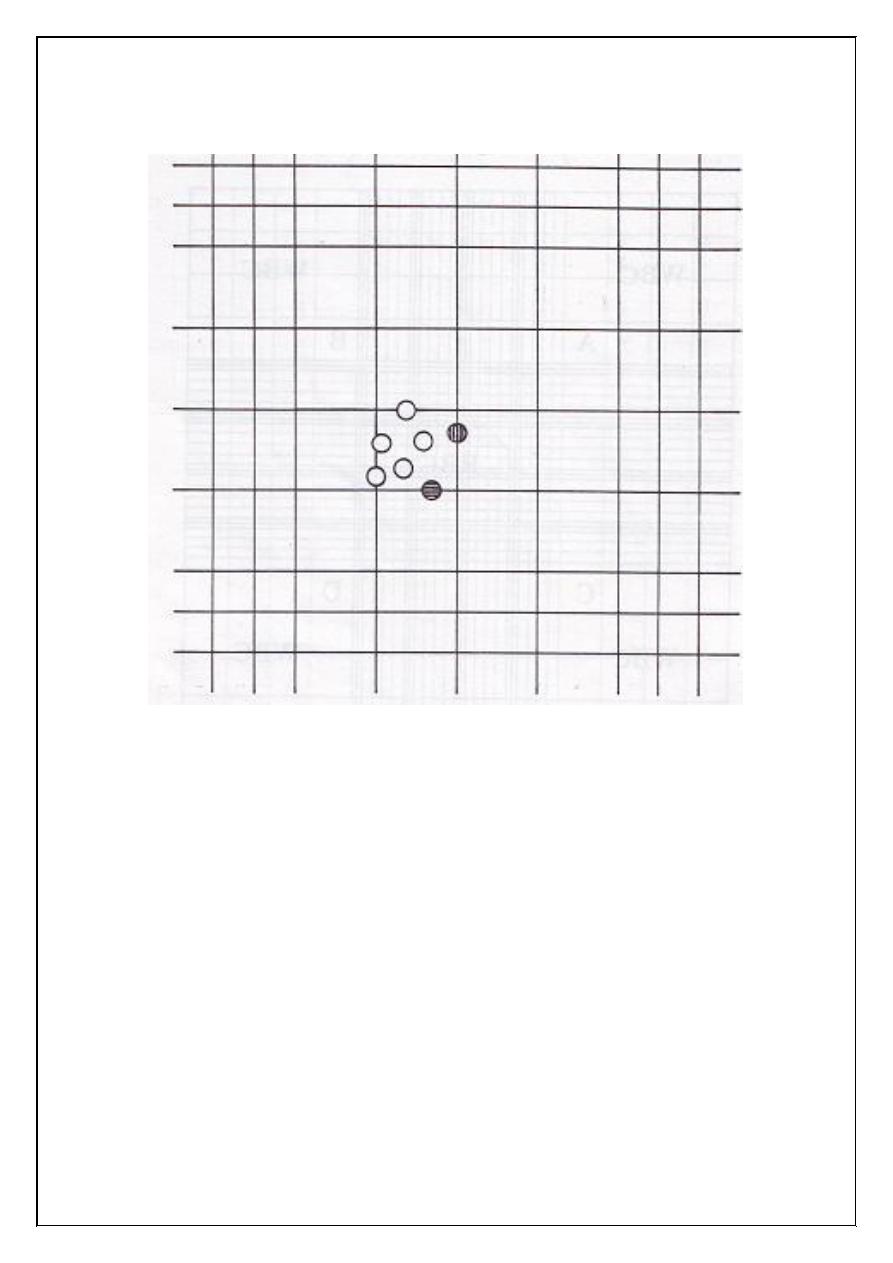
Figure (1.3): Cell counting. Five erythrocytes are counted in this square.
The shaded cells touching the bottom and right side of the square are not
included for this square.
5
Calculation:
The 0.5 units of blood, have been diluted by 99.5 units of diluting
fluid. The dilution is 1 in 200
X: the number of cells counted over 80 small squares
The volume of 80 small squares represent = 80 x 1/4000 = 1/50
80 x =
X
?
1 cu mm
?
= = X x 1 x = X x 50 x 200 (diluting
factor)
= X x 10000
1
4000
1
50
1
50
X x 1
1
50
50
1

6
Experiment (2)
White Blood Cell Count
Introduction and principle:
The white blood cell count denotes the number of white blood cells
in 1 liter of whole blood. In a normal healthy individual WBC range 4.5 -
11.0 x 10
3
/ c. mm this count varies with age. WBC count is useful to
indicate infections or may be employed to follow the progress of certain
diseases.
Objectives:
To do total WBC count of a provided sample.
Methods
1. Manual method.
2. Electronic cell counting (coulter counter)
Manual White Blood Cell Count
Materials and instruments:
1. Whole blood using EDTA as the anticoagulant, capillary blood
may be also used.
2. Turk's diluting fluid:
Glacial acetic acid 3 ml
to haemolyse RBC
Aqueous gention violet (1% w/v) 1ml
to color the nuclei of WBC
Distilled water 100 ml
3. WBC pipette (Figure 1).
4. Haemocytometer (Neubauer's counting chamber) with coverglass.
5. Microscope.
7
6. Lancet.
7. Alcohol 70%.
Figure (2.1) White cell Thoma pipette attached to rubber aspiration tube
(or rubber sucking tube)
Procedure
1. Obtain a drop of blood in the same manner as in RBC count. Draw
blood up to the mark 0.5 using WBC pipette.
2. Aspirate diluting fluid up to mark 11. The dilution is 1:20.
3. Remove blood from the outside of the pipette with a clean guaze.
4. Gently rotate the pipette horizontally with your hand to ensure a
proper amount of mixing for 3 minutes.
5. After mixing, discard the first four drops of the mixture.
6. Fill the counting chamber with diluted blood by holding the pipette
at 45° with the slide and allow the mixture to seep under the
coverslip. The filled chamber should be allowed to stand for about
1 minute prior to counting.
7. Count the WBC using low power 10x objective. Scan the four
large corner squares marked A, B, C and D on the counting
chamber as shown in Figure (1.3) in the experiment of RBC.
Mixing
chamber
Stem
Aspiration tube
(rubber sucking tube)
8
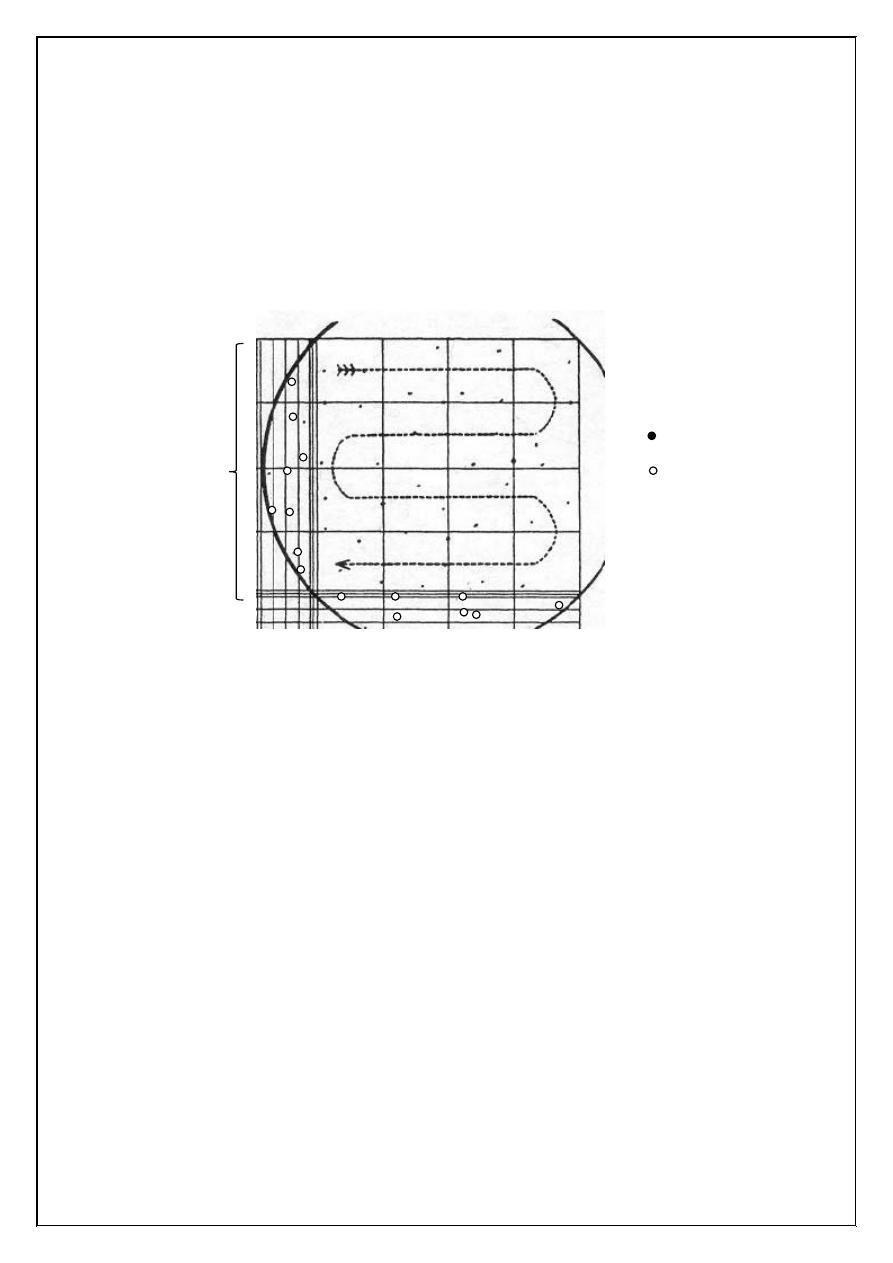
8. Count all W.B.C. in four large corner squares and add the results
together to obtain the total number of cells counted. In counting the
cells that touch the outside lines of the large square, count only
those that touch the left and upper outside lines, discharging those
that touch the right and lower outside margin. The WBC look like
black dots (Figure 2.2).
Figure (2.2) Examples of white blood cells counted (and not counted) in a
representative square.
Leucocytes:
They are commonly known as white blood cells. They are larger
than erythrocytes, contain a nucleus and do not contain haemoglobin.
Normal leucocytes count various from 4000 to 11000 cells / Cu mm of
blood.
One corner
(1mm
2
)
Counted
Uncounted
9
The leucocytes are classified into granulocytes and agranulocytes.
Granulocytes:
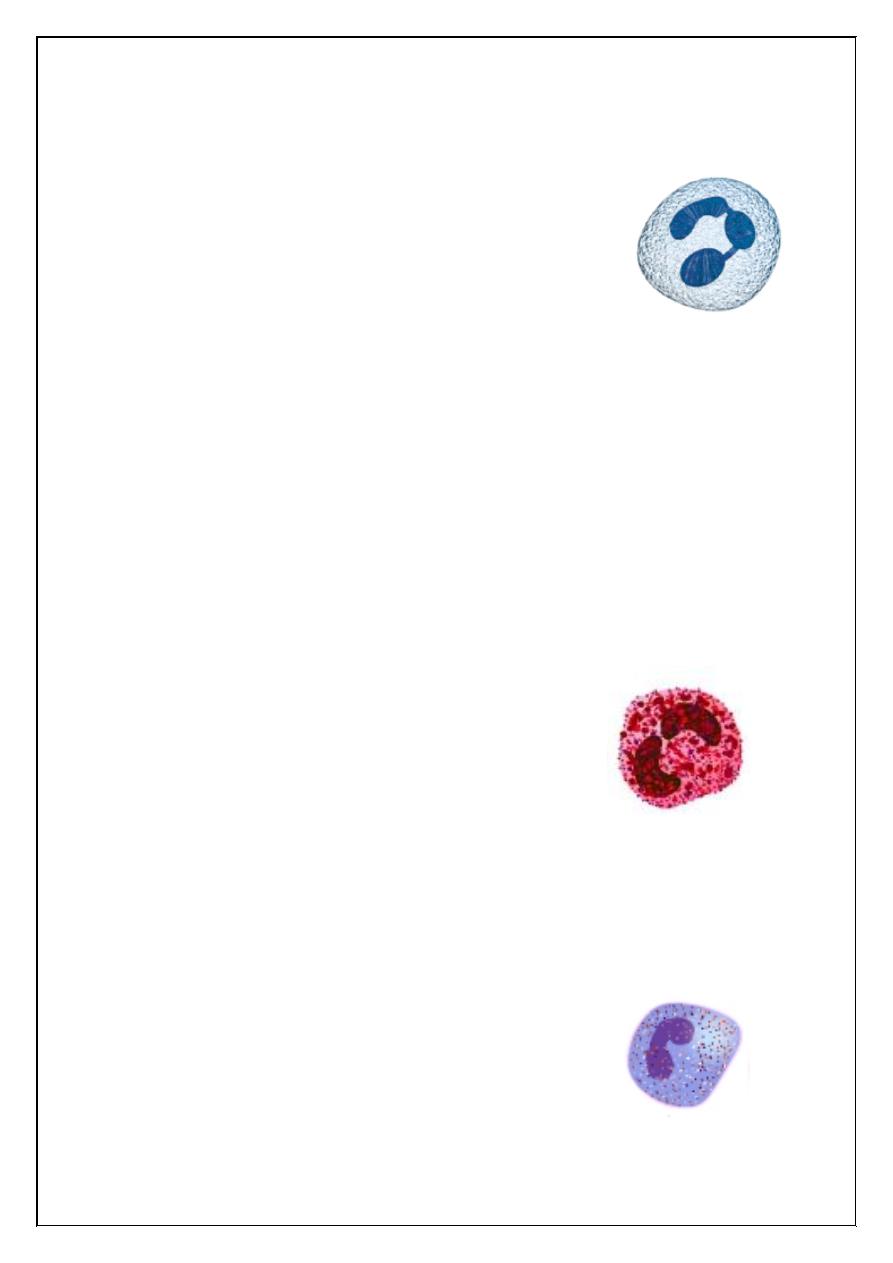
1. Neutrophil:
They constitute 60 – 70% of the total leucocute
count. They have a multilobed nucleus and the number of
lobes usually range from 3 to 5, cytoplasm contains fine
granules, which take neutral stain. Neutrophils exhibit phagocytosis and
their count increases in acute infections. They form the first line of
defense in the body.
Increase neutrophil count during menstruation, pregnancy and
muscular exercise, in acute infections like pneumonia, appendicitis,
tonsillitis.
Neutrophil count decreses in typhoid, malaria, aplastic anaemia
and under the influence of various drugs.
2. Eosinophil:
It has usually a bilobed nucleus and shows the
presence of relatively large granules, which take an
acidophilic or orange stain. Normal eosinophil count
ranges from 2 to 5%. It has been observed that in
allergic conditions eosinophil count increases (eosinophilia), the decrease
in eosinophil count constitutes eosinopenia and can be seen in acute
pyogenic infections or steroid therapy.
3. Basophil:
The nucleus in these cells is usually bilobed and
cytoplasm contains blue granules. Their cont ranges
from 0 1o 1%. Basophil releases heparin, which is an
10
anticoagulant and it also releases histamine and this occurs specially in
hypersensitivity reactions such as anaphylactic shock, the basophil count
increases in polycythemia and chronic myloid leukemia.
Agranulocytes:
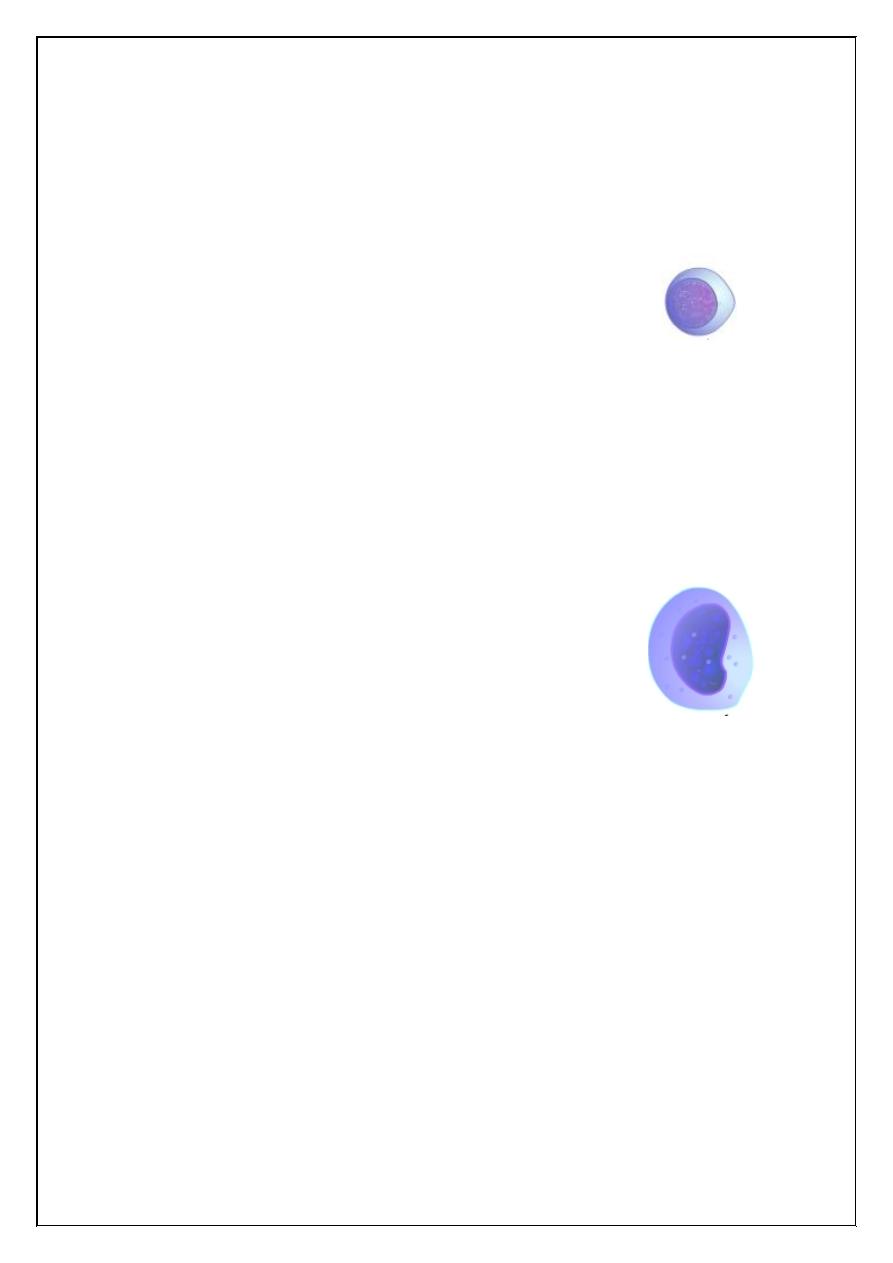
1. Lymphocyte:
The cell has a large oval or round nucleus and there is
a thin strip of clear nongranular cytoplasm between the nucleus and cell
membrane. The lymphocytes are responsible for providing immunity to
the body. There are two functionally distinct types namely T lymphocytes
and B lymphocytes, they are involved in immune and defense
mechanisms.
2. Monocyte:
They are the largest white cell (15 microns) and
have a kidney shaped nucleus. The normal monocyte count
is 3 to 8%. Monocytes are phagocytic in function and they
are the second line of defense in the body.
The life span of white cells is very short and ranges from a few
hours to 2 -3 days.
The age of a neutrophil can be determined by the number of lobes
present in its nucleus. The number of lober increase as the cells grow old.
The grouping of neutrophils based upon the number of lobes
N1 5 – 10%
N2 25 – 30%
N3 45 – 50%
N4 15 – 20%
N5 Less than 3%

11
Functions of Leucocytes:
1. Phagocytosis: It is a process by which leucocytes engulf bacteria and
foreign material.
2. Antiallergic effect: histamine release during allergic conditions is
inhibited by eosinophils, their count increases in allergy.
3. Heparin production: Basophils produce heparin, which prevents
intravascular clotting.
Leucocytosis:
This term is used to indicate an increase in the white
cell count and is a common feature in most infections. A physiological
increase in leucocytes is seen in:
Menstruation.
Pregnancy.
Muscular exercise.
A reduction in white cell count is known as leucopenia; this
condition is seen in:
Bone marrow suppression by drugs and x – ray radiation.
Pernicious anaemia.
Infections such as typhoid and malaria.
Leucocytosis is associated with the presence of premature white
cell in the peripheral blood. This condition which may prove fatal is
termed leukemia.

12
Experiment (3)
Platelet Count (Thrombocyte Count)
Introduction and principle:
Platelet count is of great importance in helping to diagnose
bleeding disorder.
Platelet play important role in the stoppage of bleeding. There are
two methods for counting of platelets:
1. Electronic (Caulter counter).
2. manual (microscopic).
Materials and instruments:
1. Diluting fluid (31.3 gm sodium citrate, 10 ml of formaldehyde
40%) added to it distilled water up to 100 ml.
2. Hb pipette.
3. Hemocytometer.
4. Blood.
5. Petri dish.
6. Filter paper.
7. Microscope.
Procedure:
1. Draw blood by the Hb pipette up to the mark 20µl and mix it with
2 ml of diluting solution, mix for 5 minutes.
2. Fill the counting chamber of hemocytometer with a mixture and
place it in a moist chamber for 15 minutes.

13
3. Place the counting chamber under the microscope and examine
under objective lens 40 in the 25 medium size squares of middle
large square.
Results:
Number of platelets (cu.mm) = N x 1000
10: correction for volume
100: correction for dilution
Number of platelets in L = N x 1000 x 10
6
The normal range of platelet count is 150.000 – 400.000 / ml
Discussion:
1. Decreased platelet count; the condition is called ---------------------
lead to -----------------------.
2. The main functions of platelets are ----------------------.
Thrombocytes:
They are commonly known as platelets. They are small, biconvex
non–nucleated cells, usually found in clusters in a dried film. The average
size of platelet is 2.5 microns and their count range from 2-4 lacs/Cum.
The life span of platelets is about 10 days.
Variations in count:
An increase in count is observed in:
Haemorrhage.
Splenectomy.
Hodgkin's disease.
A reduction in platelet count is known thrombocytopenia, it is seen in:
Splenomegaly.

14
Aplastic anaemia.
Acute infections.
Leukemia.
Idiopathic thrombocytopenic purpura.
Functions:
1. Arrest of bleeding. Platelets aggregate at site of injured vessel and
form a haemostatic plug to prevent blood loss.
2. Coagulation. Platelets release clotting factors, phospholipids and
prostaglandins which help in the clotting process.
3. Clot retraction. The release of thrombesthanin from the platelets helps
in clot retraction.
4. Repair of endothelium. Platelets release PDGF (platelet derived
growth factor) which help in the repair of damage capillary
endothelium and other tissues.
5. Release of serotonin and epinephrine. These substances released from
platelets produce vasoconstriction and consequently reduce the blood
loss.
Purpura:
A reduction in platelet count results in purpura. It is a bleeding
disorder in which haemorrhagic tendency increases and there may be
subcutaneous haemorrhage.

15
Experiment (4)
Packed Cell Volume (PCV) or
Haematocrit (HCT) Value
Introduction and principle:
Whole blood is centrifuged for maximum R.B.Cs packing. The
space occupied by the R.B.Cs is measured and expressed as a percentage
of the whole blood volume.
Objectives:
To determine the volume or the amount of the R.B.Cs in 100 ml
(dl) of blood.
Methods:
1. Microhaematocrit. It requires less blood and also less time to
determine a haematcrit.
2. Macrohaematocrit or Wintrobe Method. This method is of little
use today since it is time consuming requires large amount of
blood and contains a higher degree of plasma trapping.
3. Electric cell counting. E.g., Coulter counter.
Microhaematocrit Method
Materials and instruments:
1. Microhaematocrit tube 75 mm in length and 1 mm in diameter
which contain heparin and show a red ring at the end of the tube.
2. Microhaematocrit centrifuge capable of producing a relative
centrifugal force of 10000 to 15000 gm.

16
3. Plastic seal of Bunsen burner flame to seal one end of
microhaematocrit tube.
4. Microhaematocrit reader.
Procedure:
1. Blood is frawn into the tubes by capillary phenomenon by holding
the tubes in a horizontal manner and allow 2/3 to 3/4 to be filled
with blood. Air bubbles denote poor technique but do not affect the
results of the test.
2. Seal the dry end of the tube by plastic seal or by heating the dry
end of the tube rapidly on a fine flame of Bunsen burner combined
with rotation.
3. The sealed tube is then placed in the radial grooves of the
microhaematocrit centrifuge with the sealed end away from the
center of the centrifuge for 5 min.
4. When looking at a centrifuged haematocrit tube, you can see three
distinct layers. A top layer of clear slightly milky plasma, a thin
buffy coat layer (consisting of W.B.Cs and platelets) and a dark
packed R.B.C layer.
5. Obtain the results using the microhaematocrit tube reading device,
adjust the movable line to touch of the R.B.Cs in the tube.

17
Experiment (5)
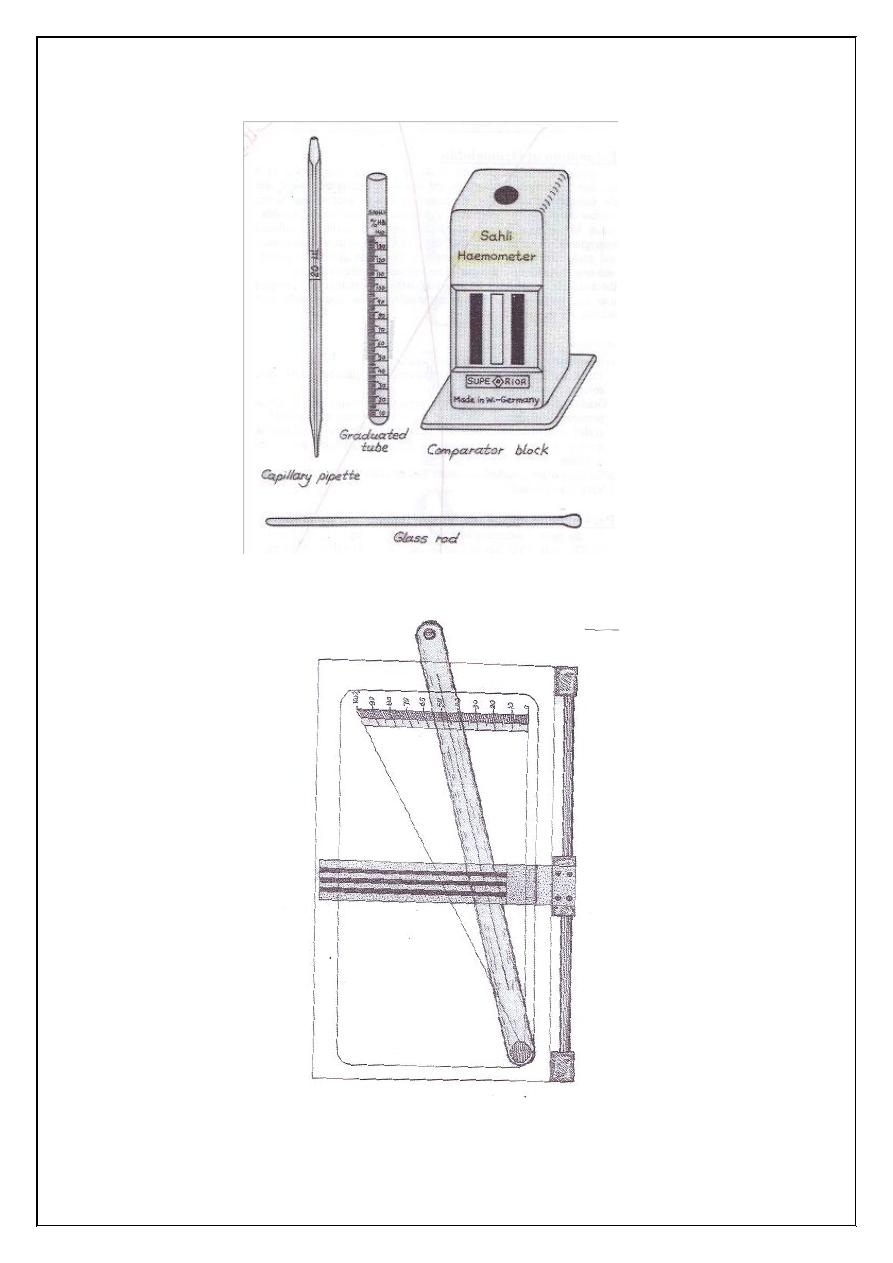
Estimation of Haemoglobin Concentration
Introduction:
Hb is a protein in nature composed of two portions:
1. Heme: the heme consists of iron and prophyrin ring.
2. Globin: which consists of two pairs of chains α and β. The α
consists of 141 A.A while β consists of 146 A.A.
Types of Hb:
There are three types of Hb:
1. Hb A
1
: consists of 2 α and 2β.
2. Hb A
2
: consists of 2 α and 2δ.
3. Hb F (F present in infants): consists of 2 α and 2γ.
Normal value of Hb:
In males 14 gm/dl
In female 16 gm/dl
Materials and Methods
1. Manual method
2. Electric cell counter.
Manual method by:
Sahlis haemoglobin binometer which usually graduated 3 columns: the
lateral two are scaled and contain standard acid.
dl = 100 ml

18
Procedure:
1. 10 ml HCl take, because it hydrolysis all types of Hb to form acid
haemation.
2. Clean the tip of finger and then the blood is sucked by Hb pipette
up to 20 mm
3
.
3. After that the colour compared in light day.
4. Then distilled water is added 3 – 4 drops each time.
Note: The important precautions should include when taken blood from
finger should never squeeze.
Other methods like:
Haldanes method.
Gower's dilution and colour matching method.
Photoelectric method.
Discussion:
What are the abnormal of Hb?
1. Hb pathics.
That mean polypeptide chain of Hb abnormal.
2. Thalasemia disease.
That mean polypeptide chain produce normally but decrease in amount.
3. Sickle cell anaemia.
That mean changes in shape of R.B.C cells to form as sickle in shape.
What is anaemia?
Definition and types.
19
Figure (5.1) Haemoglobinometer.
Figure (5.2) Microhaematocrit reader.

20
Experiment (6)
Erythrocyte sedimentation rate (ESR)
If fluid (kept fluid by means of an anticoagulant) is allowed to
stand in a narrow tube (Westergren pipette), the corpuscles settle
progressively to the botton leaving clear plasma above. The rate at which
the heavier elements of the blood settle toward the bottom of the tube is
known as sedimentation rate.
Sedimentation of erythrocytes proceeds in 3 phases:
1. Formation of rouleaux (clumping of red cells together like a stack
of coins).
2. Rapid settling.
3. Final packing of the red cell mass.
The rate of sedimentation varies with the speed of rouleaux
formation. The most important factor controlling this process outside the
body is the composition of the plasma: fibrinogen, other globulins and
certain products of tissue destruction increase rouleaux formation and
hence the sedimentation rate. Albumin reduces it. Usually the rate is
increased in acute general infections, in the presence of malignant tumors,
in inflammatory conditions, in hypothyroidism, and also in pregnancy.
The test is nonspecific and is not diagnostic of any disease. It can be used
in the prognosis of any disease.

21
Experiment (7)
Blood Indices
Introduction and principle:
The red blood cell indices are used to define the size and
haemoglobin content of the red blood cell. They consist of mean
corpuscular volume, mean corpuscular haemoglobin and mean
corpuscular haemoglobin concentration.
Objectives:
To learn how to calculate the blood indices.
Information required:
1. RBC count in millions/cu.mm
2. Hb estimation in g/dl.
3. PCV estimation as %.
Calculations:
1. Mean corpuscular volume (MCV)
The MCV indicates the average volume of single RBC in femtoloters
(fl)
MCV =
= x 10
= fl
PVC (%)
RBC count x 10
6
cumm
PVC
RBC

22
2. Mean corpuscular hemoglobin (MCH)
The MCH indicates the average weight of Hb in single RBC in picograms
(Pg)
MCH =
= x 10
= Pg
3. Mean corpuscular hemoglobin concentration (MCHC)
MCHC is an expression of the average concentreation of Hb in the red
blood cells. It is expresses as %.
MCH =
= x 100
= %
or: MCHC =
x 100
Results:
1. MCV: Normal range 80 -= 100 fL
2. MCH: Normal range 27 – 31 Pg.
3. MCHC: Normal range 31 – 36 %
Discussion:
Find the MCV, MCH and MHCH and identify the type of anaemia
from the following data:
1. Hb =11.8 g/dl, PCV= 41%, RBC = 4.5 x 10
6
/ cu.mm
2. Hb =9 g/dl, PCV= 30%, RBC = 4.5 x 10
6
/ cu.mm
3. Hb =14 g/dl, PCV= 41%, RBC = 4.5 x 10
6
/ cu.mm
Hb (gm / dl)
RBC count x 10
6
cumm
Hb (gm / dl)
PCV(%)
Hb
RBC
Hb
PCV
MCH
MCV

23
Experiment (8)
Blood Grouping
Introduction:
Blood grouping is based on the presence of antigen (agglutinogen)
on the RBC membrane. The main types of these antigens are A, B, and D.
Accordingly blood groups are classified into ABO blood group and (Rh)
blood group.
Objectives:
To identify the groups ABO and Rh (D) of a given blood sample
Methods:
1. Slide method.
2. Tube method.
Materials and instruments:
1. Anti –A serum
2. Anti – B serum
3. Anti –D serum
These anti – sera are available commercially
4. Slide.
5. Microscope.
6. Applicator sticks for mixing.
7. isotonic saline (0.9% NaCl) for dilution RBC's to prevent false
agglutination due to rouleaux formation.
8. WBC pipette 0.5 to 11 mark.

24
Procedure:
1. Place one drop of each anti –A, anti –B and anti –D serum on a
slide.
2. Add to each drop one drop of whole blood or aspirate blood to the
0.5 mark of WBC pipette and dilute to the 11 mark with isotonic
saline dilution 1:20.
3. Mix with an applicator stick.
4. The reaction will be visible within 20 – 60 seconds.
5. Examine for reaction with naked eye or by microscope.
6. The ABO grouping of the subject can then be obtained.
7. The Rh(D) grouping also can be obtained.
8. Positive (+) indicates agglutination while negative (-) indicates no
agglutination.
9. Blood grouping tests should be performed in a warm room.
10. The ABO blood group and Rh(D) blood group usually are
designated together.
Cross Matching Test
Introduction and principle:
This is the direct test of compatibility of donor's cells and
recipient's serum or plasma.
Objectives:
To find if the blood of a donor is compatible with that of the
recipient.
Methods:
3. Slide method.
4. Tube method.

25
Materials and instruments:
1. Slide.
2. Serum or plasma from recipient (contain antibody).
3. Red blood cell from donor (contain antigen).
4. Isotonic saline (0.9% NaCl) for dilution.
5. Applicator sticks.
6. Microscope.
7. WBC pipette.
Procedure:
1. Recipient serum or plasma. Draw 1ml of blood from recipient and
allow to clot, when the clot retracts, the serum can be pipetted off.
2. Donor's red blood cell, prick the ear or finger of donor. One drop of
blood should be placed in 1 ml of isotonic saline and mixed,
Aspirate blood to the 0.5 mark of WBC pipette and dilute to 11
mark with 0.9% NaCl. Mix and blow out the saline in the stem.
3. Place one drop of suspension of donor's cell on a microscope slide
and over it place one drop of the recipient's serum or plasma. Mix
and wait for 10 minutes. Examine under microscope.
4. If the blood is incompatible this will be shown by an agglutination
(+) or clumping or red blood cell.
5. If the blood is compatible this will be shown by uniform
suspension with cells i.e., no addlutination (-).
Incompatible Compatible
Cross – Matching Test

26
Ratio of different blood types
A 41%
B 9%
AB 3%
O 47%
Rh antigens – Rh positive and Rh negative people
There are six common types of Rh antigens, each of which is called
an Rh factor. These types are designated C, D, E, c, d, and e. A person
who has a C antigen does not have the c antigen, but the person missing
the C antigen always has the c antigen, the same is true for the D.d and
E.e antigens. Each person has one of each of the three pairs of antigens.
The type D antigen is widely prevalent in the population and
considerably more antigen than the other Rh antigens. Any one who has
this type of antigen is said to be Rh positive whereas the person who does
not have type D antigen is said to be Rh negative.

27
Experiment (9)
Blood Pressure
It may be defined as the pressure blood exerts against the vessel
walls. It depends on:
1. Cardiac output.
2. Peripheral resistance.
3. Total blood volume.
4. Viscosity of the blood.
5. Elasticity of the arterial wall.
Systolic pressure: The maximum pressure during ventricular systole.
Diastolic pressure: The minimum pressure during ventricular diastole.
The arterial pressure is written as systolic pressure over diastolic
pressure (e.g., 120/70 mm Hg).
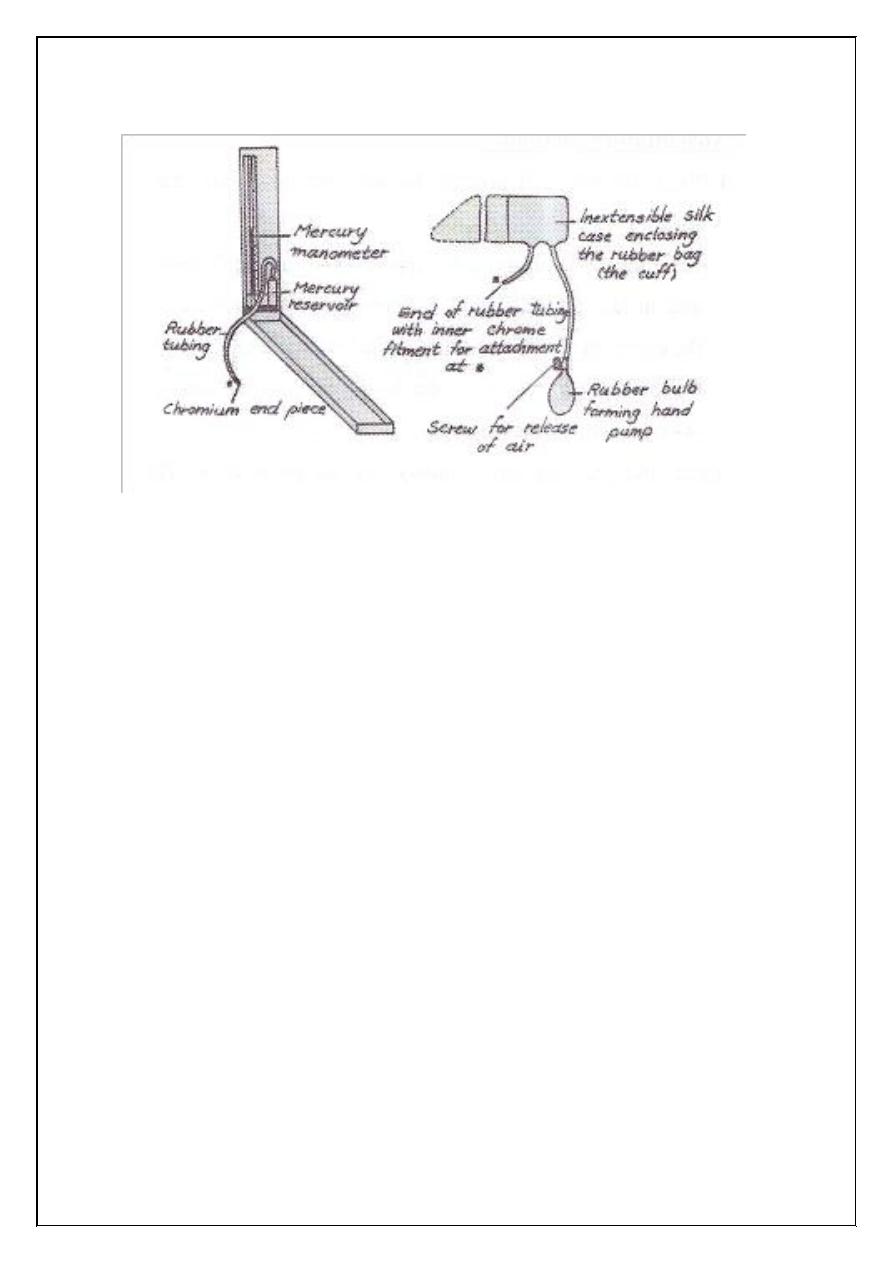
Blood pressure is measured indirectly by means of an instrument
called a Sphygmomanometer. The Sphygmomanometer consists of two
main parts:
1. One part consists of a hand pump, which is used to measure the air
pressure in an inflatable rubber bag. The bag is enclosed in a
material case (the cuff) and is attached by a rubber tubing to the
second part.
2. The second part is a mercury manometer to measure the pressure of
air in the bag.
28
Figure (9.1) Sphygmomanometer
Palpation method:
1. Palpate the subject's radial artery with the tips of the index and
middle fingers.
2. Screw down the escape valve, which is placed just above the bulb
of the pump.
3. Pump up the arm cuff rapidly (to about 150 mm Hg) till the pulse
disappears, then let out the air slowly by unscrewing the valve.
4. Watch the manometer and note the reading when the pulse returns,
this is the systolic pressure.
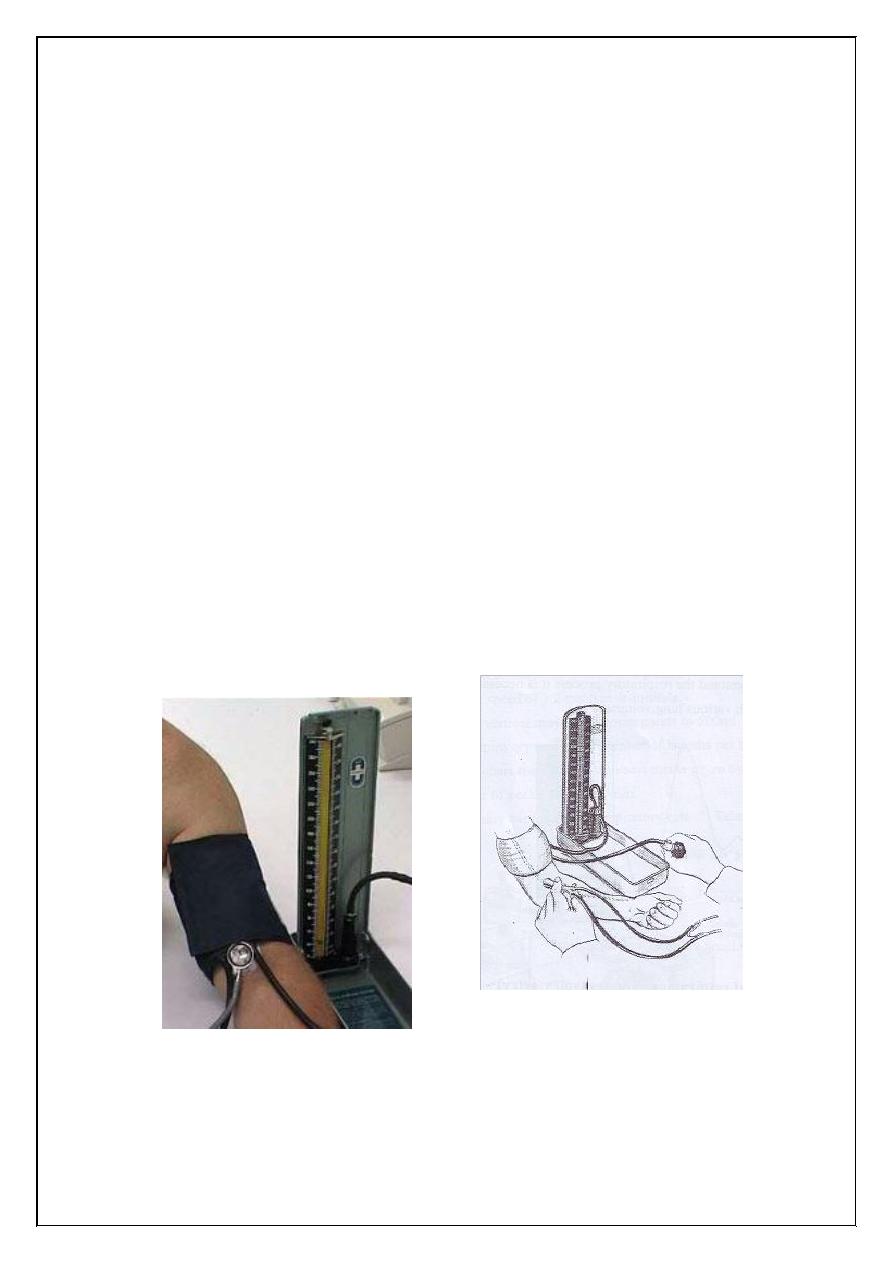
Auscultatory method:
1. Place the arm cuff around the left arm just above the elbow.
2. Place the bell of the stethoscope over the brachial artery and inflate
the cuff until the pressure in it is well above the expected systolic
pressure in the brachial artery.
29
3. The brachial artery is occluded by the cuff, and no sound, is heard
with the stethoscope.
4. Let the pressure down slowly. At the point at which systolic
pressure in the artery just exceeds the cuff pressure, a spurt of
blood passes through with each heart beat and, synchronously with
each beat, a tapping sound is heard.
5. The cuff pressure at which the sounds are first heard is the systolic
pressure.
6. As the cuff pressure is lowered further, the sounds become louder,
then dull and muffled and finally in most individuals they
disappear. These are the sounds of koratkow. These sounds are
produced by turbulence in the intermittent blood flow as the artery
opens and shuts with each cardiac cycle.
7. The cuff pressure at which the sounds disappear is the diastolic
pressure.
Figure (9.2) Indirect measurement of blood pressure with
Sphygmomanometer

30
Experiment (10)
Bleeding Time
Introduction and principle:
A standardized puncture of the ear lobe is made and the time
course for bleeding to stop is recorded. Cessation of bleeding indicates
the formation of haemostatic plugs which are in turn dependent on an
adequate number of platelets and the ability of the platelets to adhere to
the subendothelium and to form aggregates.
Objectives:
To find the time between the puncture of the skin and the stoppage
of blood oozing.
Methods:
1. Duke test, is the easiest to perform.
2. Ivy test.
3. Template test.
Materials and instruments:
1. Sterile disposable lancet.
2. Stopwatch.
3. Circular test paper.
4. Alcohol.
Procedure:
1. The ear lobe is cleansed with an alcohol spong and allowed to dry.
31
2. A standardized puncture of the ear lobe is then made, using a
sterile blood lancet.
3. The stopwatch is started at the moment of the puncture.
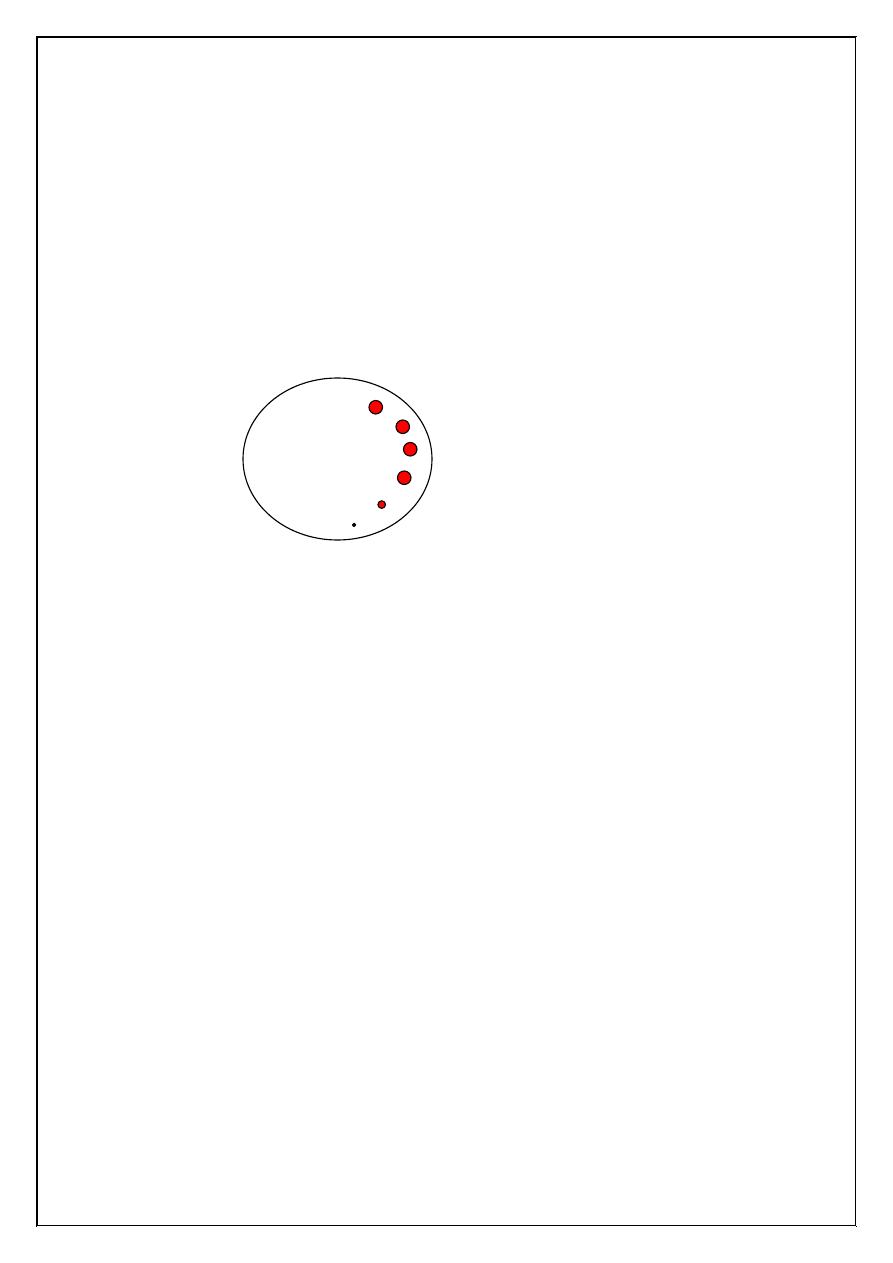
4. Using circular filter paper the blood is blotted every 30 seconds
without allowing the filter paper to touch the wound.
5. When bleeding ceases, the stopwatch is halted and the bleeding
time recorded as shown in the figure.
Normal spots on filter paper
Results:
Normal range: 1 – 3 minutes, borderline times are 3 – 6 minutes.
Discussion:
What is the clinical significance of determining bleeding time?
1
2

32
Coagulation Time (clotting Time)
Introduction and principle:
The coagulation time of whole blood is the time required for a
measured amount of blood to clot under certain specialized conditions.
Objectives:
To determine clotting (coagulation) time.
Method:
Lee and White method.
Materials and instruments:
1. Water bath, 37°C.
2. Glass test tubes, 13x100 mm.
3. Stopwatch.
4. Plastic syringe (10 ml) and 20 gauge needle.
5. Fresh whole blood, 4 ml.
Procedure:
1. Label three test tubes with the patients name and number them 1, 2
and 3.
2. Withdraw 4ml of blood.
3. Carefully place 1 ml of the blood in test tube 3, then 1ml in test
tube 2 and lastle, 1ml in the tube 1. Start the stopwatch as soon as
blood is placed in tube 3.
4. Place the three test tubes in a 37°C water bath.
5. At exactly 5 minutes, title test tube 1 gently to 45° angle. Repeat
this procedure every 30 seconds until the test tube can completely

33
be inverted without spilling the contents i.e., until the blood is
completely clotted.
6. Record the time it took for the blood in test tube 1 to clot.
7. Thirty seconds after the blood in test tube 1 is clotted, proceed with
tube 2 and repeat the preceding procedure, tilting the test tube
every 30 seconds until a clot is formed. Record the results. Repeat
this procedure for test tube 3.
8. Since agitation and handling speed up coagulation, the coagulation
time of test tube 3 is handling the reported result.
Results:
Normal range 5 – 15 minutes.
Discussion:
1. How can you differentiate between purpura and haemophilia.
2. Test tubes are incubated in water bath at 37°C. Why?

34
Prothrombin Time
Introduction and principle:
In the presence of calcium, thromboplastin is the cofactor of factor
VII which activates the extrinsic coagulation pathway. Coagulation
begins after adding thromboplastin to a normal citrated plasma which
ends within few seconds with the formation of fibrin clot.
Objectives:
To estimate the length of time taken for the plasma to clot in the
presence of excess thromboplastin and calcium.
Methods:
1. Manual method.
2. Automated system.
Manual Method
Material and instruments:
1. Thromboplastin – calcium reagent which is commercially
available.
2. Water bath 37°C.
3. Test tube, 13x100 mm.
4. Stopwatch.
5. Sodium citrate (3.8%) as anticoagulant, 0.5 ml of sodium citrate
added to 4.5 ml of whole blood.
6. Centrifuge.
7. Micropipettes, 0.1 ml, 0.2 ml.

35
Procedure:
1. Centrifuge anticoagulated blood at 1200 – 1500 g for 15 minutes.
2. Separate the plasma for patient and control RBC's and store at
room temperature until ready for testing, perform the test within 4
hours of blood collection.
3. Prepare thromboplastin – calcium reagent which is available
commercially.
4. Pipette 0.2ml of thromboplastin – calcium reagent into the
duplicate test tubes. Warm the test tubes in the water bath for 10 –
15 minutes.
5. Incubate the plasma at 37°C for 2 – 3 minutes.
6. Pipette 0.1 ml of patients plasma into the duplicate test tubes
containing 0.2 ml of thromboplastin – calcium reagent and
simultaneously start the stopwatch.
7. Mix the contents of the tubes, remove the tubes from the water bath
wipe and dry. Gently tilt the tube back and forth until a clot forms,
at which point timing is stopped.
8. Average the two results and report the patient's results.
36
Experiment (11)
Special Senses
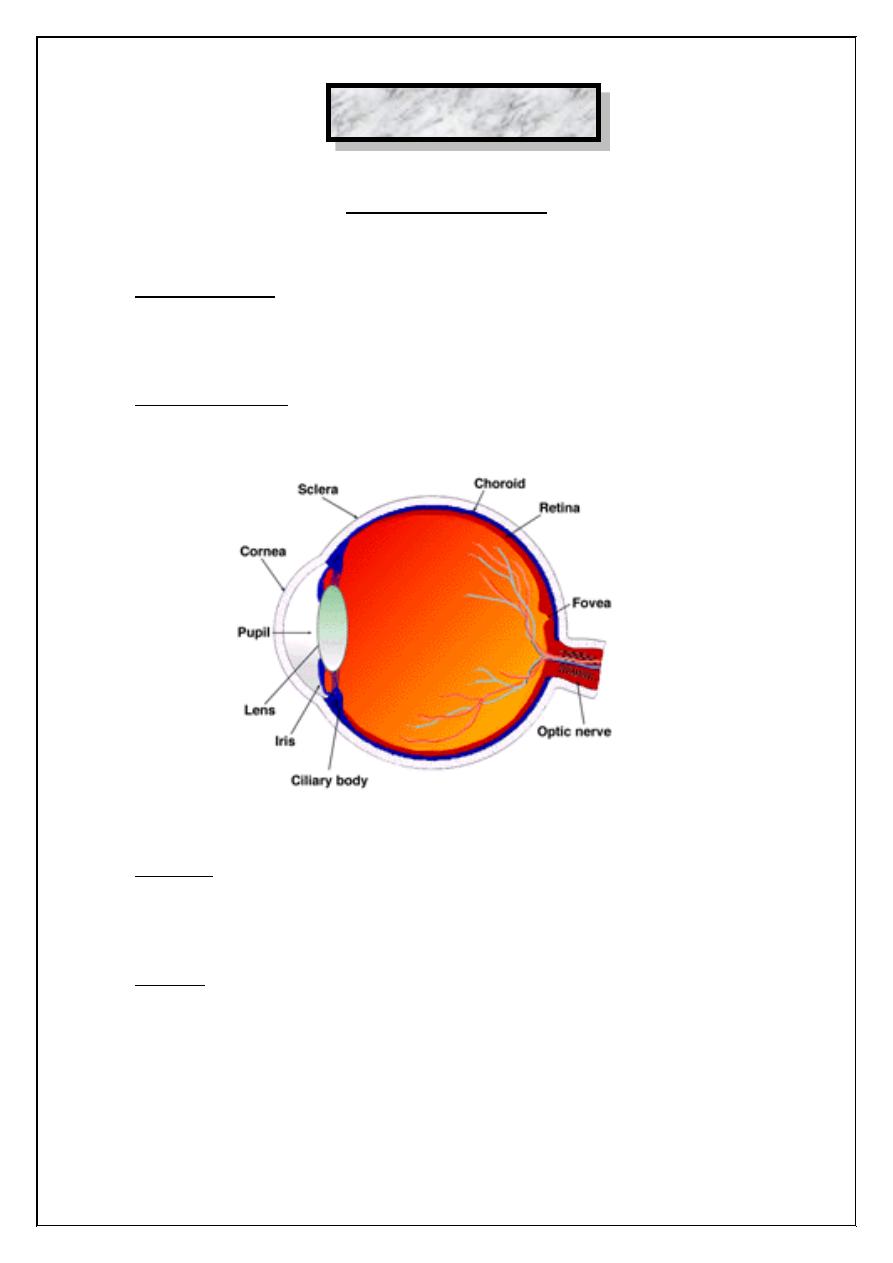
Vision:
Visual receptors are located in the retina, which forms the inner coat of
the eyeball, the anterior surface of the eyeball is kept moist by the
lacrimal fluid secreted from lactrimal glands.
Lacrimal gland: it secretes the lacrimal fluid, which is thin watery
secretion contain chlorides and glucose.
Structure of
the eyeball
Eyelids: They provide mechanical protection to the eye against injury,
foreign body and excessive light. The sudden closure of the eyelids
(blinking) helps the spread of lacrimal fluid in the conjuctival sac.
Eyeball: It is rounded or spherical in shape and it consists of three distinct
coats:
1. Sclerocornea.
2. choroids.
3. Retina.

37
Receptor
Bipolar cell
Ganglion
cell
Optic
nerve
Optic
chiasma
Optic
tract
Lateral
geniculate body
Occipital
cortex
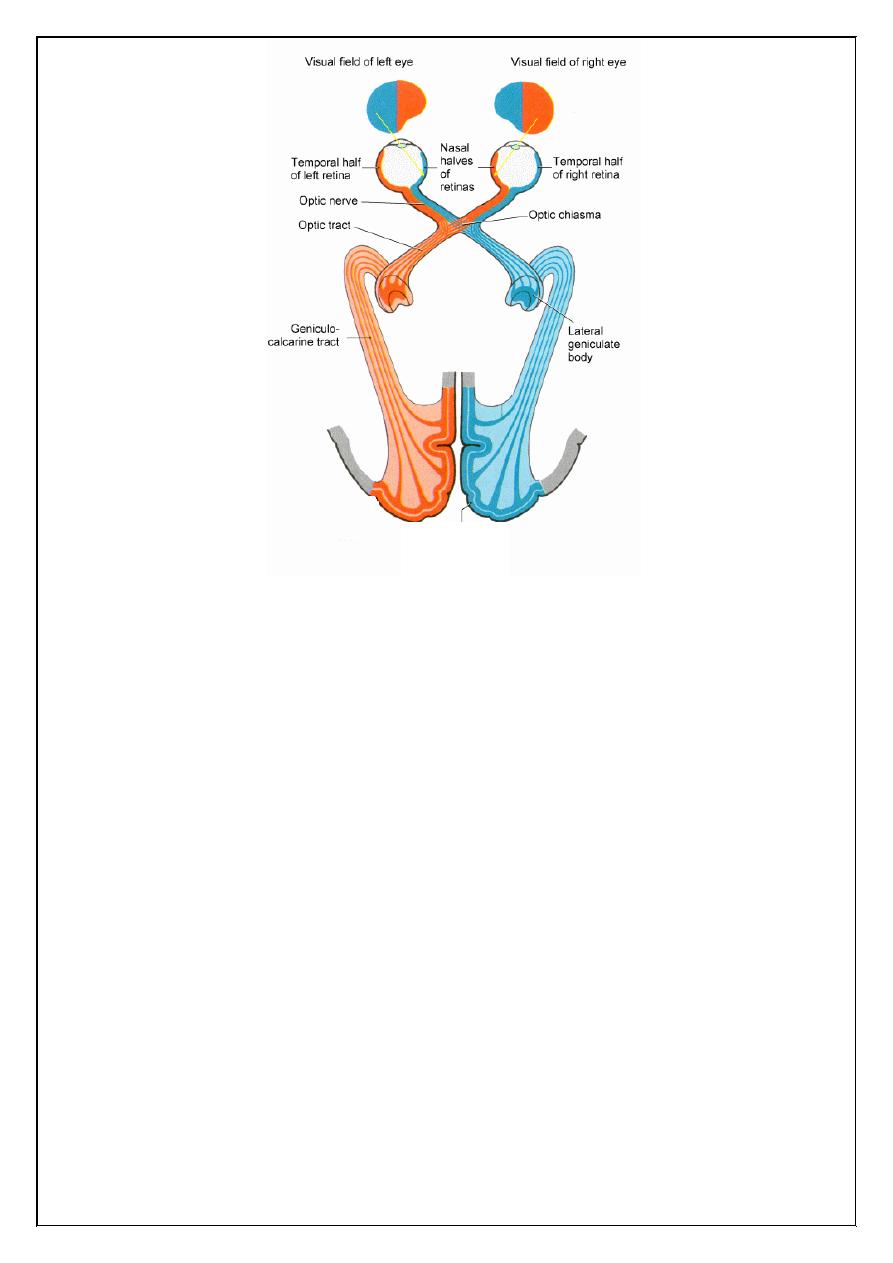
Visual pathway:
Procedure include:
1. Visual field:
When we look to an object a number of other objects in the
neighbor hood, more or less distinctly are seen, the full extent of this
vision is called visual field.
Objectives:
To map out the field of vision of the subject by using perimeter and
detect any defects in the visual fields.
Subject and Instruments:
1. A perimeter.
2. A subject.
3. A perimeter chart.
Procedures:
1. The concavity of the arc of the perimeter is towards the face of the
subject. The subject is made to rest his chin on the chin rest of the
perimeter, the other eye is covered.

38
2. The eye to be examined should keep looking at the test object
which is coloured, 5 mm object at the center of the metallic arc.
The subject should keep focusing on the white object.
3. The white disc fixed to the carrier is moved along the arc and is
gradually brought from the periphery to the center. The subject
say's "yes" the moment he sees the object and mapping of the
points is done on the chart the field. i.e., temporal, nasal, superior,
inferior at interval of 15° and a total circle of 360°.
4. marking should be done in clock wise fashion.
5. We find also the blind spot which is to the temporal side of the
central point of vision which represent the optic nerve head area in
which there are no light receptors.
6. We do the same procedure for mapping the visual field of the other
eye.
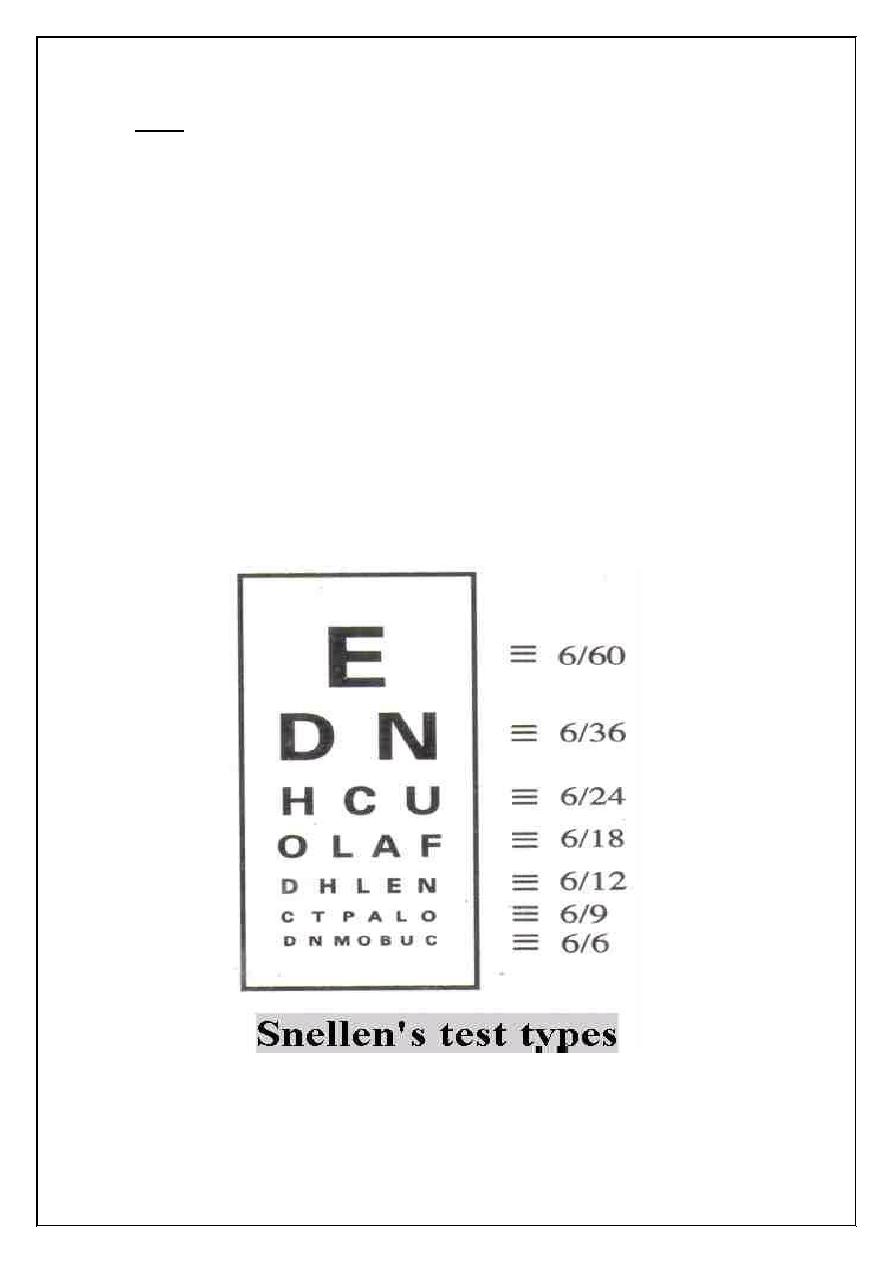
2. Visual Acuity:
It is measured with Snellen's test – type a series of letters of
varying size are so constructed that the top letters are visual or visible to
be seen to the normal eye at 60 m and the subsequent lines at 36, 24, 18,
12, 9, 6, respectively
Visual Acuity =
=
d
D
Distance at which the letter read
Distance at which they should read
39
Note:
1. each eye is tested separately.
2. patient is normally placed at distance of 6 meter from the test types d
= 6.
3. if only the tap letters are visible v= 6/60, read at least the seventh
line
mean v = 6/6
4. if visual acuity is less 6/60 move the patient toward the Snellen's test
type until he can read the top line for example about 2 meter
V = 2/60
Myopia = mean need concave lens.
Hypermetropia = mean need convex lens
40
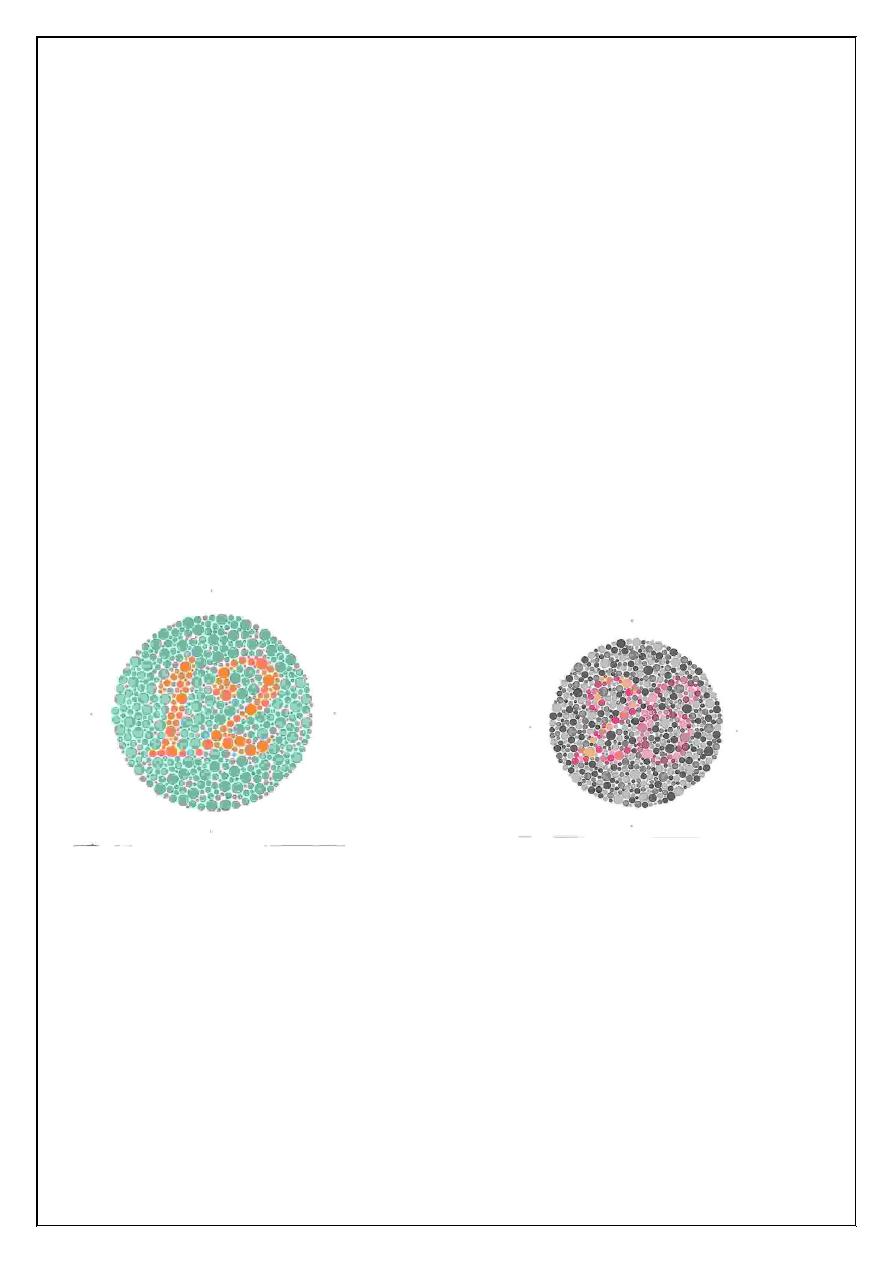
3. Colour sense:
we use pseudo isochromatic plates a person with normal colour. Vision
can read on number on plate while patient with defective colour vision
will read a different number, on the same plate
Red green colour:
Blindness most commonly inherited as sex linked recessive. Condition
occur in 8% male and 1% female.
Blue yellow colour:
Blindness in these two colours less commonly and usually defective in
the number 74, 21, 42.
Pseudo isochromatic plates for testing colour blindness
41
1. If damage in optic nerve, mean total loss of vision.
2. If damage in optic chiasma, mean Bitemporal hemianopia.
3. If lesion in optic tract mean Right homonymous hemianopia.
4. If lesion of the lower fibers of the optic radiation in the temporal lobe
lead to upper right quadrantic hemianopia
5. If lesion of the upper fibers of the optic radiation in the anterior part of
parietal lobe lead to less commonly a lower quadration hemianopia.
6. If lesion in optic radiation in the posterior part of the parietal lobe lead
to Right homonymous hemianopia.
Visual Pathway
Occipital
cortex
42
Experiment (12)
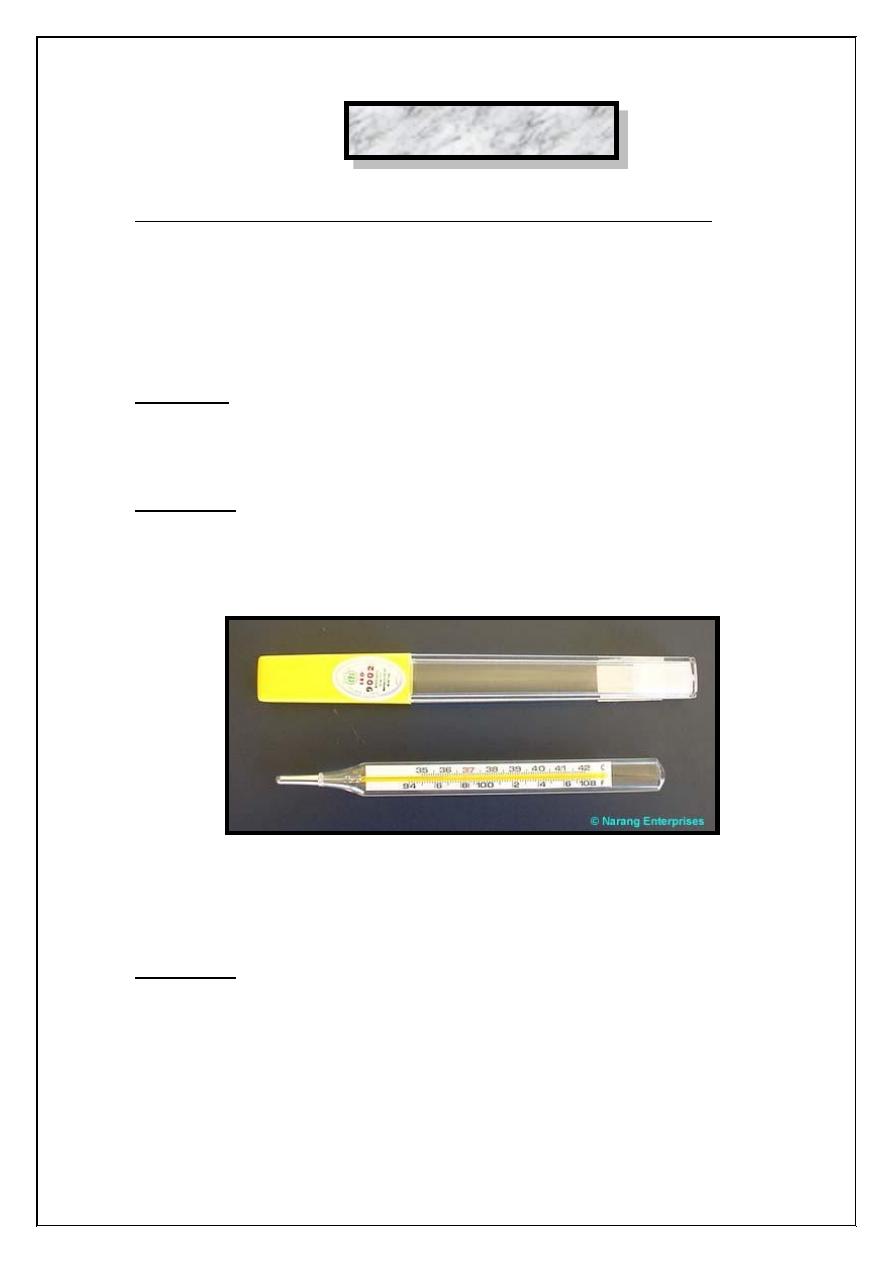
Body Temperature Measurement (Clinical Thermometry)
Measurement of body temperature is a routine procedure used in
all clinical work. It varies considerably under many physiological and
pathological conditions. It a curate measurement helps in many ways to
reach an accurate diagnosis.
Materials:
1. An accurate clinical thermometer of good quality.
2. Cotton wool and alcohol to wash the thermometer with.
Procedure:
The body temperature may be measured in the mouth axilla, groin and
rectum.
Clinical Thermometer
1. Oral Temperature Measurement:
Procedure:
1. Clean the thermometer by rubbing its bulb with a cotton wool
soaked in alcohol, holding the thermometer from the end away
from the bulb with your right thumb and index figures.

43
2. Holding the thermometer from the same end, observe the level of
the indicator fluid (mercury or alcohol column) If the column is not
seen easily rotate the thermometer forward and backward until the
column an appear clearly.
3. If the mercury level is 5°C lower its level to below this mark. This
is the best done by sharp jerky shakes of the thermometer.
4. Insert the bulb of the thermometer into your mouth, under the
tongue. Then mouth is shut tightly and you must breath through the
nose, during the whole time of the measurement. He sure that the
thermometer does not slip firm under your tongue and guard
against any breathing through the mouth.
5. Leave the thermometer in its place for 2 minutes, withdraw it and
the level of the indicator fluid in the same way as in (2 record your
results).
6. Repeat the measurement but immediately after a hot drink and
again after a cold rink of water. Compare these results with these
obtained. Take the measurement at intervals and record the time
taken for the temperature to return to its normal level after each
drink.
7. Repeat the measurement immediately after 1 minute heavy
exercise. Take the measurement at intervals and record the time
take for the temperature to return to its resting level.
8. Wash the thermometer and cleans it with alcohol soaked cotton
wool before returning to its case or bottle.
Oral Temperature
Measurement

44
2. Axillary and groin Temperature Measurement:
1. Follow the same steps 1, 2 and 3 as in oral measurement.
2. Dry the skin of axilla or the groin from any sweat and take aired to
keep the part as free as possible for perspiration both during the
measurement and for few minutes before it. The arm must be
drown near the side (for the axillary measurement) and tight up
towards the abdomen (for the groin measurement) for a short time
before the thermometer is inserted. This is necessary to guard
against the skin being chilled or exposed to air.
3. Insert the thermometer in the axillary flexure (or into the groin) and
bring down the arm to the side of the body (or flex the thing on the
abdomen) keeping the thermometer there in for 4 minutes.
4. Repeat the measurements but keeping the thermometer for periods
of 1,3,4 and 6 minutes. Be sure to shake down the mercury to a
level below 35°C before each measurement.
3. Rectal Temperature Measurement:
This procedure is used mainly for children or for unconscious
patients. In some clinics it is used regularly
45
Experiment (13)
Reflex action in man
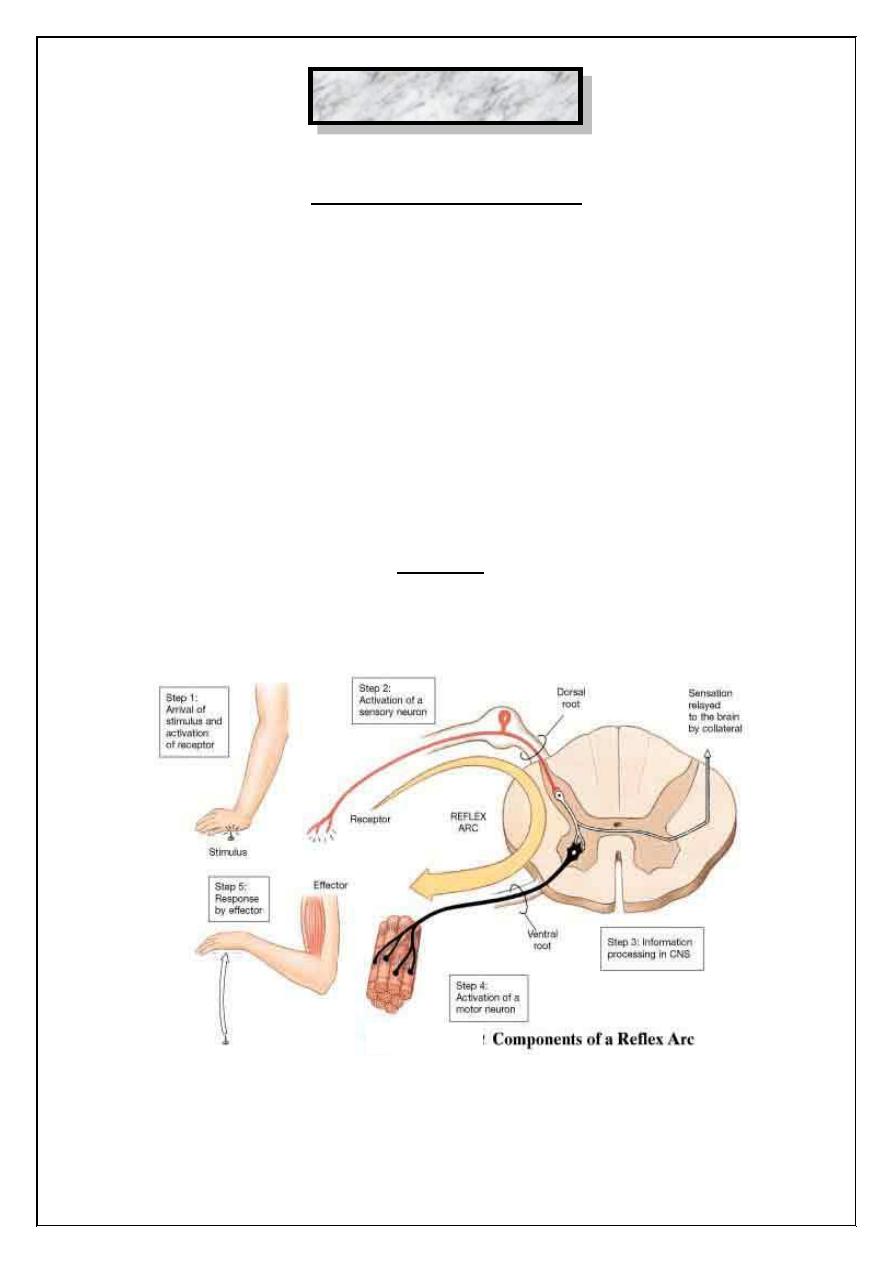
A reflex is an involuntary activity in an effectors organ (muscle,
gland) elicited by the stimulation of a receptor organ.
There are five component parts to most reflexes:
1. Receptoo organ.
2. Afferent (sensory) neuron.
3. Interneuron.
4. Efferent (motor) neuron.
5. Effectors organ.
These structures form a reflex arc. You will examine a number of
reflexes, which are especially significant from both physiological and
clinical points of view.
Figure (13.1): Reflex arc showing the pathway of impulses and
cross section of the spinal cord.

46
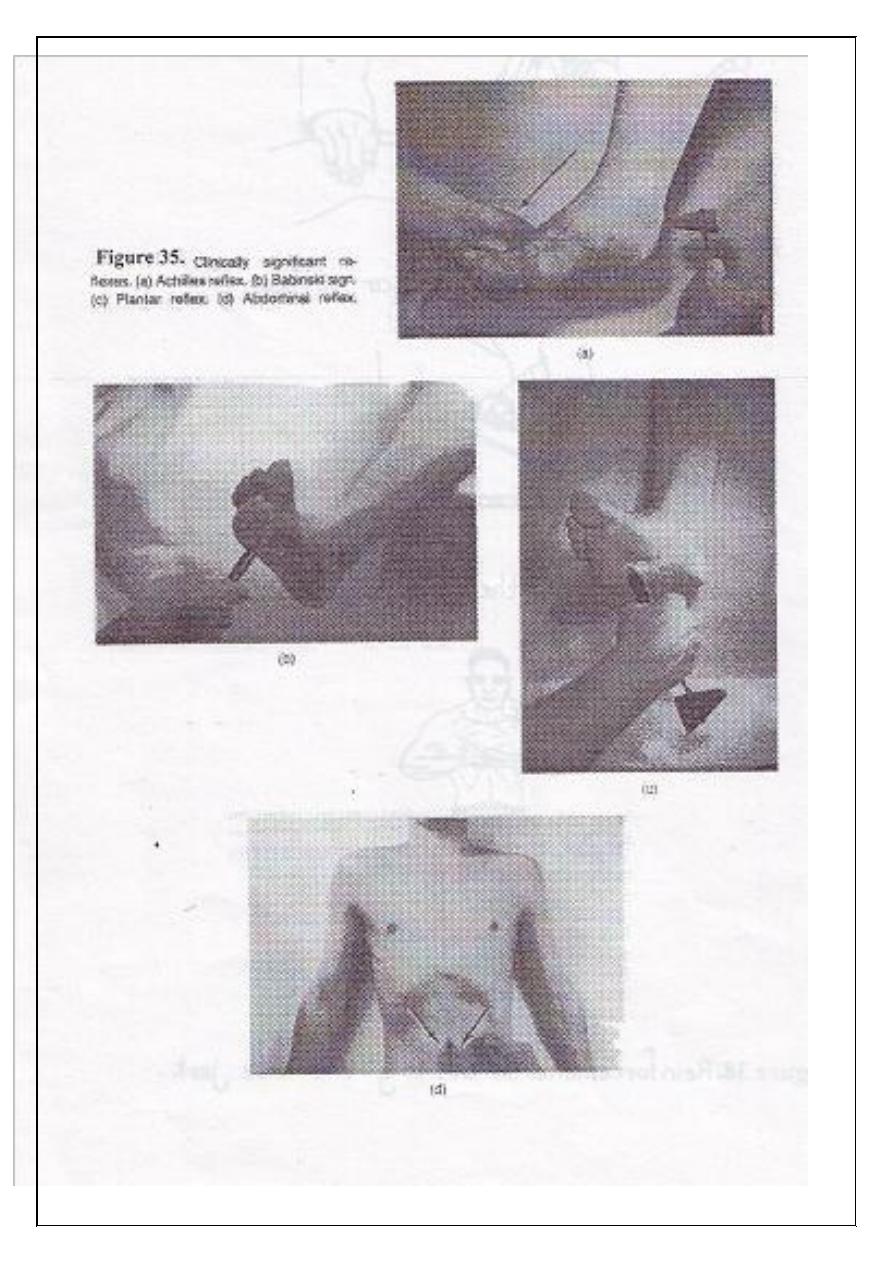
I. Cutaneous or superficial reflexes:
These consist of muscular contractions evoked by cutaneous
stimulation.
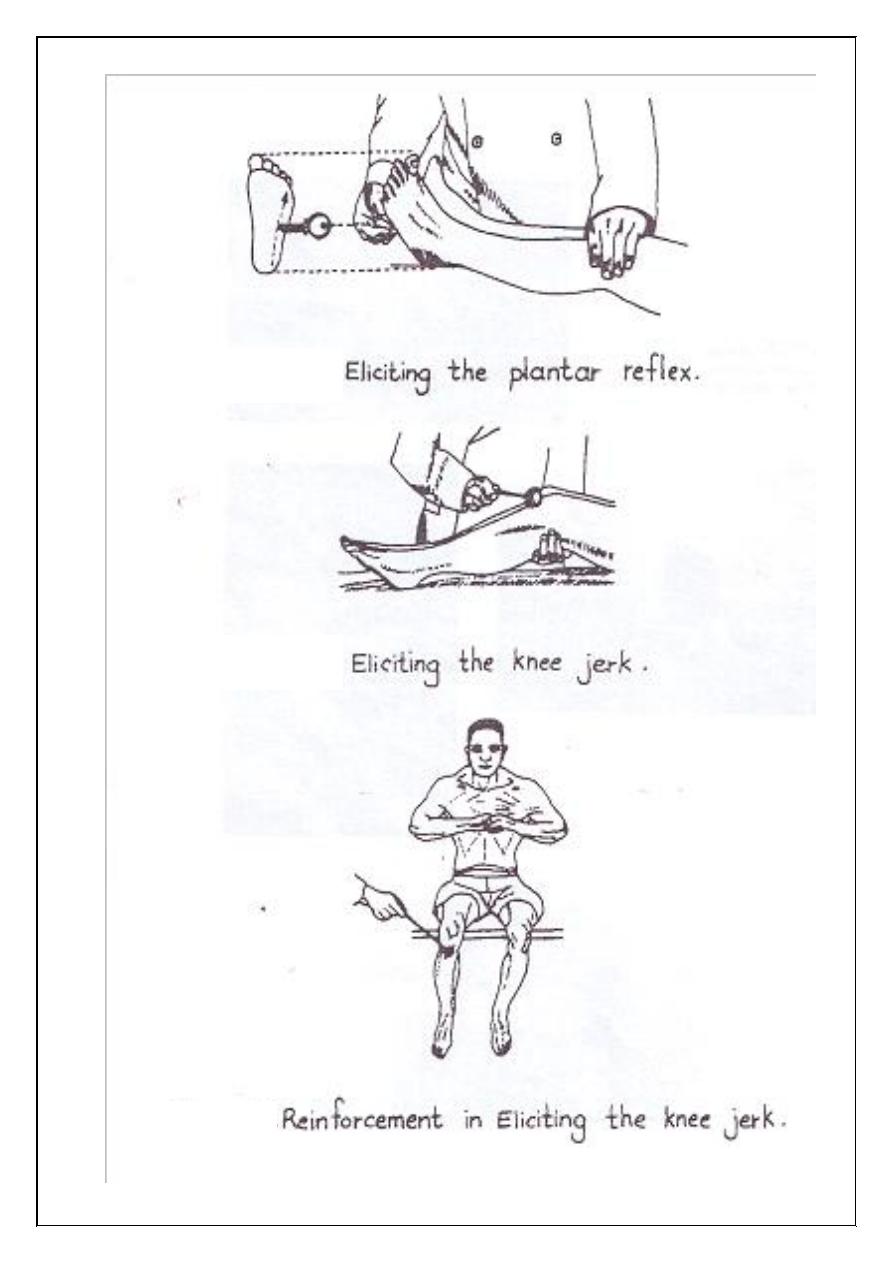
1. Plantar reflex:
Scratch the lateral border of the sole of the foot using a blunted
point (e.g., key), the normal adult response is a downward flexion of all
toes. If the toes fan out with the big toe flexed dorsally (upward) it is
referred to as Babinski reflex; this is often associated with damage to the
pyramidal tract fibers.
Babinski reflex is the normal response of a child in the first year
because the nerve are still undergoing myelination during this time.
2. Abdominal reflexes:
Stroke the skin of the abdominal wall. The reflex contraction of the
abdominal muscles will pull the umbilicus to the side stroked.
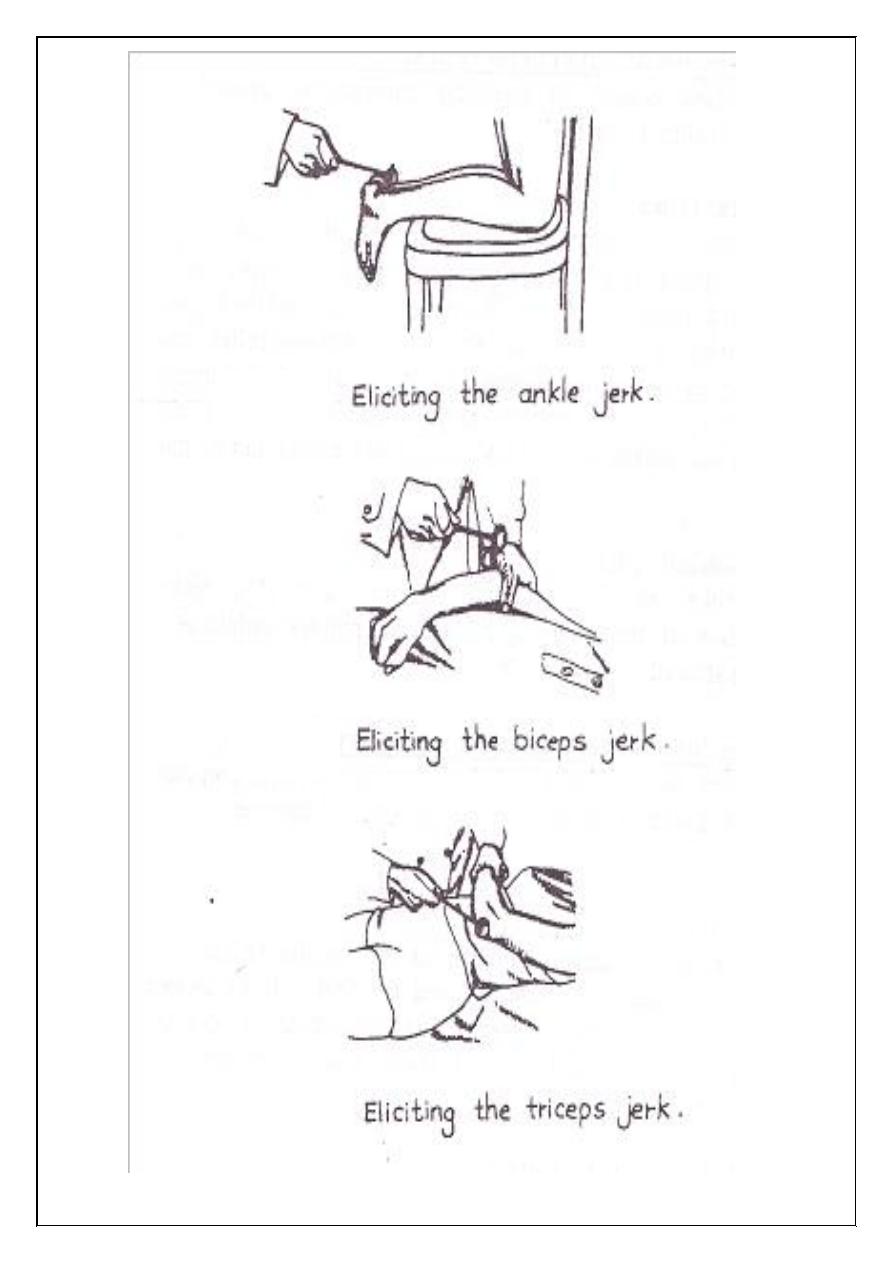
II. Tendon or deep reflexes (stretch reflexes):
They are evoked by a stretch of the tendons of appropriate muscles,
and this is done by a tap from a tendon hammer.
1. Knee jerk:
With the tendon hammer hit the patellar tendon, the extensor
muscle will contract and the foot will be kicked forward. If no reflex is
obtained ask the subject to hook his fingers together and to pull them
apart (reinforcement maneuver).
3. Ankle jerk (Achilles reflex).
4. Biceps jerk.
5. Triceps jerk.
47
48
49

50
III. Eye reflexes:
1. Corneal (Blink) reflex:
Gently touch the periphery of the cornea with the corner of a clean
handkerchief or a piece of a clean paper. The eyelids close immediately.
If the stimulus is more intense, lacrimation will occur (lacrimation
reflex). This reflex protects the cornea from injury by foreign material.
Afferent limb: Ophthalmic division of the trigeminal nerve.
Interneurons: Their cell bodies are located within the reticular formation
of the brain stem.
Efferent neurons: Alpha motor neurons of the facial nucleus, which
supply the orbicularis oculi muscles.
Afferent limb of lacrimation reflex is the same as for the blink
reflex. Efferent limb involves the restral salivatory nucleus of the brain
stem and the facial nerve fibers to the lacrimal gland.
2. Pupillary light reflex:
Swirch on the light and observe papillary constriction.
Receptor organ: Retina.
Afferent limb: Optic nerves and tracts.
Interneurons in the pretectal nucleus.
Efferent limb: Oculomator nerves.
Effector organ: Circular smooth muscles of the iris.
Fibers of both retinas project to both pretectal areas and both
pretectal areas project fibers to both oculomator nuclei. Therefore,
stimulation of either retina alone will induce the constriction of both
pupils. The constriction of the pupil receiving the stimulus is referred to
as the simple papillary light reflex, whereas the constriction of the pupil
of the opposite eye is referred to as a consensual papillary light reflex.

51
Experiment (14)
Sensory Physiology
Information about the internal and external environment reaches
the CNS via a variety of sensory receptors. These receptors are
transducers that convert various forms of energy in the environment into
action potentials in neurons.
Tactile sensation (touch):
This sense allows us to distinguish between hard and soft bodies
and to judge their shape. Touch receptors are most numerous in the skin
of the fingers and lips and relatively scarce in the skin of the trunk. There
are many receptors around hair follicles.
Localization:
This tests the ability of the subject to localize the point touched
when his eyes are closed. The power of localization depends on:
1. The position at which the nerve fibers from the tactile end-organs
enter the spinal cord and on their higher connections.
2. Experience.
Information can be transmitted via cutanoeus endings in densely
innervated zones such as the fingertips, and this is the basis of a reading
method for blind persons.
Discrimination (two –point discrimination):
These tests the ability to distinguish the contact of two separate
points applied simultaneously to the skin. Discrimination can be made by
using aesthesiometer, compass or caliper.

52
Discrimination magnitude varies from place to place on the body
and is smallest where the touch receptors are most abundant. Find the two
–point discrimination threshold (in millimeter) for the tip of tongue,
fingertip, palm of hand, back of hand and back of neck.
Stereognosis:
It is the ability to identify objects by handling them without
looking at them. This ability depends upon relatively intact touch and
pressure sensation. It also has a large cortical component.
Deep pressure touch:
With a blunted object (e.g., pencil) press on different areas of the
skin.
Pain sensation:
The sense organs for pain are the naked nerve endings. Pain is
tested by pinprick.
Temperature sensation:
There are two types of temperature sense organs; those responding
maximally to temperatures slightly above body temperature (warmth
receptors), and those responding maximally to temperatures slightly blow
body temperature (cold receptors).
Prepare two test tubes, one containing water at 15°C and another at
40°C. Touch different areas of the skin. Notice which areas of the body
are more sensitive to touch.

53
Joint movements and posture sensation:
Joint receptors are:
1. Golgi end organs in the ligaments.
2. The end organs of Ruffini in the capsule.
3. Pacinian corepuscles in the ligaments.
Change the position of the different joints passively whilst the eyes are
closed. Ask the subject to describe the passive movements induced.
Vibration sensation:
When a vibrating tuning fork is applied to the skin, a buzzing or
thrill is felt. The sensation is most marked over bones.
The receptors involved are the receptors for touch and pressure,
Merkel's disks. Apply the base of tunning fork to the superficial bones
and describe the sensation.

54
Experiment (15)
Hearing
Auditory acuity:
The relative acuity of hearing can be determined by the distance at
which a person can hear a given intensity of sound. Auditory acuity
should be performed in a quiet room.
Localization of sound:
Determination of the direction from which a sound emanates
depends upon:
1. Detecting the differences in sound intensity in both ears.
2. Detecting the differences in time of arrival of the sound wave in
both ears.
Tuning fork tests:
If a subject's sensitivity is low, this loss may be due to a defect in
the external ear (such as wax blocking the meatus), or to some defect of
the middle ear. This is called conduction deafness. There may be a loss
of sensitivity in the cochlea or a more central defect, this is called nerve
deafness. Conduction and nerve deafness can be distinguished by a
number of tests with a tuning fork (A 512 Hz tuning fork is performed).
Rinne's test:
Place the handle of tuning fork on the mastoid process at the level
of the upper portion of the ear canal. When the sound is no longer audible
place the tuning fork in front of the auditory canal. In normal subject the
air –conducted sound is heard longer than heard by bone conduction

55
(Rinne's test is positive). In conduction deafness Rinne's test may be
negative (bone conduction is greater than air conduction).
Weber's test
The base of tuning fork is placed on the forehead in the midline or
on the top of the head. If hearing is normal the sound appears to arise in
the midline. If there is a damage to the cochlea or its neural connections
(nerve deafness), the sound will be perceived less well on the affected
side and will appear to arise on the healthy side. If there is conduction
deafness, the sound is referred to the affected ear and is heard more in the
affected ear.

56
Experiment (16)
Taste sensation
Introduction and principle:
The four primary taste sensations are sweet mainly felt by the tip of
the tongue, sour sensation on the sides of the tongue, salty sensation on
the dorsum of the tongue and bitter sensation on the posterior part of the
tongue.
Objectives:
To examine the localities of the taste sensations.
Materials and subjects:
1. Volunteer from students.
2. Four solutions are used in this experiment:
a. Strong solution of sugar.
b. Strong solution of salt.
c. Weak solution of citric acid (sour).
d. Weak solution of quinine (bitter).
Procedure:
Ask the subject to put out his tongue and with a glass rod apply a
fine drop of each solution (only one at a time) to the tip, upper surface,
back and the sides of the tongue.
Ask the subject to describe what sort of taste he perceives each
time. Repeat the test with all of the solutions, (bitter at the end). Put down

57
your results and map the different parts of the tongue to all solution on a
diagram.
Results:
Bitter substances are tasted on the back of the tongue, Sour along
the edges. Sweet at the tip, and Salt on the dorsum anteriorly (see
figure16.1).
Discussion:
1. Enumerate the types of the taste papillae and their taste
specialization.
2. Mention the substances that cause the four primary taste sensations
and their chemical structures.
3. Is it possible to perceive bitter taste on the dorsum of the tongue?
How and why?
Figure (16.1): The location of different taste modalities on the surface of
the tongue.
Sweet
Salt
Sour
Bitter
B
ody
Sour
Root
Epiglottis