
1
Computer Science Lab
System and Control Department
First Stage
Lab 3
Windows 10 Desktop
2
The Windows 10 Interface
After logging the computer, Windows 10 desktop will be appeared. The Desktop
layout is as follows:
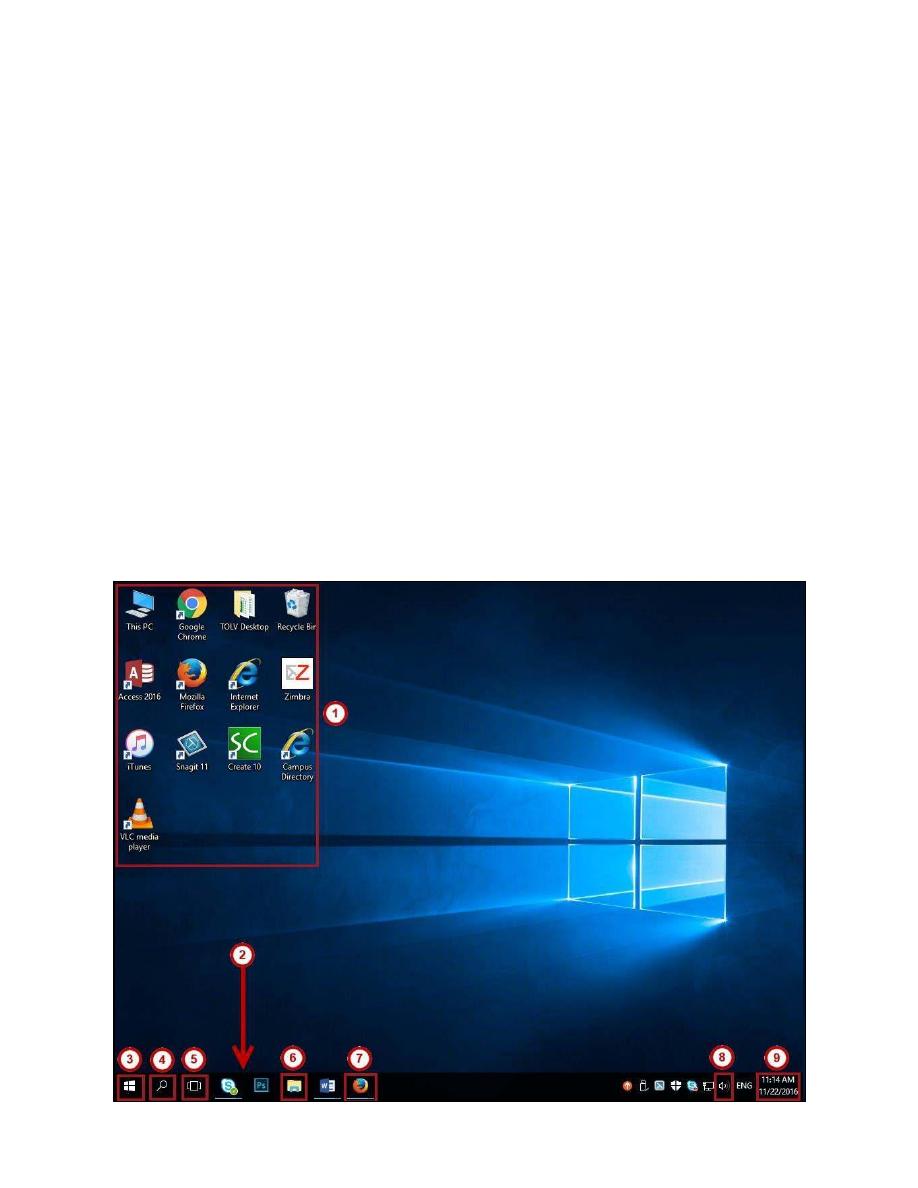
1. Desktop Shortcuts – Shortcuts to files, folders, and the Recycle Bin (See Figure 1).
2. The Taskbar – Like in previous versions of Windows, the taskbar provides access to the
Start Menu, shortcuts to programs, as well as volume and date/time control (See Figure 1).
3. The Start Button – Found on the bottom left of your screen, the Start button allows you to
access computer programs and configuration options such as Windows Settings (See Figure 1).
4. Windows Search – Allows you to search for programs, folders, and files (See Figure 1).
5. Task View – A new feature in Windows 10 that gives you access to a task switcher tool as well
as a Virtual Desktop (See Figure 1).
6. File Explorer – Formerly known as Windows Explorer, File Explorer is a file manager
application that allows you to access files and folders on the computer (See Figure 1).
7. Taskbar Programs – Provides quick access to open or pinned programs (See Figure 1).
8. Volume Adjustment – Allows you to adjust the computers volume (See Figure 1).
9. Date/Time – Access the Date/Time options (See Figure 1).
Figure 1 - Windows 10 Desktop
3
Opening Programs
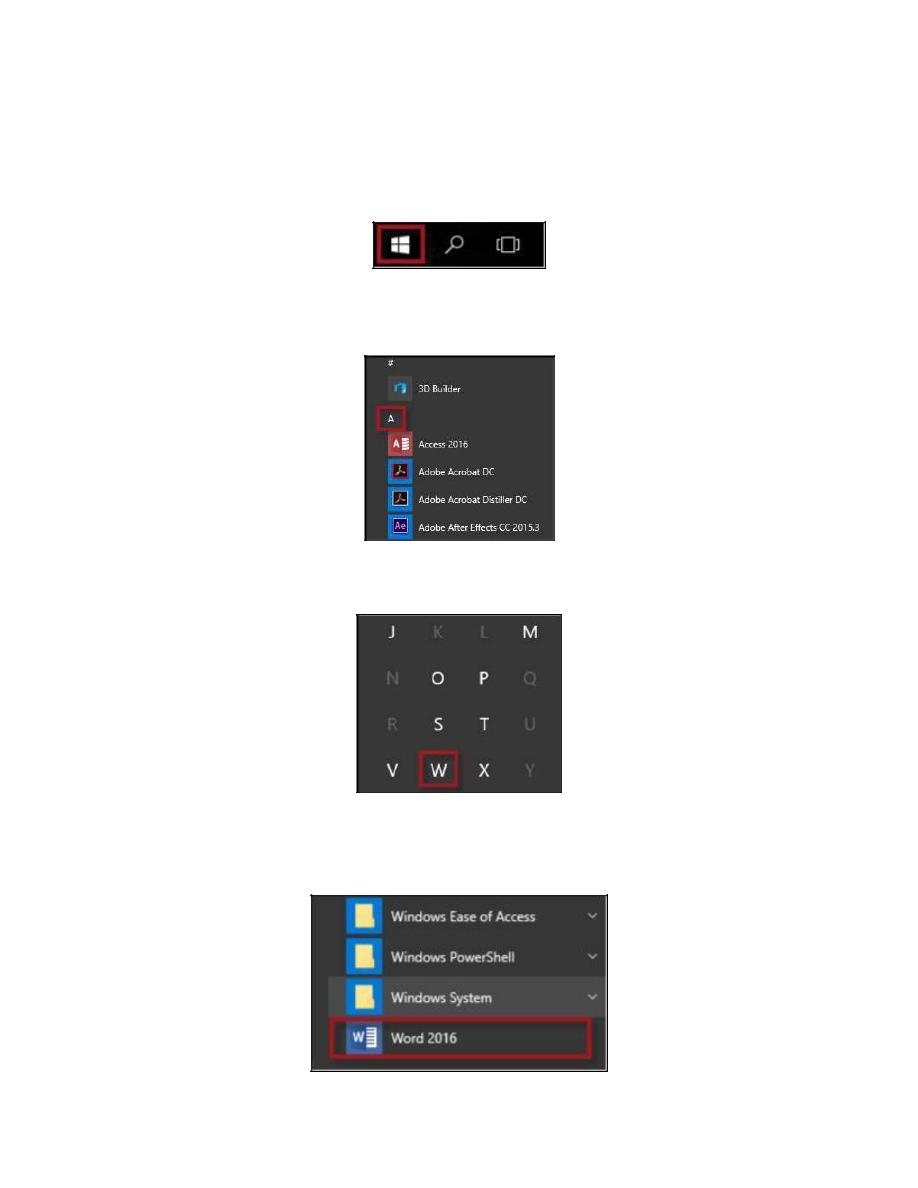
The following explains how to open a program in Windows 10:
1. Click the Start button.
Figure 2 - The Start Button
2. Click the letter A, located on the program list.
Figure 3 - Click the letter A
3. A list of letters will appear. Click W to be taken to those programs that begin with the letter 'W'.
Figure 4 - Click 'W'
4. Click Word 2016.
Figure 5 - Click Word 2016
4
Searching for Programs
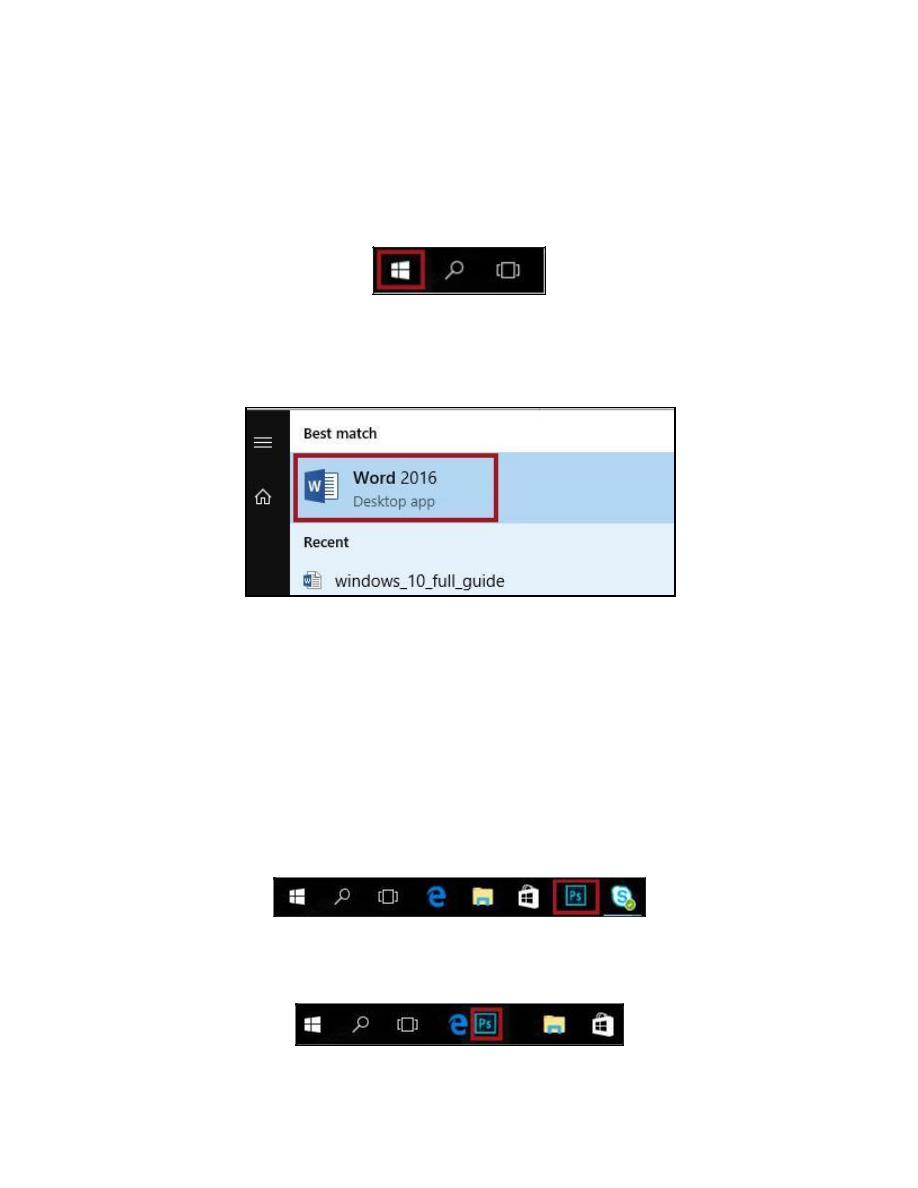
Alternatively, you can search for a program by typing the program name after clicking the Start button.
The following explains how to search for a program in Windows 10:
1. Click the Start button.
Figure 6 - Click the Start Button
2. Begin to type the name of the program that you wish to open. For example, Word 2016
3. A list of programs will appear. Click Word 2016.
Figure 7 - Click Word 2016
The Windows Taskbar
The Taskbar is located along the bottom frame of the monitor. With it, you can access the Start
button, view running programs, and view the date/time and volume adjustment features.
Organizing the Taskbar
The following explains how to rearrange buttons on the taskbar:
1. Click and hold the program that you wish to move.
Figure 8 - Click the button
2. Drag the program to a different location on the taskbar.
Figure 9 - Drag the button
5
3. Drop the program by releasing the mouse.
Figure 10 - Dropping the program
Pinning a Program to the Taskbar
You may pin programs to the taskbar. In doing so, these programs will remain on the taskbar even
when they are not open. The following explains how to pin programs to the taskbar:
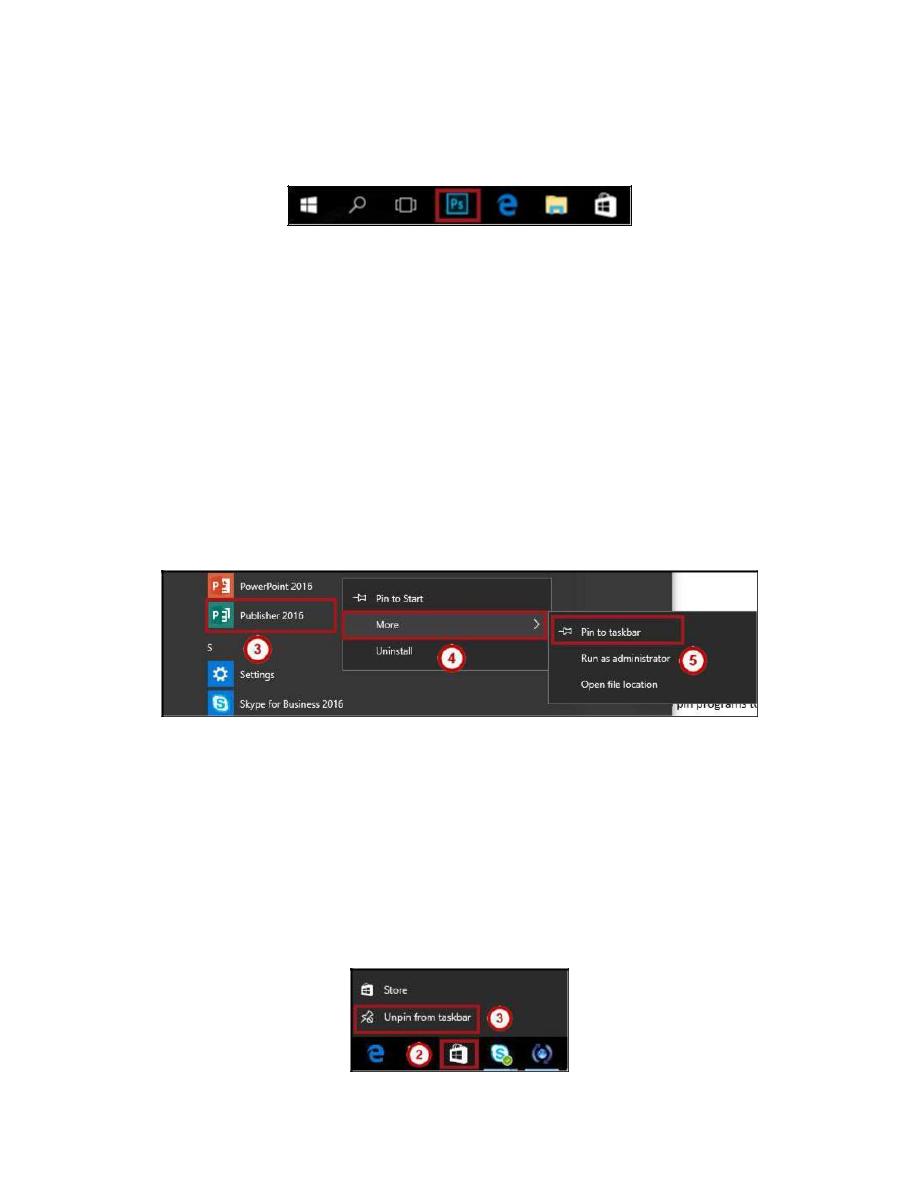
1. Click the Start button (See Figure 11).
2. Navigate to the program that you wish to pin to the taskbar (See Figure 11).
3. Right-click the program that you wish to pin to the taskbar (See Figure 11).
4. Click the More button (See Figure 11).
5. Click Pin to Taskbar (See Figure 11).
Figure 11 - Pinning Programs
Removing a Program from the Taskbar
You may also remove programs from the taskbar if so desired. The following explains how to do so:
1. Click the Start button.
2. Right-click the program that you wish to remove from the taskbar (See Figure 12).
3. Click Unpin from Taskbar (See Figure 12).
Figure 12- Unpin from the Taskbar
6
Date Time
You may also access the Date/Time tool on the taskbar as you would in Windows 7. Here, you can
quickly view a calendar as well as adjust the date/time.
Viewing the Date/Time
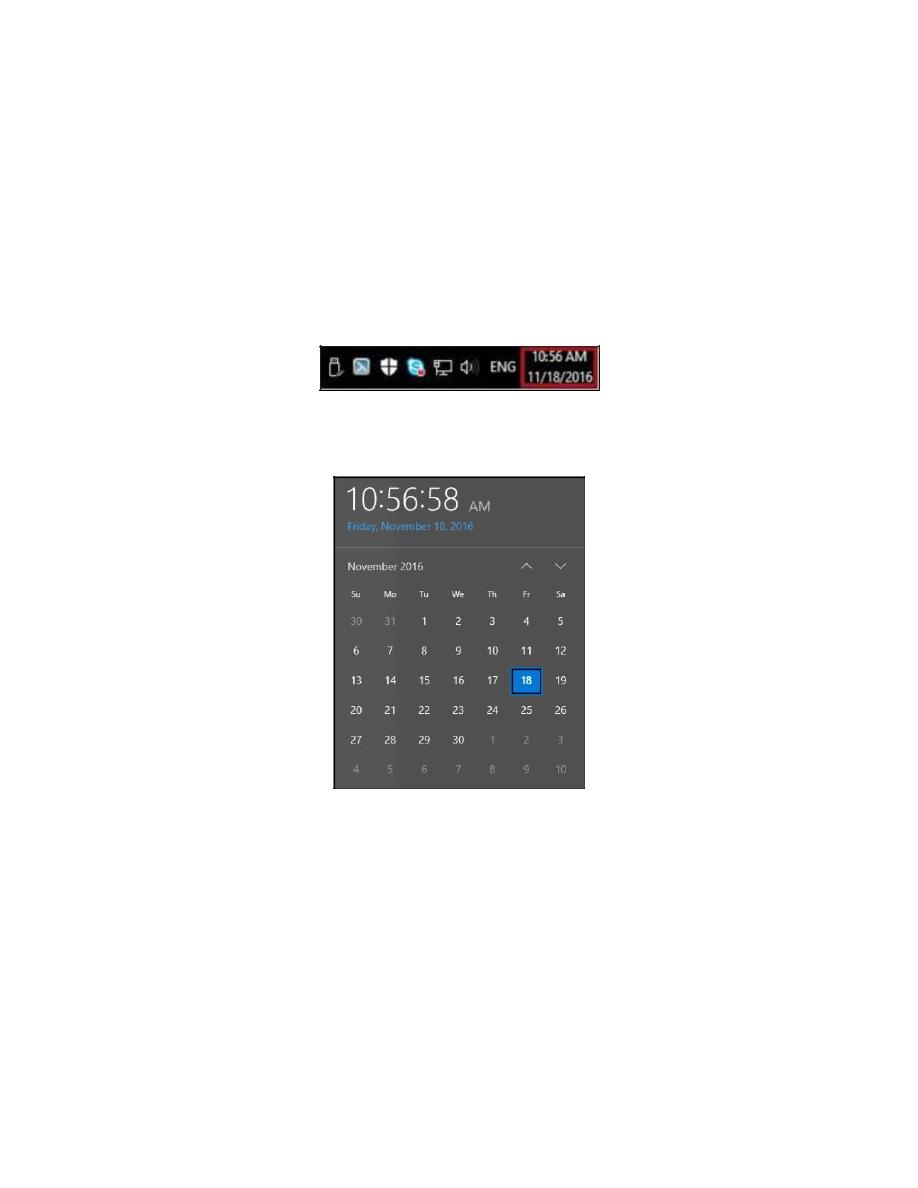
The following explains how to access Date/Time on the Windows Taskbar:
1.
Click Date/Time, located on the bottom right corner of the taskbar.
Figure 13 - Click Date/Time
2. The Date/Time window will appear.
Figure 14 - Date/Time Window
7
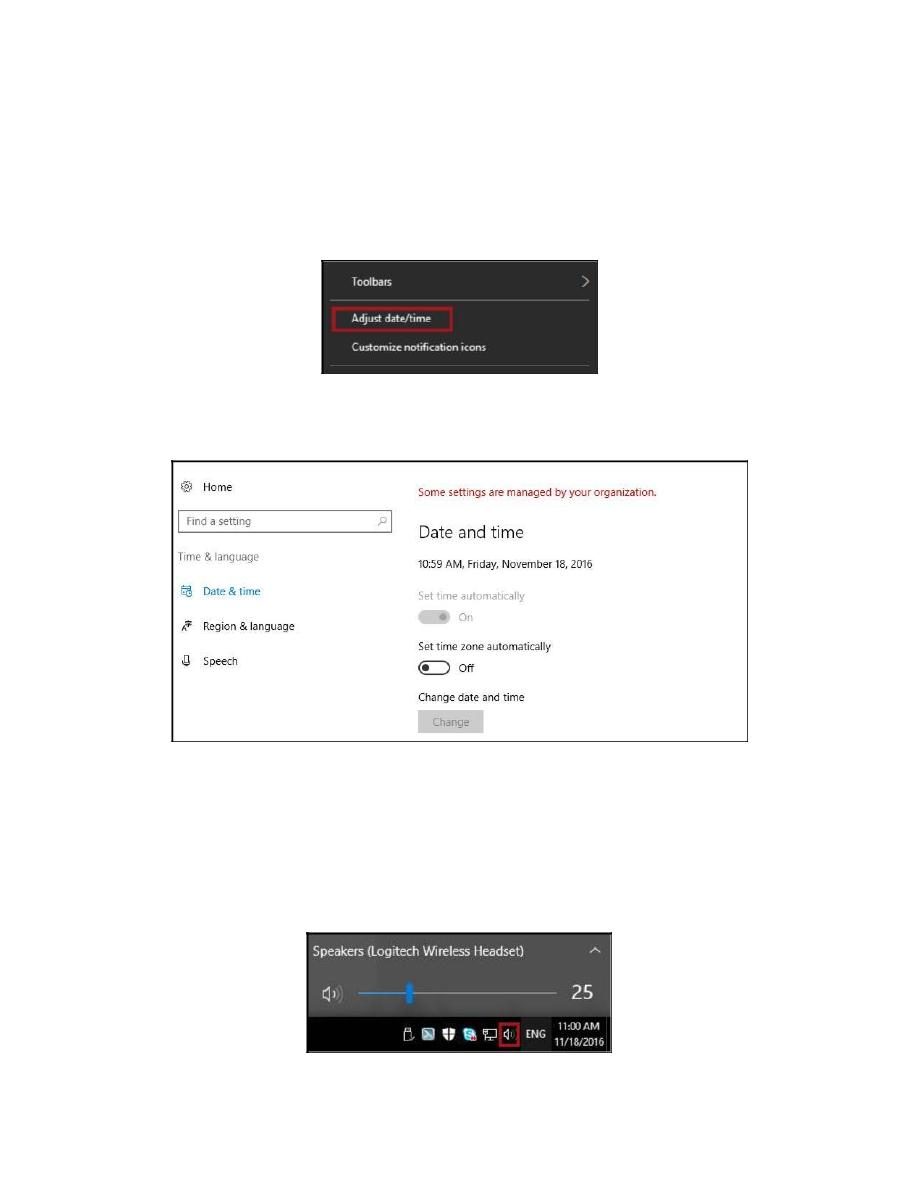
Adjusting Date/Time
Though your computer should automatically be synced so that the date/time is accurate, you do have the
ability to adjust certain date/time features. The following explains how adjust the date/time:
1. Right-click the Date/Time, located on the bottom right corner of the taskbar.
2. Click Adjust Date/Time.
Figure 15 - Adjust date/time
3. The Date/Time window will open.
Figure 16 - Date/Time Window
Note: Some Date/Time settings are managed by the system administrator.
Adjusting Volume
The Volume Adjustment icon is located on the bottom right corner of the taskbar. By clicking on the
icon, you will have the ability to adjust the computers volume dragging the lever to the left or right.
Figure 17 - Volume Adjustment
8
Personalizing the Desktop
Like in Windows 7, you have the ability to customize your desktop. For example, you can add
shortcuts, create folders, change your desktop background, and change your screensaver if so desired.
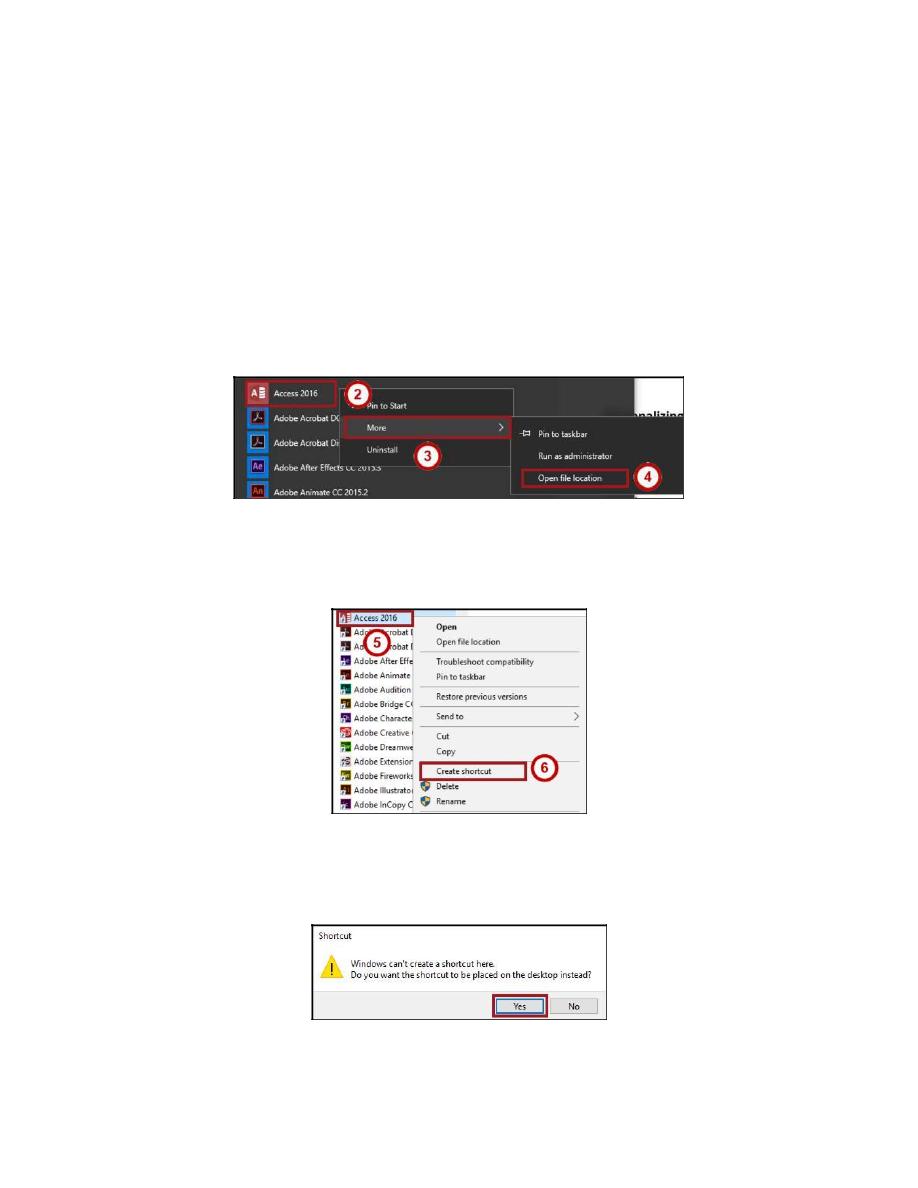
Adding Shortcuts
The following explains how to create desktop shortcuts:
1. Click the Start button.
2. Navigate to and right-click the program that you wish to create a shortcut for (See Figure 18).
3. Click More (See Figure 18).
4. Click Open File Location (See Figure 18).
Figure 18 - Opening File Location
5. The file location window will appear. Right-click the program icon (See Figure 19).
6. Click Create Shortcut (See Figure 19).
Figure 19 - Creating Shortcuts
7. The Shortcut pop-up will appear, asking if you wish to place the shortcut on the desktop.
Click Yes.
Figure 20 - Click Yes
8. The shortcut will be added to the desktop.
9
Deleting Shortcuts
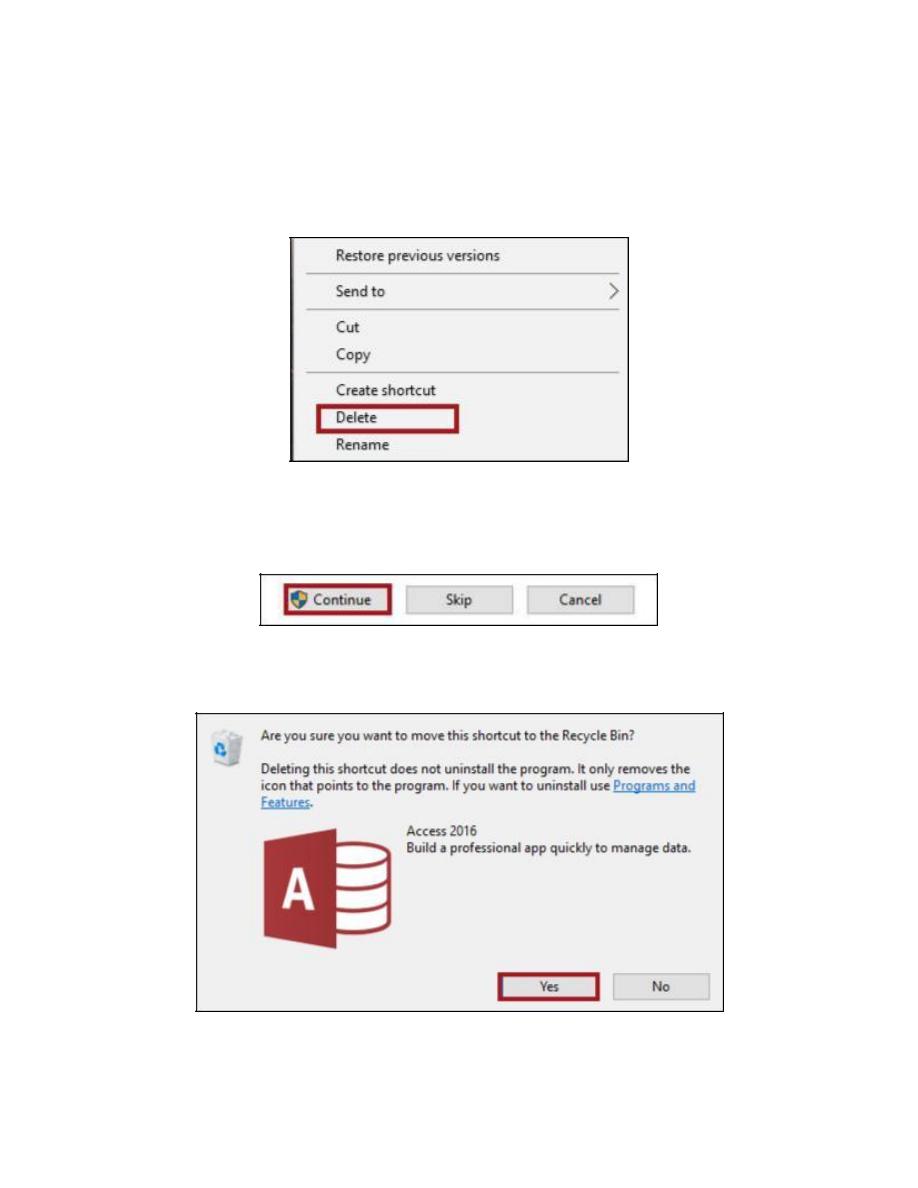
The following explains how to delete shortcuts from the desktop:
1. On the desktop, right-click the shortcut that you wish to remove.
2. Click Delete.
Figure 21 - Click Delete
3. If you are deleting a shortcut for a program that originally came on the desktop, you will
be prompted to provide administrator permission to delete the file. Click Continue.
Figure 22 - Click Continue
4. The Delete Shortcut window will appear. Click Yes to confirm deletion of the shortcut.
Figure 23 - Click Yes
5. The shortcut will be removed.
10
Creating Folders on the Desktop
The following explains how to create folders on the desktop:
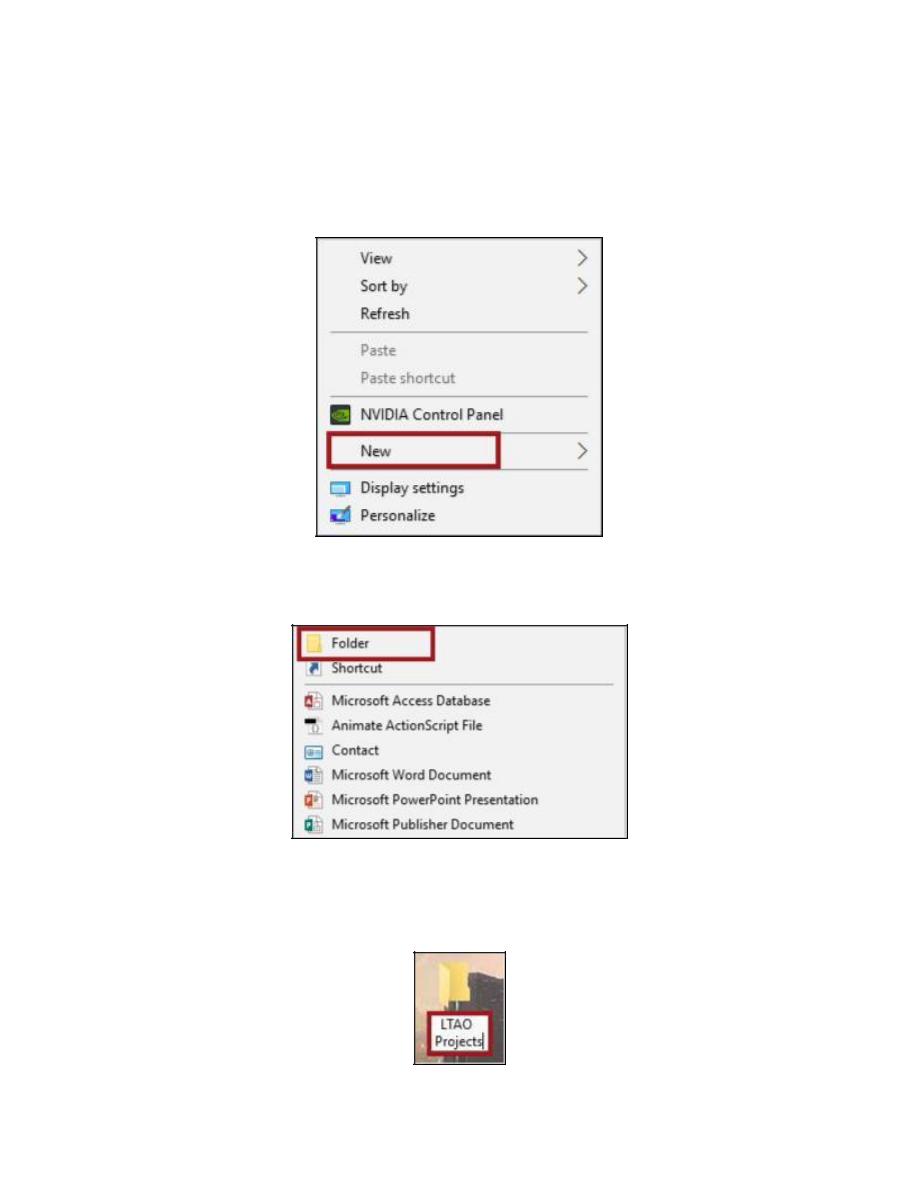
1. Right-click the desktop.
2. Select the New icon.
Figure 24 - Click New
3. Click Folder.
Figure 25 - Click Folder
4. A new folder will appear on the desktop. Enter your preferred name for the folder and
press the Enter key.
11
Changing the Desktop Background
The following explains how to change the desktop background in Windows 10:
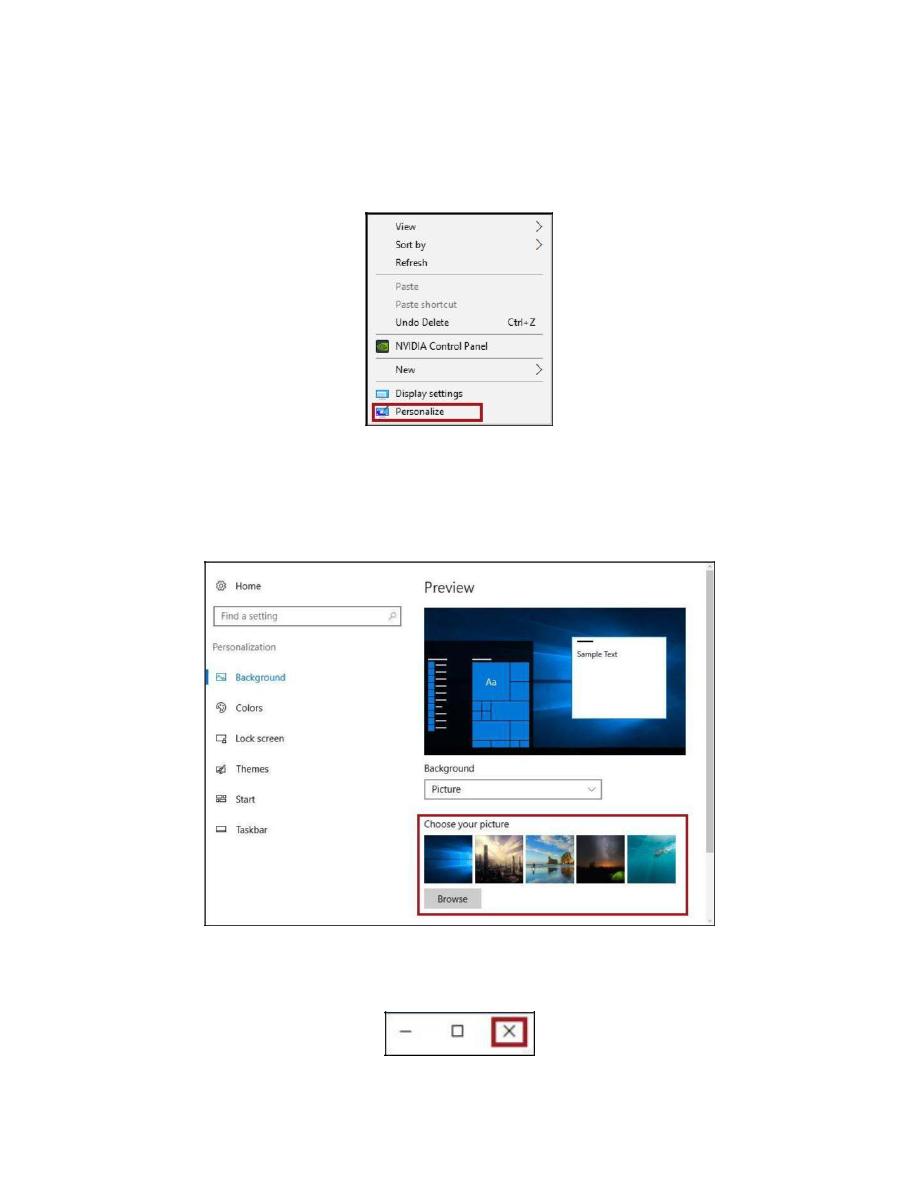
1. Right-click the desktop.
2. Click Personalize in the window that appears.
Figure 26 - Click Personalize
3. You will be taken to the Personalize Desktop window. Here, you may toggle the type of desktop
background in the Background drop-down. If you wish to select a different picture, you can
choose from the Choose your picture fields.
Figure 27 - Choose Your Picture
4. The desktop background will be changed. Click X to close the window.
Figure 28 - Click Close
12
Changing the Screen Saver
Windows comes with several screen savers. These screen savers may appear when your computer
goes idle. The following explains how to change your screensaver in Windows 10:
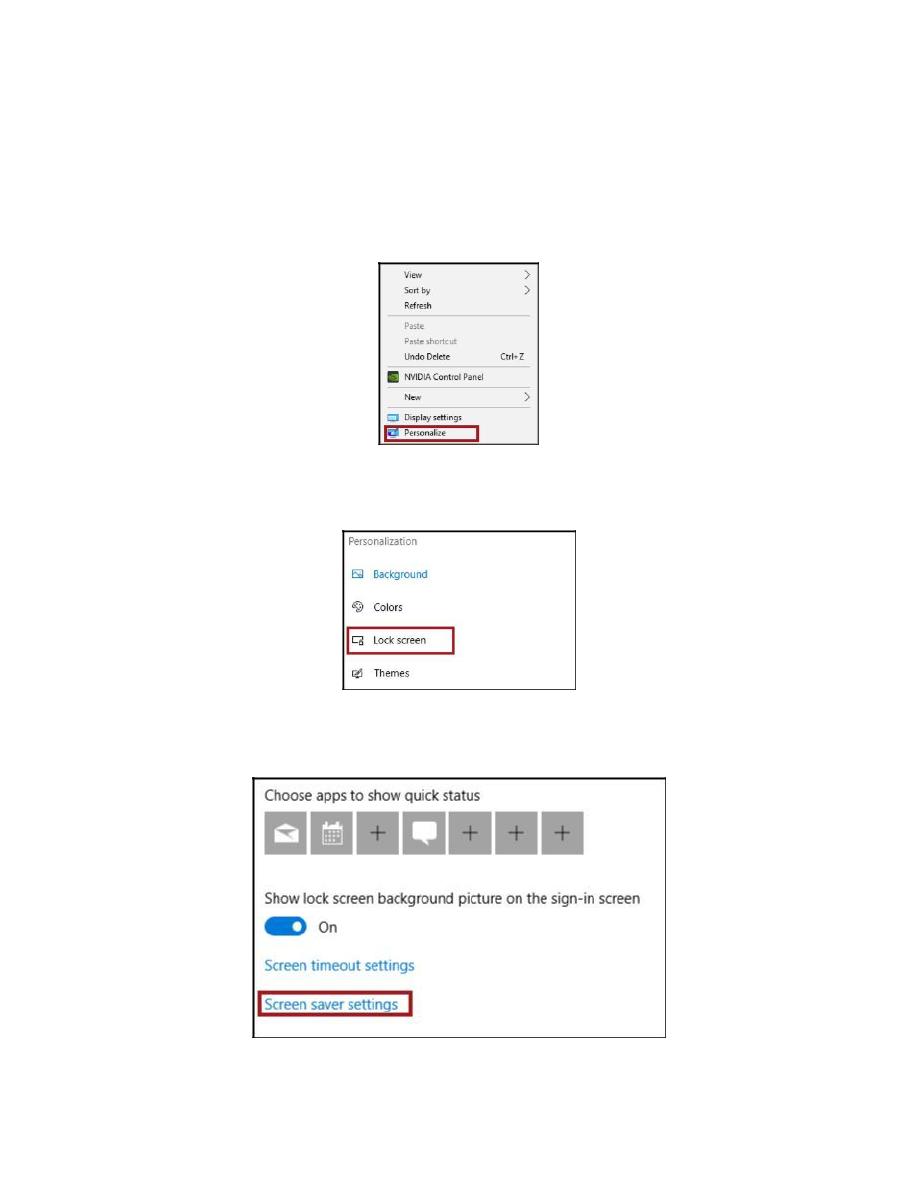
1. Right-click the desktop.
2. Click Personalize in the window that appears.
Figure 29 - Click Personalize
3. In the Settings window, click Lock Screen.
Figure 30 - Lock Screen
4. Click Screen saver settings, located at the bottom of the window.
Figure 31 - Screen saver settings
13
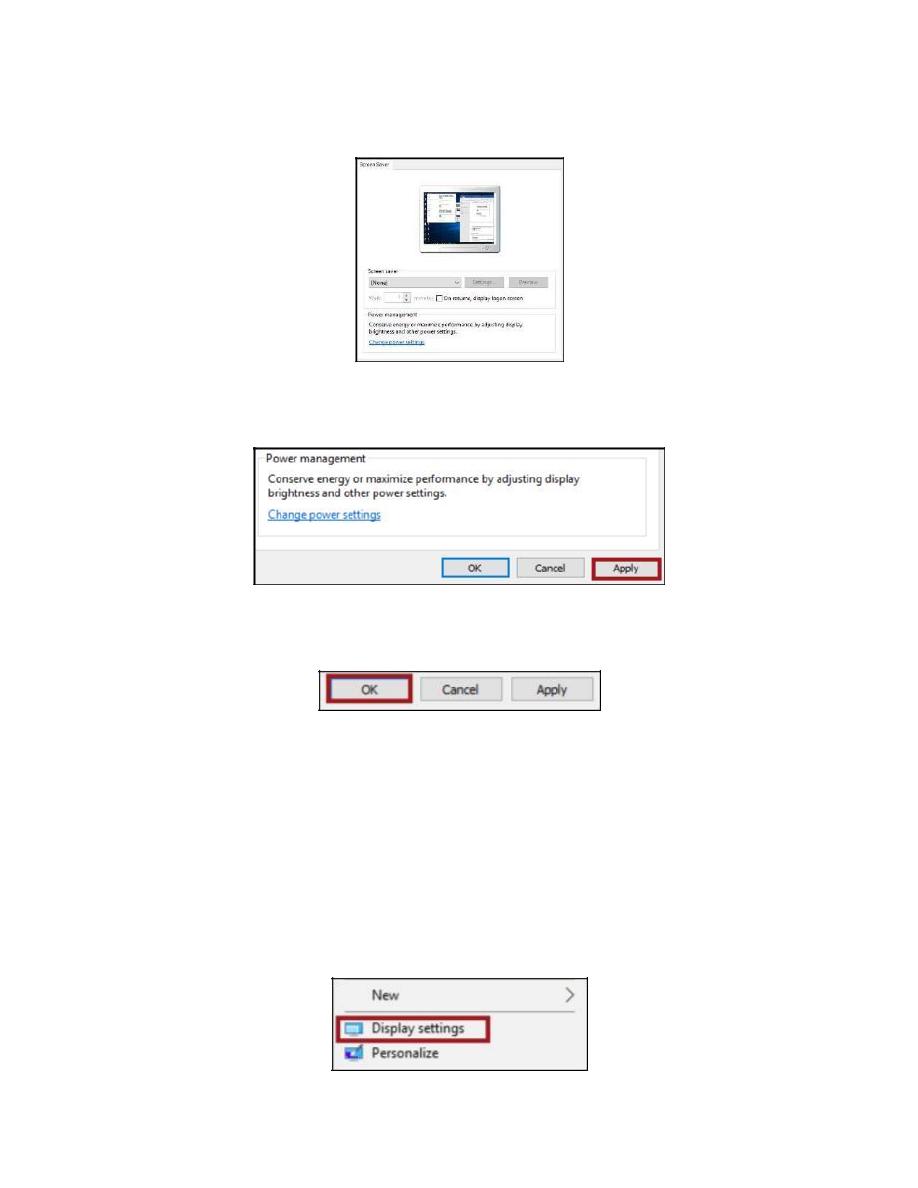
5. The Screen Saver Settings window appears. From here, you may select your preferred screen
saver and set the amount of time that your screen saver appears after being idle.
Figure 32 - Screen Saver Savings
6. Click Apply to apply your settings.
Figure 33 - Click Apply
7. Click OK.
Figure 34 - Click OK
8. Click the Close button to close the window.
Changing Screen Resolution
Windows chooses the best display settings, including screen resolution, refresh rate, and color, based
on your monitor. The following explains how to adjust the screen resolution in Windows 10:
1. Right-click the desktop.
2. Click Display Settings.
Figure 35 - Display Settings
14
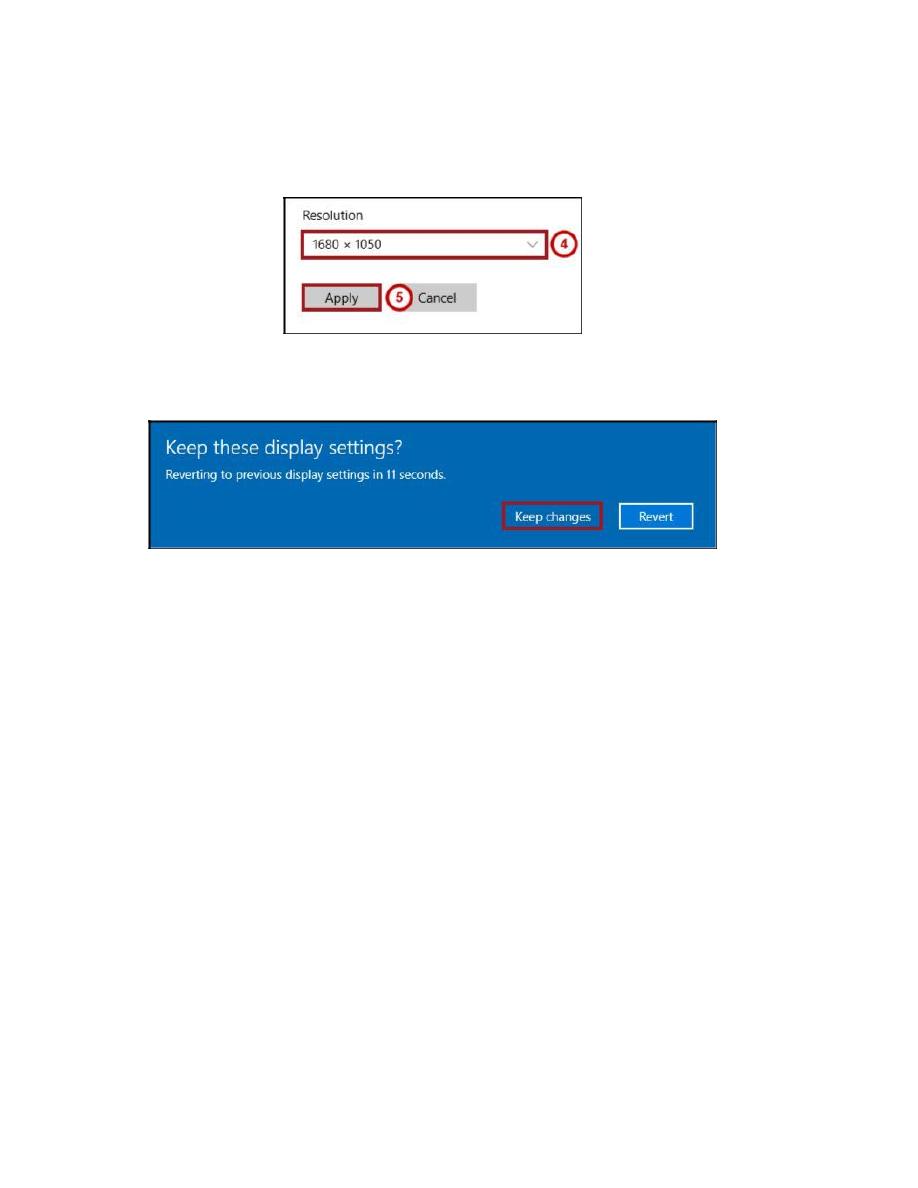
3. To adjust the screen resolution, select the resolution from the Resolution drop-down menu
4. Click Apply (See Figure 36).
Figure 36 - Changing Screen Resolution
5.
To keep the changes, click Keep Changes.
Figure 37 - Keep Changes
6.
Click Close to close the window.
Discussion:
1- List the features of windows 10 operating system?
2- What is the purpose of using screen saver?