Impression for complete denture

An impression: is the negative form of the teeth and/or other tissues of the oral cavity, made in a plastic material which becomes relatively hard or set while in contact with these tissues.
A complete denture impression: is a negative registration of the entire denture bearing, stabilizing, and border seal areas present in the edentulous mouth.
It must be seen as a two-stage process, with the primary and secondary impression stages having distinct, important function.
Primary/preliminary impression
This is made for the purpose of diagnosis or for making a preliminary cast on which a special tray is constructed.Final/Secondary/Master impression
Is an impression for making the master casts. The master casts are used in constructing the denture.Objectives of complete denture impression
1-Preservation of the remaining residual ridge.2- Support.
3- Stability.
4- Retention.
5- Esthetic.
Preservation of the remaining residual ridge
• Preservation of remaining oral structures is vitally important to long-term success of the denture.• The prosthodontist should keep constantly in mind the effect the impression technique and the impression material may have on the denture base and the effect the denture base may have on the continued health of both the soft and hard tissues of the jaws.
• Pressure in the impression technique is reflected as pressure in the denture base and results in soft tissue damage and bone resorption.
support
Support: is the resistance to the vertical forces of mastication, occlusal forces and other forces applied in a direction towards the basal seat tissues.Support is provided by the maxillary and the mandibular bones and their covering of mucosal tissues.
Maximum coverage provides the “snowshoe” effect, which distributes applied forces over as wide an area as possible. This helps in preservation, stability and retention.
support
The areas of denture support are divided into primary, secondary stress bearing areas:
Primary supporting areas:
Maxillary - Posterior ridges, Flat areas of the palate.
Mandibular - Buccal, Posterior ridges, Retro molar pad area.
Secondary supporting areas:
Maxillary - Anterior ridge (Rugae area),maxillary tuberosity, All ridge slop.
Mandibular - Anterior ridge, All ridge slops.
stability
Stability: The quality of a removable dental prosthesis to be firm, steady, or constant, to resist displacement by functional horizontal or rotational stresses.Close adaptation to the undistorted mucosa is most important. Stability decreases with the loss of the vertical height of the ridges, or with the increase in flabby, movable tissue.
Esthetics
Border thickness should be varied with the needs of each patient in accordance with the extent of residual ridge loss. The vestibular fornix should be filled, but not overfilled, to restore facial contour.Retention
Retention: that quality inherent in the dental prosthesis acting to resist the forces of dislodgment along the path of placement.The process of obtaining denture retention begins with impression making.
It should be readily seen that if the other objectives are achieved , retention will be adequate.
Classification of impressions
Impressions can be classified into the following types:Depending on theories of impression making
1-Mucostatic/Passive/Nonpressure/Minimal pressure impression technique
2-Mucocompressive/Pressure impression technique
3-Selective pressure technique
Depending on impression technique
1-Open mouth
2-Closed mouth
Mucostatic/Passive/Nonpressure/Minimal pressure impression technique
The objective of this technique is to obtain an impression of the tissues in their resting state.Spaced special trays are used during taking the impression, the spacer is adapted on the entire tissue surface with four stops to enable orientation and stabilization of the tray
Border molding is not performed; hence, flanges are shorter than other techniques.
The dentist uses a less viscous impression material with minimal application of pressure on the impression tray.
It is best termed as ‘minimal pressure’ impression as it is impossible to record the mucosa with no pressure.
The denture fit accurately on the tissues at rest.
Mucostatic/Passive/Nonpressure/Minimal pressure impression technique
Materials used:
Impression plaster, alginate(thin consistency).
Advantages:
preservation of health of tissues, good stability.
Disadvantages:
•Deprives the denture of maximum coverage within physiologic limits.
•Results in closely adapted dentures but with poor peripheral seal thereby providing good stability but poor retention.
Mucocompressive/Pressure impression technique
This technique compresses the denture-bearing tissues during impression making.The proponents of this theory perceived that by recording the tissues in a compressed state, they would withstand functional forces, which compress the tissue better. When the denture is processed, it will therefore be maximally retentive during function when the fitting surface has its closed contact with the tissues. The denture will have reduced retention when it is not under load (at rest or speaking).
Pressure can be manually applied using high viscosity impression materials impression compound, irreversible hydrocolloids, putty and heavy body elastomeric impression materials. Closed mouth functional technique also produces mucocompressive impressions .
Mucocompressive/Pressure impression technique
Materials used: impression compound, wax and soft liner.Advantages: better support and retention during functional movements like mastication.
Disadvantages
Produces overextended impressions.
As the tissues are recorded in a compressed state, due to the rebound phenomenon of the oral tissues, there are chances that the dentures will dislodge when not in function (compression)-at rest or speaking.
Increased residual ridge resorption is seen as the ridges are constantly under pressure from the overlying dentures.
As the tissues are uniformly compressed, pressure is also transmitted to areas that are not capable to withstanding the stress.
This often results in good initial retention but eventual reposition and loose dentures.
Selective pressure technique
It combines the principles of both pressure and minimal pressure techniques. Pressure is applied selectively on areas capable of resisting stress(stress-bearing areas), and reduced from areas incapable of tolerating stress(relief areas).
This is achieved through the design of the custom tray, where nonstress-bearing areas are relieved and only stress-bearing areas contact the tray.
The technique combines the principles of maximum coverage within physiologic limits , with intimate contact on the movable, loosely attached peripheral tissues, and light pressure on weak tissues.
Selective pressure technique
Materials: zinc oxide eugenol impression paste.Advantages: it considers physiologic functions of the tissues, it confines forces acting on denture to stress bearing areas.
Disadvantages:
Some feel it may be impossible to record areas with varying pressure.Some areas are still recorded under compression, which can rebound.
Impression techniques
Open mouth techniquesThis records the oral tissues in a static state with displacement. The amount of displacement depends on the ability of the different oral tissues to withstand pressure, the amount of space provided for the impression material and the consistency of the impression material.
With the patient’s mouth in open position, the dentist applies controlled pressure on the inserted tray to record the tissues in a static form.
Closed mouth techniques
In this technique oral mucosa is recorded in a functional, compressed form. It is assumed that the occlusal loading during impression making is comparable to occlusal loading during function.
Occlusal rims or teeth are attached to the impression trays and impression is recorded, while patient applies pressure and performs functional actions like swallowing, grinning or pursing the lips. Thus the peripheries of the dentures are established during function.
Oral mucosal behavior during function
Oral mucosa behaves in a visco-elastic manner. If a constant load is applied, there is a sudden elastic displacement, followed by a slower where tissue fluid is expressed from the tissues. If the load is released, immediate elastic recovery of the shape of the tissue is followed by a delay recovery lasting many hours.
A necessity that is often ignored or overlooked is that of the patient removing any existing dentures for a minimum of 24 hours, with 48 or 72 hours being more desirable, prior to making final impressions .
Removing existing dentures prior to making final impressions is necessary to allow the underlying tissues to assume their most healthy and normal physiologic shape.
The aim of the primary impression is to record the entire denture-bearing area.
the aim of the final impression is to make as exact a replica of the soft and hard tissue as possible, with maximum coverage of supporting tissues and minimal extension onto movable tissues and muscle attachments. An exact replica of the tissues is necessary to create a denture/tissue interface with intimate contact throughout, which will result in excellent retention, stability and support of the denture.Preliminary/Primary impressions
Preliminary impressions are made with stock trays.An impression material with relatively high viscosity is selected allowing the material to compensate for any deficiencies in the tray. Because of their high viscosities, however, these impression materials will often displace the soft tissues of the vestibules, resulting in an overextended impression and resulting cast.
The following materials are commonly used:
Impression compound
Irreversible hydrocolloids
Elastomeric impression material (Heavy or putty bodied)
Selection of stock tray
Rotatory movement should be used while inserting the tray in the patient’s mouth.An edentulous stock tray that is approximately 5 mm larger than the outside surface of residual ridge is selected.
The tray should cover the entire denture-bearing area.
The distobuccal area in the upper and distolingual region in the lower should be observed carefully since they constitute stability potential in treatment consideration.
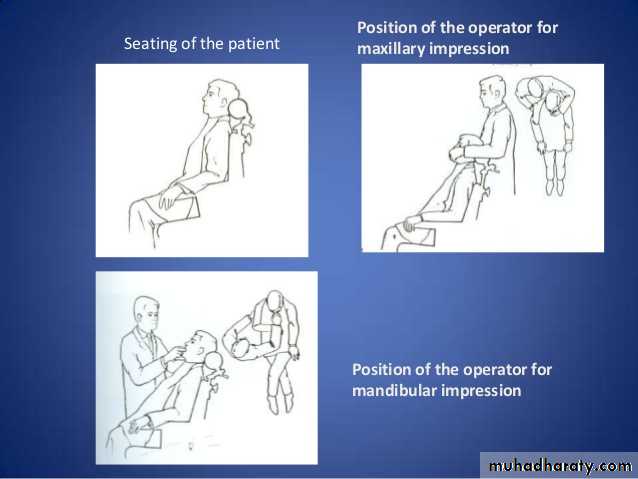
Position of patient and operator
For maxillary impressions
For mandibular impressions
• Patient positionHead and neck are in line with the trunk. Head is upright, occiput resting firmly on the headrest of the chair.
• Operator position
• Right rear or rear position.
• Height of the chair
• Patient’s mouth should be in level with the operator’s elbow.
• Patient position
• Head and neck are in line with the trunk. Head is upright, occiput resting firmly on the headrest of the chair.
• Operator position
Right front position.
• Height of the chair
Patient’s mouth should be in level with the operator’s shoulder.
Position of patient and operator
Mandibular preliminary impression
Mandibular preliminary impression With impression compound• The patient is usually asked to use an astringent mouthwash to reduce the viscosity of the saliva.
• Nonperforated stock tray is inserted in the patient’s mouth to confirm its extension. Posteriorly, the retromolar pads should be covered by the tray. The tray is raised anteriorly for observation of the relation between the lingual flanges and the lingual slope of the lower residual ridge.
• Compound is placed in hot water (60°C) and is kneaded to achieve uniform consistency without wrinkles or folds.
• It is formed into a suitable size roll (1.5 cm in diameter) and placed in the tray with enough bulk extending beyond the flanges such that there is no restriction in flow when pressed over the ridge.
• A trough is indented in the compound with a finger to receive the crest of the alveolar ridge. It should be deeper posteriorly and shallow anteriorly and moulding should begin from the midline and proceed distally.
• It is again placed in hot water, tempered and inserted in the patient’s mouth.
Mandibular preliminary impression With impression compound
• For insertion, the tray is first placed in the left side of the mouth at right angles to the final position, and then rotated in a clockwise manner to engage the right side after retracting the angle of the mouth on that side.• Once the tray is in position, the patient is instructed to slightly close the mouth and raise the tongue, while vertical pressure is applied on the tray in the molar region.
• The cheeks are stretched to ensure that they are not trapped in the tray.
• Labial and buccal flanges are border moulded and patient is asked to move the tongue from side to side and then protrude it slightly.
• As the room temperature may be less than intraorally, the material sets from the tray towards the tissues. Due to poor thermal conductivity, it will take longer time for the material in contact with the tissues to set as compared to those outside of tray. Sufficient time should be given after the external material sets to remove the tray, thereby, preventing distortion.
Mandibular preliminary impression With impression compound
• To remove the tray, the patient is asked to close the mouth partially, cheeks are retracted to break the seal, the handle of the tray is held between the thumb and index and the middle fingers of the right hand, and an upward and backward force is applied.• The impression is evaluated for extension, reproduction of anatomical landmarks, tray exposure and wrinkles or voids.
• Refining the preliminary impression: Any excess material is trimmed, impression is again softened in warm water and refined by reseating the impression in the patient’s mouth. Similarly, a deficient border can be added with low fusing compound.
• The impression should be poured within an hour to minimize warpage due to release of stresses.
Mandibular preliminary impression With impression compound
Forming material as a roll and placed in tray
A trough is indented in the compound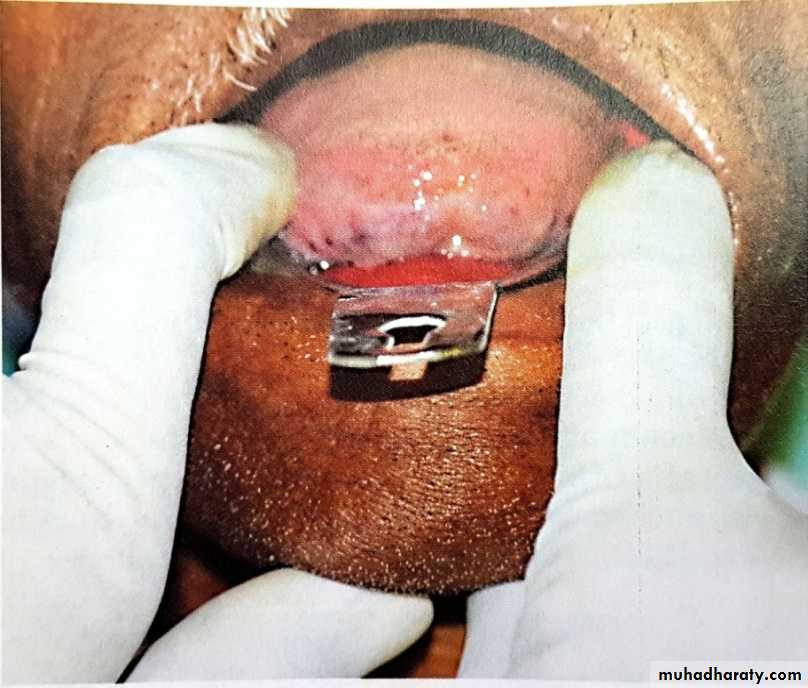
Final seating
Completed lower impressionMandibular preliminary impression With irreversible hydrocolloid (Alginate)
Alginate requires support from the tray because of its poor tear-resistance. The tray should be extended if needed with modelling or boxing wax.A clearance of 2-3mm is sufficient for alginates.
The powder and liquid are mixed to a slightly thicker consistency and loaded onto a perforated stock tray up to the border. A small quantity is placed on the retromylohyoid area and labial vestibules to displace any air pockets and the impression is made.
Tray is inserted and removed as described for impression compound. All elastic impressions should be removed in a snap. It is then rinsed in tap water, dried and evaluated for any deficiencies. The impression must be remade if any deficiencies exist.
It should be poured immediately.
Mandibular preliminary impression With irreversible hydrocolloid (Alginate)
Tray extended with wax
Completed irreversible hydrocolloid preliminary impression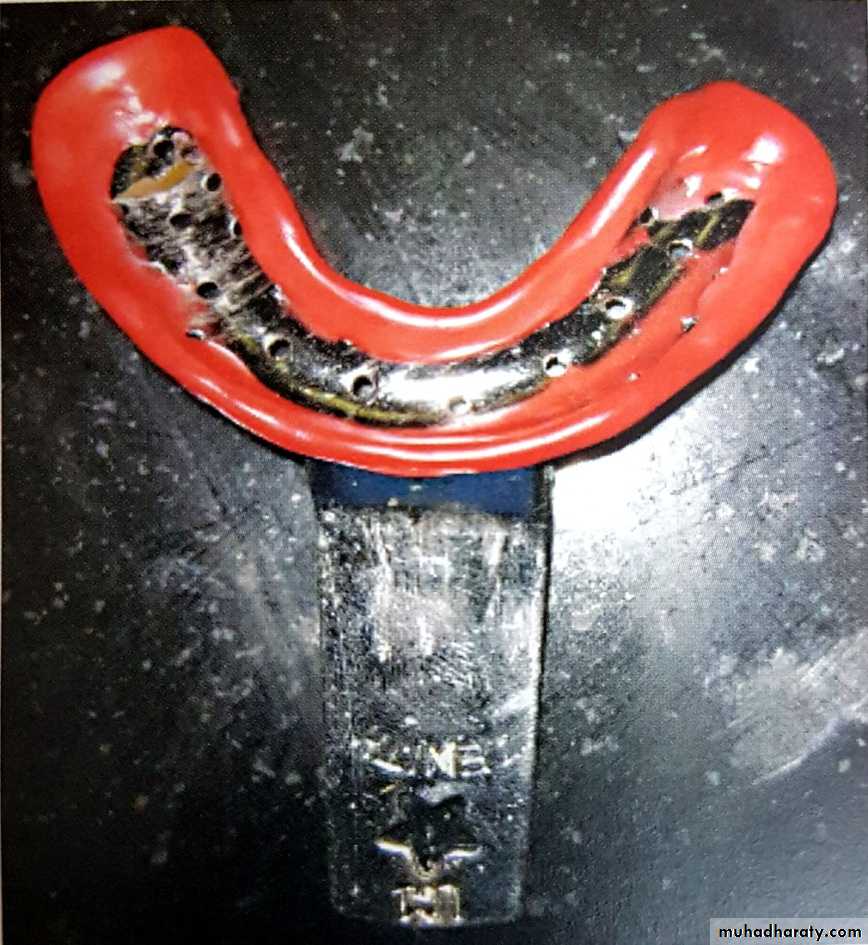
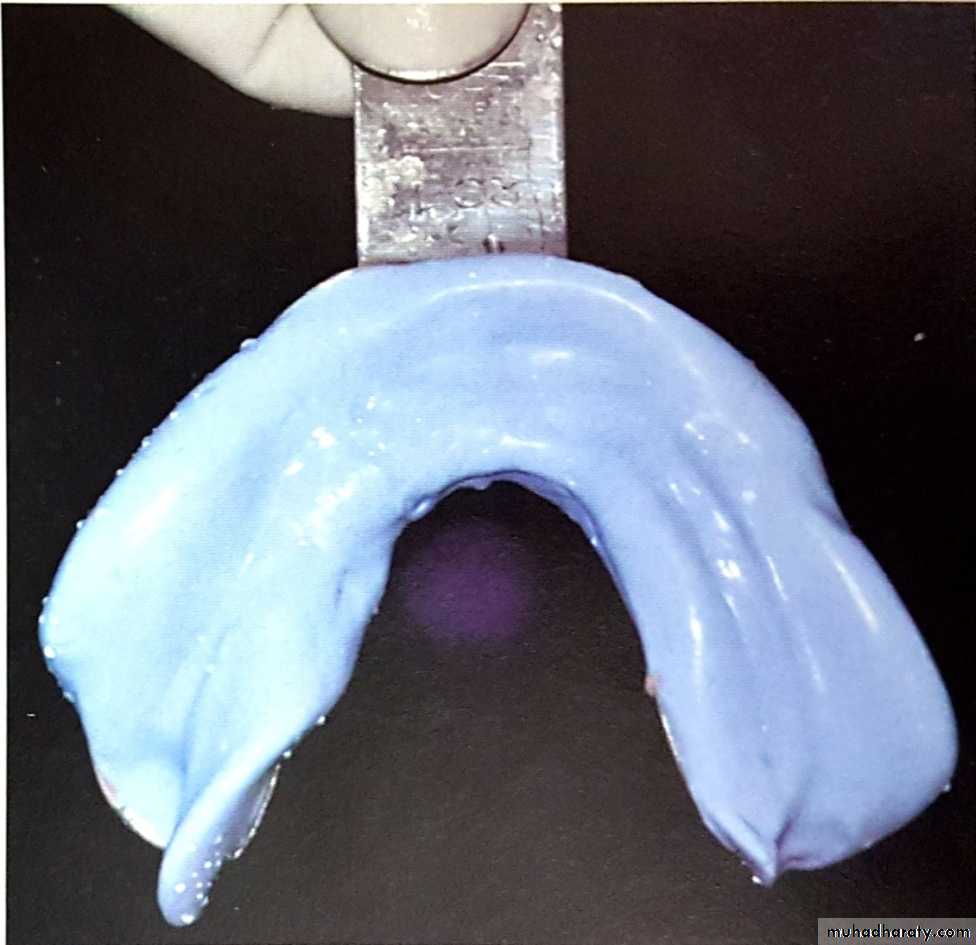
Mandibular preliminary Impression with silicone putty
The procedure is similar to impression compound except that the material is supplied as a base and catalyst, which is dispended in equal quantities and kneaded. A nonperforated stock tray is used with a tray adhesive.The impression is removed in a snap. It is difficult to refine the impression, but pouring can be delayed.
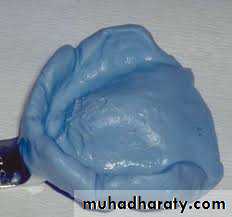
completed mandibular putty impression
Maxillary preliminary
impressionMaxillary preliminary impression With impression compound
Nonperforated stock tray is inserted in the patient’s mouth to confirm its extension. Posteriorly, the tray must include both the hamular notches and vibrating line.
Compound is placed in hot water(60°c) and is kneaded to achieve uniform consistency without wrinkles or folds (it should not be used where the ridge is displaceable, fluid alginate or impression plaster are preferable).
It is formed into a suitable size ball and placed over the center of the tray.
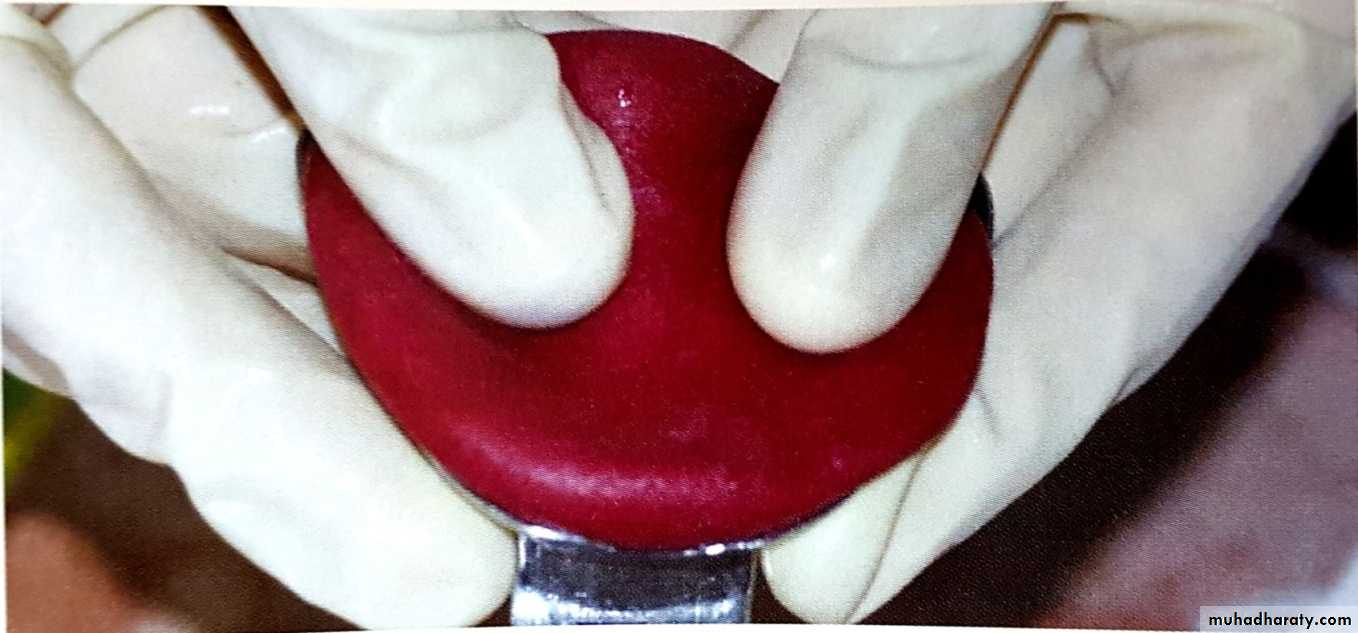
The compound is moulded and spread to fill the tray in order to develop a trough to accommodate the ridge crest. This is best accomplished by moulding the compound with both thumbs holding the tray from the rear end.
For insertion, the tray should be held with the handle in the operator’s right hand pointing towards the patient’s right. The operator uses index and middle finger of left hand to retract the upper lip and tray is rotated into the mouth.
The labial frenum is used as a guide to center the tray.
The patient is instructed to slightly close the mouth, while the upper lip is lifted upwards and forwards.
Seat the tray anteriorly such that the alveolar process presses the compound and excess flows into the labial sulcus.
Maxillary preliminary impression With impression compound
Seat the tray posteriorly until the impression contacts the ridge.Apply an upward and backward force with index finger of each hand placed under the tray until the material flows into the vestibule and posteriorly.
The lips and cheek are gently border moulded and patient is instructed to open the mouth wide and move the mandible from side to side(to mould the distobuccal flange). The material is then allowed to set.
To remove the tray, patient is asked to close the mouth partially, cheeks are retracted to break the seal, the handle of the tray is held between the thumb and index and middle fingers of the right hand, and a downward and forward force is applied.
The impression is evaluated for extension, reproduction of anatomical landmarks, tray exposure and wrinkles or voids.
It can be refined if needed and poured within an hour.
Maxillary preliminary impression With impression compound
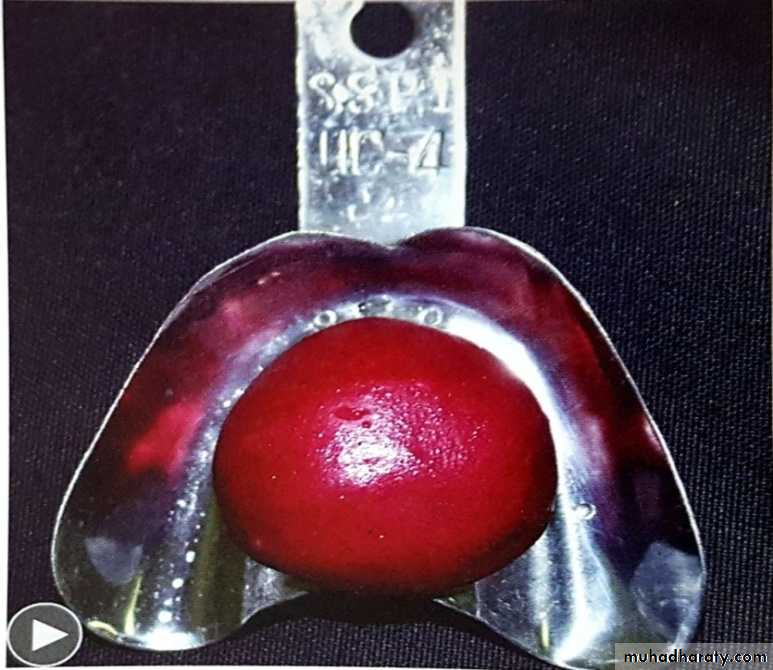
The compound is moulded into the shape of a ball and placed in center of tray
Moulding the compound with both thumbs holding the tray from the rear endThe material is spread out evenly creating a trough in the ridge areas
Maxillary preliminary impression With impression compound

Final seating
Completed maxillary impressionMaxillary preliminary impression With irreversible hydrocolloid (Alginate)
The tray should be extended if needed with modeling or boxing wax. Wax can also be added to the vault area of the tray in case of high palatal vaults.A clearance of 2-3 mm is sufficient for alginates.
The posterior palatal seal area is wiped with gauze to remove any excess saliva.
The powder and liquid are mixed to a slightly thicker consistency and loaded onto a perforated stock tray up to the border. A small quantity is placed on the palatal vault and buccal vestibule.
Tray is inserted as described for impression compound and as the material sets, the patient is instructed to keep eyes open, relax, breath through the nose and bend the head down a little to prevent impression from running down the throat. All elastic impressions should be removed in a snap. It is rinsed in tap water, dried and then evaluated for any deficiencies. The impression must be remade if any deficiencies exist.
It should be poured immediately.
Maxillary preliminary impression With irreversible hydrocolloid (Alginate)
Correction with modelling wax
Completed irreversible hydrocolloid impression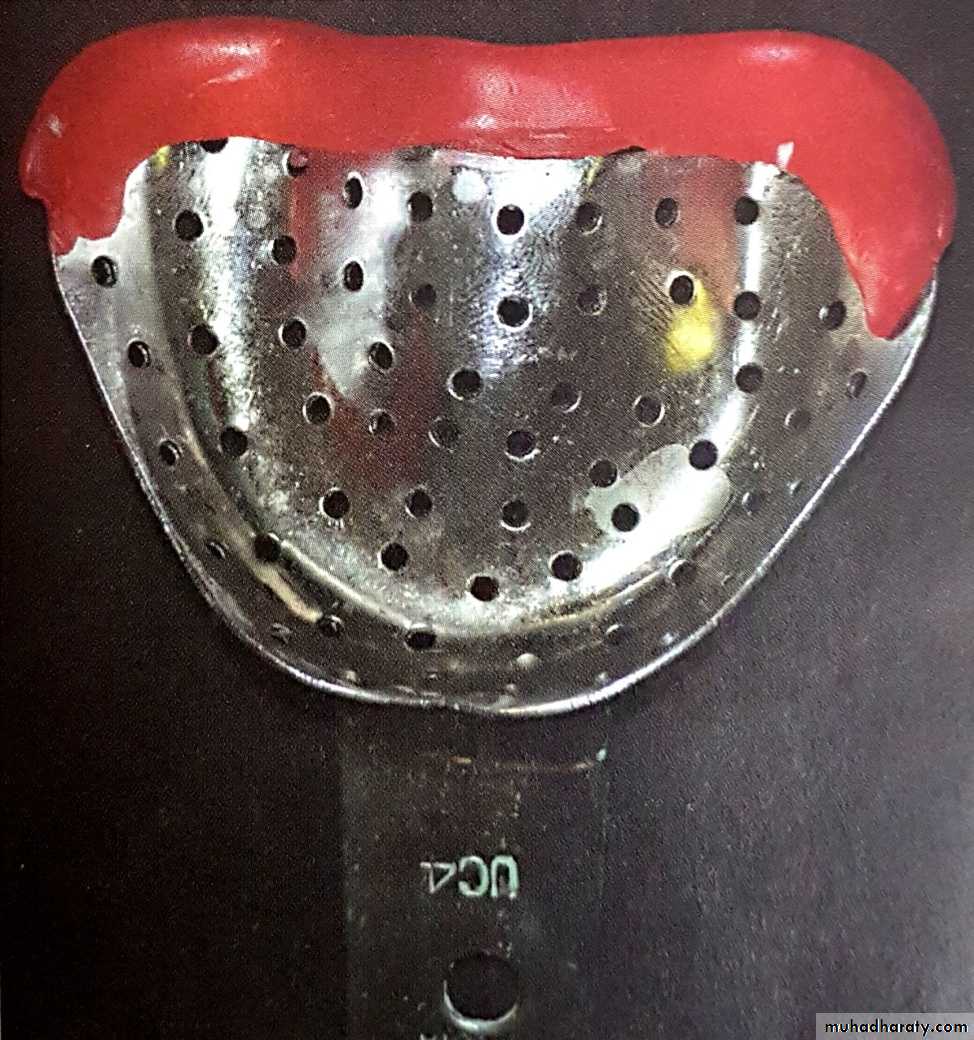
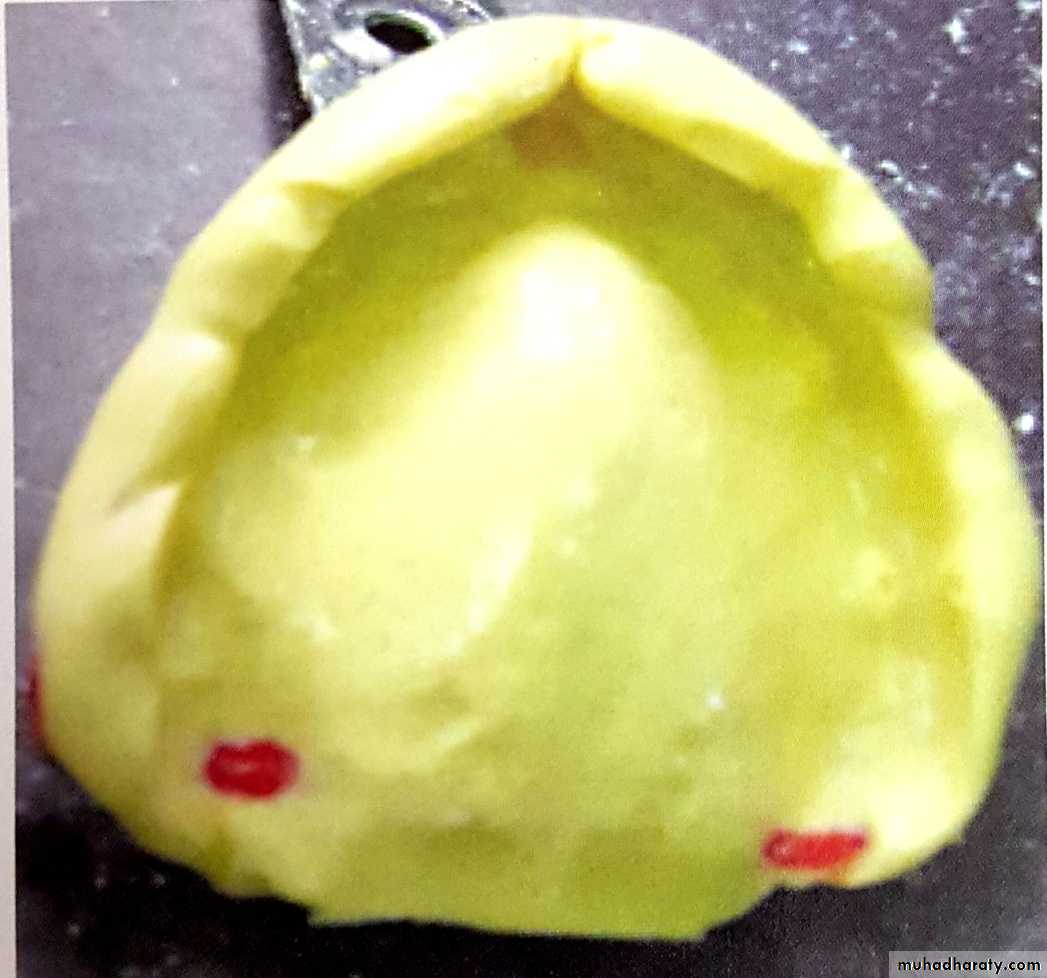
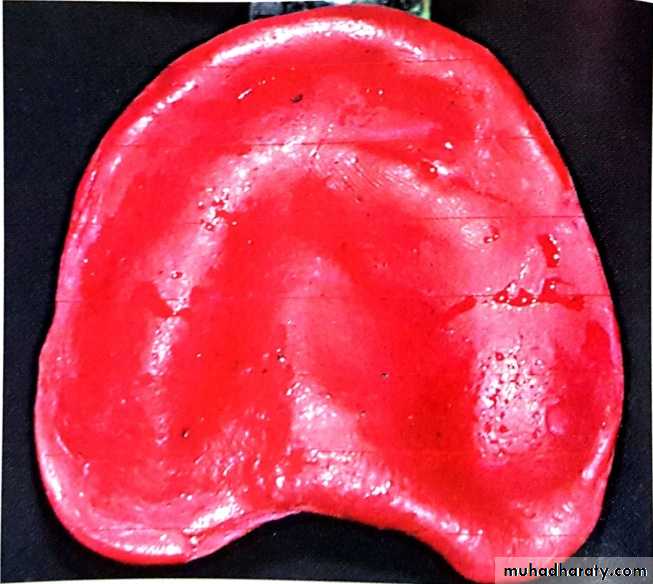
Maxillary preliminary impression With silicone putty
Procedure of manipulation, insertion and making an impression is similar to impression compound, except that the putty is supplied as a base and catalyst paste.The impression is removed in a snap. It is difficult to refine the impression, but pouring can be delayed.
Completed maxillary preliminary impression with silicone putty
Preliminary/Primary cast
After making the preliminary impression, the preliminary casts are poured with model plaster, irrespective of the impression material used.
To remove compound impressions, the cast with tray is immersed in warm slurry water at 65°C for 5 minutes. The impression is then easily separated once the material softens.
Custom tray
• Preliminary impressions are overextended due to the material used and that was the purpose. The aim is to produce a tray, which is 2 mm short of the reflection of mucosa when the tissues are at rest. This outline of the custom tray should be marked on the preliminary cast so that less chairside time is spent on trimming the borders while making final impressions.• Depending on the indication, relief and spacer are provided and tissue irregularities like flabby tissue are blocked out using baseplate wax.
• Undercut areas are blocked out with baseplate wax to ensure easy removal of the tray from cast.
• Separating medium is applied on the entire cast following provision of relief, spacer and block-out. Cold mould seal, vaseline and tin foil are commonly used.
• It must be fabricated of a material that is rigid and stable, and easily adjusted as necessary, while not bulky. This tray material is often some type of autopolymerizing or light-activated acrylic resin.
Checking the custom trays intraorally
• Before border moulding, the custom tray is placed in the mouth and checked for the following and trimmed, if necessary:• The borders of the trays should be 2 mm short of the sulcus and should provide adequate clearance for the frenum.
• The posterior extension of the maxillary tray should cover the hamular notch and extend up to the posterior vibrating line.
• The mandibular tray should cover the retromolar pads posteriorly.
• If a spacer is placed, it should be removed only after border moulding.
Border Moulding (peripheral tracing)
Border moulding: Is the shaping of the border areas of an impression material by functional or manual manipulation of the soft tissue adjacent to the borders to duplicate the contour and size of the vestibule.There are two methods of manipulating the peripheral tissues to mould them
1-Active method: The patient performs various functions related to the concerned areas to manipulate the borders.
2-Passive method: The dentist physically manipulates the tissues to mould them.
Either of these methods or a combination of both is used to mould the borders.
Technique for border moulding
1- Incremental or sectional border mouldingIn this method, sections of the periphery of the tray are refined individually , according to the anatomic landmark in that area. The material of choice for this procedure is greenstick compound(low fusing impression compound). Putty or heavy body elastomeric impression materials can also be used.
2-Single-step or simultaneous border moulding
In this method, the entire periphery of the tray is refined in a single step. The border moulding material is placed around the entire border in a single step and moulded similar to sectional technique all at once. Putty or heavy body elastomeric impression materials are ideal for this method.
Maxillary tray border moulding
1-labial flangea- passive: the lips are elevated and then extended outwards, downwards, and inwards.
b- Active: patient is asked to pucker the lips and suck on the dentist’s finger.
2-Buccal flange (buccal frenum area): This may be performed unilaterally.
a- Passive: The cheek is elevated and pulled outwards, downwards and inwards and moved backwards and forwards.
b- Active: Patient is asked to pucker the lips and smile.
3- Distobuccal area: This should be performed bilaterally.
a- Passive: The cheek is pulled outwards, downwards and inwards.
b- Active: Patient is asked to open the mouth wide, close and move the mandible from side to side. Opening the mouth wide delineates the depth and width of the distobuccal flange as governed by the muscle attachments, while moving the mandible from side to side, accommodates for the movement of the coronoid process.
4- Posterior palatal seal area:
a- Active: Observe line with patient saying ‘ah’ and trim compound to this line or area. Palpate the displacement bilaterally onto the displaceable tissues that border the hard palate and soft palate junction and place compound in a butterfly-shape border seal.
Mandibular tray border moulding
1- Labial flange:
a- Passive: The lip is slightly lifted outwards, upwards and inwards.
2-Buccal flange( buccal frenum area): Can be developed unilaterally.
a- Passive: the cheek is lifted outwards, upwards and inwards and moved backwards and forwards.
b-Active: The patient is asked to pucker and smile.
3-Buccal flange(distobuccal area): developed bilaterally
a- Passive: The cheek is pulled buccally to ensure it is not caught in the tray and then moved upwards and inwards.
b-Active and passive: The masseteric notch is recorded by asking the patient to close, while dentist exerts a downward pressure on tray.
4-Anterior lingual flange:
a- Active: patient is asked to protrude the tongue and then push the tongue against the anterior part of the palate. This develops the length and thickness of the flange in this area, respectively.
5- Middle portion of the lingual flange: Developed bilaterally.
a- Active: patient is asked to protrude the tongue and lick the upper lip from side to side.
6-Distolingual flange: Developed bilaterally.
a- Active: patient is asked to protrude the tongue and then place the tongue in the distal part of the palate in the right and left buccal vestibules.
Final impression materials
Zinc oxide eugenol impression paste, non-eugenol impression paste, mouth temperature waxes and rubber base impression material are used for final impression.Mandibular final impression
• Correct position of tray is essential and it is practiced before making the impression. It also enables the patient to be familiar with the procedure and what is expected.
• If ZOE paste is used, patient’s lips and some part of the face are covered with vaseline as the material is sticky and will be hard to remove.
• The impression material of choice is mixed and evenly loaded onto the tray, covering the borders also.
• The tray is rotated and inserted into the mouth as discussed with preliminary impressions, asking the patient to lift the tongue slightly and centering it anteriorly. The index fingers of each hand are placed on the auxiliary posterior handles to apply gentle downward pressure such that buccal flanges come in contact with
the buccal shelf.
• Border moulding, is gently performed simultaneously on all the sections both passively and actively.
• Once this is done, the material is allowed to set with the patient’s tongue touching the upper lip.
• After the material is set, the tray is removed and is inspected for deficiencies and voids .
Maxillary final impression
• All the procedures prior to impression making are similar to mandibular impressions.• After placing the material evenly on the tray and around the borders, the tray is inserted by centering and aligning the labial notch in the tray with the labial frenum.
• The index fingers of each hand are used to apply an upward pressure in the molar regions until the tray seats posteriorly in the hamular notches.
• The tray is then held in position with a finger in the hard palate just anterior to the posterior palatal seal area.
• Border moulding, is gently performed simultaneously on all the sections both passively and actively.
• The material is allowed to set and then removed and inspected for
any discrepancies.
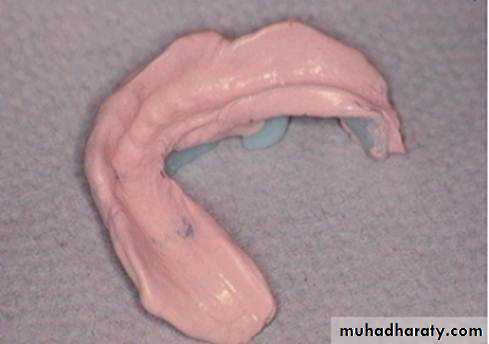
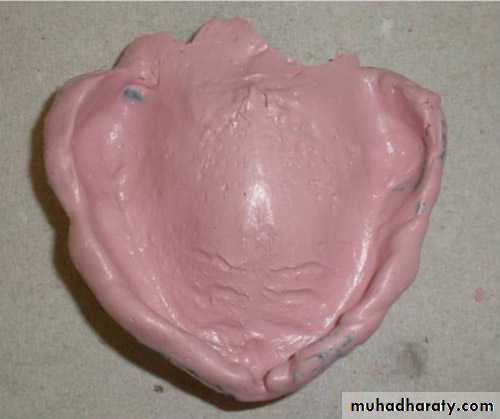
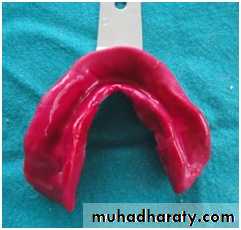
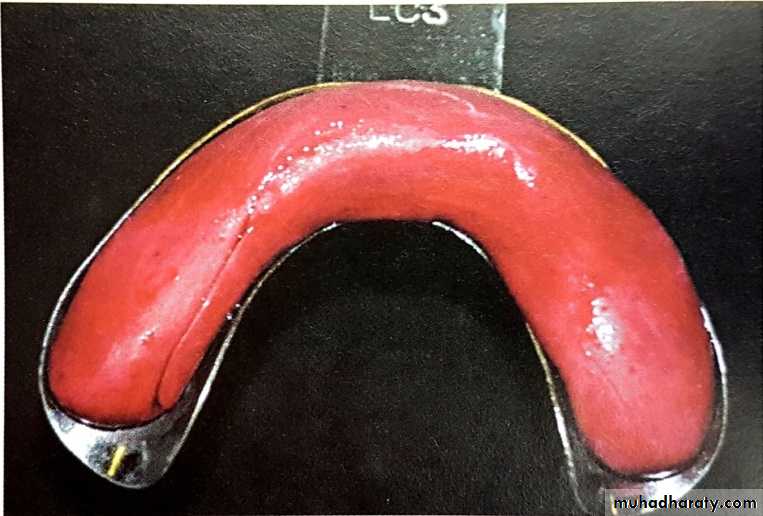
Final maxillary impression with zinc oxide eugenol impression paste
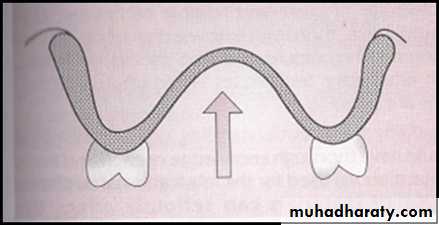
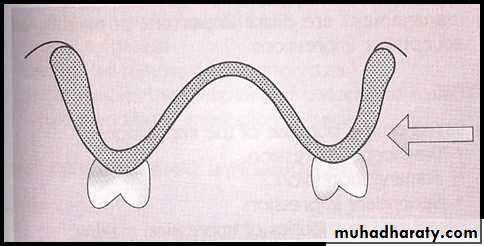
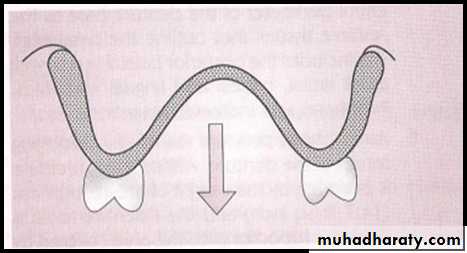
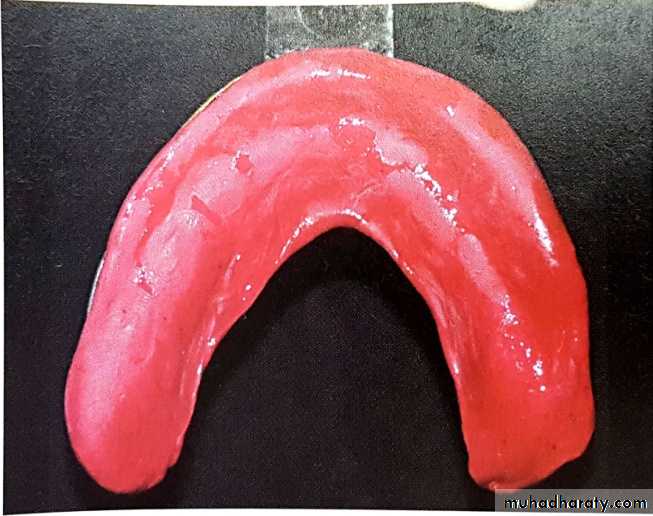
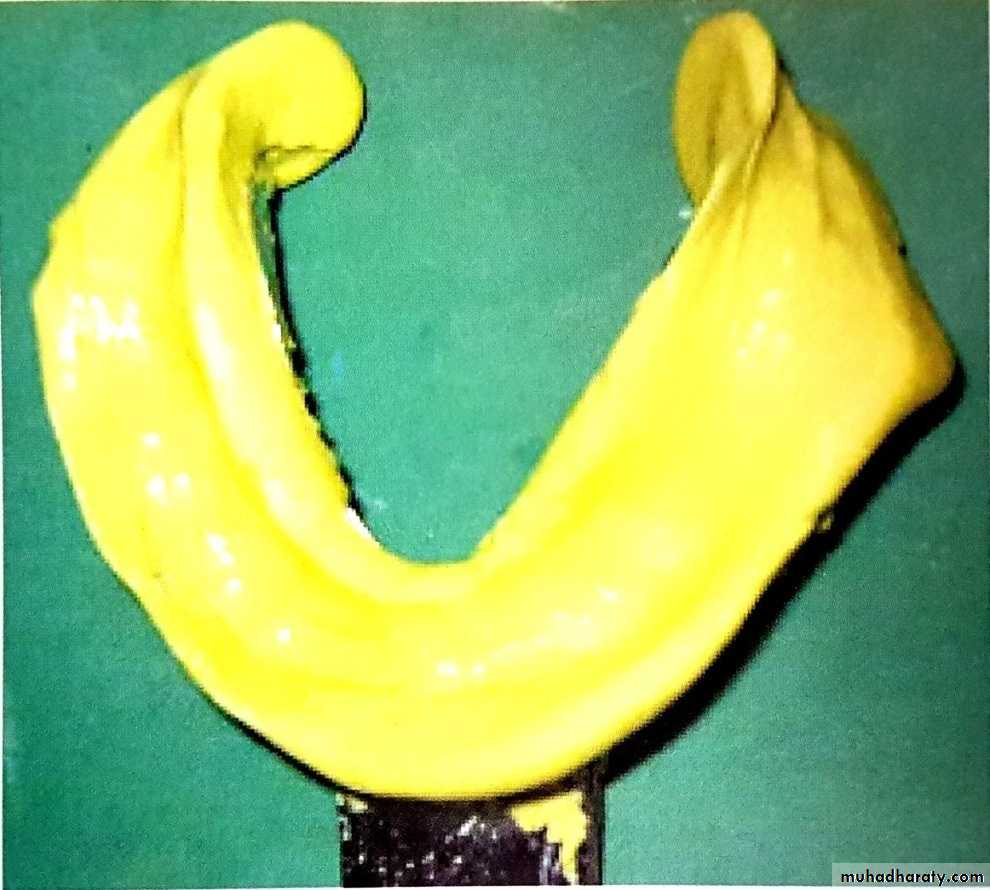
Final mandibular impression with zinc oxide eugenol impression pasteThe floor of the mouth is formed by the mylohyoid muscle, which arises from the whole length of the mylohyoid ridge. In the anterior region, the muscle lies deep to the sublingual gland and other structures and so does not affect the border of the denture except indirectly.
However, the posterior part of the mylohyoid muscle in the molar region affects the lingual impression border in swallowing and in moving the tongue.
Fortunately, in this posterior region, the lingual flange can go beyond the mylohyoid muscle’s attachment to the mandible, because the mucolingual fold is not in this area. Thus, the impression may depart from the stress-bearing area of the lingual surface of the ridge, moving away from the body of the mandible to be suspended under the tongue in soft tissue on both sides of the mouth, thereby reaching the mucolingual fold of soft tissue for a border seal.
As the lingual flange moves into the retromylohyoid fossa, it ceases to be influenced by the action of the mylohyoid muscle and so can move back toward the body of the mandible producing the typical S curve of the lingual flange.
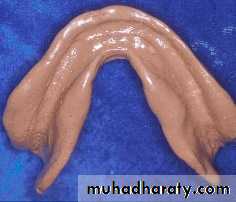
S shape of lingual flange
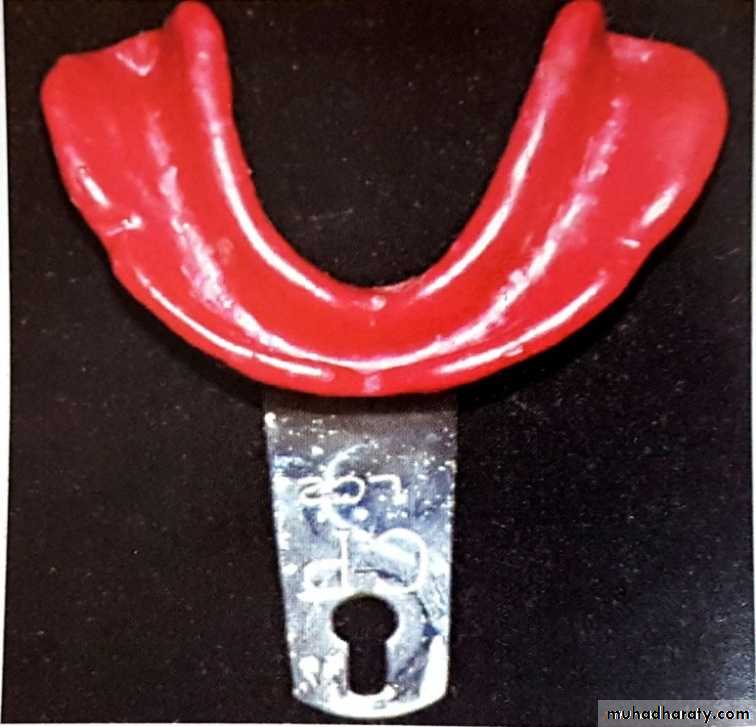
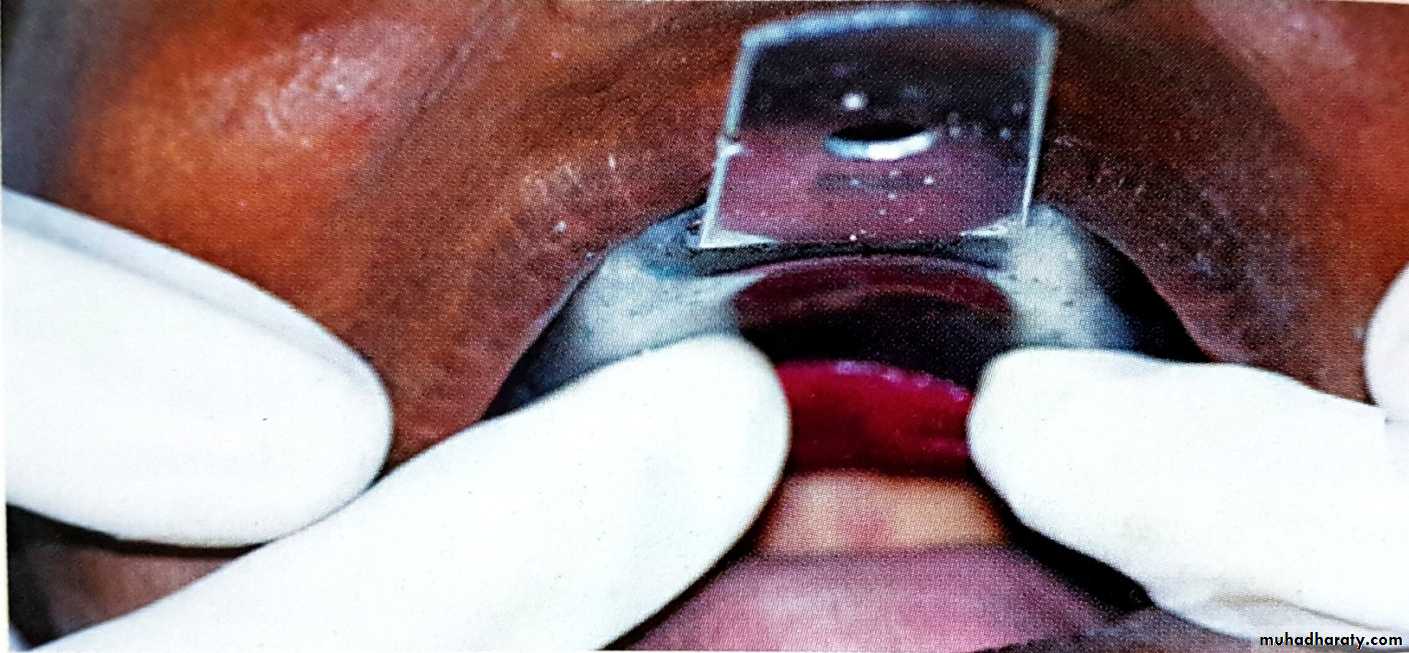
Effect of uncontrolled load during impression procedure to the underlying tissue:Impression technique that apply load, the initial retention of the dentures is good, but it soon lost possibly due to tissue changes. Whether these changes lead to ridge resorption. Distorted tissues will tend to re-bound and cause loss of denture retention. It was appear that when using special tray with holes has benefit in avoidance of any hydraulic pressure of the impression material compressing the tissues. Zinc oxide Eugenol is the impression material of choice . the advantage of this technique is that blanching of the tissues can be observed directly prior to applying the impression material and localized tissue distortion can be corrected.
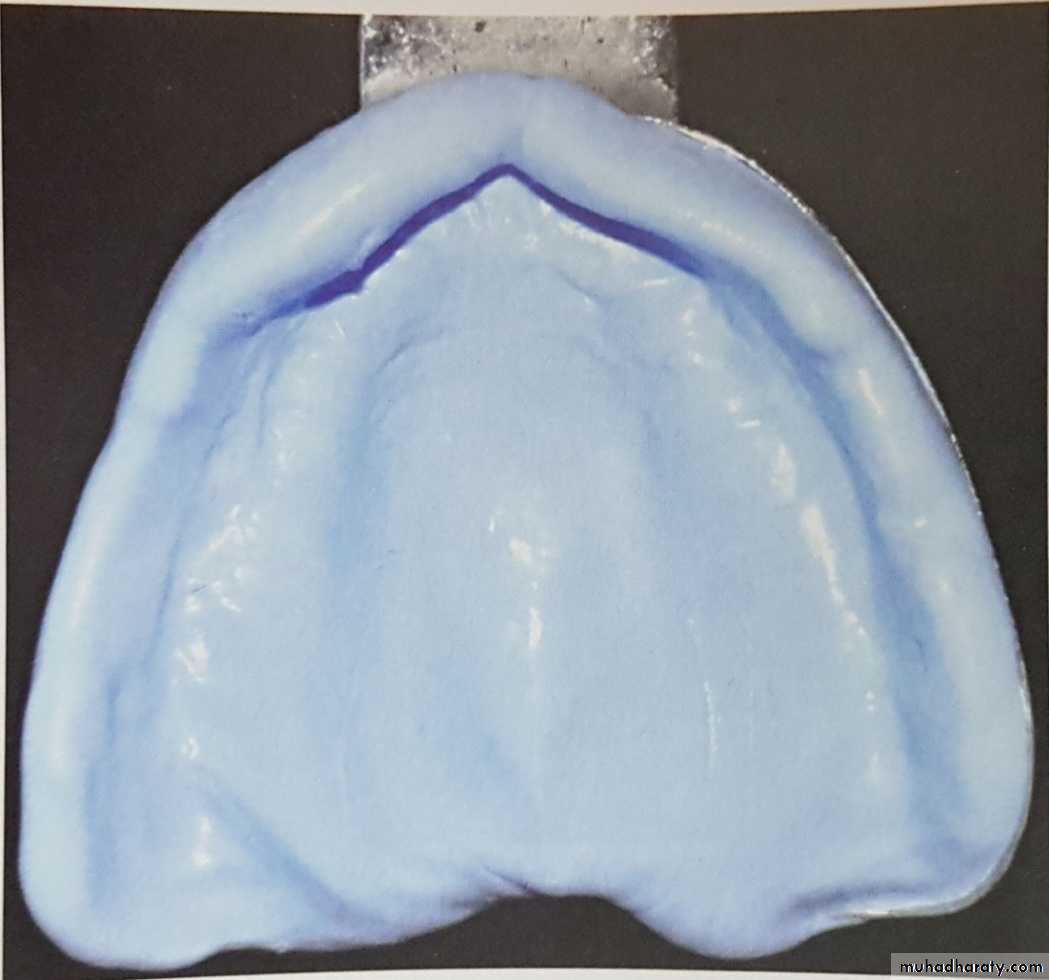
Recording the posterior palatal seal
This can be achieved by the following methods:• Scraping of cast
• • Functional
• • Arbitrary
2. Impression technique
• Using fluid wax
• Using low fusing compound.
Recording the posterior palatal seal
Fluid wax technique:
• Any wax that is designed to flow at mouth temperature can be used.
• The seal is established after making final impressions but before pouring the master cast.
• ZOE and impression plaster are suitable impression materials for this technique as fluid wax adheres well to them.
• The anterior and posterior vibrating lines are marked and transferred to the final impression in the mouth.
• The final impression is painted with fluid wax within the marked seal area. Usually it is applied in excess and cooled below mouth temperature so that it gains resistance to flow. This allows them to soften at mouth temperature and flow intraorally during impression making.
• The patient’s head should be positioned such that the Frankfort’s horizontal plane is 30° below the horizontal plane. It is only at this position that the ‘soft palate’ is at its maximal downward and forward functional position. Flexion of the head also helps to prevent excess impression material and saliva from moving down the throat.
Recording the posterior palatal seal
•The patient’s tongue should be positioned against the mandibular anterior teeth.• The impression tray is inserted in the mouth and the patient is asked to periodically rotate the head so that all functional movements of the soft palate are recorded.
• The impression is removed after 4–6 min and examined. Glossy areas show tissue contact and dull areas represent lack of contact. Wax extending beyond the posterior vibrating line should be cut with a hot knife. Wax is added to areas that appear dull, and the procedure is repeated till the appropriate seal is achieved.
Low fusing compound:
Low fusing compound (greenstick compound) can also be used to make an impression of the seal area using a similar procedure as described for fluid wax.
Disinfecting impression
The impression may be disinfected by immersing in iodophor or 2% gluteraldehyde for 10 min.