1
Access Cavity Preparation
Access cavity preparation is defined as an endodontic coronal preparation which enables
unobstructed access to the canal orifices, a straight line access to apical foramen, complete
control over instrumentation and accommodate obturation technique.
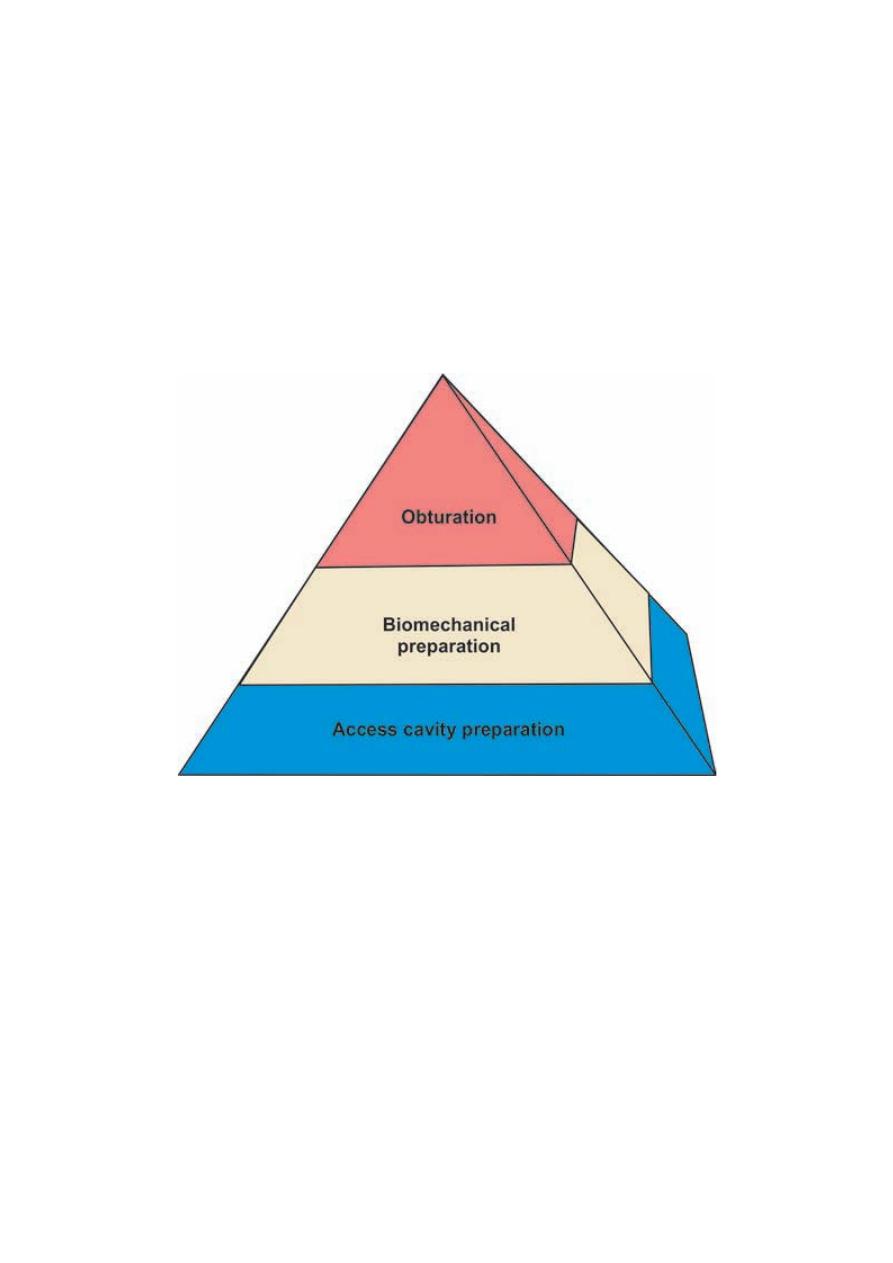
Proper coronal access forms the foundation of pyramid of endodontic treatment. Any
improperly prepared access cavity can impair the instrumentation, disinfection and therefore
obturation resulting in poor prognosis of the treatment.
Pyramid of endodontic treatment
The optimal access cavity results in the straight entry into the canal orifices with line angles
forming a funnel which drops smoothly into the canals. Removal of coronal contacts on
instruments reduces the adverse forces directed on the instruments which may result in
instrumentation errors like ledging and perforation.
An ideal access preparation should have following features:
• An unobstructed view into the canal.
• A file should pass into the canal without touching any part of the access cavity.
• No remaining caries should be present in access cavity.
• Obturating instruments should pass into the canal without touching any portion of the
access cavity.
.ﺩ
ﻋﻼء ﺍﺩﺭﻳﺱ
2
Objectives of access cavity preparation
1. Direct straight line access to the apical foramen helps in:
– Improved instrument control because of minimal instrument deflection and ease of
introducing instrument in the canal
– Improved obturation
– Decreased incidence of iatrogenic errors.
2. Complete deroofing of pulp chamber helps in:
– Complete debridement of pulp chamber
– Improving visibility
– Locating canal orifices
– Permitting straight line access
– Preventing discoloration of teeth because of remaining pulpal tissue.
3. Conserve sound tooth structure as much as possible so as to avoid weakening of
remaining tooth structure.
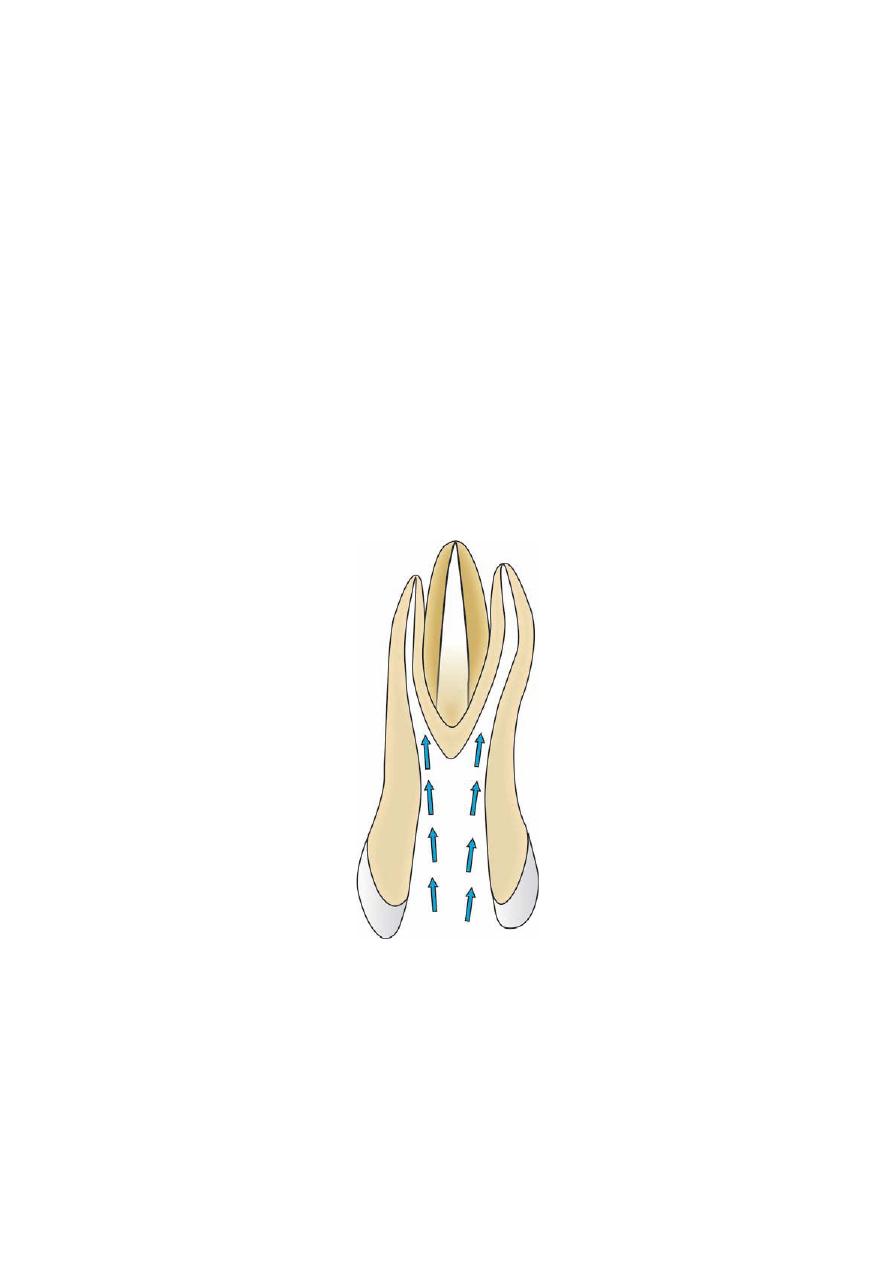
Smooth, straight line access to root canal system
3
A B
(A) Not removing dentin from mesial wall causes bending of instrument while inserting in canal leading to instrumental
errors; (B) Removal of extra dentin from access opening gives straight line access to the canal without any bending
Preoperative radiograph
Before going for access cavity preparation, a study of preoperative periapical radiograph is
necessary with a paralleling technique.
Radiographs help in knowing
• Morphology of the tooth.
• Anatomy of root canal system.
• Number of canals.
• Curvature of branching of the canal system.
• Length of the canal.
• Position and size of the pulp chamber and its distance from occlusal surface.
• Position of apical foramen.
• Calcification, resorption present if any.
4
Instruments for Access Cavity Preparation
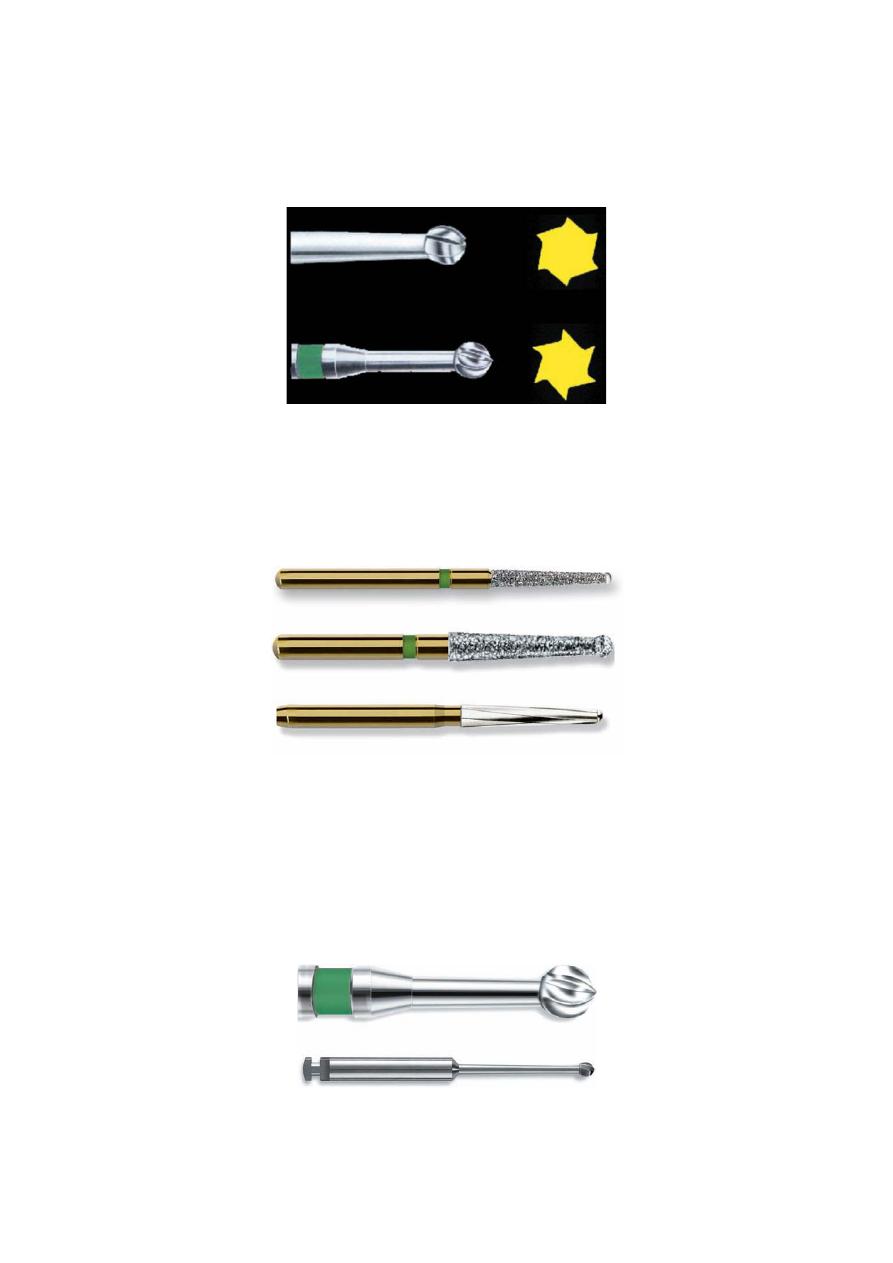
Access Opening Burs
They are round burs with 16 mm bur shank (3 mm longer than standard burs).
Access opening burs
Access Refining Burs
These are coarse grit flame shaped, tapered round and diamonds for refining the walls of
access cavity preparation.
Access refining burs
Muller Burs
• These are long shaft, round carbide burs which are used in slow speed handpiece.
• Their long shaft increases visibility of cutting tip.
• They are used for locating calcified canals because their long shaft is useful for working
deep in the radicular portion.
• But since they are made up of carbide, they do not tolerate sterilization cycles and become
dull quickly.
Muller burs
5
Guidelines for Access Cavity Preparation
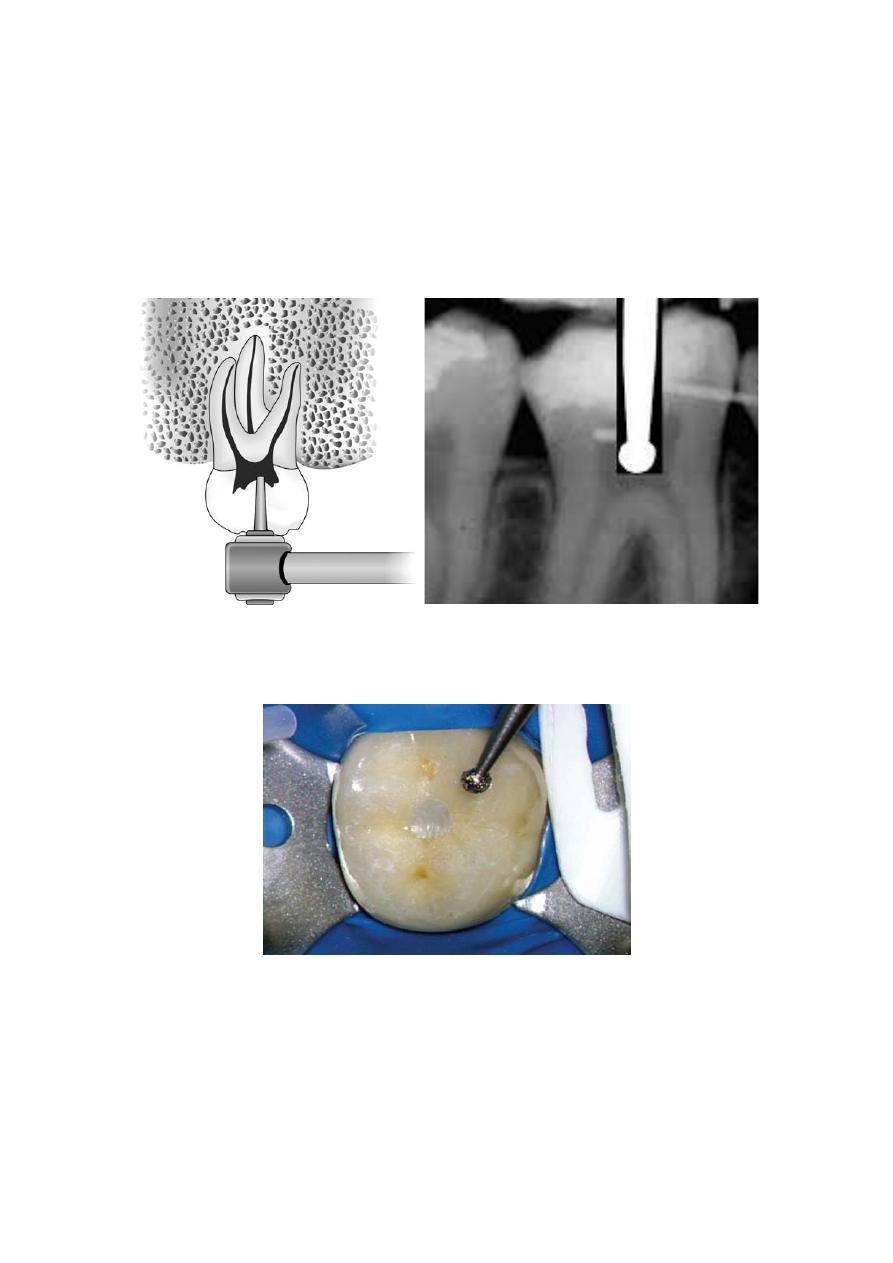
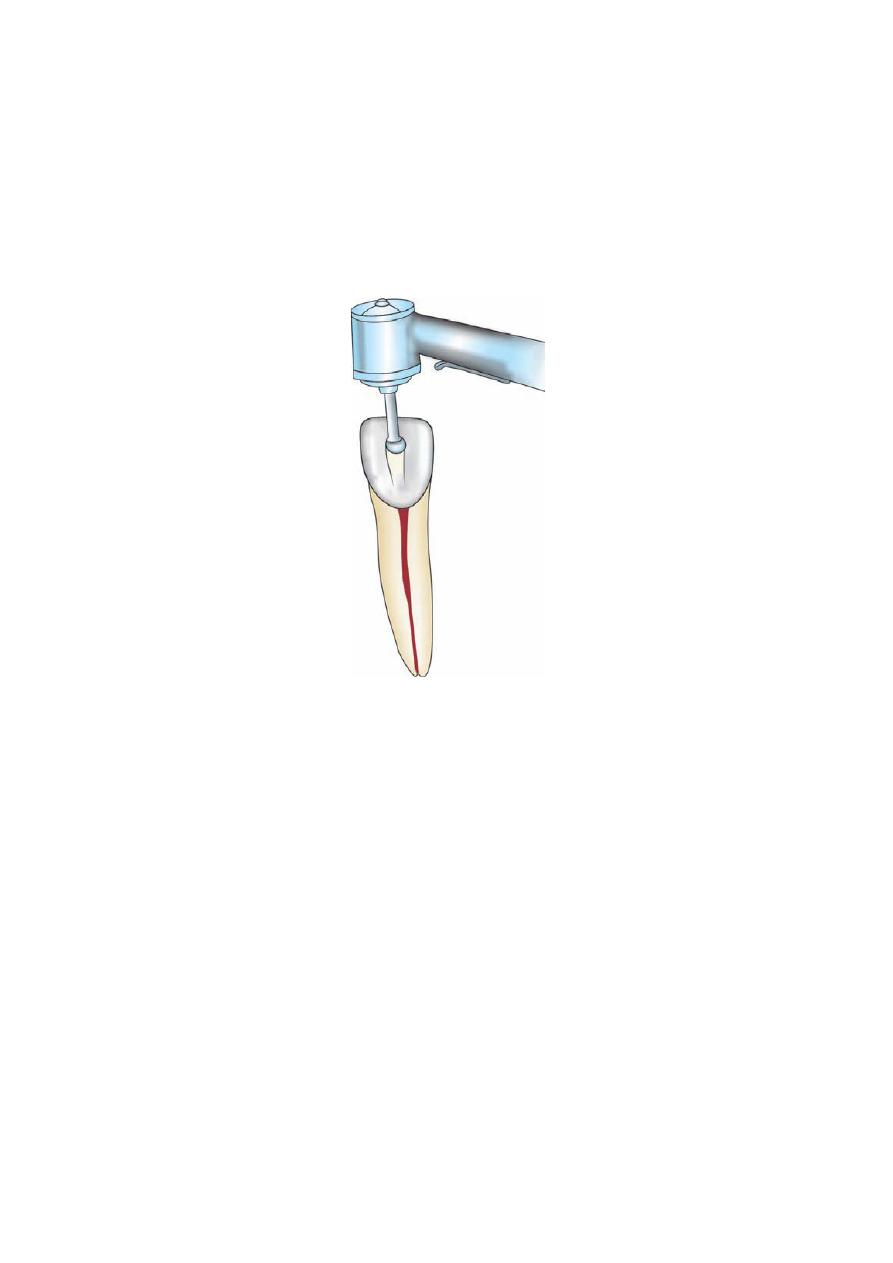
1. Before starting the access cavity preparation, one should check the depth of the preparation
by aligning the bur and handpiece against the radiograph. This is done so as to note the
position and depth of the pulp chamber. The bur is penetrated into the crown until the roof of
pulp chamber is penetrated.
Preoperative radiograph can help to note the position and depth of pulp chamber
Gain entry to pulp chamber with round bur
6
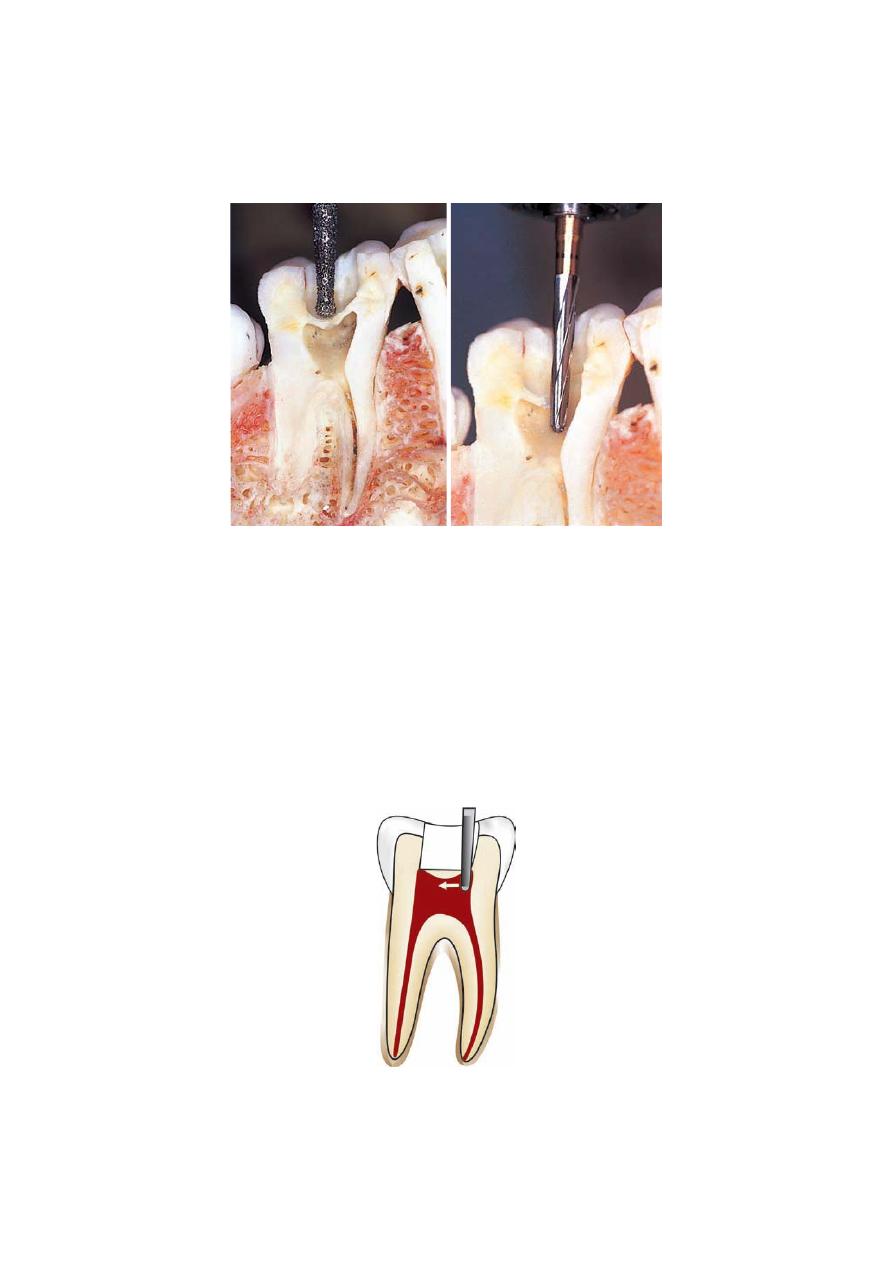
2. Access finishing is best carried out by using burs with safe non-cutting ends. Advantage of
using these burs is that they are less likely to damage or perforate the pulp chamber floor. But
these burs cut in lateral direction and cannot drop into small canal orifices.
Access preparation and refining
3. When locating the canal orifices is difficult, one should not apply rubber dam until correct
location has been confirmed.
4. Remove all the unsupported tooth structure to prevent tooth fracture during treatment.
5. Remove the chamber roof completely as this will allow the removal of all the pulp tissue,
calcifications, caries or any residuals of previous restorations.
If pulp chamber is not completely deroofed, it can result in:
• Contamination of the pulp space.
• Discoloration of endodontically treated tooth.
Completely deroof the pulp chamber
7
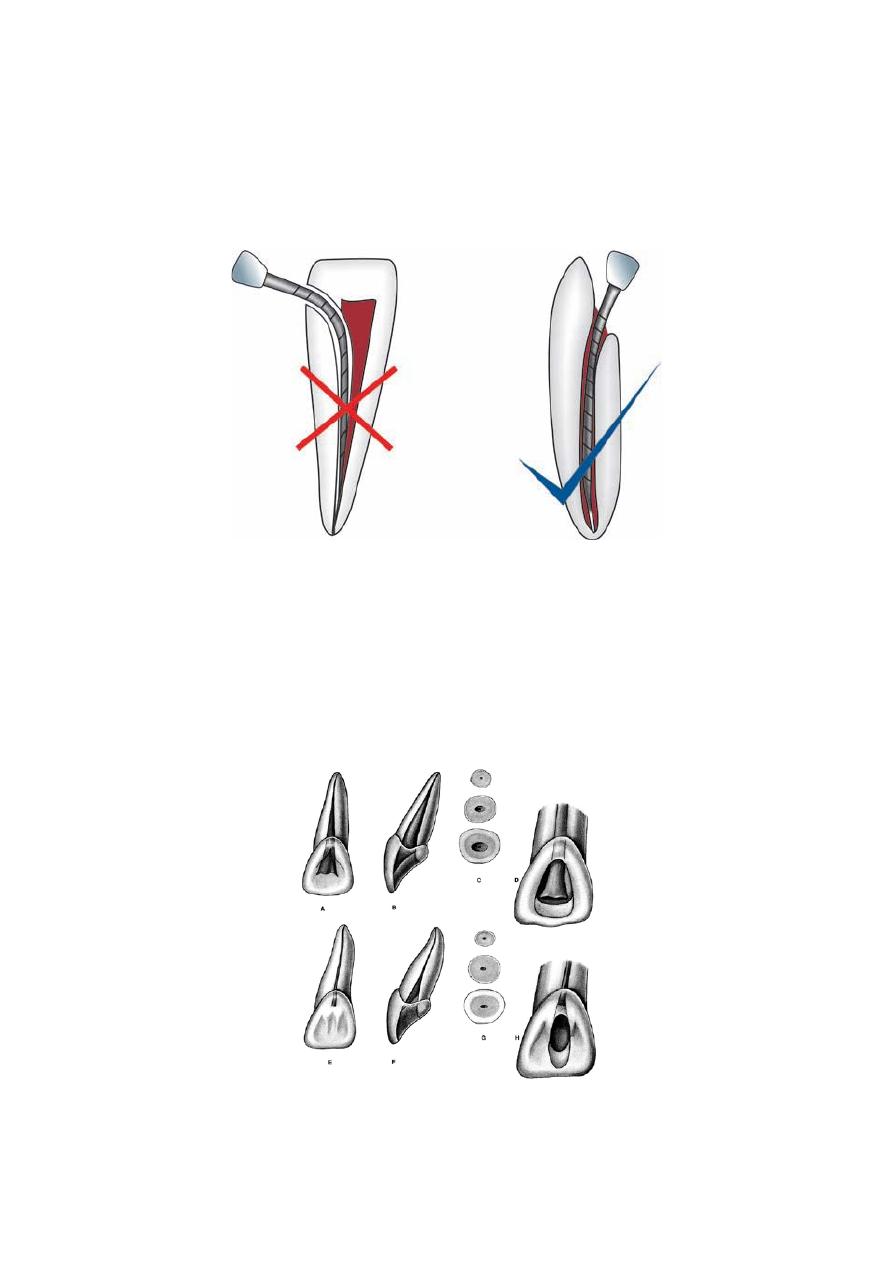
6. The walls of pulp chamber are flared and tapered to form a gentle funnel shape with larger
diameter towards occlusal surface.
7. Endodontic access cavity is prepared through the occlusal or lingual surface never through
proximal or gingival surface. If access cavity is made through wrong entry, it will cause
inadequate canal instrumentation resulting in iatrogenic errors.
Correct position for entering into the pulp cavity
8. Inspect the pulp chamber for determining the location of canals, curvatures, calcifications
using good magnification and illumination.
Shape of the access cavity is determined by:
1. Size of pulp chamber: In young patients, access preparation is wider than the older ones.
Access in young patient compared to old one
Young
Old
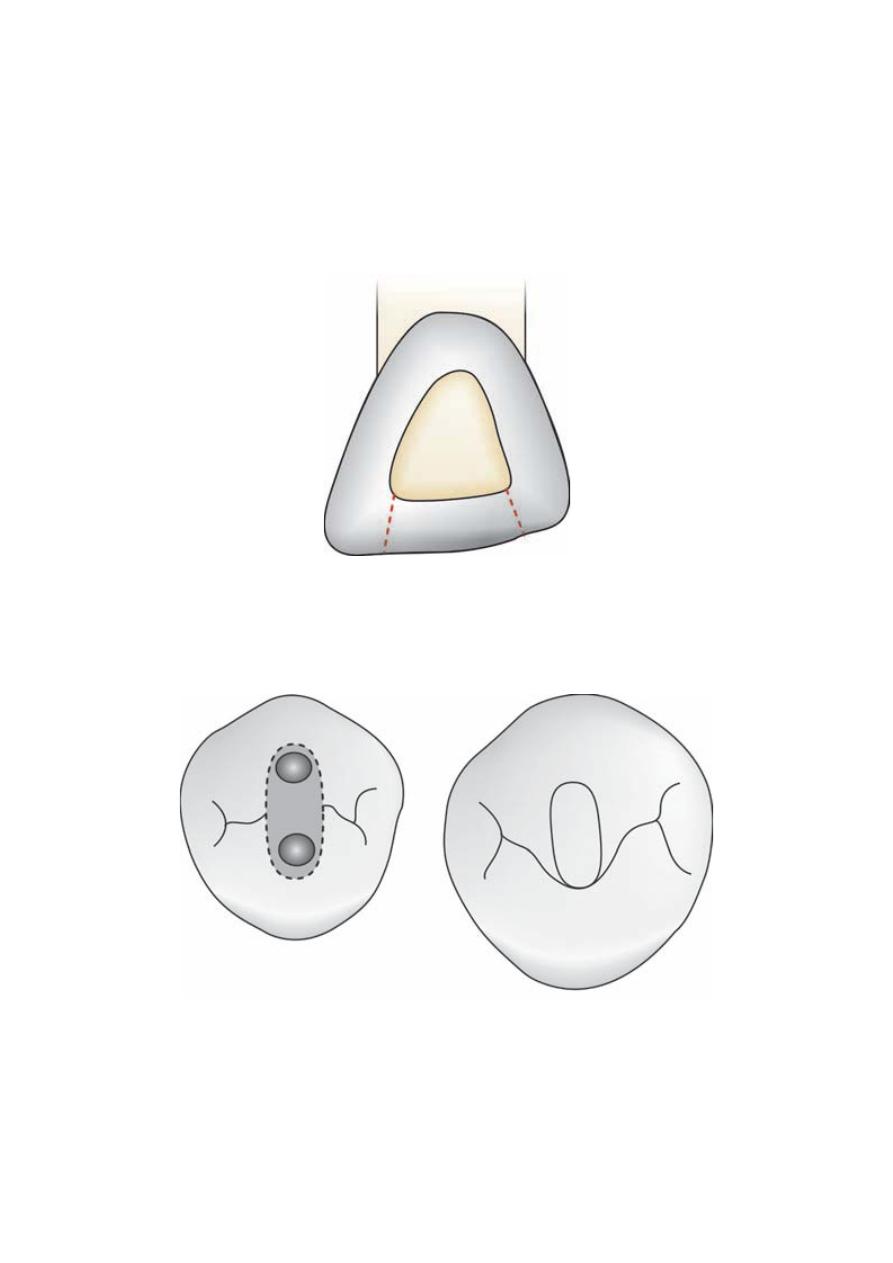
8
2. Shape of pulp chamber: Final outline form should reflect the shape of pulp chamber. It is
triangular in anteriors, ovoid buccolingually in premolars and trapezoidal or triangular in
molars.
Access opening of maxillary central & lateral incisors is triangular in shape
Oval-shaped access cavity of premolars
9
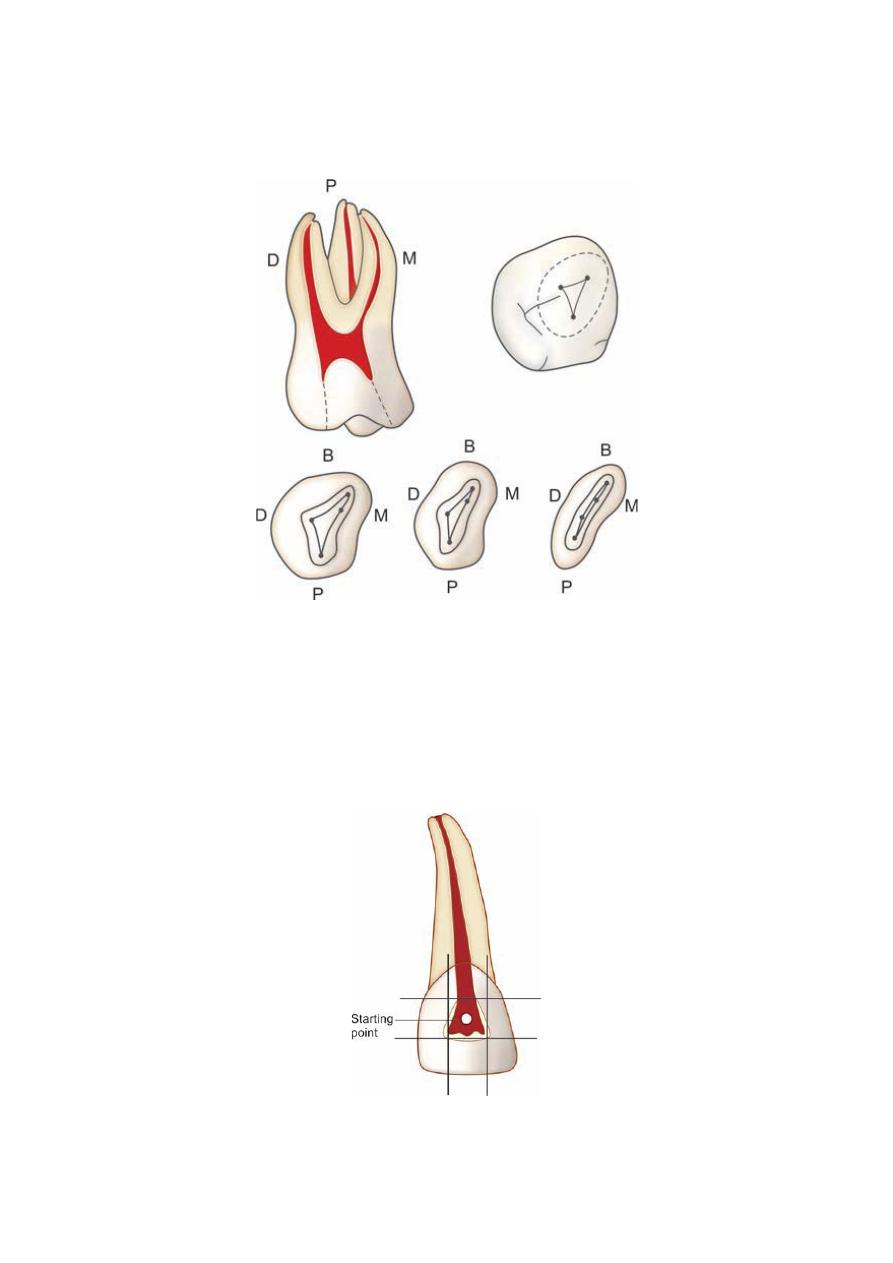
3. Number, position and curvature of the canal: It can lead to modified access preparation,
like in maxillary molar.
Different patterns of maxillary molar triangle
Access Cavity of Anterior Teeth
• Remove all the caries and any defective restorations so as to prevent contamination of pulp
space and have a straight line access into the canals.
• Access opening is initiated at the center of the lingual surface. If it is made too small and
too close to the cingulum the instrument tends to bind by the canal walls and thus may not
work optimally.
Access opening is started at the center of lingual surface
10
• Direct a round bur perpendicular to the lingual surface at its center to penetrate the enamel.
Once enamel is penetrated, bur is directed parallel to the long axis of the tooth, until ‘a drop’
in effect is felt.
Once enamel is penetrated, bur is directed parallel to long axis of tooth
• Now when pulp chamber has been penetrated, the remainder of chamber roof is removed by
working a round bur from inside to outside.
• locate the canal orifices using endodontic explorer. Sharp explorer tip is used to locate the
canal orifices.
• Once the canal orifices are located, remove the lingual shoulder using Gates-Glidden drills
or carbide burs.
• During removal of the lingual shoulder, orifice should also be flared so that it becomes
confluent with all the walls of access cavity preparation. By this a straight line access to the
apical foramen is attained, i.e. an endodontic file can reach up to apical foramen without
bending at the root canal wall. Any deflection of file occurs should be corrected because it
can lead to instrumental errors.
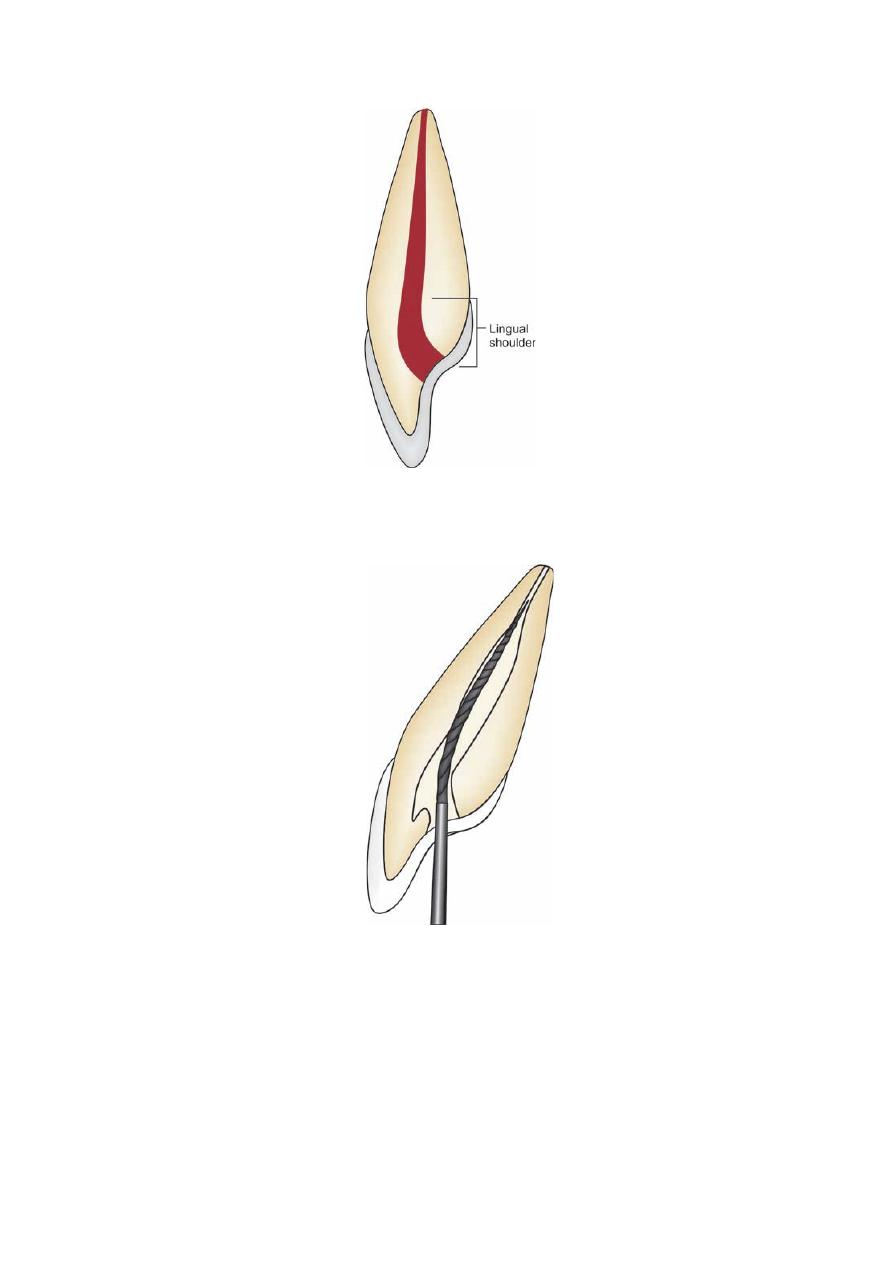
11
Lingual shoulder is prominence of dentin formed by lingual roof. It extends from cingulum to 2 mm apical to the canal
orifice
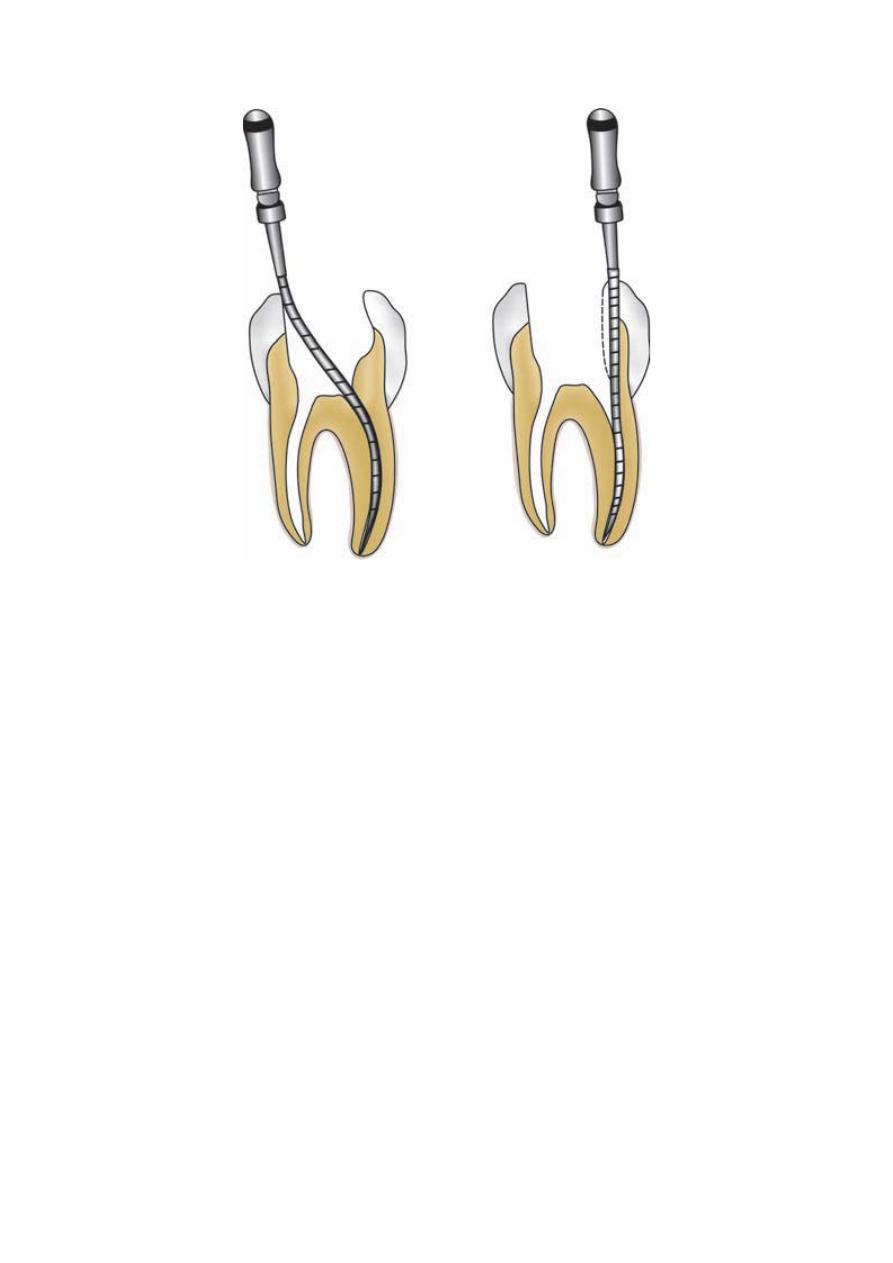
Improper access cavity preparation causing deflection of instrument
12
Access Cavity Preparation for Premolars
• In premolars, the access opening is in the center of the occlusal surface between buccal and
the lingual cusp tips.
• Penetrate the enamel with a round bur in high speed contra-angle handpiece. The bur should
be directed parallel to the long axis of the tooth and perpendicular to the occlusal table.
Generally the external outline form for premolars is oval in shape with greater dimensions
buccolingual side.
• Once the clinician feels “drop” into the pulp chamber, penetrate deep enough to remove the
roof of pulp chamber without cutting the floor of pulp chamber. To remove the roof of pulp
chamber place a bur alongside the walls of pulp chamber and work from inside to outside.
• After removal of roof of pulp chamber, locate the canal orifices with the help of sharp
endodontic explorer.
Access Cavity Preparation for Maxillary Molars
• Remove caries or any restoration.
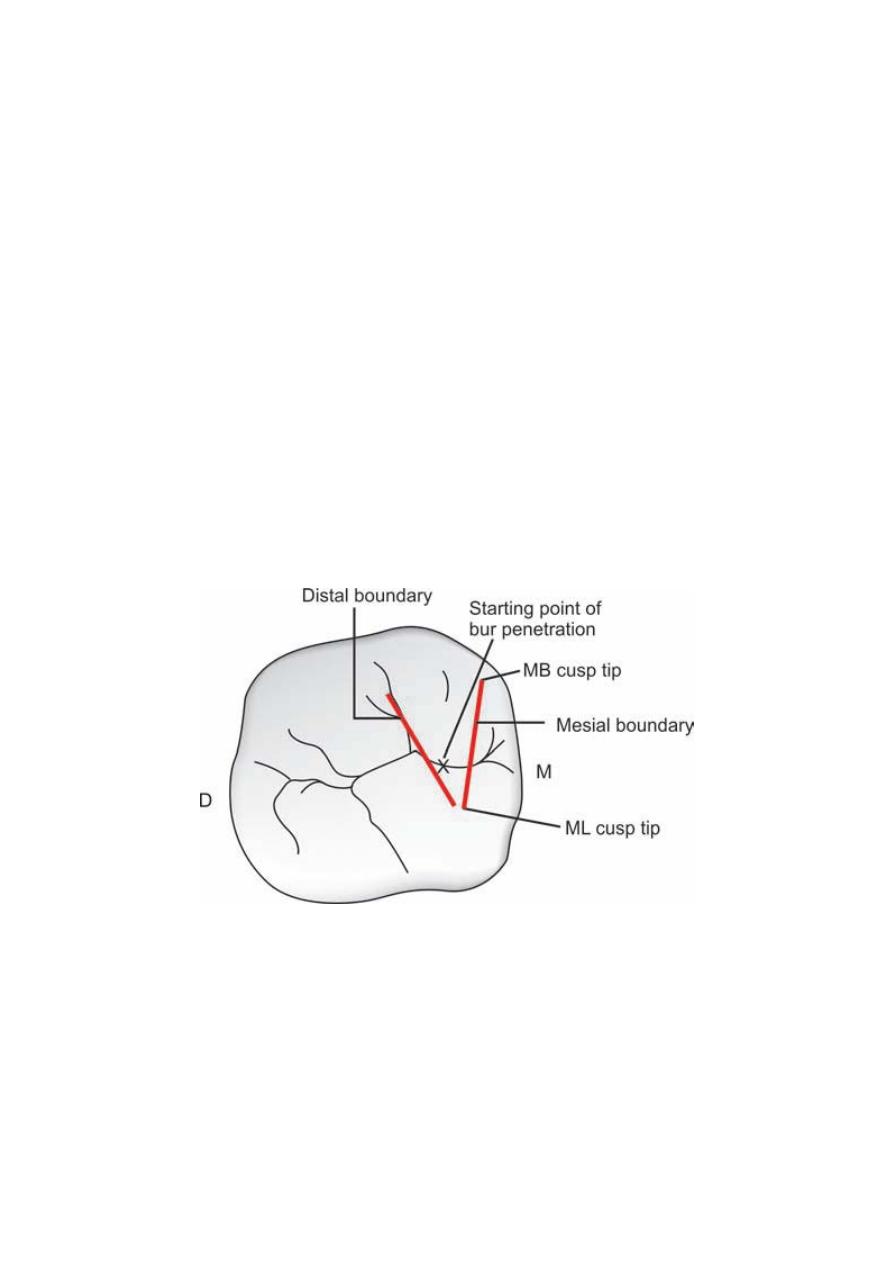
• Determine the starting point of bur into the enamel. It is determined by mesial and distal
boundary. Mesial boundary is a line joining the mesial cusps and the distal boundary is the
oblique ridge. The starting point of bur penetration is on the central groove midway between
mesial and distal boundaries.
Starting point and outline of the access cavity of maxillary molars are determined by mesial and distal boundary
• Penetrate the enamel and dentin with a round bur in the central groove until the clinician
feels “drop” into the pulp chamber. Now remove the complete roof of pulp chamber using
tapered fissure bur working from inside to outside. The shape and size of the internal
anatomy of pulp chamber guides the cutting.
• Explore the canal orifices with sharp endodontic explorer.
• Smoothen and finish the access cavity walls.
13
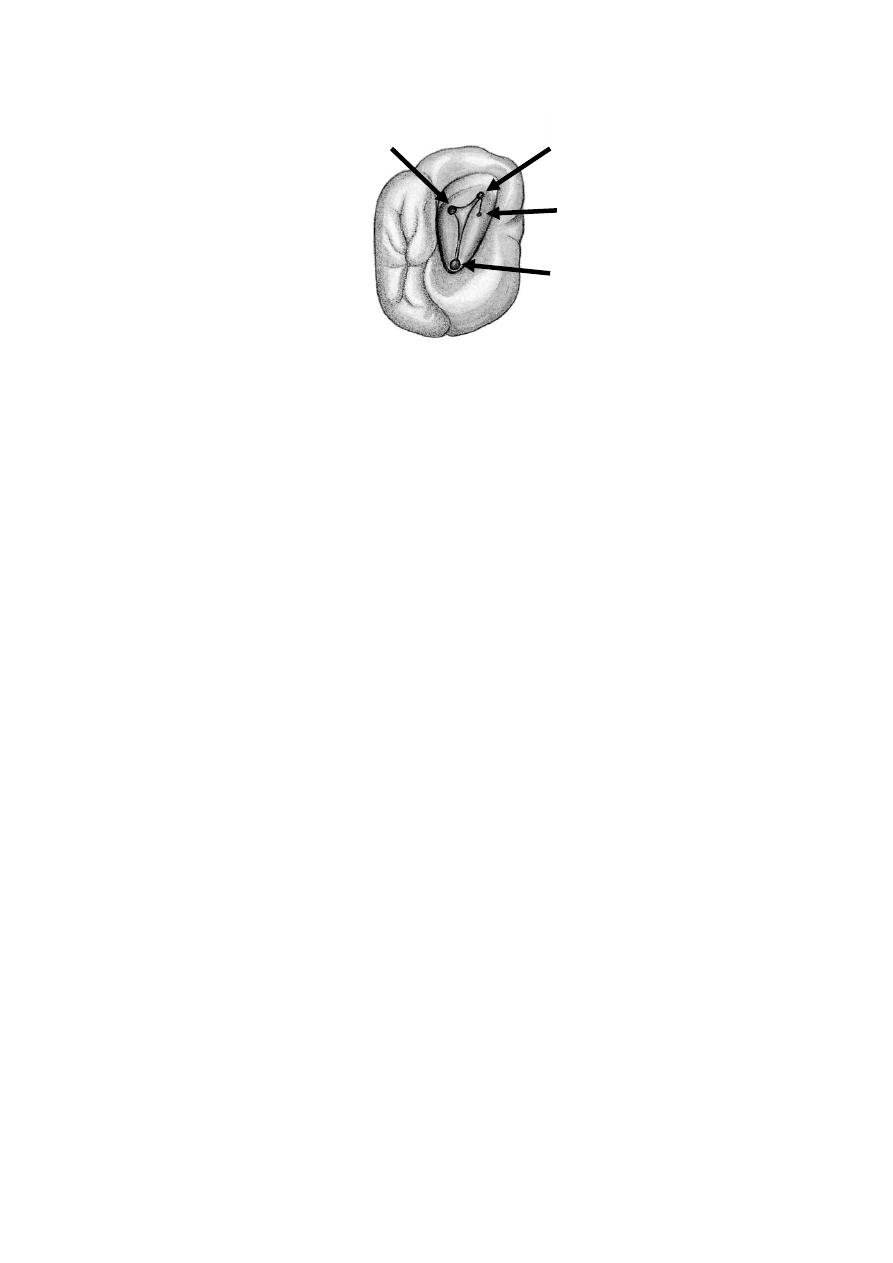
Position of root canal orifices of maxillary first molar
Maxillary First Molar
• The shape of pulp chamber is rhomboid with acute mesiobuccal angle, obtuse distobuccal
angle and palatal right angle.
• Palatal canal orifice is located palatally. Mesiobuccal canal orifice is located under the
mesiobuccal cusp. Distobuccal canal orifice is located slightly distal and palatal to the
mesiobuccal orifice. A line drawn to connect all three orifices (i.e. MB, DB and palatal)
forms a triangle.
• Almost always a second mesiobuccal canal, i.e. MB2 is present in first maxillary molars,
which is located palatal and mesial to the MB1.
Maxillary Second Molar
Basic technique is similar to that of first molar but with following differences:
• Three roots are found closer which may even fuse to form a single root.
• MB2 is less likely to be present in second molar.
• The three canals form a rounded triangle with base towards buccal side.
• Mesiobuccal orifice is located more towards mesial and buccal than in first molar.
Access Cavity Preparation for Mandibular Molars
• Remove caries and any restorative material if present.
• The initial penetration is done with a round bur on the central fossa midway between the
mesial and distal boundaries. The mesial boundary is a line joining the mesial cusp tips and
the distal boundary is the line joining buccal and the lingual grooves.
• Bur is penetrated in the central fossa directed towards the distal root. Once the “drop” into
pulp chamber is felt, remove roof of pulp chamber working from inside to outside with the
help of tapered fissure bur.
MB1
MB2
P
DB

14
Outline and starting point of access cavity of mandibular molars are determined by mesial and distal boundary
• Explore canal orifices with sharp endodontic explorer and finally finish and smoothen the
cavity with slight divergence towards the occlusal surface.
• Shape and size of the access cavity may vary according to the size, shape and location of the
canal orifices.
Outline of access cavity of mandibular molars is rhomboidal or trapezoidal in shape irrespective of number of canals
present
15
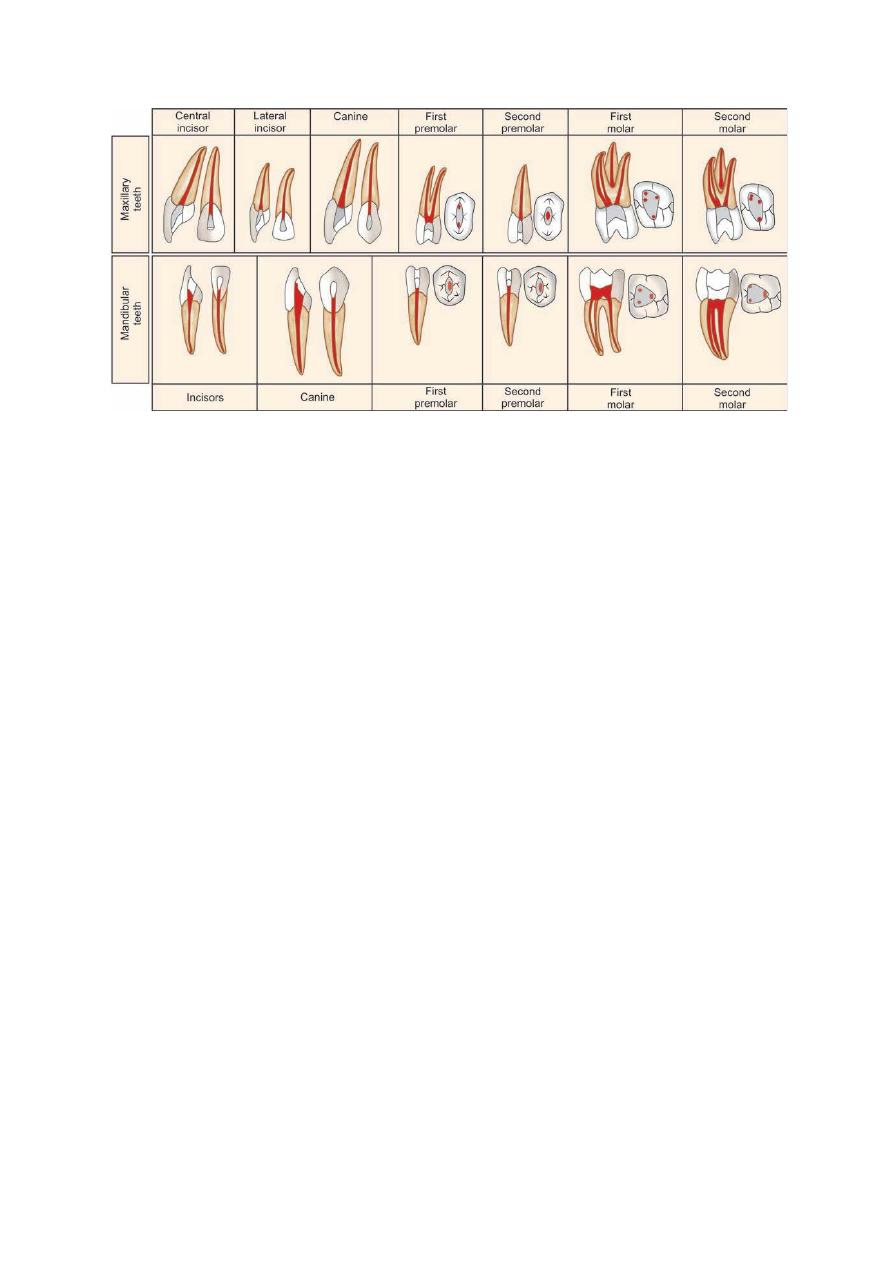
Shapes of access opening of maxillary and mandibular teeth