


Lec : 7
Flap Surgery
U N I V E R S I T Y O F M O S U L
C O L L E G E O F D E N T I S T R Y
By:
Dr.Ghayath Aljawady
B.D.S, M.Sc., Ph.D in periodontics
2020-2021
Department of:
Oral and
Maxillofacial
surgery /
Periodontics unit
Department of:

A periodontal flap is a section of gingiva
and/or mucosa surgically separated from
the underlying tissues to provide visibility of
and access to the bone and root surface.

Objectives
Flaps are used in pocket therapy for the
following:
1. Increase accessibility to root deposits for
scaling and root planing.
2. Eliminate or reduce pocket depth by
resection of the pocket wall.
3. Gain access for osseous resective surgery
if it is necessary.
4. Expose the area to perform regenerative
methods.

In moderate to advanced cases, and in cases with
furcation invasion and infrabony defects, it may be
difficult and even impossible to resolve periodontal
inflammation completely with nonsurgical
therapy alone.
Periodontal access surgery enhances access
for root instrumentation and allows for reduction of
periodontal pockets and correction of osseous
defects.
In the anterior maxilla, where aesthetics is of high
priority, recession and loss of interdental papillae
can present major aesthetic problems that are both
difficult and unpredictable to treat.
In the posterior sextants, access for definitive root
instrumentation is much more restricted due to
multiple anatomic factors, especially around
multirooted teeth.

CLASSIFICATION OF FLAPS
Periodontal flaps can be classified based on the
following:
• Bone exposure after flap reflection
• Placement of the flap after surgery
• Management of the papilla

Based on bone exposure after reflection, the flaps
are classified as either full-thickness (mucoperiosteal)
or partial-thickness (mucosal) flaps.
In full-thickness flaps, all the soft tissue, including the
periosteum, is reflected to expose the underlying
bone. This complete exposure of and access to the
underlying bone is indicated when resective osseous
surgery is contemplated.
The partial-thickness flap includes only the epithelium
and a layer of the underlying connective tissue. The
bone remains covered by a layer of connective
tissue, including the periosteum. This type of flap is
also called the split-thickness flap. The partial-
thickness flap is indicated when the flap is to be
positioned apically or when the operator does not
want to expose bone.
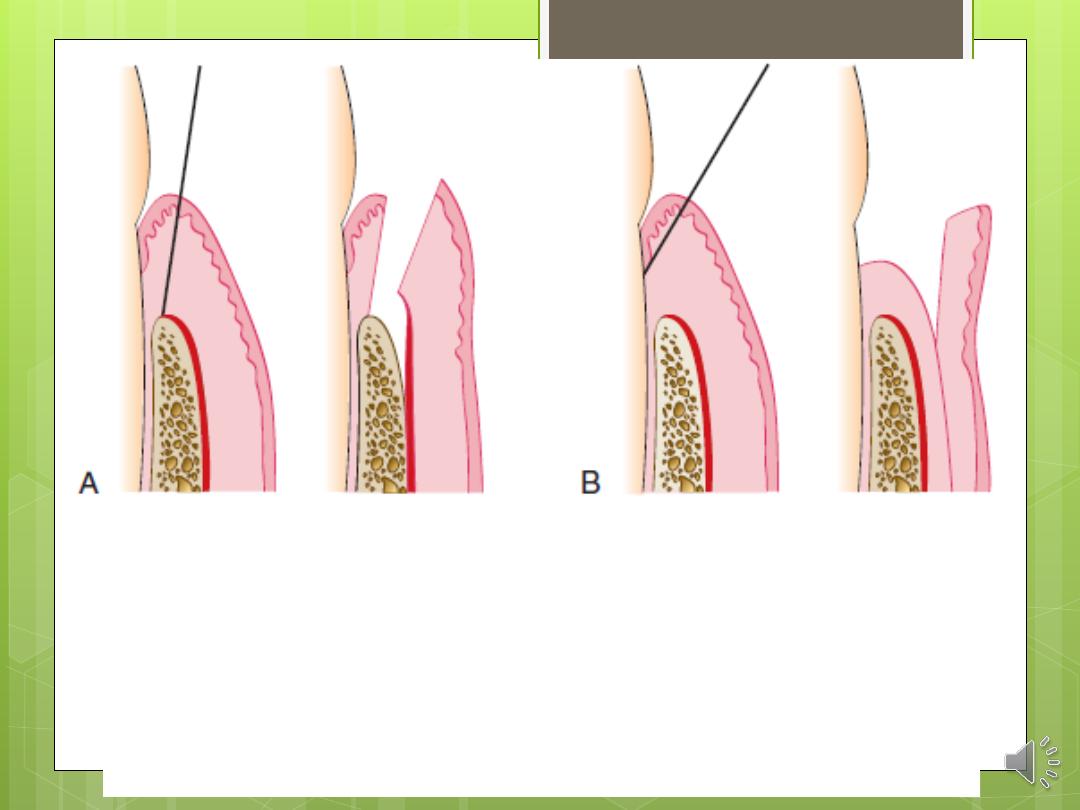
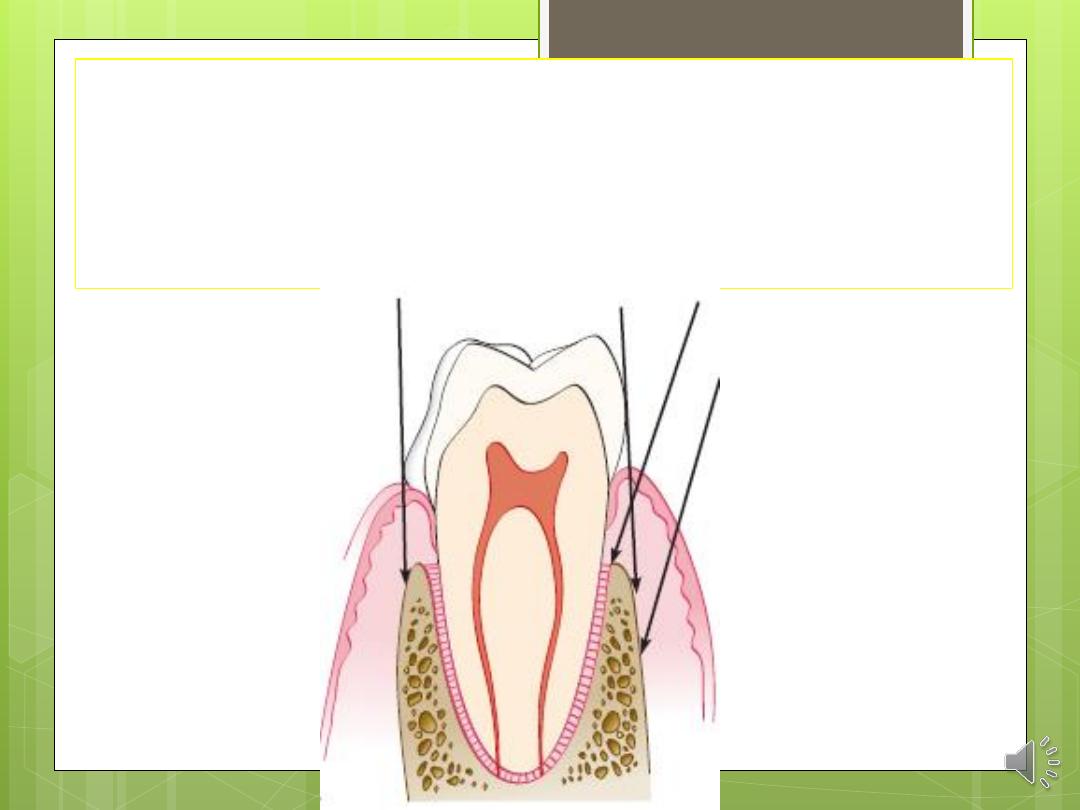
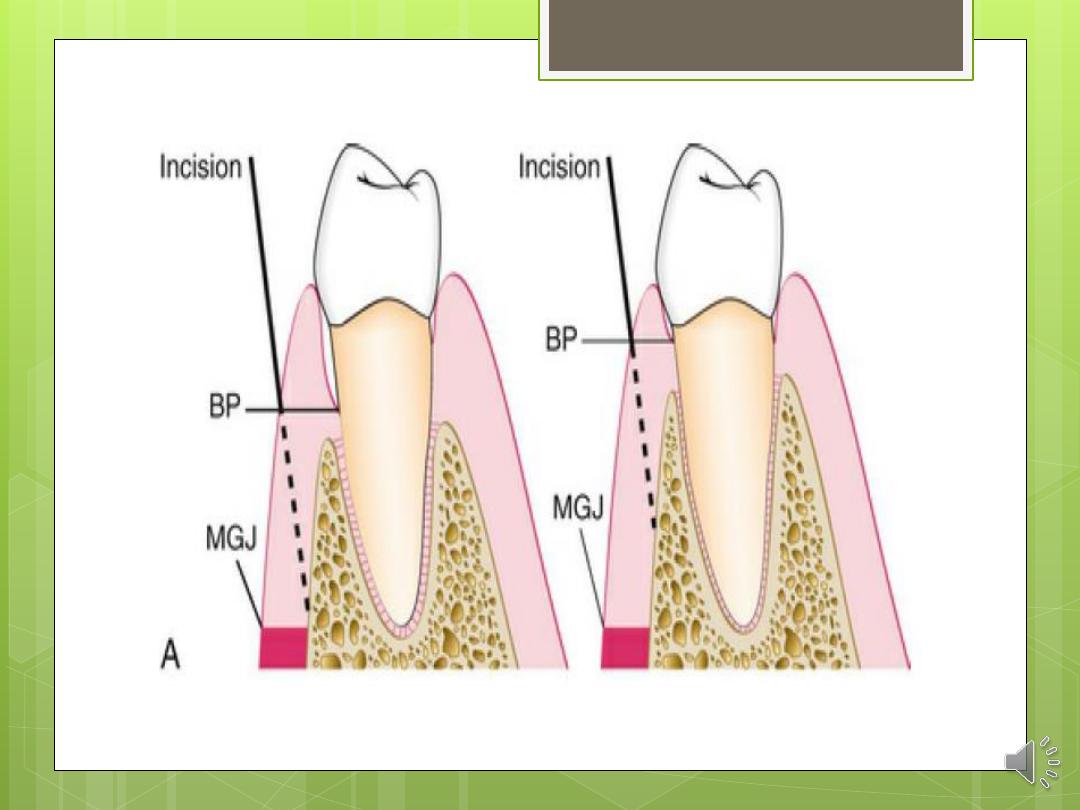
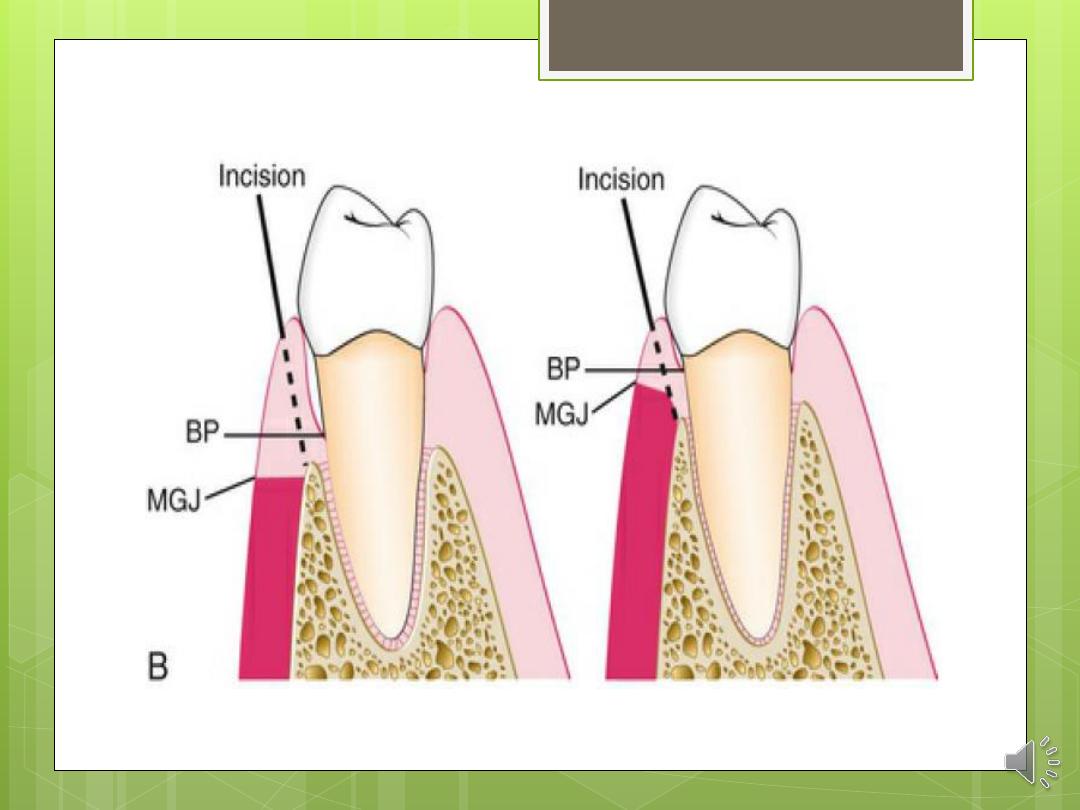
A, Diagram of the internal bevel incision to reflect a full-
thickness (mucoperiosteal) flap. Note that the incision
ends on the bone to allow for the reflection of the entire
flap.
B, Diagram of the internal bevel incision to reflect a partial-
thickness flap. Note that the incision ends on the root
surface to preserve the periosteum on the bone.

Based on flap placement after surgery, flaps are classified as
(1) Non displaced flaps, when the flap is returned and sutured in
its original position, or
(2) displaced flaps, which are placed apically, coronally, or
laterally to their original position. Both full-thickness and
partial-thickness flaps can be displaced, but to do so, the
attached gingiva must be totally separated from the
underlying bone, thereby enabling the unattached portion
of the gingiva to be movable. However, palatal flaps cannot
be displaced because of the absence of unattached
gingiva.
Apically displaced flaps have the important advantage of
preserving the outer portion of the pocket wall and transforming
it into attached gingiva. Therefore these flaps accomplish the
double objective of eliminating the pocket and increasing the
width of the attached gingiva.

Based on management of the papilla, flaps can
be conventional or papilla preservation flaps.
In the conventional flap, the interdental papilla is
split beneath the contact point of the two
approximating teeth to allow reflection of the
buccal and lingual flaps. The incision is usually
scalloped to maintain gingival morphology and
retain as much papilla as possible. The
conventional flap is used (1) when the interdental
spaces are too narrow, thereby precluding the
possibility of preserving the papilla and (2) when
the flap is to be displaced.
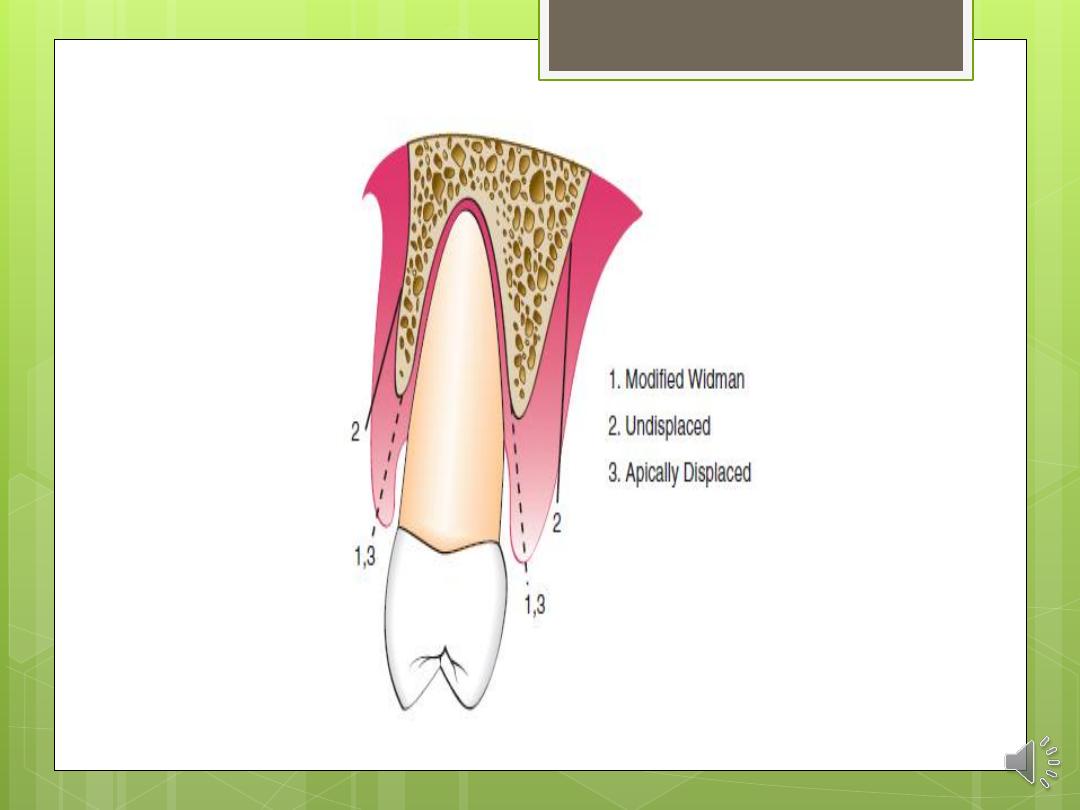
Conventional flaps include the modified Widman
flap, the undisplaced flap, the apically displaced
flap, and the flap for reconstructive procedures.

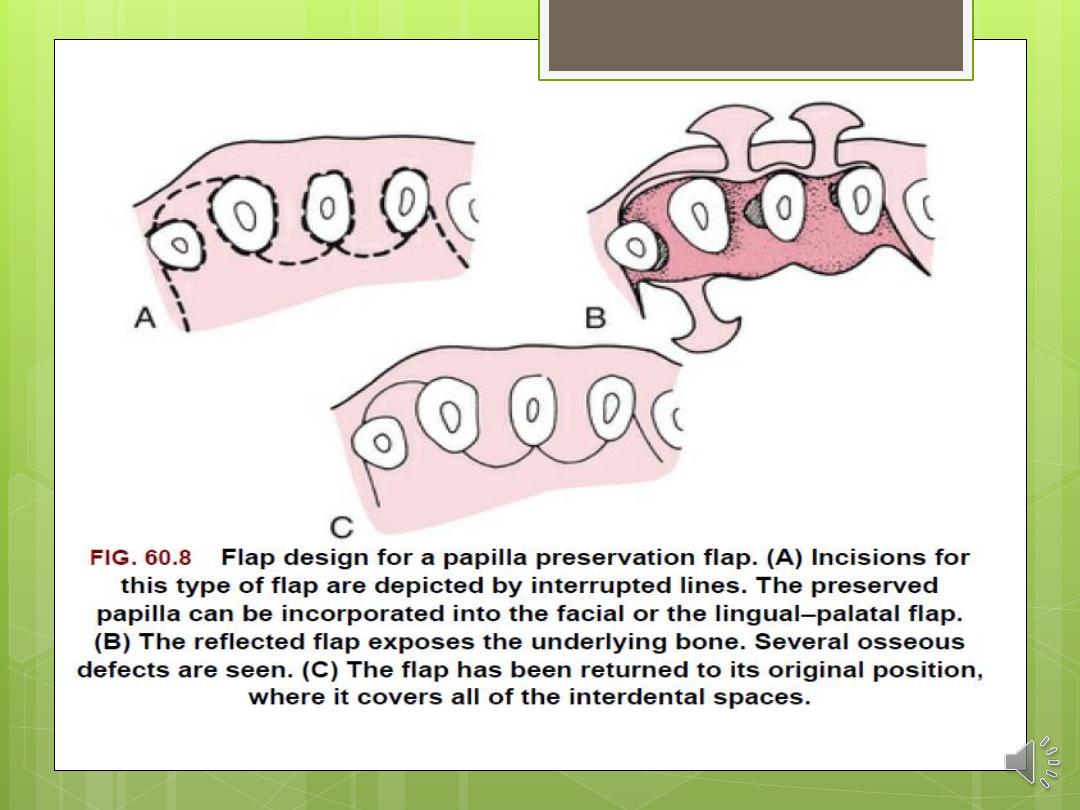
The papilla preservation flap incorporates the
entire papilla in one of the flaps by means of
crevicular interdental incisions and a
horizontal incision at the base of the papilla,
leaving it connected to one of the flaps.

INCISIONS
Periodontal flaps use horizontal and vertical
incisions.
Horizontal Incisions
Horizontal incisions are directed along the margin
of the gingiva in a mesial or a distal direction. Two
types
of
horizontal
incisions
have
been
recommended: the internal bevel incision, which
starts at a distance from the gingival margin and is
aimed at the bone crest, and the crevicular
incision, which starts at the bottom of the pocket
and is directed to the bone margin. In addition, the
interdental incision is performed after the flap is
elevated.

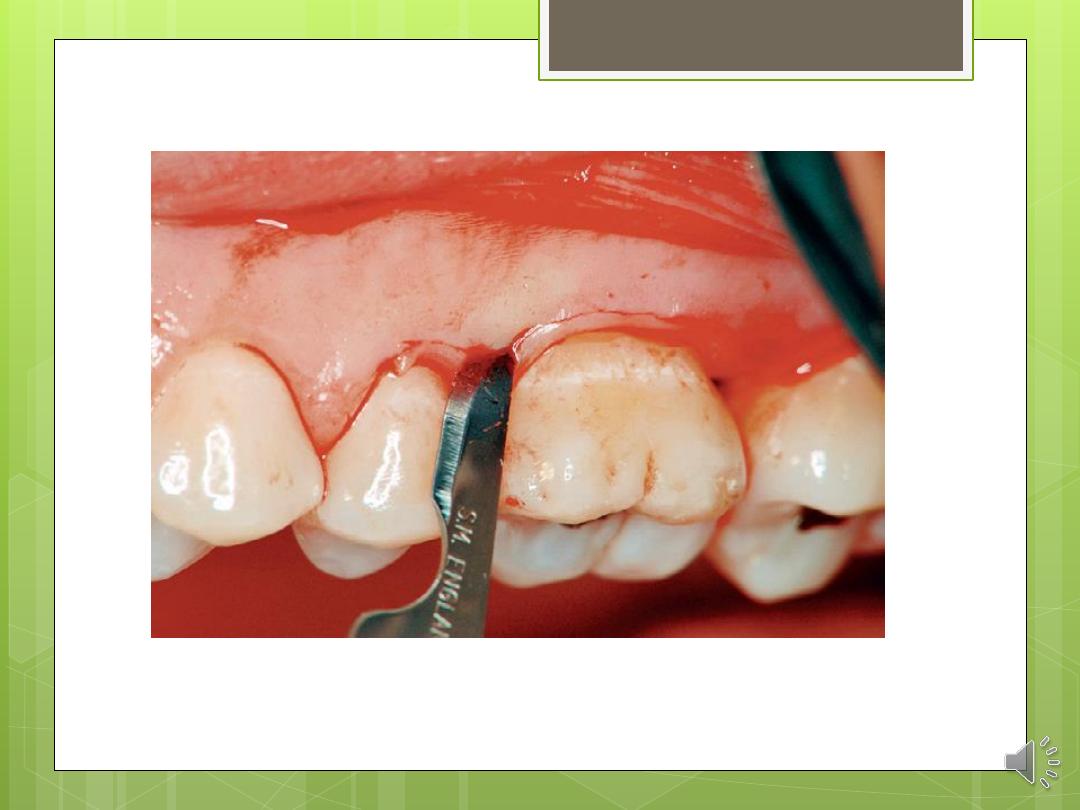
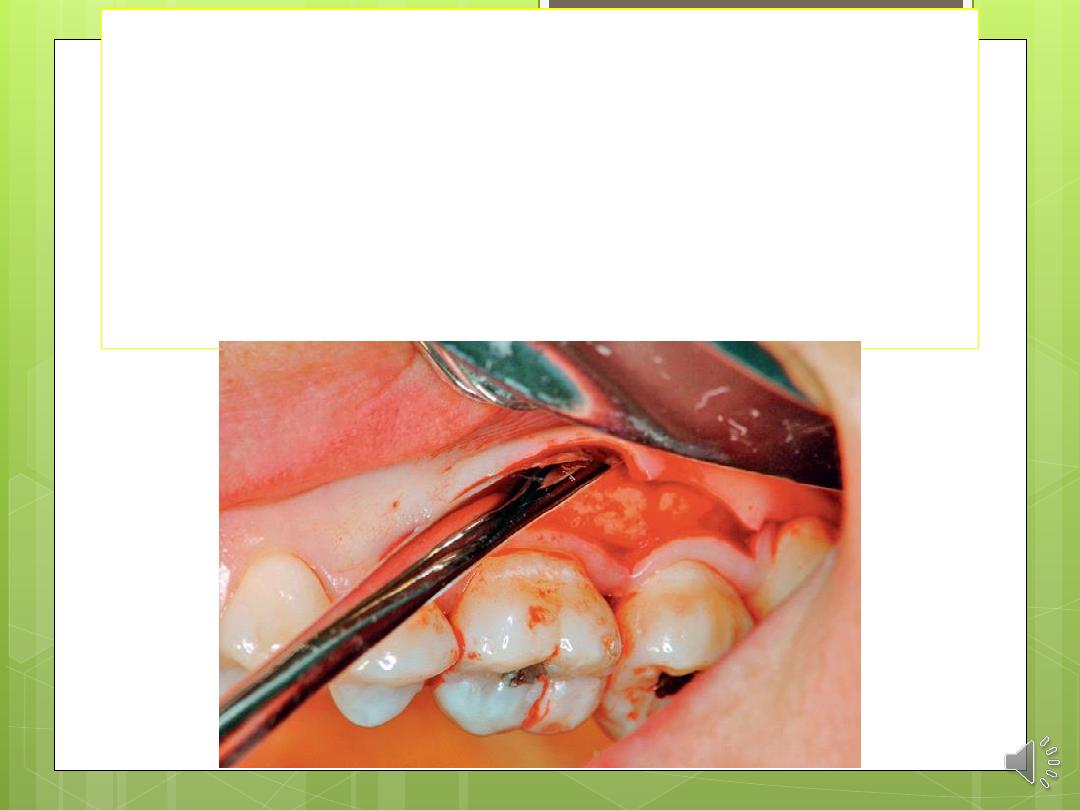
The internal bevel incision is basic to most
periodontal flap procedures. It is the incision from
which the flap is reflected to expose the underlying
bone and root. The internal bevel incision
accomplishes three important objectives:
(1) it removes the pocket lining;
(2) it conserves the relatively uninvolved outer
surface of the gingiva, which, if apically positioned,
becomes attached gingiva; and
(3) it produces a sharp, thin flap margin for
adaptation to the bone-tooth junction.
1

This incision has also been termed the first incision
because it is the initial incision in the reflection of a
periodontal flap, and the reverse bevel incision
because its bevel is in reverse direction from that
of the Gingivectomy incision. The #15 surgical
blade is used most often to make this incision. That
portion of the gingiva left around the tooth
contains the epithelium of the pocket lining and
the adjacent granulomatous tissue. It is discarded
after the crevicular (second) and interdental
(third) incisions are performed.
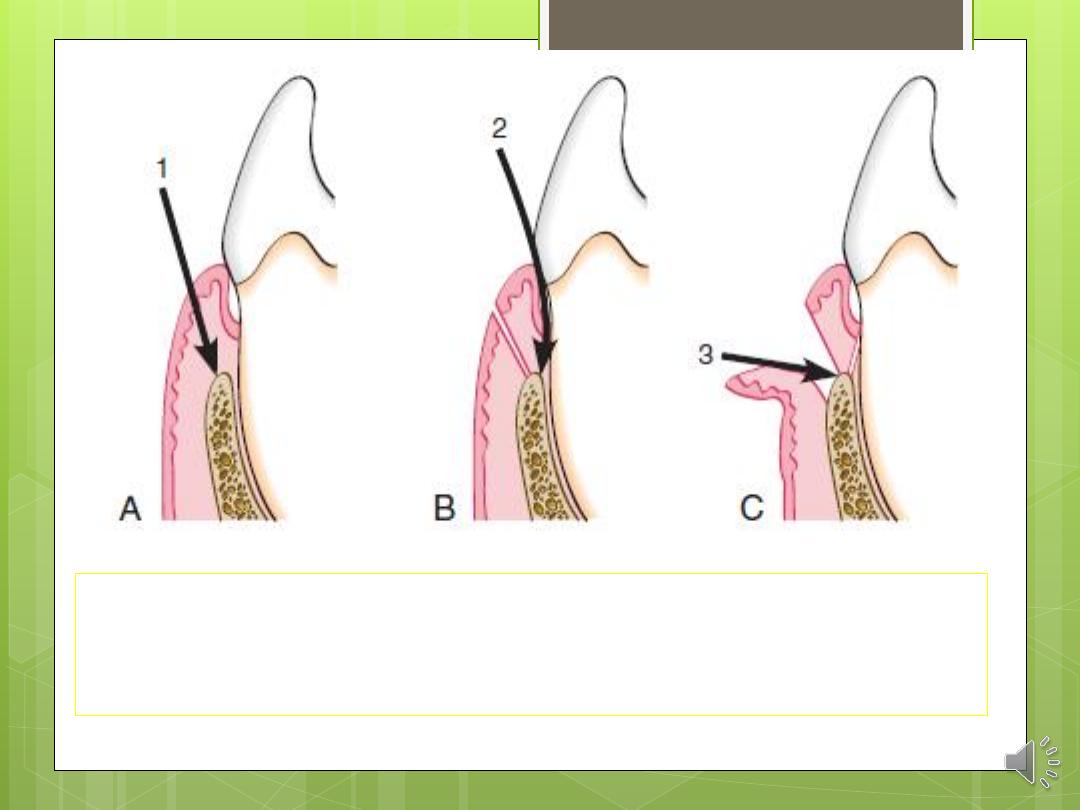
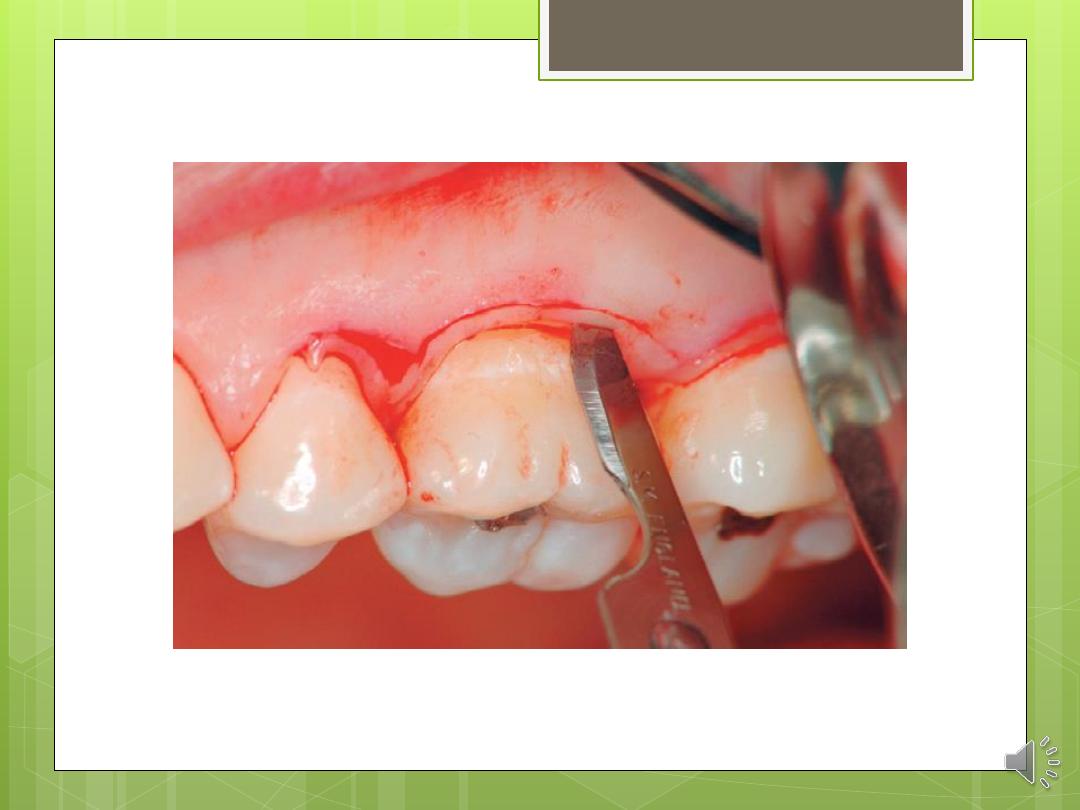
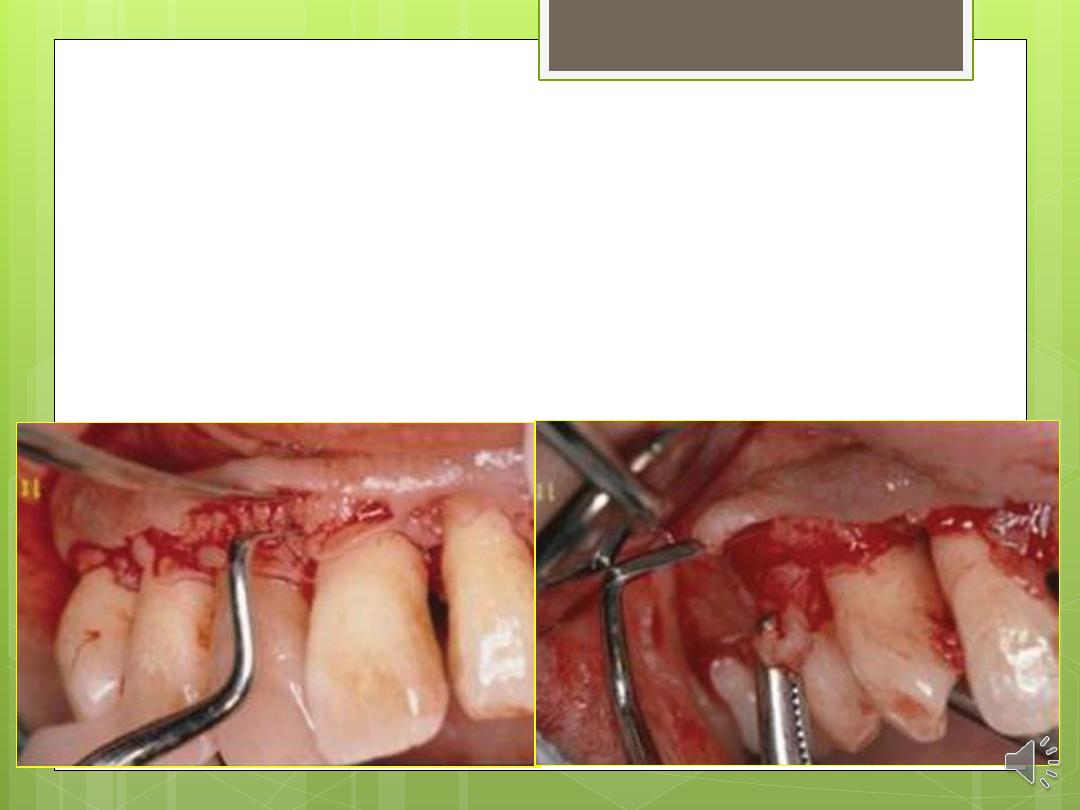
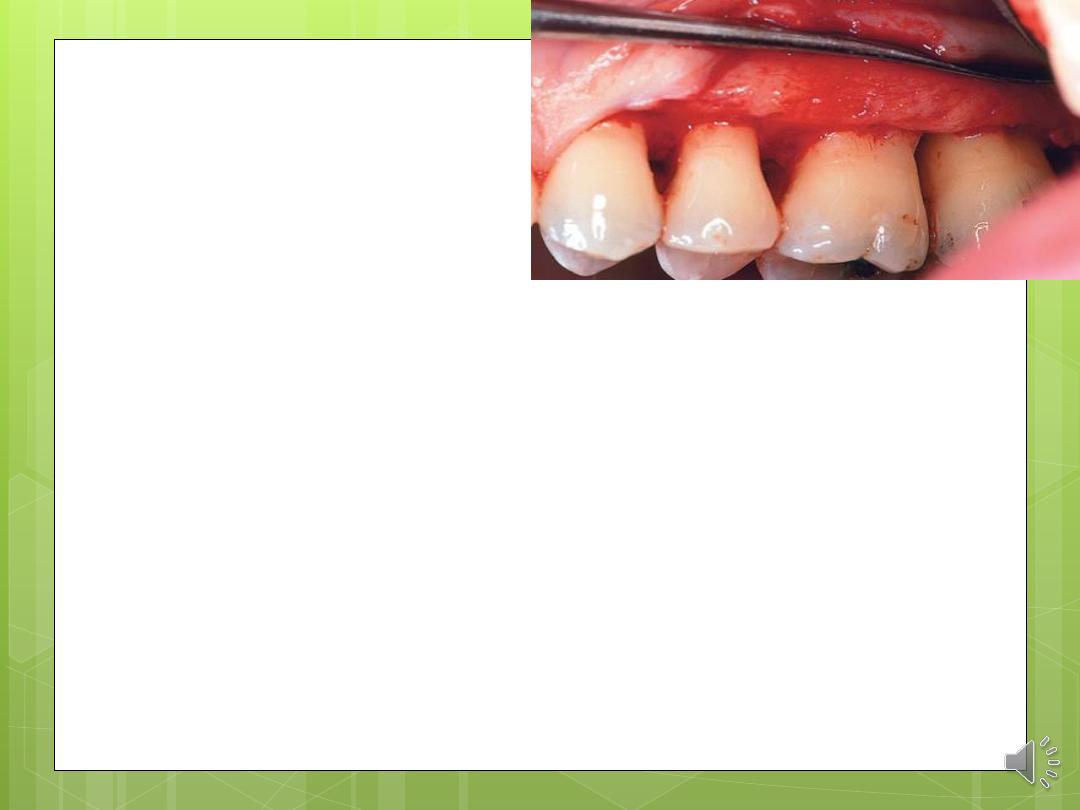
Three incisions necessary for flap surgery. A, First
(internal bevel) incision; B, second (crevicular)
incision; C, third (interdental) incision.
The internal bevel incision starts from a designated
area on the gingiva and is directed to an area at or
near the crest of the bone. The starting point on the
gingiva is determined by whether the flap is apically
displaced or not displaced.

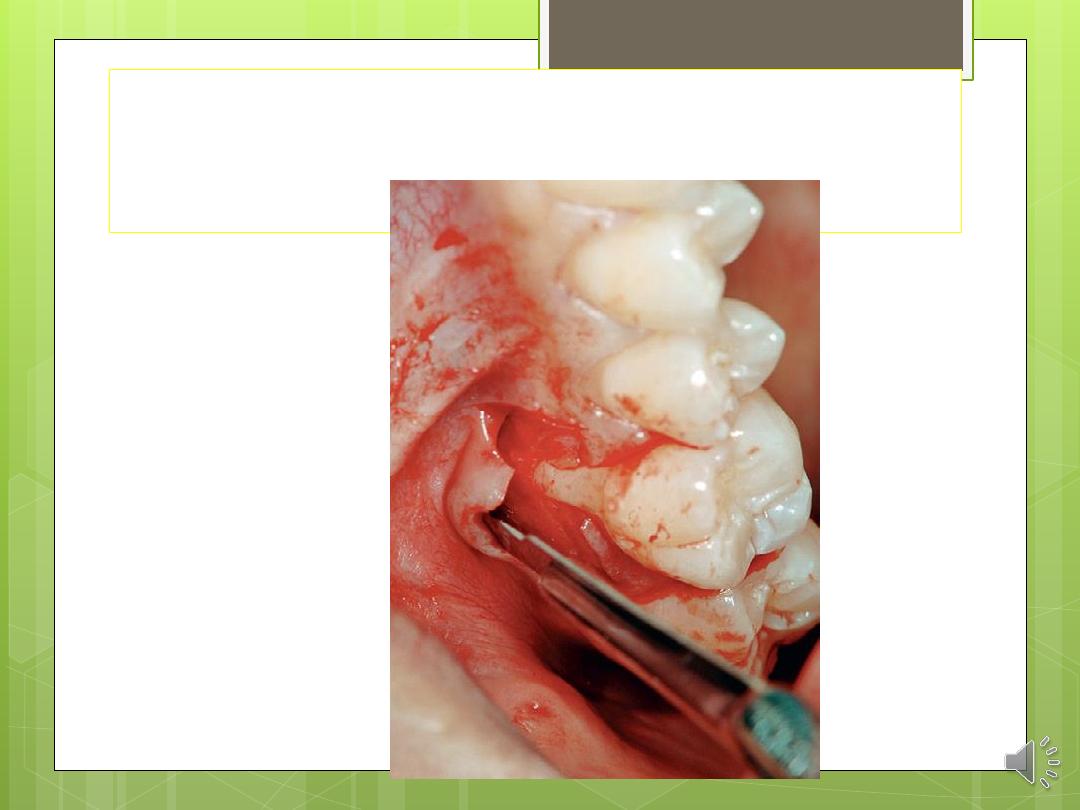
The crevicular incision, also termed the second
incision, is made from the base of the pocket to
the crest of the bone. This incision, together with
the initial reverse bevel incision, forms a V-shaped
wedge ending at or near the crest of bone. This
wedge of tissue contains most of the inflamed
and granulomatous areas that constitute the
lateral wall of the pocket, as well as the junctional
epithelium and the connective tissue fibers that
still persist between the bottom of the pocket and
the crest of the bone. The incision is carried
around the entire tooth. The beak-shaped blade
is usually used for this incision.
2

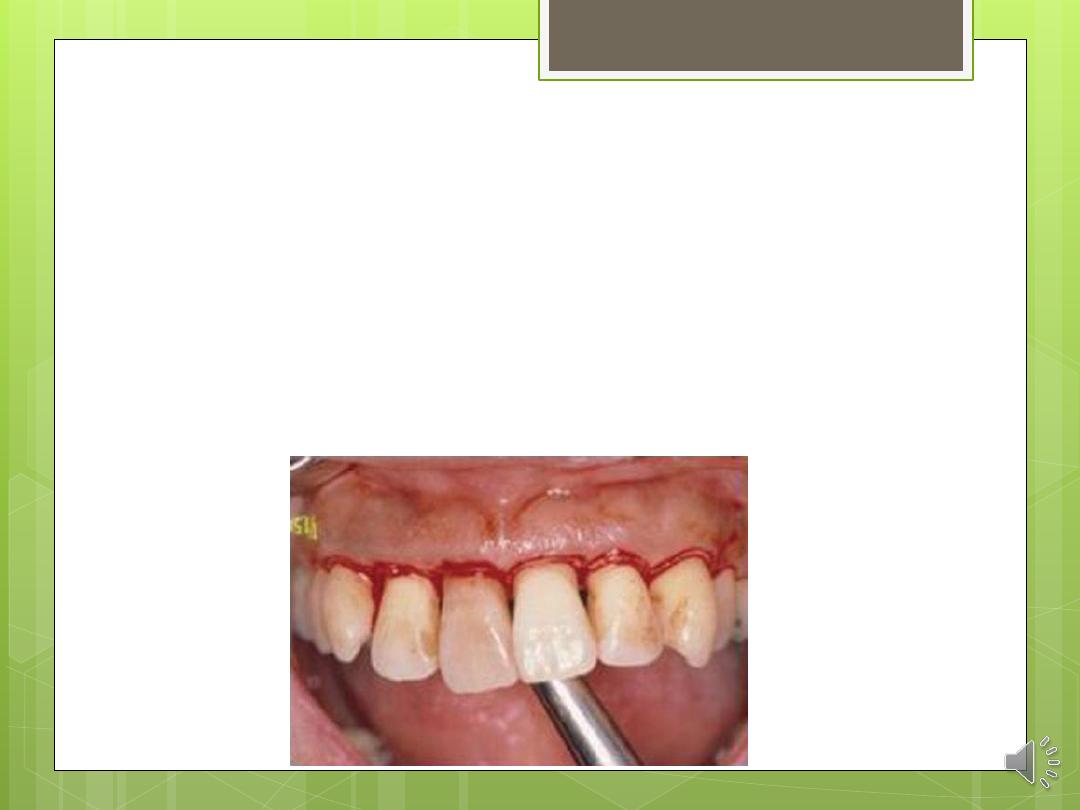
A periosteal elevator is inserted into the initial
internal bevel incision, and the flap is separated
from the bone. The most apical end of the
internal bevel incision is exposed and visible.
With this access, the surgeon is able to make the
third incision, or interdental incision, to separate
the collar of gingiva that is left around the tooth.
The Orban knife is usually used for this incision.
The incision is made not only around the facial
and lingual radicular area but also interdentally,
connecting the facial and lingual segments to
free the gingiva completely around the tooth.
3

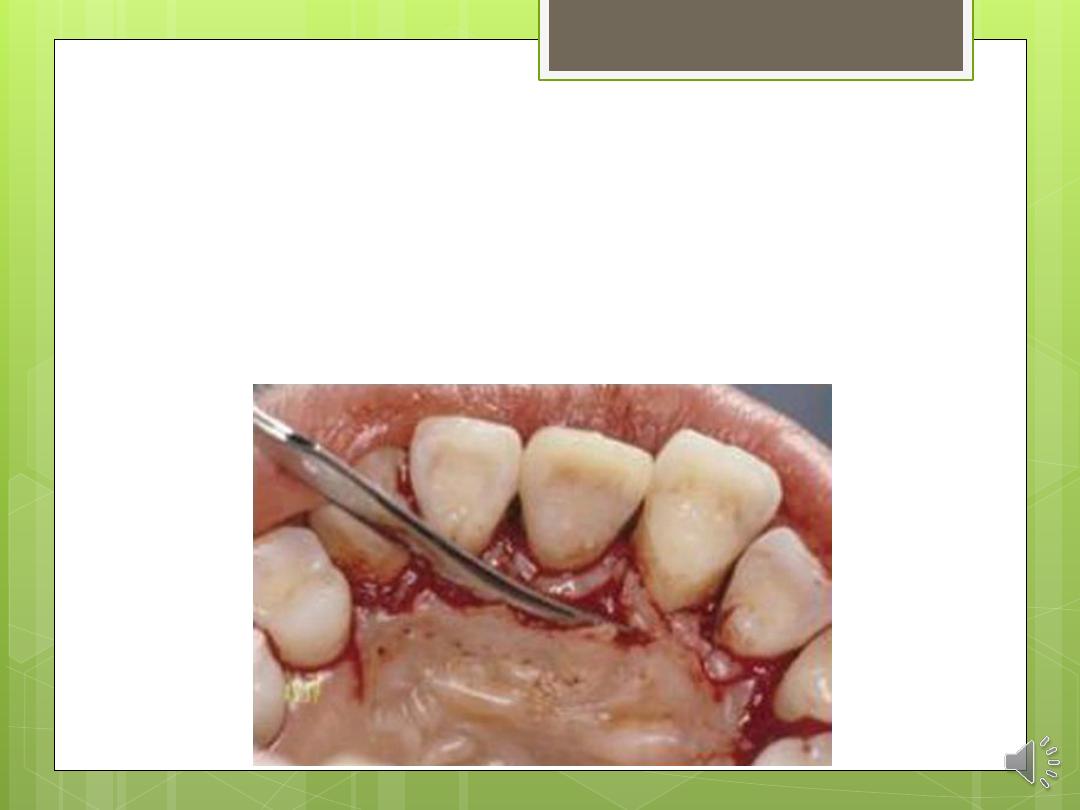
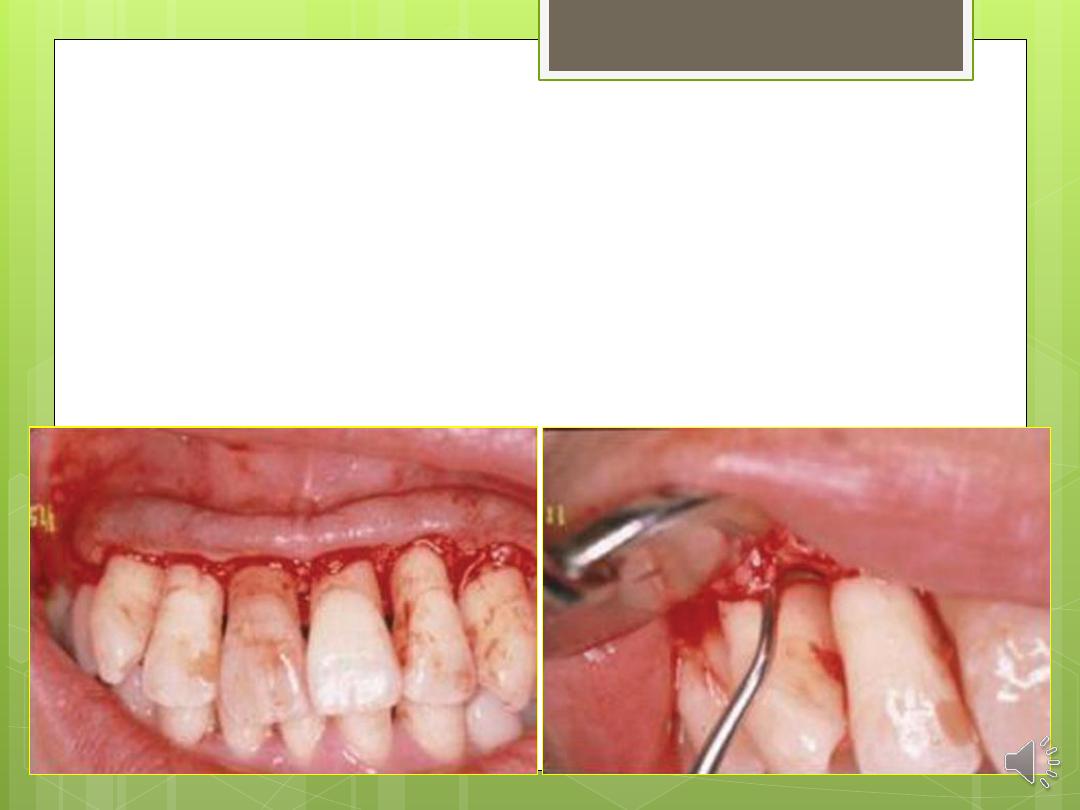
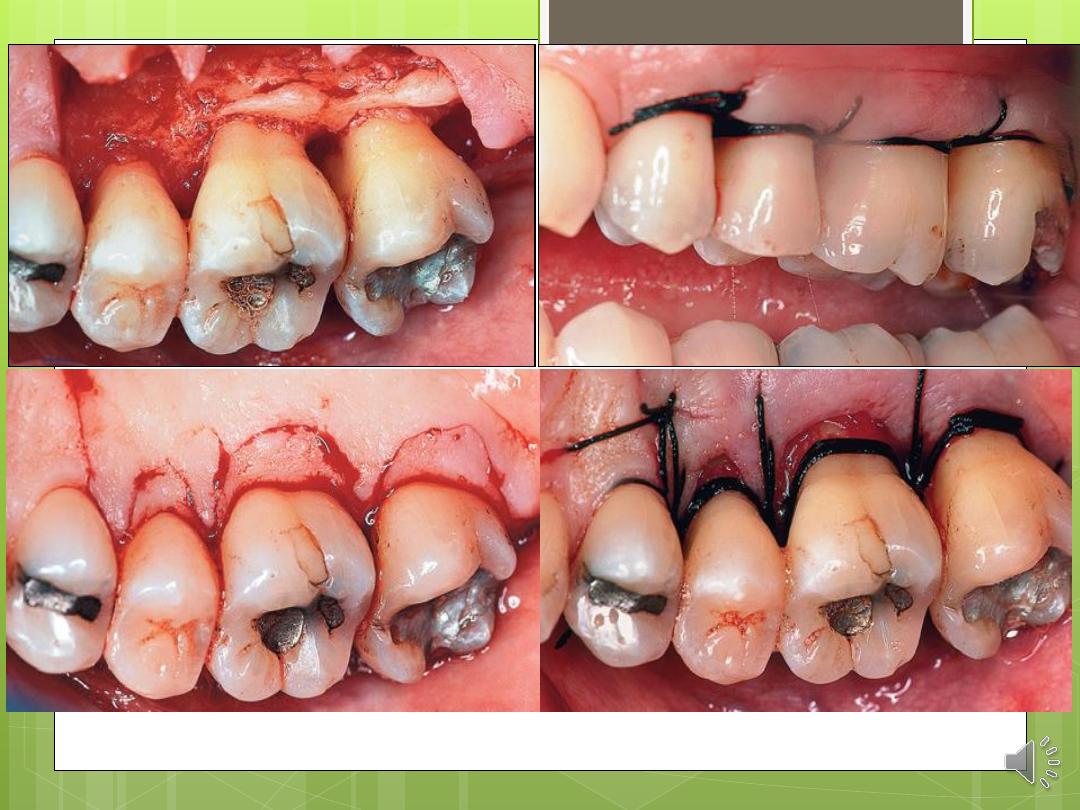
These three incisions allow the removal of the
gingiva around the tooth (i.e., the pocket
epithelium and the adjacent granulomatous
tissue). A curette or a large scaler can be used for
this purpose. After removal of the large pieces of
tissue, the remaining connective tissue in the
osseous lesion should be carefully curetted so that
the entire root and the bone surface adjacent to
the teeth can be observed.
Flaps can be reflected using only the horizontal
incision if sufficient access can be obtained in this
way and if apical, lateral, or coronal
displacement of the flap is not anticipated. If
vertical incisions are not made, the flap is called
an envelope flap.

Vertical Incisions
Vertical or oblique releasing incisions can be used on
one or both ends of the horizontal incision, depending
on the design and purpose of the flap. Vertical
incisions at both ends are necessary if the flap is to be
apically displaced.
In general, vertical incisions in the lingual and palatal
areas are avoided. Facial vertical incisions should not
be made in the center of an interdental papilla or
over the radicular surface of a tooth.
Incisions should be made at the line angles of a tooth
either to include the papilla in the flap or to avoid it
completely.
The vertical incision should also be designed to avoid
long (coronal-apical) and narrow (mesial-distal) flaps,
and flaps with the base narrower than the margin,
because this could jeopardize the blood supply to the
flap
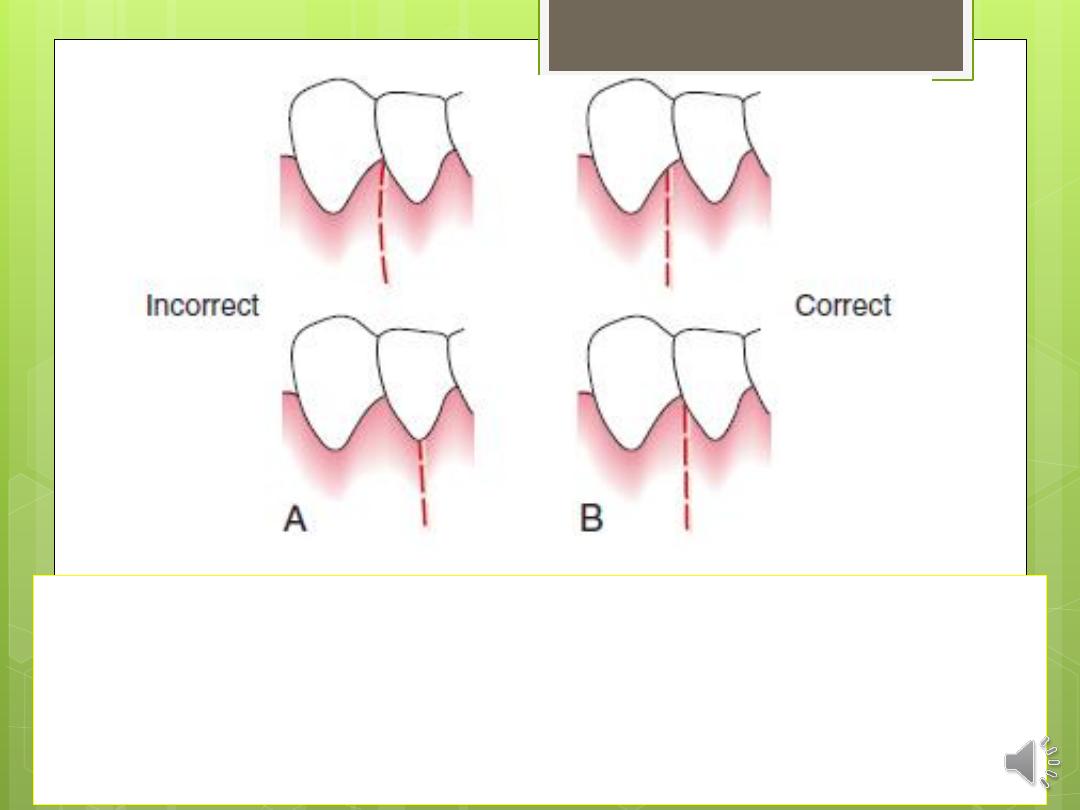
Incorrect (A) and correct (B) locations of a vertical
incision.
This incision should be made at the line angles to
prevent splitting of a papilla or incising directly over a
radicular surface.

Several investigators proposed the interdental
denudation
procedure,
which
consists
of
horizontal, internal bevel, nonscalloped incisions to
remove the gingival papillae and denude the
interdental space. This technique completely
eliminates the inflamed interdental tissue. Healing
is by secondary intention and results in excellent
gingival contour. It is contraindicated when bone
grafts are used for the graft material placed
interdentally will not be covered.
ELEVATION OF THE FLAP
When a full-thickness flap is desired, reflection of
the flap is accomplished by blunt dissection. A
periosteal elevator is used to separate the
mucoperiosteum from the bone by moving it
mesially, distally, and apically until the desired
reflection is accomplished.
Sharp dissection is necessary to reflect a
partial-thickness flap. A surgical scalpel
(#15) is used.

To fulfill the objectives of flap surgery,
five different flap techniques are used:
(1) the modified Widman flap.
(2) the undisplaced flap.
(3) the apically displaced flap.
(4) the papilla preservation flap.
(5) and the distal terminal molar flap.

The modified Widman flap facilitates root
instrumentation. It does not attempt to
reduce the pocket depth, but it does
eliminate the pocket lining.
The objectives of the undisplaced and
apically displaced flaps include root
surface access and the reduction of
probing depth.

The choice of which procedure to use
depends on two important anatomic
landmarks: the transgingival probing
depth and the location of the
mucogingival junction.
These landmarks establish the presence
and width of the attached gingiva, which
are the basis for the decision.

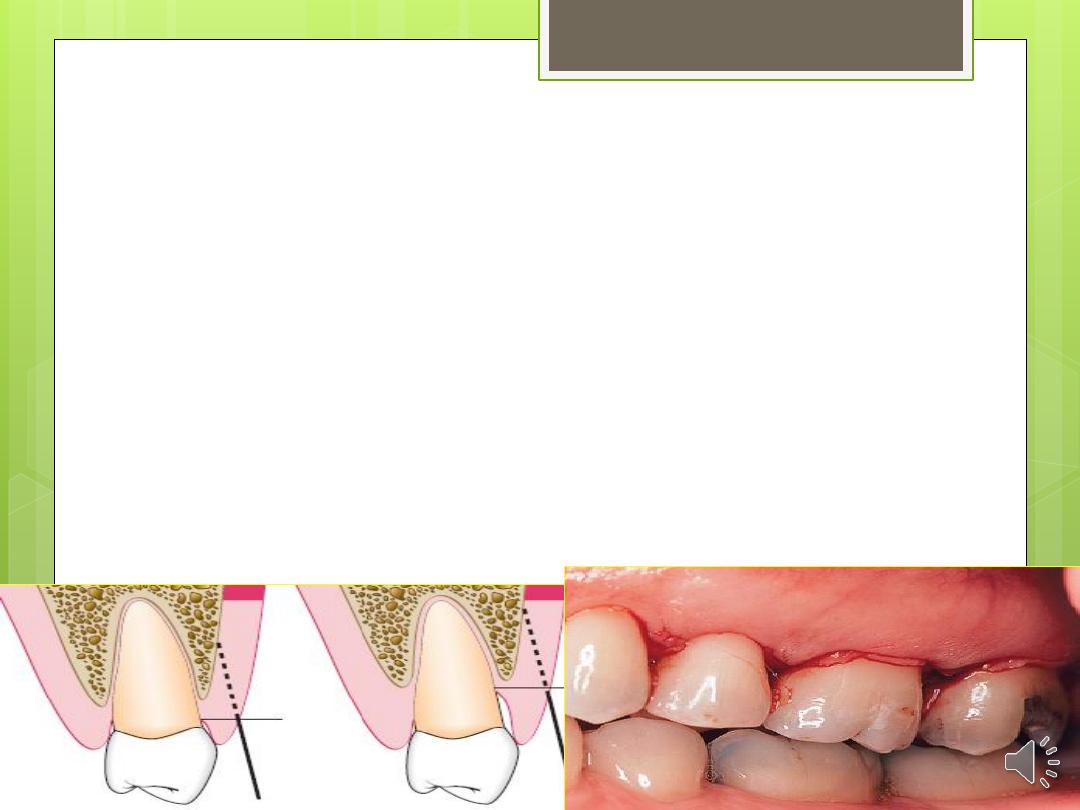
The transgingival interdental probing
depth is used to provide a guide for the
placement of the submarginal scalloped
incision.
The transgingival probing depth is the
distance from the gingival margin down
to the bone. It is measured by inserting
the probe into the gingival crevice
through the attachment apparatus and
down to the bone.
Transgingival probing is also called bone
sounding.

The papilla preservation flap is used when
possible in regenerative and aesthetic
cases to minimize recession and loss of
interdental papillae.
The distal terminal molar flap is used for
treating pockets and osseous defects on
the distal surface of the terminal maxillary
and mandibular molars.

Modified Widman Flap
The original Widman flap used two vertical
releasing incisions connected by a
submarginal scalloped internal bevel incision
to demarcate the area of surgery.
This technique offers the possibility of
establishing an intimate postoperative
adaptation of healthy collagenous
connective tissue to tooth surfaces, and it
provides access for adequate instrumentation
of the root surfaces and immediate closure of
the area.
The step-by-step technique for the
modified Widman flap is as
follows:
Step 1: The first incision parallel to the long-axis of the
tooth is a scalloped internal bevel incision to the
alveolar crest starting 0.5 to 1 mm away from the
gingival margin. The papillae are dissected and thinned
to have a thickness similar to that of the remaining flaps.
Step 2: Full-thickness flaps are reflected 2
to 3 mm away from the alveolar crest.
Step 3: The second, crevicular incision is
made in the gingival crevice to detach
the attachment apparatus from the root.
Step 4: The interdental tissue and the
gingival collar are detached from the
bone with a third incision.
Step 5: The gingival collar and granulation
tissue are removed with curettes. The root
surfaces are scaled and planed.

Step 6: Bone architecture is not corrected
unless it prevents intimate flap
adaptation. Every effort is made to adapt
the facial and lingual interdental tissue in
such a way that no interdental bone
remains exposed at the time of suturing.
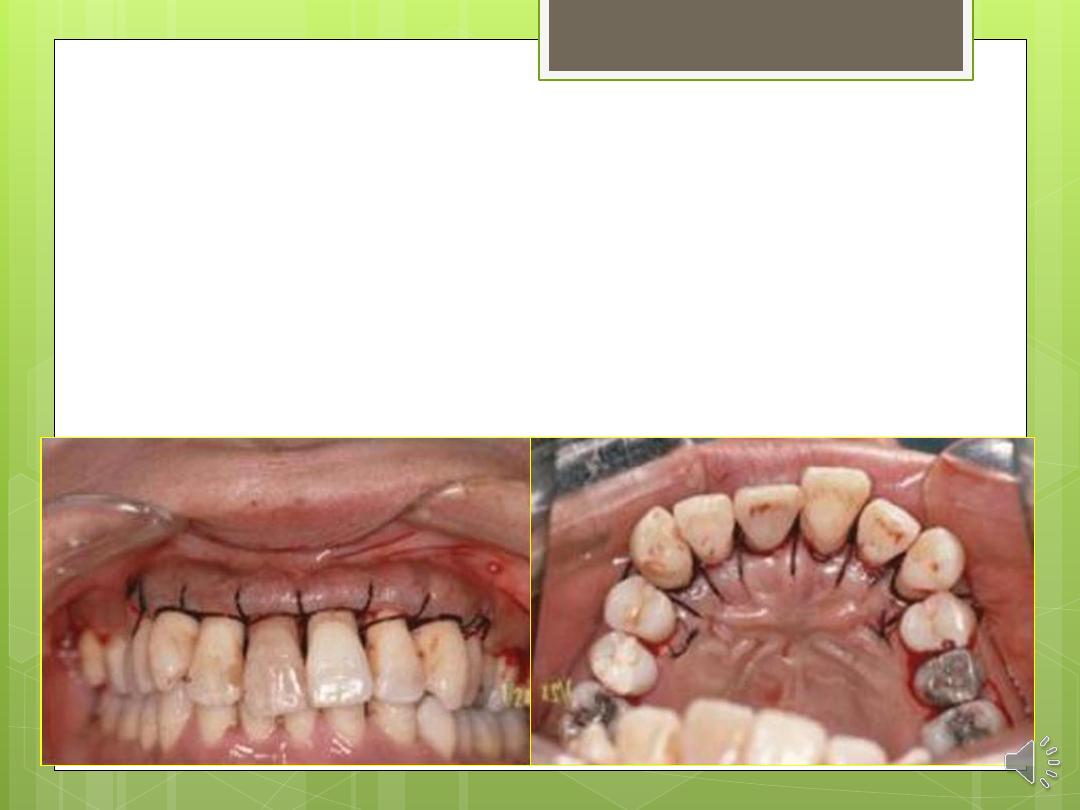
Step 7: The flaps are stabilized with sutures
and covered with a surgical dressing.


Undisplaced Flap
Currently, the undisplaced flap may be the
most frequently performed type of
periodontal surgery. For the undisplaced flap,
the submarginal scalloped internal bevel
incision is initiated at a distance from the
tooth that is roughly one-half to two-thirds the
interdental transgingival probing depth.
This incision can be accomplished only if
sufficient attached gingiva remains apical to
the incision.

the two anatomic landmarks, the
transgingival interdental probing depth
and the mucogingival junction, must be
considered to evaluate the amount of
attached gingiva that will remain after
surgery.
The step-by-step technique for the
undisplaced flap is as follows:
Step 1: The periodontal probe is inserted into the
gingival crevice and penetrates the junctional
epithelium and connective tissue down to bone.
Step 2: The mucogingival junction is assessed to
determine the amount of keratinized tissue.
Step 3: The initial placement of the submarginal
scalloped internal bevel incision is based on the
transgingival interdental probing depth and the
mucogingival junction. The incision is made parallel to
the long axis of the tooth and directed down to the
alveolar bone.
Step 4: Full-thickness flaps are reflected 1
mm apical to the mucogingival junction.
Step 5: The crevicular is made in the
gingival crevice to detach the
attachment apparatus from the root.
Step 6: The gingival collar and granulation
tissue are removed with curettes. The root
surfaces are scaled and planed.

Step 7: Osseous recontouring is performed
to eliminate defects and reestablish
positive architecture.
Step 8: The flaps are adapted on the
alveolar crest with the flap margin well
adapted to the roots. The flaps may be
trimmed and rescalloped if necessary.
Step 9: The flaps are stabilized with sutures
and covered with a surgical dressing.

Apically Displaced Flap
The apically displaced flap is selected for
cases that present with a minimal amount
(<3 mm) of attached gingiva. For this
reason, the internal bevel incision should
be made as close to the tooth as possible
(i.e., 0.5 to 1.0 mm).

APICALLY DISPLACED FLAP
With some variants, the apically displaced flap
technique can be used for (1) pocket eradication
and/or (2) widening the zone of attached gingiva.
Depending on the purpose, it can be a full-thickness
(mucoperiosteal) or a split-thickness (mucosal) flap.
The split-thickness flap requires more precision and
time, as well as a gingival tissue thick enough to split,
but it can be more accurately positioned and
sutured in an apical position using a periosteal
suturing technique.

The step-by-step technique for
the apically displaced flap is
as follows:
Step 1: A marginal scalloped internal bevel
incision parallel to the long axis of the tooth is
made down to the crest of bone.
Step 2: If used, vertical incisions are made
extending beyond the mucogingival junction.
It is important that the vertical incisions—and
therefore the flap elevation—reach past the
mucogingival junction to provide adequate
mobility to the flap for its apical
displacement.

Step 3: The flap is reflected in full thickness
or partial thickness, depending on the
thickness of the gingiva and the objective
of the surgery.
Step 4: Crevicular and interdental incisions
are made, and the marginal collar of
tissue is removed.
Step 5: After degranulation, scaling and
root planing, and osseous surgery if
needed, the flap is displaced apically.

Step 6: If a full-thickness flap was
reflected, an independent sling suture
positions the flap margin at the alveolar
crest, and a surgical dressing can prevent
its coronal movement. If a partial-
thickness flap was reflected, it can be
apically displaced with an independent
sling suture, and further stabilized with
periosteal sutures. A periodontal dressing
can prevent its coronal movement.

IN THE NEXT LECTURE
(4) the papilla preservation flap.
(5) and the distal terminal molar flap.