
Complications following traumatic injuries to primary teeth may appear
shortly after the injury (e.g., infection of the PDL or dark discoloration of the
crown) or after several months (e.g., yellow discoloration of the crown and
external root resorption).
Pulpitis
The pulp's initial response to trauma is pulpitis. Capillaries in the tooth
become congested, Teeth with reversible pulpitis may be tender to percussion
if the PDL is inflamed (e.g., following a luxation injury). Pulpitis may be
totally reversible if the condition causing it is addressed, or it may progress to
an irreversible state with necrosis of the pulp.
Infection of the Periodontal Ligament
Infection of the PDL becomes possible when detachment of the gingival fibers
from the tooth in a luxation injury allows invasion of microorganisms from the
oral cavity along the root to infect the PDL. Loss of alveolar bone support can
be seen on a periapical radiograph . This diminishes the healing potential of
the supporting tissues. Subsequently, increased tooth mobility accompanied by
exudation of pus from the gingival crevice will require extraction of the
injured tooth.
Pulp Necrosis and Infection
Two main mechanisms can explain how the pulp of injured primary teeth
becomes necrotic: (1) infection of the pulp in cases of untreated crown fracture
with pulp exposure, and (2) interrupted blood supply to the pulp through the
apex in cases of luxation injury leading to ischemia. Periapical radiolucencies
indicative of a granuloma or cyst are frequently evident radiographically in
necrotic anterior teeth.

Coronal Discoloration
As a result of trauma, the capillaries in the pulp occasionally hemorrhage,
leaving blood pigments deposited in the dentinal tubules. In mild cases, the
blood is resorbed and very little discoloration occurs, or that which is present
becomes lighter in several weeks. In more severe cases, the discoloration
persists for the life of the tooth .
From a diagnostic standpoint, discoloration of primary teeth does not
necessarily mean that the tooth is nonvital, particularly when the discoloration
occurs 1 or 2 days after the injury.
Pink discoloration that is observed shortly after the injury may represent
intrapulpal hemorrhage.
Yellow discoloration of primary incisors can be seen when the dentin is thick
and the pulp chamber narrower than usual. This condition is termed pulp canal
obliteration
Dark discoloration of primary teeth is the most controversial posttraumatic
complication in terms of the significance of the change in tooth color. The
term “dark” refers to a variety of shades, including black, gray, brown.
When the pulp becomes necrotic or when pulpal hemorrhage occurs, red blood
cells lyse and release hemoglobin. Hemoglobin and its derivatives, such as
hematin molecules that contain iron ions, invade the dentin tubules and stain
the tooth dark. If the pulp remains vital and eliminates the pigments, the dark
discoloration may fade with subsequent restoration of the original color. If the
pulp loses its vitality and cannot eliminate the iron-containing molecules, the
tooth may remain discolored.
Inflammatory Resorption
Inflammatory resorption can occur either on the external root surface or
internally in the pulp chamber or canal .It occurs subsequent to luxation
injuries and is related to a necrotic pulp and an inflamed PDL.

Internal Resorption
The predentin, an unmineralized layer of organic material, covers the inner
aspect of the dentin and protects it against access of osteoclasts. When the pulp
becomes inflamed, as in cases of traumatic injury, the odontoblastic layer may
lose its integrity and expose the dentin to odontoclastic activity, which is then
seen on radiographs as radiolucent expansion of the pulp space. Eventually
this process reaches the outer surface of the root, causing root perforation.
External Resorption
The cementoblast layer and the precementum serve as a shield protecting the
root from involvement in the perpetual remodeling process of the surrounding
bone. In nontraumatized primary teeth, external root resorption is part of the
physiologic process of replacing the primary dentition with permanent teeth. In
primary incisors sustaining traumatic injuries, external root resorption may
appear as an accelerated unfavorable pathologic reaction.
Pulp Canal Obliteration
Pulp canal obliteration is the result of intensified activity of the odontoblasts
that results in accelerated dentin apposition. Gradually, the pulp space narrows
to a state in which it cannot be seen on a radiograph. PCO is a common finding
in primary incisors following traumatic injuries and is often associated with
yellow coronal discoloration
Replacement Resorption
Replacement resorption, also known as ankylosis, results after irreversible
injury to the PDL. Alveolar bone directly contacts and fuses with the root
surface. As the alveolar bone undergoes normal physiologic osteoclastic and
osteoblastic activity, the root is resorbed and replaced with bone). Ankylosis
occurs more often in intruded primary teeth, and they eventually become
infraoccluded

Injuries to the permanent successor tooth can be expected in 12-69% of
primary tooth trauma and 19-68% of jaw fractures. Intrusive luxation causes
most disturbances. Most damage to the permanent tooth bud occurs under 3
years of age during its developmental stage. However, the type and severity of
disturbance are closely related to the age at the time of injury. Changes in the
mineralization and morphology of the crown of the permanent incisor are most
common, but later injuries can cause radicular anomalies. Injuries to
developing teeth can be classified as follows:
1. White or yellow-brown hypomineralization of enamel.
2. Crown dilaceration.
3. Odontoma-like malformation.
4. Root duplication.
5. Vestibular or lateral root angulation and dilacerations.
6. Partial or complete arrest of root formation.
7. Sequestration of permanent tooth-germs.
8. Disturbance in eruption: Eruption disturbances may involve delay because
of thickening of connective tissue over a permanent tooth-germ, ectopic
eruption due to lack of eruptive guidance, and impaction in teeth with
malformations of crown or root.
The term dilaceration describes an abrupt deviation of the long axis of the
crown or root portion of the tooth. This deviation results from the traumatic
displacement of hard tissue, which has already been formed, relative to
developing soft tissue.
The term angulation describes a curvature of the root resulting from a gradual
change in the direction of root development, without evidence of abrupt
displacement of the tooth-germ during odon-togenesis. This may be vestibular
(i.e. labiopalatal) or lateral (i.e. mesiodistal).
Evaluation of the full extent of complications following injuries must await
complete eruption of all permanent teeth involved. However, most serious
sequelae (disturbances in tooth morphology) can usually be diagnosed
radiographically within the first year post-trauma.
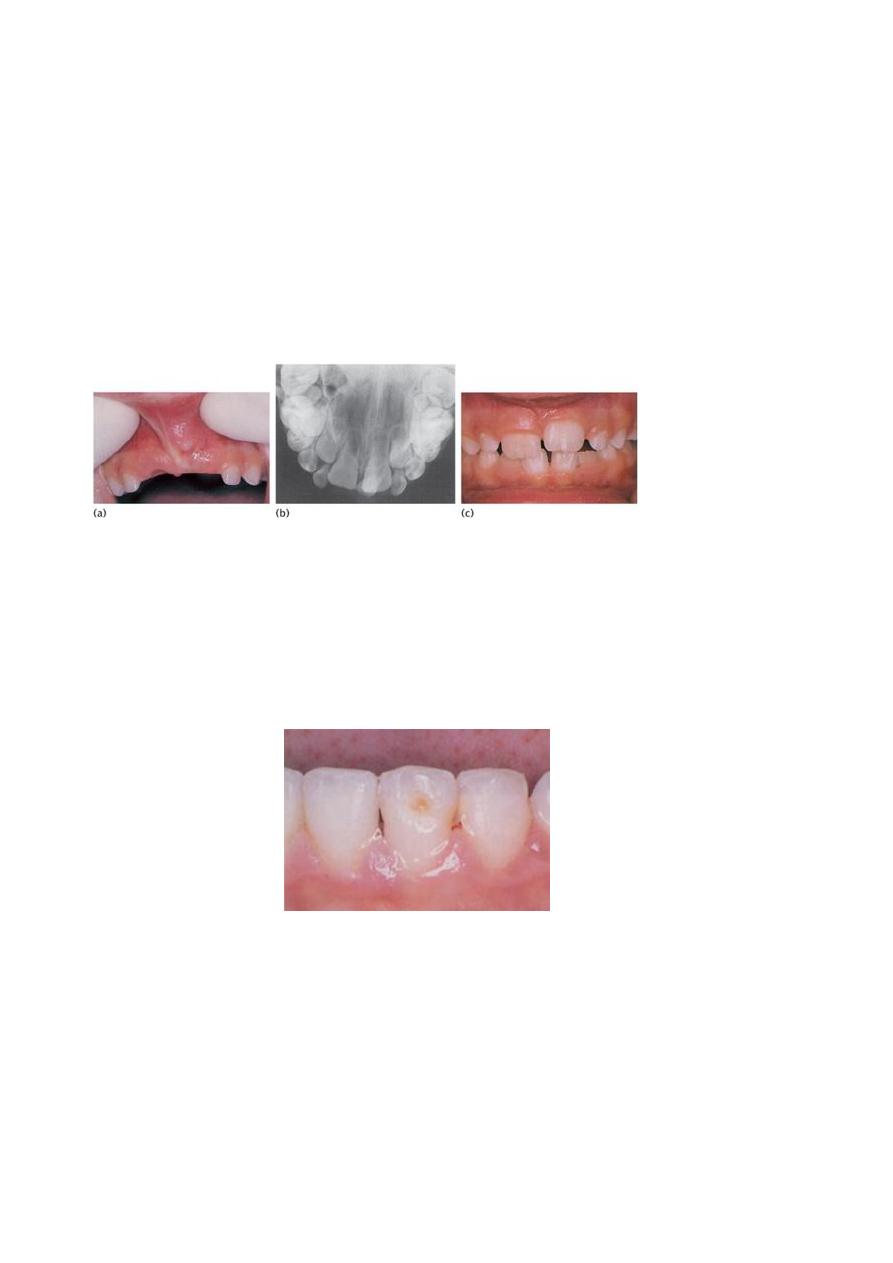
(a) Investigation of delayed eruption of the permanent upper central incisors
revealed (b) an intruded upper left primary central incisor on radiograph. (c)
Following removal of the retained primary incisor, the permanent successor
erupted spontaneously with a white hypoplastic spot on the labial surface.
Brown hypoplastic area on the lower left permanent central incisor
Treatment of injuries to the permanent dentition
Yellow-brown hypomineralization of enamel with or without hypoplasia
1. Acid–pumice micro–abrasion.
2. Composite resin restoration: localized, veneer, or crown.
3. Porcelain restoration: veneer or crown . Conservative approaches are
preferred whenever possible.
Crown dilaceration
1. Surgical exposure + orthodontic realignment.
2. Removal of dilacerated part of crown.
3. Temporary crown until root formation complete.
4. Semi-permanent or permanent restoration.
Vestibular root angulation
Combined surgical and orthodontic realignment.
Trauma cases require follow-up to identify any complications and institute the
correct treatment. In the review period the following schedule is a guide: 1
week; 1, 3, 6, and 12 months; then annually for 4–5 years.
Infraction is defined as an incomplete fracture (crack) of the enamel without
loss of tooth structure. Clinical examination reveals normal gross anatomic and
radiographic appearance: however, upon closer examination, craze lines are
apparent in the enamel, especially with transillumination. A periapical
radiograph of the involved area is taken to rule out root fracture and injuries to
the supporting tooth structure. Pulp sensibility testing is recommended in adult
teeth to monitor pulpal changes, however, results in primary teeth may be
unreliable. Test results may be negative initially indicating transient pulpal
damage.
These incomplete fractures without loss of tooth substance and without proper
illumination are easily overlooked. Review is necessary, as above, as the
energy of the blow may have been transmitted to the periodontal tissues or the
pulp.

In some cases, minor enamel fractures can be smoothed with fine disks. Larger
fractures should be restored using an acid-etch/composite resin technique.
1. The primary issue in managing fractures that expose dentin is to prevent
bacterial irritants from reaching the pulp. Standard care in the past called for
covering exposed dentin with calcium hydroxide (CaOH) or glass ionomer
cement to seal out oral flora. Recent research indicates that sealing exposed
dentin with a bonding agent enables the unexposed pulp to form reparative
dentin. Some clinicians are thus advocating simultaneous acid etching of dentin
and enamel followed by dentin and enamel bonding without placement of CaOH
or glass ionomer. However, a recent review of pulp capping with dentin adhesive
systems reported that these systems are not indicated owing to increased
inflammatory reactions, delay in pulp healing, and failure of dentin bridge
formation. Its recommends covering the deepest portion of dentin fractures with
glass ionomer cement, followed by a dentin-bonding agent . The tooth can then
be restored with an acid-etch/composite resin technique .If adequate time is not
available to restore the tooth completely, an interim covering of resin material (a
resin “patch”) can temporize the tooth until a final restoration can be placed.
Some dentists routinely place such a partial restoration to ensure an appropriate
post-treatment evaluation when the patient returns for the final restoration. This
is a reasonable strategy, provided that care is taken to ensure an adequate seal.
2. Reattachment of crown fragment. Few long-term studies have been reported
and the longevity of this type of restoration is uncertain. In addition, there is a
tendency for the distal fragment to become opaque or require further
restorative intervention in the form of a veneer or full-coverage crown . If the

fracture line through dentine is not very close to the pulp, the fragment can be
reattached immediately. However, if it runs close to the pulp, it is advisable to
place a suitably protected calcium hydroxide dressing over the exposed
dentine for at least a month while storing the fragment in saline, which should
be renewed weekly.
Technique
1. Check the fit of the fragment and the vitality of the tooth.
2. Clean fragment and tooth with pumice-water slurry.
3. Isolate the tooth with rubber dam.
4. Attach fragment to a piece of sticky wax to facilitate handling.
5. Etch enamel for 30 seconds on both fracture surfaces and extend for 2mm
from fracture line on tooth and fragment. Wash for 15 seconds and dry for 15
seconds.
6. Apply bonding agent ± dentine primer according to the manufacturer’s
instructions and light cure for 10 seconds.
7. Place appropriate shade of composite resin over both surfaces and position
fragment. Remove gross excess and cure for 60 seconds labially and palatally.
8. Remove any excess composite resin with sandpaper discs.
9. Remove a 1mm gutter of enamel on each side of the fracture line both
labially and palatally to a depth of 0.5mm using a small round or pear-shaped
bur. The finishing line should be irregular in outline.
10. Etch the newly prepared enamel, wash, dry, apply composite, cure, and
finish.
Management of crown fractures that expose the pulp is particularly
challenging .Pertinent clinical findings that dictate treatment include the
following:
1Vitality of the exposed pulp
2Time elapsed since the exposure

3Degree of root maturation of the fractured tooth
4Restorability of the fractured crown
The objective of treatment in managing these injuries is to preserve a vital pulp in
the entire tooth. It is not always possible to maintain vital tissue throughout the
tooth. Three treatment alternatives are available, based on the clinical findings just
noted:
1. Direct pulp cap
2. Pulpotomy
3. Pulpectomy
The direct pulp cap is only indicated in small exposures that can be treated within
a few hours of the injury. The chances for pulp healing decrease if the tissue is
inflamed, has formed a clot, or is contaminated with foreign materials..
A rubber dam is applied, and the tooth is gently cleaned with water. Commercially
available CaOH paste or mineral trioxide aggregate (MTA)
is applied directly to the
pulp tissue and to surrounding dentin. It is essential that a restoration be placed that
is capable of thoroughly sealing the exposure to prevent further contamination by
oral bacteria. As in the management of dentin fractures, it is acceptable to use an
acid-etch/composite resin system for an initial restoration. A calcific bridge
stimulated by the capping material should be evident radiographically in 2 to 3
months.
In fractures exposing pulps of immature permanent teeth with incomplete root
development, a direct cap is no longer the treatment of choice. Failure in these cases
leads to total pulpal necrosis and a fragile, immature root with thin dentinal walls.
Thus the preferred treatment in pulp exposures of immature permanent teeth is
pulpotomy.
Vital pulp therapy: pulpotomy
In pulpotomy a portion of exposed vital pulp is removed to preserve the radicular
vitality and allow completion of apical root development (apexogenesis) and further

deposition of dentine on the walls of the root. This procedure is the treatment of
choice following trauma where the pulp has been exposed to the mouth for more
than 24 hours. The amount of pulp that is removed depends on the time since
exposure, which will also determine the depth of contamination of the pulp.
Attempts must be made to remove only the pulp that is deemed to be contaminated.
If the patient presents within 24–48 hours of the incident, it is safe to assume that
the contaminated zone is no more than 2-4mm around the exposure site and only
the pulp in the immediate vicinity of the exposure is removed, in a procedure also
termed partial pulpotomy (Cvek’s technique). For more extensive exposures all
coronal pulp can be removed down to the cervical constriction of the tooth .