RADIOGRAPHIC INTERPRETATION
Interpretation:Step by step analytical process that provides an exact idea of the clinical problem and helps to achieve the final diagnosis of any particular lesion.
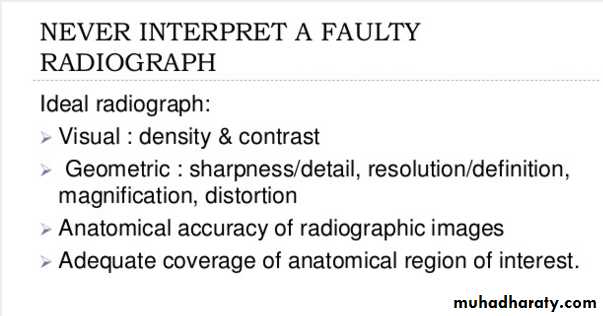
I-Essential requirements for interpretation
1- Optimum viewing conditions2- Understanding the nature and limitations of the black,
white and grey radiographic image.
3- Knowledge of what the radiographs used in dentistry
should look like, so a critical assessment of individual film
quality can be made.
4-Detailed knowledge of the range of radiographic
appearances of normal anatomical structures.
5- Detailed knowledge of the radiographic appearances of the
pathological conditions affecting the head and neck.
6- A systematic approach to viewing the entire radiograph and
to viewing and describing specific lesions.
7- Access to previous films for comparison.
1- Optimum viewing conditions
• An even, uniform, bright light viewing screen
(preferably of variable intensity to allow viewing. of films of different densities)
.• A quiet, darkened viewing room
• The area around the radiograph should be
masked by a dark surround so that light passes
only through the film.
• Use of a magnifying glass to allow fine detail to be
seen more clearly on intraoral films.
• The radiographs should be dry.
• Steps of interpretation
• Localization.• Observation.
• General consideration.
• Interpretation.
• Correlation.
Localization:
Localized or generalized.
Position in the jaw.Single or multiple.
Size.
Observation:
All shadows, other than the localized shadows of the normal landmarks must be observed.For example: shadows in crowns, cervical area, roots, restorations, size of root canals, periodontal membrane space, periapical area, alveolar crest, foreign bodies, integrity of bone.
General consideration:
A radiograph shows only 2 dimensions of a 3 dimensional object (width and height but not the depth)Cervical burnout: usually appears as cervical Radiolucency and misinterpreted by caries; this occurs due to less density and more penetration of rays.
Pulp exposure: never to be determined from radiograph but only the proximity to the pulp.
Interpretation:
Studying the features of teeth and bone:Teeth
Study the whole tooth,(crown, root, enamel, pulp), number of teeth and finally supporting structures, (Periodontal membrane space, lamina dura , alveolar crest).
Bone:
Changes in bone may include:
1- Changes in density.2- Changes in the margin.
3- Changes inside the lesion.
4- Effect on surrounding tissues.
5- Changes in structure.
Correlation:
The final step is to correlate all of the radiographic features to reach a radiographic differential diagnosis.Then to draw a final diagnosis, we have to correlate other data as case history, clinical examination, and other diagnostic aids with the radiographic differential diagnosis
Image analysis
Identify normal anatomic landmarks.Knowledge of normal v/s abnormal.
Attention to all regions on the film systematically.
Three visual circuits.
First visual circuit: intraoral images
Periapical before bitewing imagesRight maxilla to left; left mandible to right
One anatomic structure at a time:Ex: posterior maxilla-maxillary sinus,tuberosity,zygomatic process
Normal anatomy: Ex: bones, canals, foramina.
Check for symmetry.
Use a systematic process
• Go back to the first quadrant and look at the trabecular pattern. Is it:
• Normal
• Symmetrical when compared to the contralateral
• side
• Sparse
• Dense
• In the direction of anatomical stress
• Altered
Second visual circuit
Examination of bone:Height of alveolar bone
Crest relative to teeth
Loss of height-more than 1.5 mm-periodontal disease
Lamina dura + PDL space + tooth roots
Carcinoma-erosion of alveolar crest+ ill defined borders.
Third visual circuit
Examination of dentition & associated structuresNumber, Sequence, appearance, root structure
Crowns –defective enamel, caries
Intreproximal areas & restorations
Pulp chambers-size, content
Bone-radioluscent/radioopaque lesions