


Endodontic cavity preparation
Endodontic cavity preparation: separated into two anatomic divisions:
(a) coronal preparation and (b) radicular preparation.
PRINCIPLES OF ENDODONTIC CAVITY PREPARATION
Endodontic Coronal Cavity PreparationI. Outline Form
II. Convenience Form
III. Removal of the remaining carious dentin
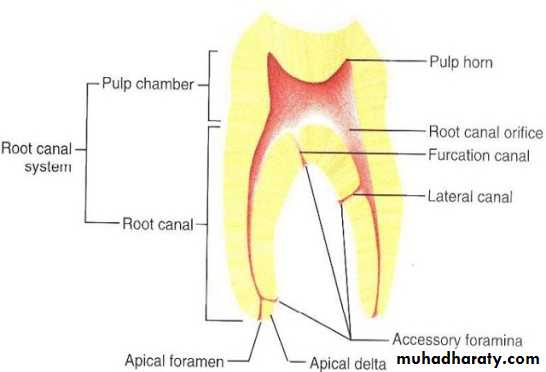
Major anatomic components of the pulp cavity.
(and defective restorations)
IV. Toilet of the cavity
Endodontic Radicular Cavity Preparation
I and II. Outline Form and Convenience Form (continued)
IV. Toilet of the cavity (continued)
V. Retention Form
VI. Resistance Form
Concept of total endodontic cavity preparation, coronal and radicular as a continuum, based on Black’s principles. :A, Radiographic apex. B, Resistance Form, C, Retention Form. D, Convenience Form. E, Outline Form,
Outline Form
The outline form of the endodontic cavity must be correctly shaped and positioned to establish complete access for instrumentation, from cavity margin to apical foramen. The external outline form is established by mechanically projecting the internal anatomy of the pulp onto the external surface. This may be accomplished only by drilling into the open space of the pulp chamber and then working with the bur from the inside of the tooth to the outside, cutting away the dentin of the pulpal roof and walls overhanging the floor of the chamber.To achieve optimal preparation, three factors of internal anatomy must be considered:
1-Size of Pulp Chamber.: In young patients, the outline form of endodontic access cavities must be more extensive than in older patients, in whom the pulp has receded and the pulp chamber is smaller in all three dimensions
2-Shape of Pulp Chamber: The finished outline form should accurately reflect the shape of the pulp chamber. For example, the floor of the pulp chamber in a molar tooth is usually triangular in shape, owing to the triangular position of the orifices of the canals. This triangular shape is extended up the walls of the cavity and out onto the occlusal surface; hence, the final occlusal cavity outline form is generally triangular .
3-Number, Position, and Curvature of root Canals. To prepare each canal efficiently without interference, the cavity walls often have to be extended to allow an unstrained instrument approach to the apical foramen.
Convenience Form
Convenience form allows modification of the outline form. In endodontic therapy, convenience form makes more convenient (and accurate) the preparation and filling of the root canal. Four important benefits are gained through convenience form modifications: (1) unobstructed access to the canal orifice, (2) direct access to the apical foramen, (3) cavity expansion to accommodate filling techniques, and (4) complete authority over the enlarging instrument.Removal of the Remaining Carious Dentin and Defective Restorations
Caries and defective restorations remaining in an endodontic cavity preparation must be removed for three reasons: (1) to eliminate mechanically as many bacteria as possible from the interior of the tooth, (2) to eliminate the discolored tooth structure, that may ultimately lead to staining of the crown, and (3) to eliminate the possibility of any bacteria-laden saliva leaking into the prepared cavity.Toilet of the Cavity
All of the caries, debris, and necrotic material must be removed from the chamber before the radicular preparation is begun. Round burs , are most helpful in cavity toilet. The long-blade, endodontic spoon excavator is ideal for debris removal . Irrigation with sodium hypochlorite is also an excellent measure for cleansing the chamber and canals of persistent debris. However, air must never be aimed down the canals. Emphysema of the oral tissues has been produced by a blast of air escaping out of the apex.Retention Form
In filling techniques, it is recommended that the initial primary gutta-percha point fit tightly in the apical 2 to 3 mm of the canal. These nearly parallel walls (Retention Form) ensure the firm seating of gutta perch point and provide sealing against future leakage or percolation into the canal. Coronally, from the area of retention, the cavity walls are flared.Resistance Form
Resistance to overfilling is the primary objective of Resistance Form. Beyond that, however, maintaining the integrity of the natural constriction of the apical foramen is a key to successful therapy. Violating this integrity by over instrumentation leads to complications: (1) acute inflammation of the periradicular tissue from the injury by the instruments or bacteria and/or canal debris forced into the tissue, (2) chronic inflammation of this tissue caused by the presence of a foreign body—the filling material forced there during obturation, and (3) the inability to compact the root canal filling because of the loss of the limiting apical termination of the cavity (apical stop). This could be compared to an attempt to place a Class II amalgam filling without the limiting presence of a proximal matrix band.
Access cavity preparation (Access opening): Access cavity preparation is an endodontic coronal preparation. The objectives of access cavity preparation are: (1) to locate all root canal orifices, (2) to achieve straight- or direct-line access to the apical foramen or to the initial curvature of the canal., (3) to completely unroof the pulp chamber, (4) to remove all coronal pulp tissue (vital or necrotic), (5) to conserve sound tooth structure.
Access cavity preparation of anterior teeth
Access opening is initiated at the exact center of the lingual surface (in center of the middle 1/3 region).Direct a #2 or #4 round bur (or around point tapering fissure bur) in high-speed handpiece perpendicular to the lingual surface at its center to penetrate the enamel.
Once enamel is penetrated, the round bur is directed parallel to the long axis of the tooth, until ‘a drop’ in effect is felt (i.e the bur falls into a space which is the pulp chamber).
Now when pulp chamber has been penetrated, the remainder of chamber roof is removed by working a round bur from inside to outside. This is done to remove all the obstructions of enamel and dentin overhangs that would entrap debris, tissues and other materials.
Now locate the canal orifices using sharp endodontic explorer.
Once the canal orifices are located, remove the lingual shoulder using Gates-Glidden drills or safe tipped burs. (Lingual shoulder is a prominence of dentin formed by removal of lingual roof which extends from the cingulum to approximately 2 mm apical to the orifice).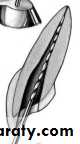
During removal of the lingual shoulder, orifice should also be flared so that it becomes confluent with all the walls of access cavity preparation. By this a straight line access to the apical foramen is attained, i.e. an endodontic file can reach up to apical foramen without bending.
Any deflection of file occurs should be corrected because it can lead to instrumental errors.
*Since the outline form of access cavity reflects the internal anatomy of the pulp space, technique of the access opening of anterior teeth is the same, the shape may vary according to internal anatomy of each tooth.
1-Maxillary Central Incisor
Outline form of access cavity of maxillary central incisor is a rounded triangular shape with base facing the incisal aspect .
Shape may change from triangular to slightly oval in mature tooth because of less prominence of mesial and distal pulp horns.
2-Maxillary Lateral Incisor
When pulp horns are present, shape of access cavity is rounded triangle.
If pulp horns are missing, shape is oval.
3-Maxillary Canine:Shape of access cavity of canine is oval
4-Mandibular Incisors:Access cavity of mandibular central and lateral incisors is long oval
5-Mandibular Canine:The shape of access opening of mandibular canine is oval.
1 2 3 4 5
ACCESS CAVITY PREPARATION FOR PREMOLARS
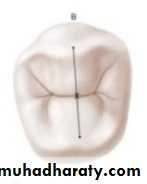
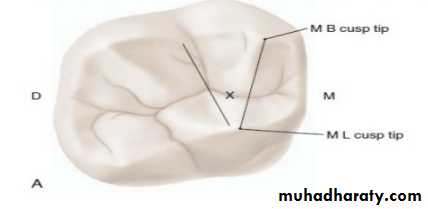
1• Determine the site of access opening on the tooth. In premolars, it is through the occlusal surface between buccal and the lingual cusp tips . Slight variations exist between mandibular and maxillary premolars because of the lingual tilt of mandibular premolars. Therefore, in maxillary premolars, the point of entry is on the central groove between the cusp tips.
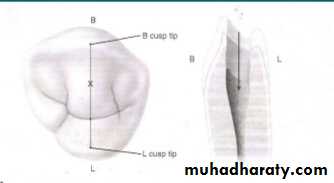
For mandibular first premolar, there is presence of 30° lingual inclination of the crown to the root, hence the starting point of bur penetration should be halfway up the lingual incline of the buccal cusp on a line connecting the cusp tips. For mandibular second premolar the enamel penetration is initiated in the central groove because its crown has smaller lingual tilt.
2• Penetrate with No. 4 round bur in high speed contra-angle handpiece. The bur should be directed parallel to the long axis of tooth and perpendicular to the occlusal table.
3• Once the clinician feels “drop” into the pulp chamber, penetrate deep enough to remove the roof of pulp chamber without cutting the floor of pulp chamber. To remove the roof of pulp chamber place a round bur and work from inside to outside.
4• After removal of roof of pulp chamber, locate the canal orifices with the help of sharp endodontic explorer.
5• Remove any remaining cervical bulges or obstructions using safety tip burs or Gates-Glidden drills and obtain a straight line access to the canals, and the walls of access cavity are smoothened.
6• Generally the outline form for premolars is oval in shape buccolingually.
.ACCESS CAVITY PREPARATION FOR MAXILLARY MOLARS
• Endodontic access cavity is prepared through the occlusal surface in all posterior teeth. Determine the starting point of bur. For maxillary molars it is determined by mesial and distal boundary. Mesial boundary is a line joining the mesial cusps and the distal boundary is the oblique ridge. The starting point of bur penetration is on the central groove midway between mesial and distal boundaries .• Now penetrate the enamel with No. 4 round bur in the central groove directed palatally. Penetrate the bur deep into the dentin until the clinician feels “drop” into the pulp chamber.
•Now remove the complete roof of pulp chamber using round bur, working from inside to outside. The shape and size of the internal anatomy of pulp chamber guides the cutting.
•Explore the canal orifices with sharp endodontic explorer. The canals usually are 3: mesiobuccal, distobuccal and palatal. Occassionally a fourth canal i.e. a second canal in the mesiobuccal root maybe present in the maxillary 1st molars.
• After the canal orifices has been located, remove any cervical bulges, or obstruction if present using Gates-Glidden bur or safety-tip tapered diamond bur .
• Smoothen and finish the access cavity walls . Final preparation provides unobstructed access to canal orifices and should not impede complete authority of enlarging instruments.
• The final outline form is triangular in shape the base is toward the buccal and the apex is to the lingual, with the canal orifice positioned at each angle of the triangle. The cavity is entirely within the mesial half of the tooth and need not invade the transverse ridge.
ACCESS CAVITY PREPARATION FOR MANDIBULAR MOLARS
• Starting location of access opening is on the central groove halfway between the mesial and distal boundaries The mesial boundary is a line joining the mesial cusp tips and the distal boundary is the line joining buccal and the lingual grooves .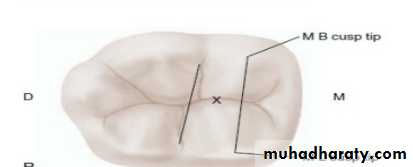
•The enamel is penetrated with No. 4 round bur on the central groove midway between the mesial and distal boundaries., the bur directed towards the distal root where the greatest space in the chamber exist.
• The round bur is used to open the pulp chamber. Once the “drop” into pulp chamber is felt, remove roof of pulp chamber working from inside to outside with the help of round bur.
•Explore canal orifices with sharp endodontic explorer the distal, mesiobuccal, and mesiolingual canals . an additional canal in the distal root may be present
• Finally finish and smoothen the cavity. Final preparation provides unobstructed access to canal orifices
•Final cavity is triangular or rectangular in shape with the base directed mesially.
Errors in Access Opening:
1- Perforation: It is common when drilling is continued apically or laterally after we reach the pulp chamber. It is mostly see in:a) Old patients. It is due to pulp recession.
b) Teeth restored by crowns, inlays or big restorations. It is difficult to know the long axis of the tooth so it is better to remove the restoration and work.
d) Tilted teeth.
e) Failure to complete a convenient extension.
2- Furcation perforation: It is caused by failure to measure the distance between the occlusal surface and the furcation. The bur bypasses the pulp chamber and creates an opening into the periodontal tissues. Perforations weaken the tooth and
cause periodontal destruction.
3- Narrow access opening. This will cause incomplete pulp extirpation and
instrumentation through the pulp chamber or pulp horn.4- Entrance through labial (buccal) or proximal surface. This type of access opening causes incomplete pulp extirpation and possible instrument breakage caused by total loss of instrument control.
5-Over extended preparation. This access opening causes undermining and weakening of the enamel walls.
6- Poor access placement and/or inadequate extension: Inadequate extension of the access cavity leaves the canal orifices unexposed