


Cleaning and Shaping
Cleaning: Is the removal of all potentially pathogenic contents from the root canal. This includes:-Infected material, organic remnant , microbes .This goal is achieved through:1)proper instrumentation, 2)Use of irrigants.Shaping.: Is the establishment of a specific cavity shape which is a continuously tapered form from the canal orifice to the apical constriction (narrowest cross-sectional diameter apically and the widest diameter coronally), which will permits vertical pluggers and other obturating instruments to fit freely within the root canal system and to generate the pressures required to three-dimensionally obdurate the gutta-percha and a microfilm of sealer into all foramina.
The goals of shaping and cleaning of the root canal systems are:
1• debridement of the root canal system;2• development of a continuously tapering preparation;
3• avoidance of procedural errors.
*Objective of biomechanical preparation :
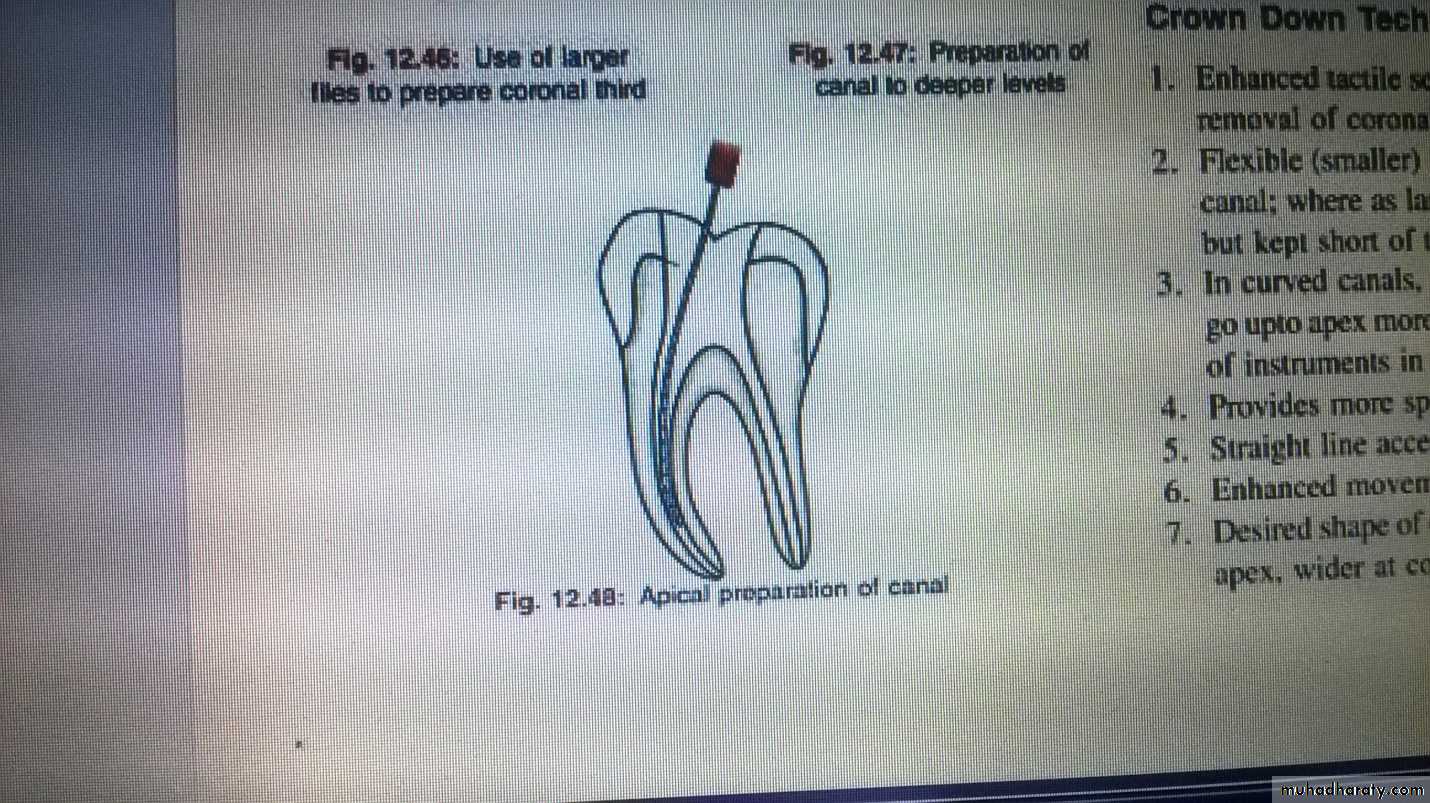
Mechanical objectives of root canal preparation (schilder objectives)1-. Develop a continuously tapering conical form in the root canal preparation. This shape mimics the natural shape of canals. The goal is to create a conical form from access cavity to foramen .
2-Making the canal narrower apically and widest coronally
3. Making the preparation in multiple planes which introduces the concept of “flow”:
This objective preserves the natural curve of the canal.
4-Avoid transportation of the foramen.
5. Keep the apical foramen as small as possible
Figure: Mechanical objectives of root canal preparation
Biologic objectives of root canal preparation:
Procedure should be confined to the root canal space.
All infected pulp tissue, bacteria and their by-product should be removed from canal.
Necrotic debris should not be forced periapically.
Sufficient space for intracanal medicaments and irrigants should be created.
*Movements of instruments:
Reaming: it is clockwise rotation of an instrument to generate a cutting effect.
Filing: It is pull-push motion of an instrument.
Reaming
FilingCombination of reaming and filing (turn-pull): File is inserted with a quarter turn clockwise (reaming) and then is subsequently withdrawn (filing).
Balanced force motion: oscillation of instrument right and left with different arcs in either direction. The file is first inserted into the canal and rotated clockwise with one quarter turn (90 degree), then the file rotated counter clockwise (180-270 degree) simultaneously pushing apically to prevent it from backing out of the canal, finally the file is removed by rotating file clockwise simultaneously pulling the instrument out of the canal.
Watch winding: Watch-winding is the back-and-forth oscillation of a file or reamer , (30 to 60 degrees) right and (30 to 60 degrees) left as the instrument is pushed forward into the canal.
Watch winding and pull motion: First instrument is moved apically by rotating it right and left through an arc, when it feels resistance it is taken out by pull motion.
Balanced force motions
Turn-and-pull motionA watch-wind and pull motion
A watch-winding motion
Circumferential Filing: Circumferential filing is used for canals that are not round. The file is placed into the canal and withdrawn in a directional manner sequentially against the mesial, distal, buccal, and lingual walls.
*Basic principles of canal instrumentation
There should be a straight line access to the canal orifice .Files are always worked within a canal filled with irrigant. Therefore copious irrigation is done in between the instrumentation.
Preparation of canal should be completed while retaining its original form and the shape
Canal enlargement should be done by using instruments in the sequential order without skipping sizes.
All the working insruments should be kept in confines of the root canal to avoid any procedural accidents.
After each insertion and removal of the file, its flutes should be cleaned and inspected.
Smaller number instruments should be used extravagantly.
Recapitulation is regularly done to loosen debris by returning to working length.
Over preparation should be avoided.
Creation of an apical stop,
Never force the instrument in the canal, forcing may break the instrument.
*Master apical file:Is the largest file at the working length.
*Recapitulation: is sequential reentry and reused of previous files that have been confirmed to reach the working length in order to prevent packing of debris and dentinal mud at the apical portion of the canal preparation .
Techniques of root canal preparation:
Step-Back Preparation: Step back technique is approach used for root canal preparation starting at the apex with small instruments and working up to orifice with progressively larger instruments. The advantage of step back preparation: This technique creates small apical preparation with larger instruments used at successively decreasing lengths to create a taper. Disadvantages of step back technique are: Difficult to irrigate apical region, More chances of pushing debris periapically and time consuming.The step-back preparation divided into two phases. Phase I is the apical preparation starting at the apical constriction. Phase II is the preparation of the remainder of the canal, gradually stepping back while increasing in size. The completion of the preparation is the Refining Phase IIA and IIB to produce the continuing tapering form.
phaseI
1. Access.
2. Establish working length of the tooth .
3. Now insert first instrument and place to working length with a ‘watch-winding’ motion (a watch winding motion implies a gentle clockwise and anti-clockwise rotation of a file with minimal apical pressure);then remove the instrument and irrigate the canal.
4. Place the next larger size file to the working length in similar manner and ; then remove the instrument and irrigate the canal .
5. Repeat the process until a size 25 K-file reaches working length. Recapitulate between files by placing a small file to working length.
phaseII
1. Place the next file in the series to a length 1 mm short of the working length; instrument circumferentially, irrigate and recapitulate.
2. Repeat this process placing the next larger file in the series to 2 mm short of the working length; instrument circumferentially, irrigate and recapitulate.
3. Repeat the process with successively larger files at 1 mm increments from the preceding file. It is important not to omit any instrument in the sequence.
The completion of the preparation is the refining phase IIA and IIB to produce a perfect continuing taper from the apex to coronal area.
Refining IIA done using Gates-Glidden drills 2, and 3 to create coronal and middle root preparation.
Refining phase IIB is done by using #25 file, through circumferential filing smoothes step back to produce a perfect continuing taper from the apex to the cervical portion of the canal.
Standardized Preparation
The standardized technique adopts the same working length definition for all instruments introduced into a root canal and therefore relies on the inherent shape of the instruments to impart the final shape to the canal. Clinicians utilized a preparation technique of sequentially enlarging the canal space with smaller to larger instruments at the corrected working length. This technique was adequate for preparing the canals that were relatively straight however, in curved canals, procedural errors were identified with the technique.Crown-Down Technique: Crown down technique is approach used for root canal preparation starting at the orifice with larger instrument and working up to apex with smaller instruments .
There are several advantages with the crown-down approach:
1• elimination of debris and microorganisms from the more coronal parts of the root canal system thereby preventing inoculation of periapical tissues with contaminated debris
2• elimination of coronally-placed interferences that might adversely influence instrumentation
3• early movement of large volumes of irrigant and lubricant to the apical part of the canal
4• facilitating accurate working length determination as coronal curvature is eliminated early in the preparation.
Technique of crown down preparation
1-First step is the access cavity preparation with no pulp chamber obstructions ,. locate the canal orifices.
2.Now fill the access cavity with an irriigant and start preflaring of the canal orifices. preflaring of coronal third of the canal can be done by using gates glidden drills.
3- Gates glidden drills can be used after scouting the canal orifices with number 10 or 15 files. the crown down approach begins with larger gates glidden first. After using this subsequent, smaller diameters gates glidden are worked in the canal with additional mm to complete coronal flarning
4- Frequent irrigation with sodium hypochlorite and recapitulation with a smaller files ( usually number 10 file) to prevent canal lockage .
5- After establishing coronal and mid root enlargement explore the canal and establish the working length .
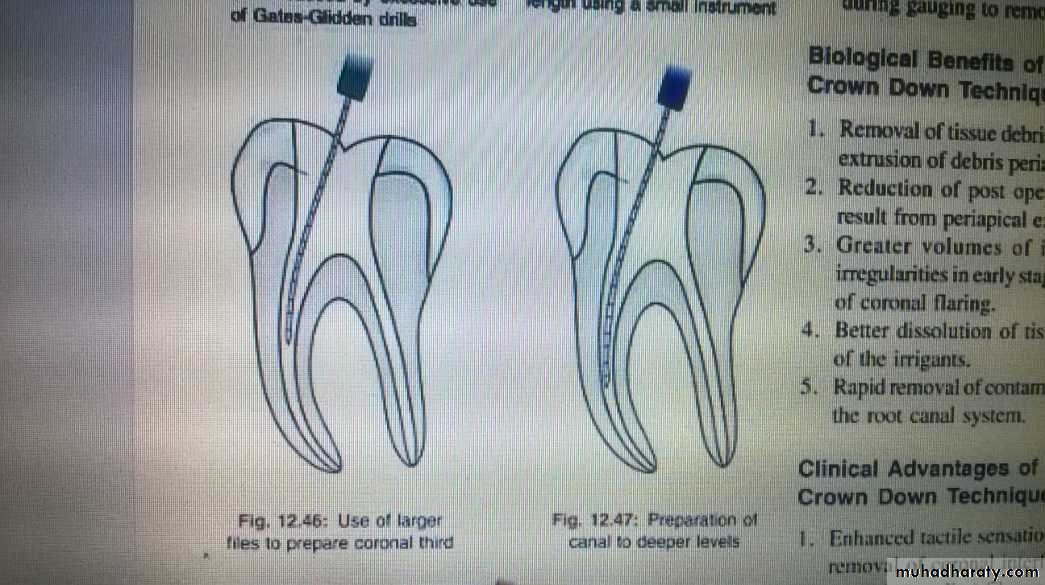
6- Introduce larger files to coronal part of the canal and prepare it. Subsequently introduce progressively smaller files deeper into the canal in sequential order and prepare the apical part of the canal
7- Final apical preparation is prepared and finished along with frequent irrigation .
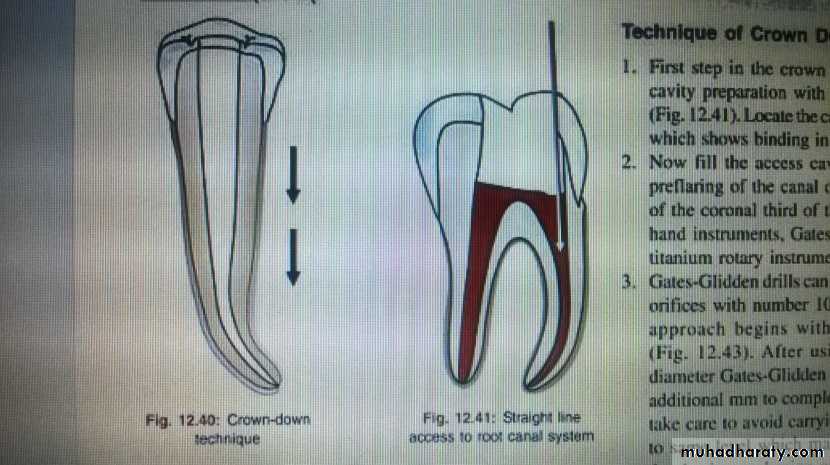
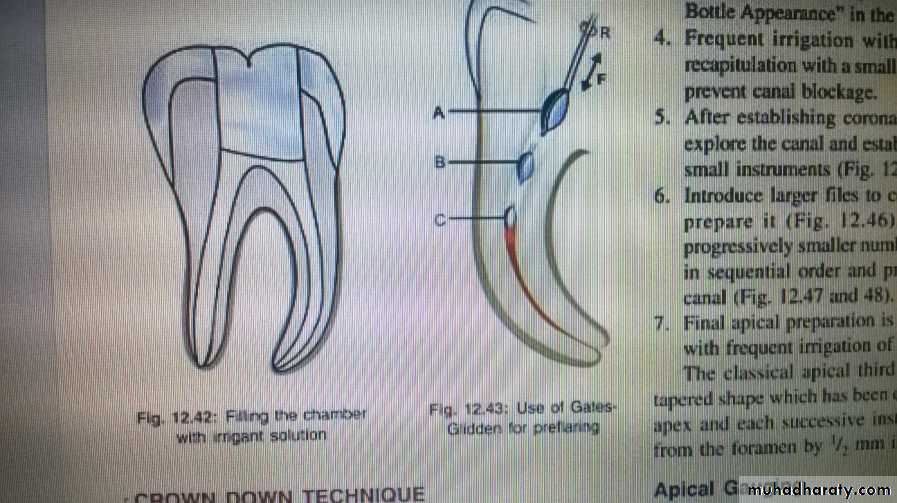
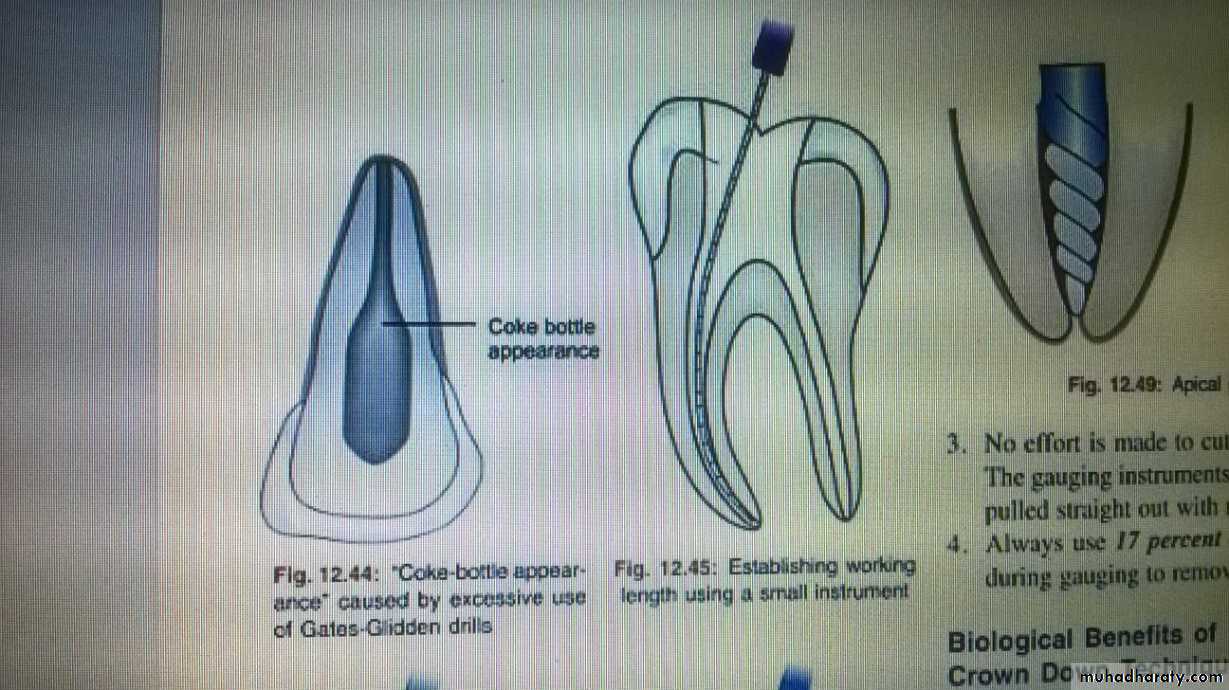
Figure ( Crown-Down Technique)
Root canal Irrigation
The actions of an root canal irrigant include:• rinsing of debris
• lubrication of the canal system which facilitates instrumentation
• dissolution of remaining organic matter
• antibacterial properties
• softening and removing the smear layer
• penetrating into areas inaccessible to instruments, thereby extending the cleaning process.
Properties of an ideal root canal irrigant include :
1-Organic tissue solvent
2-Inorganic tissue solvent
3-Antimicrobial action
4-Nontoxic
5-Low surface tension
6-Lubricant.
Normal saline: Normal saline causes gross debridement and lubrication of root canals. Since it is very mild in action, it can be used as an adjunct to chemical irrigant. Normal saline as 0.9%W/V is commonly used as irrigant in endodontics. It basically acts by flushing action. It is biocompatible in nature. It can also be used as final rinse for root canals to remove any chemical irrigant left after root canal preparation.
Sodium Hypochlorite: NaOCl is the most commonly used irrigating solution. Advantages to NaOCl include the mechanical flushing of debris from the canal; the ability of the solution to dissolve necrotic tissue, vital pulp tissue, and the organic components of dentin ; the antimicrobial action of the solution; and the lubricating action. In addition, it is inexpensive and readily available. concentrations ranging from 0.5% to 5.25% have been recommended. A common concentration is 2.5%. Because of toxicity, extrusion is to be avoided. The irrigating needle must be placed loosely in the canal., If inadvertently NaOCl is extruded through the apex, severe accidents may occur , it can result in severe cellular damage.
Chlorhexidine: A 2% solution is used as root irrigant in canals. Chlorhexidine possesses a broad spectrum of antimicrobial activity, provides a sustained action, and has little toxicity.. A disadvantage of chlorhexidine is its inability to dissolve necrotic tissue and remove the smear layer.
Hydrogen peroxide :
3% hydrogen peroxide solution used as an irrigating agent. The advantages of hydrogen peroxide irrigating solution include:The effervescence or bubbling action of hydrogen peroxide pushes debris mechanically out of root canal
The bactericidal effect of hydrogen peroxide disinfect the canal.
Chelating agent (EDTA)
Removal of the smear layer is accomplished with chelating agents such as ethylenediamine tetraacetic acid (EDTA) after cleaning and shaping. Irrigation with 17% EDTA for 1 minute followed by a final rinse with NaOCl is a recommended method. Chelators remove the inorganic components and leave the organic tissue elements intact. NaOCl is then necessary for removal of the remaining organic components..Method of irrigation:
The irrigant is commonly delivered using specially designed endodontic needles and syringes. Endodontic irrigation needles come in different gauges and are secured to the syringes. Disposable plastic syringes of 2.5 or 5ml capacity with 25 or 27 gauge blunted needles are preferred for endodontic irrigation. A bend of approximately 30 degree is made in the center of the needle so the canals of both anterior and posterior teeth are reachable. The needle should be inserted into the canal to the binding point (until resistance is felt), then the needle pulled out slightly (2 to 3 mm away from that point) so that it is loose in the canal and then the irrigant delivered gently and passively. Needle should never be wedged into the canal and should allow an adequate backflow
Types of endodontic needles:
1-Needle with Bevel: Needle with bevel, if gets lodged into the canal, there is risk of forcing irrigant past the apex.2-Monojet Endodontic Needle : It is long blunt needles .
3-Max I probe: It is closed ended side vented needle. This design allow for upward flushing action for better canal irrigation and also eliminates possibilities of irrigant to be pushed beyond the apical foramen.